
Eric F. Reichman
The practice of emergency medicine frequently requires access to the venous and sometimes the arterial circulation of a patient (1). Vascular access allows for blood sampling, medication administration, blood product administration, hydration, patient monitoring (i.e., arterial lines and pulmonary artery catheters), and insertion of cardiac pacing wires. Peripheral venous puncture is the most common invasive procedure performed in the emergency department (ED). Peripheral vein cannulation is performed on a daily basis and is the cornerstone of circulatory resuscitation.
There are many techniques with which to access a patient’s venous or arterial circulation. Venous puncture (venipuncture) or arterial puncture with a needle is only indicated for the sampling of blood. Medications may be administered as a one-time dose via this technique, but the risk of extravasation is high. Venous cannulation (intravenous [IV] placement) is indicated for repeated sampling of venous blood. Venous cannulation is also performed for the administration of medications, fluid solutions, blood products, and nutritional support.
There are some general contraindications to peripheral vascular access. Arteries and veins should not be accessed through infected skin. Do not withdraw venous blood from a vein proximal to a running IV infusion. The blood sample will be tainted or diluted by the infused solution. A hole in the vein may allow blood, infused solutions, and medications to extravasate into the surrounding tissues. Venipuncture and venous cannulation of veins in an extremity with an arteriovenous fistula should be avoided. Veins in the upper extremity that may be needed for arteriovenous fistula construction for hemodialysis in the future should not be punctured unless absolutely necessary.
Complications specific to each technique and site are discussed more fully in this chapter. Venous and arterial catheters should be assessed immediately after their placement and be reassessed frequently. The assessment must include the skin puncture site, catheter function, the neurovascular status of the distal extremity, and the patient’s overall condition.
GENERAL PRINCIPLES FOR INTRAVENOUS ACCESS
Although veins can dilate and constrict somewhat on their own, they do so mostly in response to the pressure within them. The use of venous tourniquets, dependent positioning, “pumping” via muscle contraction, and the local application of heat or nitroglycerin ointment all contribute to venous engorgement. These maneuvers can be used to aid in the performance of a venipuncture or peripheral venous access.
The vascular anatomy can affect access (2). Deficient perivascular connective tissue permits the vein to “roll” from side to side and evade the needle. Tough connective tissue can impede the entry of a flexible catheter while serving to stabilize the vein and prevent its collapse. Venous valves allow unidirectional flow and prevent blood from pooling in the dependent portions of the extremities. Valves can block the passage of a catheter through and into a vein. Valves are more numerous at the points where tributaries join larger veins and in the lower extremities. Valves are almost absent within the large central veins, the veins of the head, and the veins of the neck.
Peripheral veins are easiest to access at the apex of the “Y,” formed when two tributaries merge into a larger vein or where the vein is straight and free of branches and valves for two or so proximal to the site of puncture. These sites tend to be anchored and “roll” less than other sites.
The angle of insertion of the needle varies depending on the depth of the vein being punctured. A shallow angle (30 to 45 degrees) should be used for small and superficial veins. A more obtuse angle (60 degrees) should be used to access deeper veins. Very small and superficial veins should be entered at a very acute angle (15 to 30 degrees).
Fluid Flow Considerations
Both the diameter and the length of the infusion device affect the flow rate through the catheter. Viscous fluids (e.g., blood products and albumin) infuse more slowly than less viscous fluids (e.g., saline). These relationships can be seen in the solution of Poiseuille equation for ideal fluid flow through a cylindrical tube. The pressure gradient and resistance to flow is inversely proportional to the length of the catheter tubing. Flow rates decrease as catheter length increases. Using the shortest possible catheter permits the highest fluid infusion rates. Catheter diameter changes will have the most effect on flow rates. The flow rate increases to the fourth power as the catheter internal radius increases. Maximal flow rates result from using the largest bore or largest internal diameter (i.e., smallest gauge) catheter that will fit inside the vein. Large-bore venous catheters are preferred for high-volume infusions.
Venous Cannulation
There are four main techniques of venous cannulation (2). The first is the needle-only technique using a butterfly-type needle. This method is seldom used today. The catheter-over-the-needle is the most commonly used technique for peripheral venous cannulation. The catheter-through-the-needle technique is occasionally used but not very popular. The Seldinger wire-guided technique is most commonly used for central venous access.
Identify the vein to be cannulated and the site of the skin puncture. Clean the area of any dirt and debris. Cleanse the skin with isopropyl alcohol, chlorhexidine, or povidone iodine. Apply a tourniquet to the extremity, proximal to the venous cannulation site, to engorge the vein. Additional engorgement of the vein can be accomplished by placing the extremity in a dependent position, “pumping” via muscle contractions of the extremity, and the application of heat or nitroglycerin ointment over the vein. Optionally, a small subcutaneous wheal of local anesthetic solution may be placed at the skin puncture site to provide comfort to the patient.
The needle-only technique is used occasionally for short-term venous access in young children and elderly patients with fragile veins. This system is prone to malposition and infiltration. The tip of the needle can easily lacerate the vein if the needle is not secure and allowed to move. This technique is, therefore, recommended only for venous blood draws and not venous cannulation.
The catheter-over-the-needle systems are most commonly used for venous access (Fig. 5.1). The infusion catheter fits closely over a hypodermic needle. Placement of these catheters is usually quick and simple. Several considerations should always be kept in mind when using a catheter-over-the-needle. Intravascular placement is indicated by a flash of blood in the hub of the needle. If the patient’s venous pressure is very low or if the needle is long and narrow, both sides of the vessel may be traversed (through and through) before the practitioner realizes that the needle was within the vein. If the tip of the needle is withdrawn from the vein, the catheter will not advance. If the catheter is advanced when the tip of the needle but not the catheter is within the vein, the catheter will not advance. The catheter will push the vein off the needle. Depressing the skin just distal to the puncture site and pulling it distally can prevent the vein from “rolling.”

FIGURE 5.1 The catheter-over-the-needle technique. (Reprinted with permission from Reichman EF. Emergency Medicine Procedures. 2nd ed. New York, NY: McGraw-Hill; 2013.)
As opposed to the over-the-needle approach, the catheter-through-the-needle technique eliminates the need for a needle that is as long as the catheter and eliminates the possibility of pushing the vein off the end of the needle when the catheter is advanced (2). The main disadvantage of this technique is the possibility of the needle tip shearing off the catheter, resulting in a catheter embolism. This complication is prevented by using proper technique. Another disadvantage is an increased risk of hematoma formation because the needle used for venipuncture must be larger in diameter than the catheter.
The Seldinger technique allows for the placement of a catheter over a wire rather than directly over a needle. The wire used must be longer than the catheter. The needle used to insert the wire can be short and of a smaller gauge than the catheter. The Seldinger technique is most commonly used for central venous catheter insertion.
VENIPUNCTURE AND PERIPHERAL INTRAVENOUS ACCESS
The upper extremity is preferred to the lower extremity for vein cannulation (3). Distal placement should be attempted before moving more proximal (3). Avoid veins overlying a joint. These simple principles allow the patient maximum mobility and increase the chance of successfully cannulating a vein. It is easiest to insert a venous cannula where two tributaries merge and form a “Y.” Choose a straight portion of vein without branches to minimize the chance of hitting valves within the vein and to make threading the catheter easier.
Peripheral Venipuncture
Stabilize the vein with the nondominant hand. Insert the needle attached to a syringe or vacuum tube adapter, with the bevel upward, into the vein at a 45- to 60-degree angle. Lower angles, at times nearly parallel to the skin, are often required to enter very narrow or superficial veins. Apply negative pressure to the syringe. A flashback of blood in the hub of the needle indicates that the tip of the needle is within the vein. Pulsatile blood indicates an arterial puncture. Unless venous blood is specifically needed for a test, collect the necessary samples before removing the needle. No additional harm will be done by withdrawing a blood sample from an artery that has already been punctured.
If no blood is obtained, slowly advance the needle until it is deeper than the judged depth of the vein. The tip of the needle can collapse the vein and prevent the flashback of blood (Fig. 5.2A). Slowly withdraw the needle to just beneath the skin. The vein will often have been punctured through-and-through (Fig. 5.2B). If this is the case, blood will flash back into the syringe as the needle is withdrawn (Fig. 5.2C). If no blood is obtained by the time the needle is withdrawn to just beneath the skin, redirect the needle, and make another attempt at puncturing the vein. Never sweep the point of the needle around without withdrawing it as the sharp bevel can lacerate nearby structures.
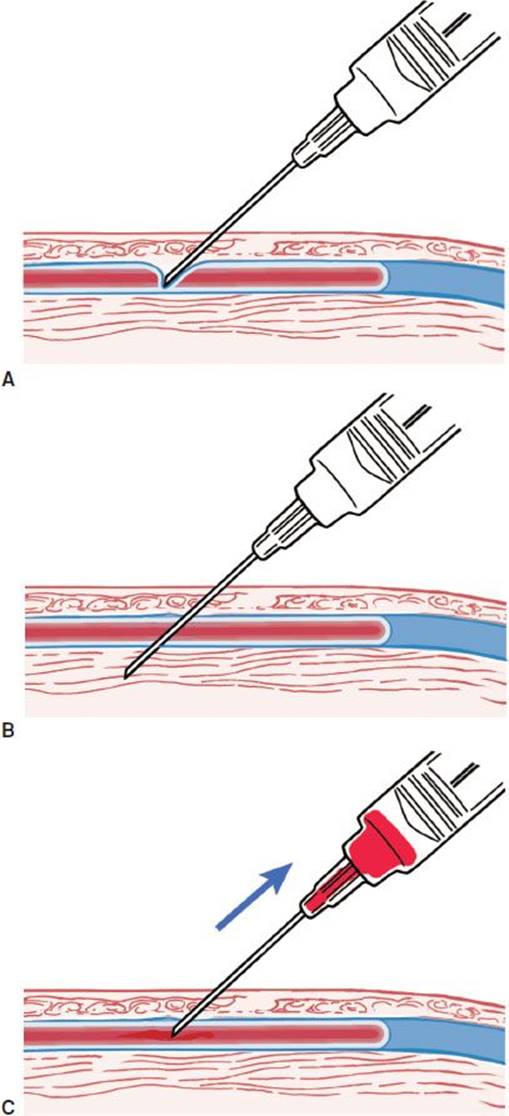
FIGURE 5.2 Through-and-through puncture of a vein. (Reprinted with permission from Reichman EF. Emergency Medicine Procedures. 2nd ed. New York, NY: McGraw-Hill; 2013.)
Peripheral Intravenous Cannulation
Vein cannulation begins with a successful venipuncture (2). Insert the catheter-over-the-needle through the skin and into the vein (Fig. 5.1A). A flash of blood in the hub of the needle confirms that the tip of the needle is within the vein. Advance the catheter-over-the-needle an additional 2 to 3 mm to ensure that the catheter is within the vein. Securely hold the hub of the needle. Advance the catheter until its hub is against the skin (Fig. 5.1B). Withdraw the needle leaving the catheter in place (Fig. 5.1C). Apply pressure with the nondominant index finger over the catheter to prevent blood from exiting the catheter. Attach IV tubing to the catheter hub, and begin the infusion. Secure the catheter with tape.
A modified Seldinger technique (described later in this chapter) with a radial artery catheterization kit is very useful for deep brachial and external jugular venous catheterization (3). The depth of the deep brachial vein combined with overlying skin (which is often scarred from previous venous punctures) makes catheterization with the usual 1.25-in catheter difficult. The external jugular vein is quite mobile, and the overlying tissues are fairly tough. This combination can make threading an over-the-needle catheter into the vein, without pushing the vein off the end of the needle, quite difficult.
Pediatric Considerations
Venipuncture and peripheral venous access can be quite a challenge in the infant and small child (3). Proper restraint of the extremity will greatly aid the process. Aside from the techniques discussed above, there are a few techniques that can aid pediatric vascular access. The scalp veins can be used for venous access in newborns. Scalp veins are most easily cannulated with a small (23- to 25-gauge) butterfly needle or catheter. A rubber band can be placed about the baby’s head as a tourniquet. Other veins commonly used include those of the antecubital fossa, dorsal hand, dorsal foot, the external jugular vein, and the saphenous vein at the knee or groin. For small and superficial veins, place a small bend at the hub of the catheter-over-the-needle assembly. This bend provides a less-acute angle and easier entry into the vein. The best guide to the gauge (diameter) of catheter to use is to compare the catheter to the vein. The catheter should be at least slightly smaller than the vein. In practice, the smallest readily available catheters are 24 gauge. Keeping a peripheral IV line from being pulled out by an active toddler is quite a challenge. Each institution has its own “recipe” for securing pediatric IVs including taping securely, covering the catheter with a cut plastic medicine cup, and covering the whole assembly with a gauze roll or stockinette.
Assessment
The IV line should flush easily. Any infusions should flow by gravity alone. Progressive swelling at the catheterization site indicates a hematoma formation or extravasation of infused fluids. Peripheral infusions of vasopressors, IV contrast, and caustic solutions require the skin puncture site to be assessed frequently and carefully as extravasation may lead to extensive local soft tissue necrosis. Pain at the IV access site must be taken seriously and should prompt a search for the cause.
Complications
The main complications of venipuncture are pain and hematoma formation. Other complications include nerve injury and usually reversible paresthesias. Infection is uncommon from simple venous sampling. In addition to these complications, venous catheters have additional risks. IV catheters increase the risk of superficial venous thrombosis and thrombophlebitis. It is possible to injure a number of structures in the neck or cause a pneumothorax during external jugular vein cannulation with inadvertent deep penetration. Extravasation of some IV solutions can cause local skin necrosis. Extravasation of large volumes into a muscle compartment can lead to a compartment syndrome, although this is rare with superficial peripheral venous lines. Infections can often be prevented by using aseptic technique, using sterile dressings, and changing peripheral catheters every 48 to 72 hours. The rare complications of peripheral nerve palsies, pressure necrosis, and compromised peripheral circulation do occasionally occur. Complications can be prevented by making frequent neurovascular checks to any restrained extremity, padding all pressure points, and avoiding the placement of circumferential tape on an extremity.
CENTRAL VENOUS ACCESS
Percutaneous cannulation of the central veins is an essential technique for both long-term and emergent medical care (4). Access to the major veins of the torso allows rapid high-volume fluid resuscitation, administration of concentrated ionic and nutritional solutions, and hemodynamic measurements. The right internal jugular vein is generally preferred to the left internal jugular vein as the site of central venous cannulation. The right internal jugular vein provides a nearly straight and direct route to the superior vena cava. The dome of the right lung is somewhat lower than that of the left lung and thus decreases the chance of a pneumothorax during catheter placement. The thoracic duct is relatively large and lies high in the left chest. These anatomic considerations favor the right internal jugular approach to central venous cannulation to minimize complications.
The internal jugular route is acceptable for central venous access in most cases. This route allows ready access to the superior vena cava for long-term central venous access, caustic or concentrated infusions, and central venous pressure monitoring. Pulmonary artery catheters and transvenous pacing wires can be introduced through the right internal jugular vein. The internal jugular vein is accessible without terminating cardiopulmonary resuscitation (CPR) efforts, although chest compressions and the lack of carotid pulsations make accessing it difficult. The risk of a pneumothorax is probably less with the internal jugular vein cannulation as opposed to the subclavian vein route, although patient mobility is less and discomfort is greater. In a coagulopathic patient, the internal jugular vein puncture site is compressible, but hematoma formation may lead to compromise of the airway.
The subclavian vein is the preferred route for longer-term central venous access. This site allows for ambulation (unlike a femoral line) and neck movement without discomfort (unlike a jugular line). The catheter is concealable under clothing, making outpatient use more acceptable.
The femoral vein is often the preferred route for emergency central venous cannulation in many patients. The femoral vein is not a suitable route for ambulatory patients beyond the initial resuscitation and stabilization period. Femoral venous access is relatively easy during CPR and often does not require the cessation of chest compressions. The femoral vein is easily compressible. This makes it preferable to the subclavian vein in coagulopathic patients or those undergoing thrombolysis, although peripheral access would be preferred in these cases. A femoral vein central line should be changed as soon as possible to another site because of the increased rates of infection compared to other locations.
Internal Jugular Vein
Central Approach
Place the patient in the Trendelenburg position with their head down 15 to 30 degrees. Rotate the patient’s head away from the side that will be cannulated. Excessive rotation will distort the anatomic landmarks and may bring the internal jugular vein closer to the carotid artery.
Insert the needle at a 30- to 60-degree angle at the apex of the triangle formed by the sternal and clavicular heads of the sternocleidomastoid muscle and the clavicle (Fig. 5.3). Direct the needle toward the ipsilateral nipple. Shallower angles cause a greater amount of subcutaneous tissues and structures to be traversed before entering the vessel but are generally necessary in children whose vessels are smaller. Steeper angles make insertion of the catheter over the guidewire difficult as the guidewire tends to kink.
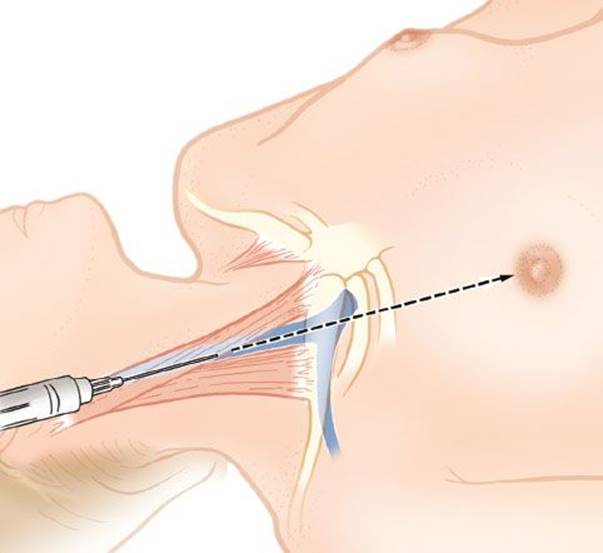
FIGURE 5.3 Central approach to the right internal jugular vein. (Reprinted with permission from Reichman EF. Emergency Medicine Procedures. 2nd ed. New York, NY: McGraw-Hill; 2013.)
Anterior Approach
The skin puncture site is at the anterior border of the sternal head of the sternocleidomastoid muscle, just lateral to the carotid artery (Fig. 5.4). Enter the skin at a 45- to 60-degree angle. Direct the needle toward the ipsilateral nipple. The internal jugular vein should be encountered within 3 to 5 cm in an adult. If the vein is not encountered by 5 cm, withdraw the tip of the needle to the subcutaneous space, and redirect it slightly medially.
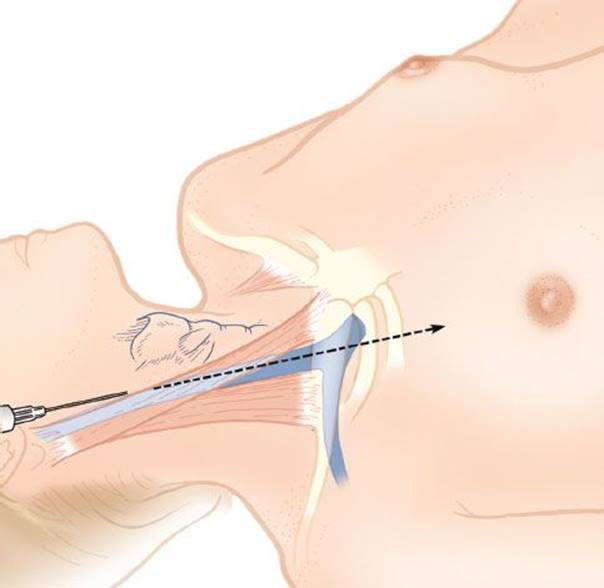
FIGURE 5.4 Anterior approach to the right internal jugular vein. (Reprinted with permission from Reichman EF. Emergency Medicine Procedures. 2nd ed. New York, NY: McGraw-Hill; 2013.)
Posterior Approach
Enter the skin at the posterior edge of the sternocleidomastoid muscle, one-third of the way from the clavicle to the mastoid process (Fig. 5.5). Alternatively, the point where the external jugular vein crosses the lateral border of the sternocleidomastoid muscle can be used. Direct the needle under the muscle at a 30- to 45-degree angle to the skin toward the sternal notch. Place the index finger of the nondominant hand in the sternal notch to provide a landmark with the patient draped. The internal jugular vein should be encountered within 5 cm in an adult. This approach is not recommended in children.
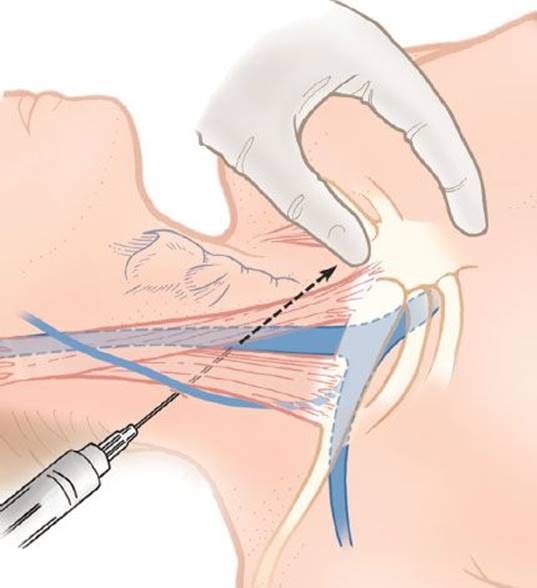
FIGURE 5.5 Posterior approach to the right internal jugular vein. (Reprinted with permission from Reichman EF. Emergency Medicine Procedures. 2nd ed. New York, NY: McGraw-Hill; 2013.)
Subclavian Vein
Infraclavicular Approach
The infraclavicular approach to the subclavian vein is most commonly used. This technique is easier to perform and less likely to result in a pneumothorax than the supraclavicular approach. Several different skin entry sites have been described (4). Some clinicians feel that the preferred entry site is 1 cm caudal to the junction of the medial third and middle third of the clavicle. The subclavian vein lies just posterior to the clavicle at this site. Direct the needle just superior and posterior to the suprasternal notch while staying as close to the frontal (coronal) plane as possible. The needle and syringe should be parallel to the bed (Fig. 5.6A,B). Placing the nondominant index finger in the sternal notch will help to guide placement (Fig. 5.6A).

FIGURE 5.6 Infraclavicular approach to subclavian vein cannulation. (Reprinted with permission from Reichman EF. Emergency Medicine Procedures. 2nd ed. New York, NY: McGraw-Hill; 2013.)
Some practitioners prefer to enter the skin inferior to the clavicle at the deltopectoral groove, or the point just lateral to the midclavicular line along the inferior surface of the clavicle. This is the point where the skin may be maximally depressed. Direct the needle parallel to the bed and toward the sternal notch. This entry site may make it easier to keep the needle in the coronal plane. The distance before entering the subclavian vein is longer than in the preceding approach, and the protection offered by the first rib is lost.
An additional alternative landmark exists. Palpate the bony tubercle, or protrusion, on the inferior surface of the clavicle and approximately one-third to one-half the length of the clavicle from the sternoclavicular joint. The advantage of this site is that it is a definitive landmark and avoids approximating distances as described for the other sites previously described. The needle is inserted parallel to the bed and aimed just posterior to the sternal notch.
Supraclavicular Approach
Although most practitioners are more comfortable with the infraclavicular approach to the subclavian vein, the supraclavicular approach offers some advantages (4). These advantages include the subclavian vein being closer to the skin, the route from a right-sided skin puncture site to the superior vena cava being more direct, the procedure avoiding the hazards of a left-sided puncture (i.e., the thoracic duct), and the skin entry site being more accessible during CPR. The complication rate for the supraclavicular approach is probably lower than that for the infraclavicular approach with an experienced clinician.
The skin is entered at a point 1 cm lateral to the lateral border of the clavicular head of the sternocleidomastoid muscle and 1 cm superior to the clavicle (Fig. 5.7A,B). The needle should bisect the angle formed by the clavicle and the lateral border of the sternocleidomastoid muscle (Fig. 5.7A). Direct the needle toward the contralateral nipple or a point just superior and posterior to the sternal notch. Orient the needle bevel medially. The subclavian vein should be entered within 2 to 3 cm in an adult. The length of catheter inserted will be a few centimeters less than that for the infraclavicular approach.

FIGURE 5.7 Supraclavicular approach to subclavian vein cannulation. (Reprinted with permission from Reichman EF. Emergency Medicine Procedures. 2nd ed. New York, NY: McGraw-Hill; 2013.)
Alternative skin entry sites and approaches have been described. Enter the skin 1 cm medially and 1 cm superiorly to the midpoint of the clavicle with the needle directed toward the ipsilateral sternoclavicular joint. The skin can be entered just posterior to the clavicle, at the junction of the medial third and middle third of the clavicle, with the needle directed toward the ipsilateral sternoclavicular joint and parallel to the coronal plane. This last approach is probably the simplest, although the study cited was performed on cadavers rather than live patients.
Femoral Vein Catheterization
Premeasuring from the insertion site to the xiphoid process will give the maximum catheter insertion depth. The needle should enter the skin 2 to 4 cm inferior to the midpoint of the inguinal ligament and 1 cm medial to the femoral artery pulse (Fig. 5.8). The needle should enter the skin 1 to 2 cm inferior to the inguinal ligament and 0.5 cm medial to the femoral artery pulse in an infant or young child.
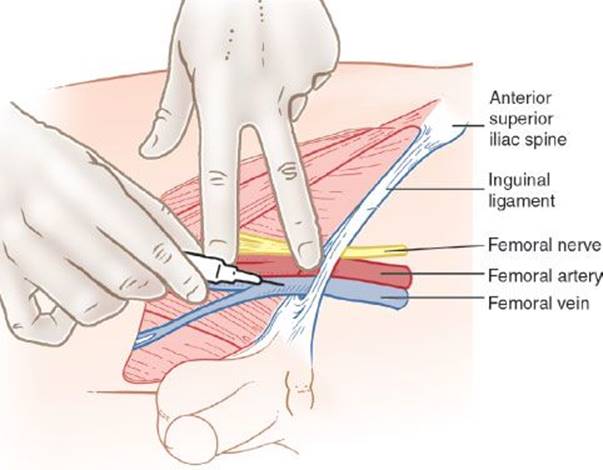
FIGURE 5.8 Femoral vein cannulation. (Reprinted with permission from Reichman EF. Emergency Medicine Procedures. 2nd ed. New York, NY: McGraw-Hill; 2013.)
Two site-specific considerations deserve mention. The use of a “finder” needle is unnecessary because there are no vital structures in the area other than the femoral artery that is compressible if it is punctured. The introducer needle is directed at a 45- to 60-degree angle to the skin and parallel to the long axis of the thigh. Shallower angles may be necessary in very small and thin patients. Use caution to avoid puncturing the posterior wall of the vein above the inguinal ligament because this can result in a retroperitoneal hemorrhage.
Seldinger Technique
There are numerous anatomic approaches to obtain central venous access (4). This includes three approaches to the internal jugular vein, two approaches to the subclavian vein, and one approach to the femoral vein. A more detailed discussion of the anatomy and approaches can be found elsewhere (1,4). Regardless of the approach, the Seldinger technique is the preferred method.
Clean, prep, and drape the area. Position the patient based on which central vein is to be accessed. Several cardinal rules for the insertion of the catheter should be observed. Always occlude the open hub of a needle or catheter in a central vein to prevent an air embolism. Never let go of the guidewire to prevent its embolization into the central venous circulation. Never apply excessive force to the guidewire on insertion or removal if resistance is met. Doing so may injure the vessel, break the guidewire, or embolize a piece of the guidewire.
Attach the thin-walled needle to a 5-mL syringe containing 1 mL of sterile saline. Insert the needle while applying negative pressure to the syringe by withdrawing the plunger. Advance the needle into the vein (Fig. 5.9A). If the vein is not located within 3 to 5 cm, stop advancing the needle. Withdraw the needle slowly while continuing to aspirate. Often, the vessel will have been completely traversed upon insertion, and blood will flash back into the syringe as the needle is withdrawn. Stabilize and hold the needle perfectly still with the nondominant hand once blood returns in the syringe. Remove the syringe. Occlude the open hub of the needle with the thumb of the nondominant hand while keeping the small finger of the hand in contact with the patient’s skin.

FIGURE 5.9 The Seldinger technique for central venous access. (Reprinted with permission from Reichman EF. Emergency Medicine Procedures. 2nd ed. New York, NY: McGraw-Hill; 2013.)
Grasp the guidewire and its sleeve with the dominant hand. Slide the sleeve forward to straighten out the “J” of the guidewire. Insert the wire sleeve into the hub of the needle (Fig. 5.9B). Advance the guidewire through the needle and into the vein (Fig. 5.9B). The guidewire should advance easily into the vein. Withdraw the needle and guidewire sleeve over the guidewire while securely holding the guidewire (Fig. 5.9C). Grasp the guidewire with the nondominant hand as soon as the guidewire is visible between the tip of the needle and the skin.
Make a small incision in the skin adjacent to the guidewire using a no.11 scalpel blade (Fig. 5.9D). Place the dilator over the guidewire, and advance it into the vein (Fig. 5.9E). Continue to advance the dilator until its hub is against the skin. Do not release hold of the guidewire at any time. Remove the dilator over the guidewire. Place the catheter tip over the guidewire. Advance the catheter over the guidewire and into the vein to the desired depth (Fig. 5.9F). The depth is typically 10 to 15 cm for the internal jugular or subclavian approaches, or completely to the hub for femoral central venous lines. Securely hold the catheter in place, and remove the guidewire (Fig. 5.9G). Occlude the open catheter lumen with a sterile-gloved finger to prevent air embolization and excessive blood loss.
Attach a syringe to the catheter hub, and aspirate blood to confirm that the catheter is within the vein. Withdraw any necessary blood samples. Attach infusion tubing or a cap to the port, and flush the catheter to prevent a blood clot from obstructing the lumen. Securely attach the catheter to the skin with nylon or silk sutures. Cover the skin puncture site with a sterile dressing. Obtain a chest radiograph to evaluate for central line placement complications such as a pneumothorax, hemothorax, hematoma, and/or line malpositioning.
Pediatric Considerations
The anterior or central approach to the internal jugular vein is preferred for children. Appropriate catheter sizes and lengths are shown elsewhere (4). The child must be sedated and immobilized prior to attempts at cannulation of the internal jugular or subclavian vein.
The femoral vein is the vein of choice if central venous access is needed in a combative child who cannot be completely restrained. The patient need not be in Trendelenburg position, the consequences of a misdirected needle are less severe, and the procedure is less threatening as the face is not draped. A shallower angle of skin entry is necessary to access the femoral vein compared to an adult. Enter the skin 1 to 2 cm inferior to the inguinal ligament and 0.5 mm medial to the femoral artery.
Assessment
Examine the patient after central line placement. Examine the lung fields carefully to exclude a significant pneumothorax. Vital signs should be rechecked. Obtain a portable anteroposterior chest radiograph to verify line tip placement in the superior vena cava and to rule out a procedural-related pneumothorax. Check the catheter site for hematoma formation or hemorrhage along the dilated catheter track. Control any hemorrhage with direct pressure. Check the function of the catheter by aspiration and infusion through all ports.
Most femoral vein catheters can be fully inserted. Premeasurement is recommended to make sure that the catheter tip will not reach the right atrium. If there is any doubt about the catheter position, postinsertion abdominal and chest radiographs should be obtained. The tip of the catheter must be at or below the xiphoid process of the sternum. Reassess the lower extremity distal to the catheter to determine any change in the neurovascular status after line placement.
Removal of the Central Venous Catheter
Place the patient in the Trendelenburg position when removing a central venous catheter from the internal jugular or subclavian vein. Place the patient supine to remove a femoral vein catheter. Remove the dressing overlying the skin puncture site. Cut the suture securing the catheter to the skin. Ask the patient to exhale and hold their breath. Briskly remove the catheter, and cover the puncture site with a gauze dressing. Apply an occlusive dressing to the site for the first 1 to 2 days after the catheter has been removed if the catheter had a large diameter or had been in place for more than 2 to 3 days. The skin puncture site should be observed for signs of infection twice a day for 48 hours.
Complications
Complications associated with central venous access are numerous. The internal jugular and subclavian access has a myriad of potential complications (1,4). These complications include infection, vessel laceration, catheter malposition, pneumothorax, hemothorax, chylothorax, carotid artery puncture, stroke, airway compromise, air embolism, cardiac dysrhythmias, cardiac puncture, pericardial tamponade, and death. The guidewire can become entrapped, necessitating surgical or interventional radiology removal. Thrombosis of the catheter or vein may lead to pulmonary embolism. Infection may result in septic emboli or endocarditis. Complications during catheterization occur in proportion to the operator’s inexperience (6). If the patient is unlikely to survive complications, the most experienced person available should perform the procedure.
Deep venous thrombosis of the femoral and more distal veins is a recognized complication of femoral venous lines. Inadvertent cannulation of the femoral artery may occur. This is particularly true during an episode of severe hypotension or cardiac arrest during central venous line placement. If intra-arterial placement is unrecognized, infusion of vasopressors into the artery may result in ischemic injury to the distal limb.
ULTRASOUND GUIDANCE FOR VASCULAR ACCESS
Ultrasound is a very useful tool to assist with peripheral or central vascular access, whether arterial or venous (8). Ultrasound can provide direct visualization of vessel cannulation, which can reduce the number of attempts and minimize complications. Although somewhat controversial because most community-based EDs do not yet have ultrasound capabilities, it is likely to emerge as the standard of care in the near future.
There are both static and dynamic ultrasonographic methods to assist in vascular access. The static method uses ultrasound to identify the vessel to be cannulated, but ultrasound is not used during the actual puncture. Rather, ultrasound is used to identify the vessel’s location. A mark is made on the skin above the vessel. The ultrasound probe is then slid 0.5 to 1 cm along the course of the vessel, and a second mark on the skin is made. This mark provides the direction of needle entry. An estimation of the angle required to reach the vessel can be determined by evaluating its depth. This technique allows the operator to remove the probe from the field and have both hands free to perform the procedure. The dynamic method uses ultrasound to visualize the puncture of the vessel in real time.
A high-frequency (5 to 10 MHz) linear probe should be used when attempting vascular access. High-frequency probes sacrifice tissue penetration for increased resolution. High-frequency probes provide better resolution at shallow depths and thus a better picture of superficial tissue. This resolution is important when visualizing vascular structures that are generally small and superficial.
The operator can place the vessel in the center of the screen and maximize its size by adjusting the depth (Fig. 5.10). Using the centimeter scale that is usually at the side of the screen, the operator can gauge the degree to which a needle should be inserted to enter the vessel based on the distance of the insertion site to the probe and the distance from the probe to the vessel (Fig. 5.11).

FIGURE 5.10 Ultrasound field of depth. A: Appropriate depth. B: Inappropriate settings of depth. Deep depth is not required and results in a small image on the ultrasound machine screen. C: Inappropriate depth setting as vascular structures should be completely visible and in the center of the screen. FA, femoral artery; FV, femoral vein.

FIGURE 5.11 Estimation of needle insertion angle and depth.
Before beginning the procedure, one must always ensure that the catheter chosen is of sufficient length to penetrate the soft tissues and enter the target vessel.
Basic Principles
Ultrasound requires a gel between the probe and the skin surface to transmit the acoustic signals. Most commercially available gels are good transmitters but are not sterile. When using ultrasound for vascular access, the probe should be placed inside a commercially available probe cover or sterile glove with transducer gel inside the cover or glove and with sterile gel between the probe cover and the skin to maintain a sterile environment and protect the probe from contamination.
Long-Axis Approach
This approach allows the operator to see the length of the needle enter the vessel as well as to appreciate the angle of insertion and length of catheter required to adequately cannulate the vessel. Place the probe on the site determined by anatomic landmarks with the probe marker toward the patient’s head and perpendicular to the patient’s skin (Fig. 5.12A). Locate the long-axis view of a fluid-filled (black) vessel (Fig. 5.12B). Adjust the depth to maximize the size of the vessel, and position the vessel in the center of the ultrasound machine screen. Adjust the gain as previously described.

FIGURE 5.12 Long-axis approach. A: Probe marker toward patient’s head. B: Needle entry into the vessel.
To determine if the vessel is arterial or venous, apply downward pressure on the area. Venous structures should be fully compressible, except in the setting of a thrombus. Arterial structures will not be fully compressible and should be pulsatile. Slide the probe several millimeters medially and laterally to locate the paired vessels (artery and vein), and determine which is the artery and which is the vein. Once the operator is certain of the vessel to be cannulated, enter the skin with the needle aligned directly with the long axis of the probe (Fig. 5.12A), and observe as the needle enters the vessel. The needle will appear as a bright white linear object as it travels through the tissue below the probe. There may be a degree of tenting of the vessel as the needle enters (Fig. 5.12B).
Short-Axis Approach
This approach allows visualization of both the artery and the vein on the ultrasound machine screen. Place the probe on the site determined by anatomic landmarks with the probe marker toward the operator’s left, perpendicular to the patient’s skin (Fig. 5.13A). Locate the short-axis view of the fluid-filled (black) vessels. Adjust the depth to maximize the size of the vessels, and position them in the center of the ultrasound machine screen. Identify the artery and vein by applying vertical pressure to the area as described previously. The operator may see the needle tip on the screen as a bright white dot that casts a shadow (Fig. 5.13B). Distortion of the soft tissues as the needle passes or tenting of the vessel wall just before the vessel is entered may sometimes be the only signs seen.

FIGURE 5.13 Short-axis approach. A: Probe marker toward operator’s left. B: Needle entry into the vessel with shadowing and tenting of the vessel wall visible.
It is important to remember that the probe should be in a position to visualize the point of entry of the needle into the vessel and not so close to the skin insertion site that the operator only sees a point of passage of the needle through soft tissue, which means the needle tip is actually passing out of the view on the ultrasound machine screen. If the first attempt is unsuccessful and the needle needs to be repositioned, withdraw it to just below the surface of the skin before redirecting it toward the vessel. If the probe marker is to the operator’s left and the ultrasound machine screen marker is also to the left, by directing the needle to the left it will move appropriately on the screen.
The use of color Doppler to help distinguish an artery from a vein may be beneficial when using the short-axis approach (Fig. 5.14). Doppler signals depend on direction of flow. Convention dictates that red represents flow toward the probe and blue represents flow away from the probe. Alter the tilt of the probe so that arterial flow is directed toward the probe and causes arteries to appear red on the ultrasound machine screen.

FIGURE 5.14 Distinguishing an artery from a vein. A: The left internal jugular vein and adjacent carotid artery. B: Compression of the skin with the ultrasound probe results in compression of the vein (arrow) and not the artery. C:Doppler reveals more intense flow in the carotid artery than in the internal jugular vein.
The short-axis approach is the preferred, though slightly less intuitive, method for vascular access in most cases. Because it gives the operator direct visualization of the artery and the vein, the operator can see which vessel (i.e., artery or vein) has been entered and can easily guide lateral movement’s if the first attempt is unsuccessful.
SPECIAL CONSIDERATIONS FOR PERIPHERAL VENIPUNCTURE
Emergency physicians are often faced with patients who have difficult vascular access. Prior IV drug abuse, peripheral vascular disease, hypotension, and debilitation increase the likelihood of difficulty in obtaining peripheral vascular access (9). Ultrasound can provide direct visualization of deep peripheral veins and confirmation of catheter placement.
External Jugular Vein Cannulation
Place the patient in the Trendelenburg position to distend the external jugular vein. Turn the patient’s head toward the opposite side. Clean and prep the skin of the neck. Place the nondominant thumb or index finger above the midportion of the clavicle to obstruct outflow and distend the external jugular vein. Align the catheter-over-the-needle parallel to the vein with the bevel of the needle upward. Enter the vein midway between the angle of the mandible and the midclavicle. Insert the catheter-over-the-needle during inspiration, when the valves of the external jugular vein are open. Be sure to cover the hub of the needle or catheter with a finger at all times to prevent an air embolism. The remainder of the technique is similar to that described previously.
Deep Brachial Vein Cannulation
Extend the patient’s arm. Identify by palpation the brachial artery pulse in the antecubital fossa. Clean and prep the skin of the antecubital fossa. Place a tourniquet on the upper arm. Reidentify the brachial artery pulse. Place a catheter-over-the-needle onto a 5-mL syringe. Insert the catheter-over-the-needle just medial or lateral to the brachial artery pulse and at a 30- to 45-degree angle to the skin with the tip of the needle pointing cephalad. Advance the catheter-over-the-needle while applying negative pressure to the syringe. A flash of blood in the syringe indicates that the vein has been entered. The remainder of the technique is similar to that described previously.
Ultrasound can be used to facilitate brachial vein cannulation. First, cleanse and prepare the site, apply a tourniquet, and prepare the probe as described previously. Using the short-axis approach, identify the vessel to be cannulated. Scan proximally and distally to isolate the portion of vessel that is at the shallowest depth and of the greatest diameter to increase the likelihood of successful cannulation.
It is extremely important to estimate the distance the needle will need to be inserted to enter the vessel (the hypotenuse to the triangle; Fig. 5.11). The risk of failure or subsequent infiltration is increased if the catheter used is not longer than this estimate. The cannulation site should be reconsidered or a longer catheter obtained.
Although ultrasound does allow direct visualization of the vessels, it does not change the chance of vessels “rolling.” Use the minimal pressure required to maintain probe contact with the skin and to prevent venous compression of peripheral veins, which are shallow and pliable.
ACCESSING INDWELLING CENTRAL VENOUS LINES
A variety of indwelling central venous access devices have been developed to avoid repeated venipunctures and permit direct access to the central circulation (5). These devices may be partially or completely implanted under the patient’s skin and include tunneled catheters, Perm-a-Caths, Hickman catheters, Groshong catheters, and Mahurkar catheters. The emergency physician must be able to access these devices to administer medications and withdraw blood samples without damaging the device or causing it to thrombose. The most important elements after accessing indwelling lines are to prevent the central venous line from clotting off and to avoid contaminating the line.
There are several contraindications to accessing indwelling central venous lines. Fully implanted devices should not be accessed through infected skin. Phenytoin and diazepam cannot be given via silicone indwelling central venous lines as they can crystallize and permanently obstruct the catheter lumen. Devices used for hemodialysis should only be accessed in a true emergency and if no other method of venous access can be readily obtained. This guideline is intended to prevent loss of the patient’s dialysis access.
Accessing a partially implanted central venous catheter is simple and similar to accessing a capped peripheral IV catheter. The Luer cap can be removed entirely and the catheter lumen accessed directly with a syringe if an infusion is to be subsequently started.
A noncoring Huber-type needle must be used to access subcutaneous injection ports. A small-gauge standard hypodermic needle can be used in a dire emergency if a noncoring needle is not available. The diaphragm covering the injection reservoir can be damaged by a standard hypodermic needle, leading to subcutaneous hemorrhage and requiring surgical replacement of the implanted device.
It is extremely important to prevent the indwelling central venous catheter from becoming thrombosed after it is used. Flush the Hickman and Broviac catheters with 3 to 5 mL of heparinized saline (100 U/mL). Flush the Groshong catheter with 5 mL of normal saline. Flush dialysis catheters with the volume printed on the catheter (usually ≤2 mL) with heparinized saline (1,000 U/mL). Flush fully implanted catheters with 3 to 5 mL of heparinized saline (100 to 200 U/mL). Heparin may be contraindicated in some patients because of bleeding or thrombocytopenia. Sterile saline is an alternative but may result in catheter thrombosis.
PERIPHERAL VENOUS CUTDOWN
Venous access in the critically ill patient is of utmost importance. Peripheral venous access can be extremely difficult because of vascular collapse from shock, previous injury to the vessel, obesity, or scars. Direct visualization of the vein to be cannulated will often be quicker and more successful than indirect visualization with central venous lines (10). To perform peripheral venous cutdowns, one must understand the anatomy and details of venous cannulation (10). Practicing the cutdown technique before its critical need will help with placement in the emergent setting. Emergency physicians should be knowledgeable of the anatomy of the saphenous vein at the ankle, the saphenous vein at the groin, and the basilic vein at the elbow.
The primary indication for a peripheral venous cutdown is the need for venous access in a patient with no peripheral access and in whom central access is not obtainable or contraindicated (10). This is the ideal procedure for the IV drug user with no peripheral veins, burn patients, the patient in cardiorespiratory arrest, or the hypovolemic trauma patient. This is also an excellent technique for emergent pediatric vascular access after other access attempts (i.e., intraosseous access, central venous access, peripheral venous access—including scalp veins) have failed.
Greater Saphenous Vein Isolation at the Ankle
The saphenous vein is easily found and isolated at the ankle (Fig. 5.15). Extend and externally rotate the lower extremity. Identify the medial malleolus of the tibia. Find the spot 2.5 cm anterior and 2.5 cm superior to the medial malleolus. The greater saphenous vein will be found at this site. Alternatively, the vein will be found two fingerbreadths above and two fingerbreadths in front of the medial malleolus (Fig. 5.15A).

FIGURE 5.15 Isolation of the greater saphenous vein at the ankle. (Reprinted with permission from Reichman EF. Emergency Medicine Procedures. 2nd ed. New York, NY: McGraw-Hill; 2013.)
Stretch the skin taught over the distal tibia with the nondominant hand (Fig. 5.15B). Transversely incise the skin overlying the greater saphenous vein using a no. 10 scalpel blade, from the anterior tibial border to the posterior tibial border (Fig. 5.15B). This incision should be superficial to expose only the subcutaneous tissue. An incision into the subcutaneous tissue may transect the vein causing significant bleeding, difficulty visualizing the surgical field, and difficulty finding the ends of the vein, which may retract proximally and distally.
Isolate the greater saphenous vein. Insert a curved hemostat along the posterior border of the tibia, and scrape the tip along the tibia. Advance the hemostat along the tibia while scraping the periosteum until the tip reaches the anterior border of the tibia (Fig. 5.15C). Widely open the arms of the hemostat (Fig. 5.15D). This motion will open the jaws of the hemostat and separate the saphenous vein from the saphenous nerve and fibrous strands of connective tissue. Insert a straight hemostat (Kelly clamp) between the jaws of the curved hemostat and below the greater saphenous vein (Fig. 5.15E). Remove the curved hemostat to leave the straight hemostat elevating the greater saphenous vein (Fig. 5.15F).
Greater Saphenous Vein Isolation at the Groin
The groin vasculature offers the potential for massive infusion of blood or fluids in a matter of minutes. These vessels are closer to the central circulation and large enough to easily accommodate IV tubing, cut off at a 45-degree angle, as a catheter. The greater saphenous vein is superficial at the groin and lies in a meshwork of subcutaneous tissue superficial to the femoral artery and vein.
Identify the location where the scrotal or labial fold meets the thigh (Fig. 5.16). Identify the lateral edge of the mons pubis. Identify the point where a vertical line from the lateral edge of the mons pubis meets a horizontal line from the scrotal/labial fold. Make a 6-cm, transverse, medial-to-lateral incision with a no.10 scalpel blade on the patient’s thigh starting where the scrotal or labial fold meets the thigh. Extend the incision laterally until it meets the vertical line from the lateral edge of the mons pubis. Dissect the subcutaneous tissue to locate the greater saphenous vein.

FIGURE 5.16 Isolation of the greater saphenous vein at the groin. (Reprinted with permission from Reichman EF. Emergency Medicine Procedures. 2nd ed. New York, NY: McGraw-Hill; 2013.)
Basilic Vein Isolation at the Elbow
The basilic vein may be used for a peripheral venous cutdown. This procedure is often performed when the greater saphenous vein cannot be accessed because of lower-extremity amputation, deformity, injury, or trauma. This site is not ideal as accessing it may interfere with resuscitative efforts. The vein is deep, small, and often hard to find.
Techniques for Cannulation of the Vein
There are a number of techniques to cannulate a vein after it has been isolated (10). Either of the following techniques can be used to cannulate the greater saphenous vein or basilic vein. The techniques include a surgical technique using IV tubing, a Seldinger technique, a modified Seldinger technique, and an IV catheter technique. It is important to realize that this may be a lifesaving procedure in an emergent setting, and the rapid and definitive cannulation of the vessel is the primary goal and not the technique chosen.
The complications of a peripheral venous cutdown include arterial injury, nerve injury, phlebitis, thromboembolism, wound dehiscence, and wound infection. The incidence of complications ranges from 2% to 15% (10). The difficulty in reporting complications is that there is a high mortality rate in patients undergoing this procedure because of the underlying problem requiring emergent vascular access (i.e., hypovolemia, sepsis, shock, trauma, etc.).
INTRAOSSEOUS INFUSION
Obtaining peripheral vascular access in the critically ill pediatric or adult patient may be difficult and time consuming. An alternative route to IV infusion for blood, drug, and fluid administration is to insert an intraosseous line (11). Intraosseous infusion is quick, safe, and effective in compromised neonates and adults when other vascular access techniques fail or are contraindicated (11). The procedure is technically straightforward.
The intraosseous needle is inserted through the cortex and into the bone marrow (medullary) cavity of a long bone. Numerous anatomic sites can be used to access the medullary cavity. The most traditional site, which is favored in pediatric patients, is the flat anteromedial surface of the proximal tibia. The distal tibia just above the medial malleolus and the greater tuberosity of the humerus are the preferred sites in adults. It is easier to penetrate the cortex of the medial malleolus and the greater tuberosity of the humerus in the adult than the thicker cortex of the proximal tibia. A third site for intraosseous access is the flat anterior surface of the distal femur. The sternum can be used, but this route is difficult and associated with numerous complications.
Intraosseous line placement is contraindicated in diseased or osteoporotic bone. Avoid placement of an intraosseous line through areas of cellulitis, abscess, or burns. Fractures in the ipsilateral bone increase the risk of extravasation-induced compartment syndrome and nonunion of the fractures. Failed placement of an intraosseous line in the same bone is a relative contraindication.
Use only specifically designed intraosseous needles for this procedure. Spinal needles bend, do not penetrate the cortex, and have increased resistance to fluid flow. Standard hypodermic needles often bend and do not penetrate the cortex of the bone. Both of these types of needles may break while being inserted and may injure the healthcare provider.
The most common complication of intraosseous infusion is extravasation of fluid. Localized infections may occur after intraosseous needle placement. Injury to the growth plate and bone marrow embolism are possible. The flow rate of fluid through an intraosseous line is slower than that through a peripheral IV line.
UMBILICAL VESSEL CATHETERIZATION
Umbilical vessel catheterization can be used as a reliable method for vascular access, fluid resuscitation, blood transfusion, medication administration, frequent blood sampling, and cardiovascular monitoring. Either the umbilical artery or vein may be used for vascular access (12). It is possible to access the umbilical artery up to 7 days after birth. The umbilical vein can be accessed for up to 2 weeks of age.
Umbilical artery catheterization is more desirable than umbilical vein catheterization because it allows frequent arterial blood gas sampling and continuous blood pressure monitoring in addition to fluid, blood, and medication administration. Unfortunately, umbilical artery catheterization is more difficult and time consuming to perform, especially in unskilled hands. Therefore, umbilical vein catheterization is the preferred procedure for the infant in shock in need of rapid resuscitation. Arterial access can be obtained later in a more controlled environment, such as in the neonatal intensive care unit.
The umbilical vein and arteries can easily be differentiated by examination of a cross section of the umbilical cord. The umbilical vein is a single vessel with thin walls and a large lumen. It is usually flattened in one direction. There are two thick-walled umbilical arteries that are significantly smaller in diameter than the umbilical vein. Occasionally, only a single umbilical artery is present.
Umbilical vessel catheterization in the ED should only be performed on severely ill neonates in whom peripheral vascular access attempts have failed. Never insert an umbilical catheter if there are any signs of infection on or around the remnant of the umbilical cord. Umbilical vessel catheterization is contraindicated if a neonate is older than the previously stated ages or an abdominal abnormality exists.
ARTERIAL PUNCTURE AND CANNULATION
Arterial blood gas sampling is an essential component of the care of many ED patients (13). Arterial blood gas sampling provides key information regarding a patient’s oxygenation and acid–base status. Arterial cannulation allows for continuous and accurate blood pressure monitoring and frequent blood gas sampling in the care of the critically ill patient. A modified Allen test should be performed to assess the adequacy of the collateral circulation to the hand prior to radial artery puncture or cannulation. An alternative method of evaluating the collateral circulation involves the use of a pulse oximeter with a visual pulse waveform display.
The preferred site for the initial attempt at arterial puncture or cannulation is the radial artery. Other acceptable second-attempt sites of access include the femoral, dorsalis pedis, brachial, posterior tibial, and superficial temporal arteries. Arterial puncture may be performed to obtain a single blood sample.
Arterial cannulation can be accomplished by numerous techniques (1,13). The catheter-over-the-needle technique is the most basic method, yet possibly the one associated with the lowest rate of successful cannulation. It is the direct introduction of the catheter-over-the-needle in a manner similar to that of inserting an IV catheter. The second technique for arterial cannulation is a Seldinger-type technique (i.e., catheter-over-the-wire) utilizing one of a number of prepackaged commercially available kits. A double arterial wall puncture technique may offer an advantage in passing the guidewire and catheter into the true arterial lumen. This technique for cannulation theoretically may be associated with greater vascular damage. Finally, a cutdown technique may be performed to cannulate an artery. This technique is primarily used for the brachial or radial arteries but may be used to access other peripheral arteries.
Arterial puncture and catheterization are generally safe procedures with an incidence of clinically significant complications under 5% (14). The primary complications of arterial catheterization are infection, bleeding, arterial injury, and intra-arterial thrombosis. Infection is usually limited to the site of catheterization. Nerve injury can occur from direct puncture or neuropathy as a result of a hematoma formation and subsequent nerve compression. Small hematomas are common after arterial puncture. Major bleeding is unusual. Rare complications include the formation of a pseudoaneurysm or arteriovenous fistula.
Common Pitfalls
• Know the anatomy and common variations of the major veins used for vascular access.
• Be familiar with the equipment and techniques for venous access before performing the procedure.
• Have a backup plan for an alternative vascular access site if the attempts at the primary site are unsuccessful.
• Anticipate difficult central venous line placement or complications because of a particular patient’s anatomic variation from normal.
• Be sure to align the ultrasound probe marker and the screen marker.
• Always optimize the ultrasound machine screen depth and gain.
• Always differentiate artery from vein if ultrasound is available.
• Always maintain sterile technique.
• Involve a second operator to make both hands available when using ultrasound.
REFERENCES
1. Reichman EF, ed. Emergency Medicine Procedures. 2nd ed. New York, NY: McGraw-Hill; 2013.
2. Belmont D. General principles of intravenous access. In: Reichman EF, ed. Emergency Medicine Procedures. 2nd ed. New York, NY: McGraw-Hill; 2013:
287–296.
3. Belmont D. Venipuncture and peripheral intravenous access. In: Reichman EF, ed. Emergency Medicine Procedures. 2nd ed. New York, NY: McGraw-Hill; 2013:
296–308.
4. Nagdev A, Sisson C. Central venous access. In: Reichman EF, ed. Emergency Medicine Procedures. 2nd ed. New York, NY: McGraw-Hill; 2013:308–327.
5. Freeman-Grossheim L. Accessing indwelling central venous lines. In: Reichman EF, ed. Emergency Medicine Procedures. 2nd ed. New York, NY: McGraw-Hill; 2013:340–344.
6. Sznajder JI, Zveibil FR, Bitterman H, et al. Central vein catheterization: Failure and complication rates by three percutaneous approaches. Arch Int Med. 1986;146:259–261.
7. Meridith JW, Young JS, O’Neil EA, et al. Femoral catheters and deep venous thrombosis: A prospective evaluation with venous duplex sonography. J Trauma. 1993;35(2):187–191.
8. Randolph AG, Cook DJ, Gonzalez CA, et al. Ultrasound guidance for placement of central venous catheters: A meta-analysis of the literature. Crit Care Med. 1996;24(12):2053–2058.
9. Costantino TG, Parikh AK, Satz WA, et al. Ultrasonography-guided peripheral intravenous access versus traditional approaches in patients with difficult intravenous access. Ann Emerg Med.2005;46(5):456–461.
10. Nobay F. Peripheral venous cutdown. In: Reichman EF, ed. Emergency Medicine Procedures. 2nd ed. New York, NY: McGraw-Hill; 2013:350–361.
11. Munk A, Ma OJ. Intraosseous infusion. In: Reichman EF, ed. Emergency Medicine Procedures. 2nd ed. New York, NY: McGraw-Hill; 2013:361–369.
12. Reichman EF, Noland A, Muniz AE. Umbilical vessel catheterization. In: Reichman EF, ed. Emergency Medicine Procedures. 2nd ed. New York, NY: McGraw-Hill; 2013:
369–376.
13. Foy Z, Stroud S. Arterial puncture and catheterization. In: Reichman EF, ed. Emergency Medicine Procedures. 2nd ed. New York, NY: McGraw-Hill; 2013:376–387.
14. Lodato RF. Arterial pressure monitoring. In: Tobin MJ, ed. Principles and Practice of Intensive Care Monitoring. New York, NY: McGraw-Hill; 1998:733–747.