
BRUISES
A bruise is a collection of blood that develops in soft tissue (muscle, skin, or fat), caused by a direct blow to the body part, a tearing motion (such as a twisted ankle), or spontaneous bleeding (ruptured or leaking blood vessel). With trauma, tiny blood vessels are torn or crushed and leak blood into the tissue, so that it rapidly becomes discolored. Pain and swelling are proportional to the degree of injury. People on anticoagulants (such as Coumadin) and hemophiliacs tend to develop larger bruises; elders and those taking steroid medications tend to bruise easily, often spontaneously.
The immediate (within the first 48 hours) treatment of a bruise is to apply cold compresses or to immerse the injured part in cold water (such as a mountain stream). This decreases the leakage of blood, minimizes swelling, and helps reduce pain. Cold applications should be made for intermittent 10-minute periods until a minimum total application time of 1 hour is attained. Do not apply ice directly to the skin (to avoid frostbite). Rather, wrap the ice in a cloth before application.
If the swelling progresses rapidly (such as with bleeding into the thigh), an elastic bandage can be wrapped snugly to try to limit the swelling. Continue cold applications over the wrap. It is important to keep the wrap loose enough to allow free circulation (fingertips and toes should remain pink and warm; wrist and foot pulses should remain brisk). Elastic wraps are indicated only if pain and swelling will not allow the victim to extricate himself to seek medical attention.
Elevation of the bruised and swollen part above the level of the heart is essential, to allow gravity to keep further swelling to a minimum.
Never attempt to puncture or cut into a bruise to drain it. This is fraught with the risk of uncontrolled bleeding and the introduction of bacteria that cause infection. The exception to this rule is a tense and painful collection of blood under the fingernail (see page 258).
After 48 to 72 hours, the application of moist or dry heat will promote local circulation and resolution of the swelling and discoloration. Heat ointments or liniments are ineffective; they only irritate nerve endings in the outermost layers of the skin and give a false impression of warmth.
People who have prolonged blood-clotting times and/or who have large bruises should avoid products that contain aspirin, which might cause increased bleeding. A hemophiliac who sustains an expanding bruise will likely need to be transfused with a blood-clotting “factor” to promote coagulation; transport to a medical facility should be prompt.
A severe bruise, usually caused by a direct blunt force, can on rare occasion develop into a compartment syndrome (see page 73).
BLACK EYE
A black eye is a darkened blue or purple discoloration in the region around the eye. It can be caused by a direct blow (bruise) or by blood that has settled into the area from a broken nose, skull fracture, or laceration of the eyebrow or forehead. “Raccoon eyes” are black eyes caused by a skull fracture. If a black eye is due to a direct injury (with swelling and pain), first examine the eyeball for injury (see page 182). The skin discoloration may be treated with intermittent cold compresses for 24 hours.
BLOOD UNDER THE FINGERNAIL
When a fingertip is smashed between two objects, there is frequently a rapid blue discoloration of the fingernail, which is caused by a collection of blood underneath the nail. Pain from the pressure may be quite severe. To relieve the pain, it is necessary to create a small hole in the nail directly over the collection of blood, to allow the blood to drain and thus relieve the pressure. This can be done during the first 24 to 48 hours following the injury by heating a paper clip or similar-diameter metal wire to red-hot temperature in a flame (taking care not to burn your fingers while holding the other end of the wire; use a needle-nose pliers, if available) and quickly pressing it through the nail (Figure 134). Another technique is to drill a small hole in the nail by twirling a scalpel blade, sharp knife, or needle. As soon as the nail is penetrated, blood will spurt out, and the pain will be considerably lessened. Before and after the procedure, the finger should be washed carefully. If the procedure was not performed under sterile conditions, administer dicloxacillin, erythromycin, or cephalexin for 3 days.
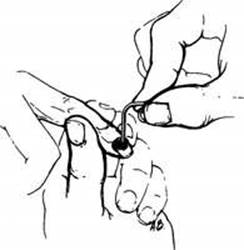
Figure 134 Hot paper clip technique to drain blood from under the fingernail.
PUNCTURE WOUNDS
Puncture wounds are most frequently caused by nails, tree branches, fishhooks, and the like. Because they do not drain freely, these wounds carry a high risk for retained bacteria and subsequent infections. A puncture wound should be irrigated copiously with the cleanest solution that is available and left open to heal. Bleeding washes bacteria from the wound, so a small amount of bleeding should be encouraged. Never suture or tape a puncture wound closed, unless necessary to halt profuse bleeding; doing so promotes the development of infection. Similarly, do not occlude the opening of a puncture wound with a “grease seal” or plug of medicinal ointment; apply any antiseptic sparingly. If the wound is more than ¼ in (0.6 cm) at its opening, you can leave a piece of sterile gauze in the wound as a wick for a day or two, to allow drainage and prevent the formation of an abscess cavity (see page 241). If the wound becomes infected (see page 240), apply warm soaks four or more times a day. Treat the victim with dicloxacillin, erythromycin, or cephalexin for 4 days.
IMPALED OBJECT
See page 59.
SCRAPES
Scrapes (abrasions) are injuries that occur to the top layers of the skin when it is abraded by a rough surface. They are generally very painful, because large surface areas with numerous nerve endings are involved. Bleeding is of an oozing, rather than free-flowing, nature.
An abrasion should be scrubbed until every last speck of dirt is removed. Although it hurts just to think about this, scrubbing is necessary for two reasons. The first is the infection potential when such a large area of injured skin is exposed to dirt and debris. The second is that if small stones or pieces of dirt are left in the wound, these in essence become like ink in a tattoo, leaving the victim with permanent markings that require surgical excision. Soap-and-water scrubbing with a good final rinse should be followed with an antiseptic ointment such as bacitracin or mupirocin, or cream such as mupirocin, and a sterile nonadherent dressing or Spenco 2nd Skin. You can also place Hydrogel occlusive dressing over an abrasion; it will absorb up to 2½ times its weight in fluid weeping from the wound. It should be covered with a dry, light dressing. This technique is useful for burns as well. If the surface area is not particularly large or is on a difficult-to-bandage area, such as the nose or ears, the bandage (not the ointment) may be omitted.
The pain of cleansing can be relieved by applying pads soaked with lidocaine 2.5% ointment to the abrasion for 10 to 15 minutes before scrubbing. To avoid lidocaine toxicity, don’t do this if the surface area of the abrasion exceeds 5% of the total body surface area (an area approximately five times the size of the victim’s fingers and palm). In some cases, particularly when there is deeply embedded grime that will be extremely painful to remove, it is useful to inject the wound with a local anesthetic (see page 262).
CUTS (LACERATIONS)
Remove all clothing covering a wound so that you may determine the origin and magnitude of any bleeding.
1. Control bleeding. This can be done in almost every instance by direct pressure (see page 54). Apply firm pressure to the wound using a wadded sterile compress, cloth, or direct hand contact (wearing latex gloves, if possible; if you are allergic to latex, use other nonpermeable gloves, such as nonlatex synthetic). Hold the pressure for a full 10 to 15 minutes without release. If this does not stop the bleeding, apply a sterile compress and wrap with an elastic bandage, taking care to not wrap so tightly as to occlude the circulation (check for warm and pink fingers and toes). If bleeding is not controlled with pressure alone, you may need to apply a hemostatic (stops bleeding) dressing or compress. These are described on page 55. During all of these maneuvers, keep the victim calm and elevate the injured part as much as possible.
2. Clean the wound. In many cases, “the solution to pollution is dilution.” After you have controlled the bleeding, the minor wound(s) should be properly cleansed. If you have needed to use hemostatic gauze or other ancillary agent (such as Celox) other than brief pressure to control the bleeding, you should wait for at least 60 minutes before attempting to clean the wound. Otherwise, brisk bleeding may reoccur. Wear sterile, nonpermeable, nonlatex gloves if these are available; if you are not allergic to latex, latex gloves are acceptable. If sterile gloves are not available, wear nonsterile gloves. Examine the wound and remove all obvious foreign debris.
The best way to clean a wound is to irrigate away the dirt and bacteria. The irrigating stream should be forceful enough (approximately 8 to 10 pounds per square inch) to dislodge the foreign material without injuring the tissues beneath the stream or forcing harmful material deeper into the wound. Use the cleanest disinfected water available. The best irrigants are “normal” saline (0.9% NaCl) solution (add 1½ level tsp, or 9 g of table salt, per quart or liter), or a quart of disinfected saline or water. Tap water or disinfected water without the addition of povidone iodine is fine for irrigation purposes. Addition of no more than 1 fluid oz (30 mL) of povidone iodine (Betadine) solution (not soapy “scrub”) into a liter of irrigating fluid has been recommended in the past, but has fallen out of favor. Certainly, don’t use a povidone iodine solution to irrigate eyes, and don’t drink this stuff. Hydrogen peroxide and other antiseptics are also tissue toxic. Try to use at least 500 mL (roughly one pint) of irrigation fluid per wound. There is no benefit from soaking a wound in water, disinfected or not. Soaking may actually increase the bacterial count. If there is grease in the wound, it is best to avoid commercial degreasing agents; use soap and water, followed by water irrigation.
Use a syringe (50 to 60 mL is best, but any size can be used) with a 16- to 20-gauge (18-gauge is best) plastic catheter or steel needle attached to draw up the irrigating fluid and act as a “squirt gun.” This creates a stream of the appropriate force (range of 5 to 12 pounds per square inch). Another way to obtain the appropriate stream diameter and force is to attach a Zerowet Splashield (www.zerowet.com) to a plastic syringe (Figure 135). A complete wound irrigation system (Klenzalac) with a 10 mL syringe, fill stem, and Splashield is also available. This technique protects the operator from splash exposure to blood and tissue fluid. If you don’t have these supplies, you can fill a small (as sturdy as possible) plastic bag with the irrigating solution, punch a tiny hole in the bag, and squeeze out the liquid (Figure 136). Irrigate the wound until it appears clean, usually with at least a pint to a quart (½ to 1 liter) of liquid. Take care to avoid splashing yourself.
Sometimes irrigation isn’t enough to remove all of the dirt from the wound, or you won’t be carrying irrigation equipment. In that case, the wound needs to be scrubbed out with a gauze or cloth, using a disinfectant solution or hand soap and the cleanest disinfected water available. This can be painful, so get everything ready in advance and then try to accomplish the task as quickly as possible. Rinse the wound thoroughly when you are finished.
Do not forcefully irrigate a puncture wound, because you may push fluid deeper into the tissues, and force germs and other contaminants further into the wound.
Scrubbing and irrigation will often cause a wound to begin bleeding again as blood clots are dislodged from tiny blood vessels. Stop this bleeding by holding absorbent gauze with pressure against the wound.
Do not pour tincture of iodine, rubbing alcohol, merthiolate, mercurochrome, or any other over-the-counter antiseptic into the wound (except for potentially rabid animal bites—see page 410). These preparations inhibit wound healing and are extremely painful. Although recommended by healers in ancient civilizations, herbal doctors, and professional woodsmen, the use of butter, pine sap, ground charcoal, hard liquor, or wine as an antiseptic is not recommended.
3. Anesthetize (numb) the wound. Most laypeople will never be called on to sew (suture) or staple a wound closed. However, for the benefit of rescuers who might need to practice advanced skills, here are the basics:
Local anesthesia of a wound can be achieved by injecting sterile 1% lidocaine or 0.25% bupivacaine solution into the edges of the wound using a 25-, 27-, or 30-gauge needle attached to a 10 mL syringe. There will be less stinging sensation with injection if you add 1 mL of 8.4% sodium bicarbonate solution to each 10 mL of the lidocaine solution before using it. Bicarbonate should not be added to bupivacaine, because it causes precipitation if the solution is not used immediately. Once bicarbonate has been injected, the shelf life of the multidose vial of anesthetic decreases considerably, so this maneuver may not be practical in the field. Whenever possible, use a new ampule or vial of anesthetic for each episode (event, or victim). This minimizes the risk of injecting a contaminated (with bacteria) product and causing a wound infection. Never share needles between victims.
To draw up medication into a syringe, follow the instructions given for subcutaneous injection on page 474. The onset of anesthesia from injection of lidocaine or bupivacaine is 2 to 5 minutes, with duration of action 1 hour for lidocaine and 4 hours for bupivacaine. The maximum safe adult dose (volume) of 1% lidocaine is 30 mL; for 0.25% bupivacaine, it is 70 mL. For a child, the maximum safe dose for 1% lidocaine is 0.4 mL/kg (2.2 lb) of body weight, up to 30 mL; the maximum safe dose for 0.25% bupivacaine is 1 mL/kg, up to 70 mL. Of course, it is best to stay as far as possible below the maximum safe dose.
The wound should be cleansed of all major debris and dirt before injecting an anesthetic, so as not to plunge the needle through the grime. Inject through the open (cut or torn) portion of the wound, rather than through the surface of the skin, unless this is necessary to avoid gross contamination. One useful technique is to insert the short needle up to its hub, and then inject while you slowly withdraw the needle back out from the skin, rather than injecting during entry. As with any other medical intervention, it is important to have practiced ahead of time before attempting to numb a wound by injecting it with an anesthetic.
Numbing a wound can be done before it is definitively cleansed and irrigated, particularly if the cleansing process will be extremely painful (as when an abrasion needs to be scrubbed). In order to not have to reinject the wound because the anesthetic has worn off, have all of your supplies gathered and your helpers ready to assist before you inject.
Reapproximate the anatomy (close the wound) as best as possible. Most cuts do not involve tissue loss, so that edges fit together like a jigsaw puzzle. Because of the infection risk away from the hospital or doctor’s office (a relatively germ-free environment), do not close a wound tightly with stitches of thread (sutures) unless absolutely necessary. Instead, bring the wound edges together with paper tape with adhesive specifically made for wound closure (such as elastic or nonelastic Steri-Strips) or with butterfly bandages (see also page 266 ’”Taping a Wound Closed”). The latter can be fashioned from regular surgical adhesive tape (Figure 137). A small scar is preferable to a wound infection caused by tight closure that requires hospitalization for surgical management of a wound infection. If nothing else is available to hold together the edges of a widely gaping wound that prevents the victim from seeking help, use one or more safety pins.
No matter what method you use to close a wound, the best way to make the opposite sides match up properly, and to take tension off the wound while the remainder of the closure is completed, is to place the first piece of tape, staple, or suture (thread) at the midpoint of the wound (“halve the wound”) (Figure 138). The second fastener should then “halve the halves” (Figure 139), so that the wound is now quartered, and so forth until the closure is complete. A final long locking strip can be placed over the ends of the crossing strips to complete the closure (Figure 140).
When aligning the two sides of a cut lip, be sure to match the vermilion border (the line where the skin of the lip meets the skin of the face) perfectly (Figure 141). The same concern holds for aligning a laceration of the eyebrow. Never shave an eyebrow, because it might not grow back! In fact, there is no absolute need to shave hair from the skin around any wound. Shaving hair may increase the risk for infection, because you create micro-nicks in the skin with your razor or knife edge.
Regardless of which technique you choose to close the wound, it is useful to splint the repair (see page 74) for at least a few days, to allow healing to begin without the wear and tear of motion, particularly across a joint.
One way to close a laceration of the scalp is to first lay a long piece of string or dental floss along and beyond the length of the wound (see Figure 37). Next, twirl hair on direct opposite sides of the wound to form strands, and then pull these strands toward each other to pull the skin together. Then, use the string to tie the hair strands together. Repeat this process as necessary to account for the entire open length of the wound. If the wound is large and you do not have any string, you may be able to bring the edges together by tying or gluing together twisted thick strands of hair taken from opposite sides of the wound, but this is often quite difficult (see below).
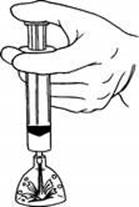
Figure 135 Using a Zerowet Splashield attached to a syringe to irrigate the open wound.
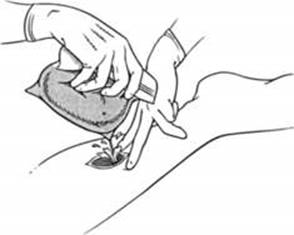
Figure 136 Using a small plastic bag filled with water to irrigate a wound.
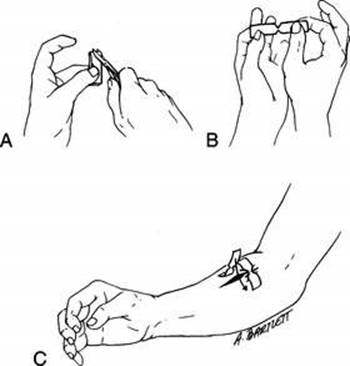
Figure 137 Fashioning a butterfly bandage. A, Fold a piece of tape (however, don’t let the tape stick together) and cut off both corners at the crease. B, The straightened tape reveals the “butterfly.” C, The bandage is used to hold the wound edges close together.
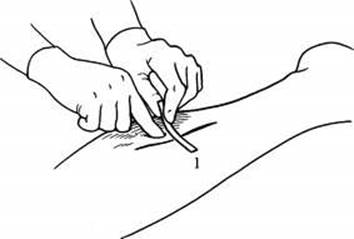
Figure 138 “Halving” a wound for the first act of closure.
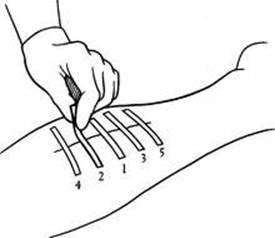
Figure 139 Halving a half, or “quartering the wound.” This helps keep the wound in alignment and prevent mismatched sides (of different lengths).
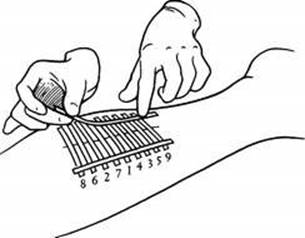
Figure 140 Completed wound closure using tape.
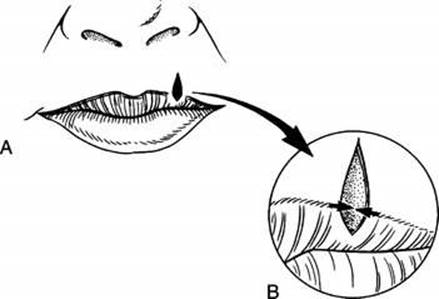
Figure 141 Matching the vermilion border of the lip.
SKIN FLAPS AND AVULSIONS
If a cut occurs at an oblique angle to the skin, so that a very thin layer of skin is “shaved” away, the wound should be cleaned carefully and the flap repositioned and held in place with tape (see below). If the flap is extremely thin or if its base of attachment is small, the blood supply may not be sufficient to allow survival of the tissue. In this circumstance, it will turn dusky blue and then blacken, harden, shrivel, and fall away. Unless there is an underlying infection—in which case the obviously dead or dying tissue should be removed—the flap may provide a biologic covering, much like a skin graft, to allow the underlying tissue to proliferate and heal. Since it is difficult to tell which dusky flaps will survive and turn pink and which will deteriorate and “mummify,” it is best to give the flap at least a few days before trimming to see which way things are headed.
If a large chunk of skin is cut away entirely, or avulsed, the wound must either be closed, allowed to fill in as it heals with new tissue, or covered with a skin graft. The first two options are available to you in the field. If fat or muscle is showing and the wound edges will not easily pull together for field closure, the wound should be cleaned carefully, a sterile bandage (see below) applied, and the victim transported to definitive medical care.
TAPING A WOUND CLOSED
To apply tape to a wound, prepare the skin surrounding the cut by drying it thoroughly. Next, apply a thin layer of tincture of benzoin using a cotton-tipped swab, taking care not to get any into the open wound (it will sting like crazy). Push the two sides of the wound together so that they are perfectly opposed, and then lay the first adhesive strip across the wound at the midpoint of its length. Continue to apply strips perpendicular to the long axis of the wound until it is closed. Use diagonal or crisscross strips for extra strength.
If you don’t have an assistant and it is difficult to hold the wound edges together and lay down an adhesive strip at the same time, you can fix a strip to one side of the wound, fix a second strip immediately next to the first one on the opposite side, and then use the two loose ends to pull the wound together (Figure 142). If the strips keep popping off the skin because it is slippery or too much tension is required to keep the edges together, you can run a strip of adhesive tape or duct tape longitudinally along the wound edges on either side of the gash about ¼ in (0.6 cm) away from the opening, and use these as anchors for the crossing strips (Figure 143).
Another method of wound closure using tape, which may be more appropriate for a longer wound, is to cut two strips of adhesive tape 1 in (2.5 cm) longer than the wound. Fold one-quarter of each strip of tape over lengthwise (sticky to sticky) to create a long nonsticky edge on each piece (Figure 144). Attach one strip of the tape on each side of the wound, ¼ in to ½ in (0.6 to 1.3 cm) from the wound, with the folded (nonsticky) edge toward the wound. Using a needle and thread, sew the folded edges together, cinching them tightly enough to bring the wound edges together properly (Figure 145). The tape will stick much better if you first apply a thin layer of benzoin to the skin.
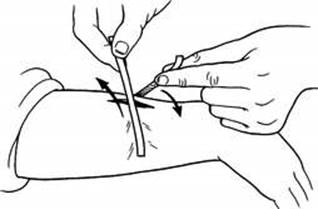
Figure 142 Using opposite-facing tape strips to pull a wound closed.
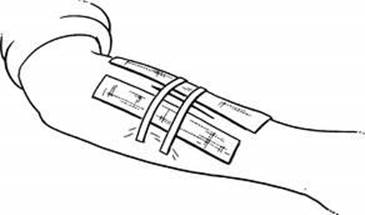
Figure 143 Longitudinal tape strips used as anchors for the cross (closing) pieces.
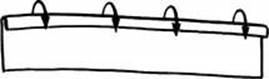
Figure 144 Folding a longitudinal piece of tape to prepare for a suture anchor strip.
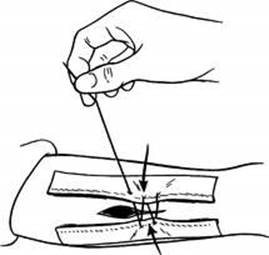
Figure 145 Sewing the tape suture strips together to close the wound.
SEWING (SUTURING) A WOUND CLOSED
In general, it is best to avoid sewing (suturing) a wound closed outside of the sterile environment of the hospital. However, sometimes this is necessary, particularly if the wound is large and cannot be closed with taping methods.
Sutures come in a variety of sizes attached to many different types of needles, depending on their purpose. For an expedition kit intended for use by a layperson, I recommend carrying 3/O monofilament nylon suture (such as Ethilon, Dermalon, or Prolene) attached (“swaged on”) to a large curved “cutting” needle, and 4/O monofilament nylon suture attached to a large curved cutting needle. The 3/O suture is larger in diameter, and should be used to close large wounds on the scalp, trunk, and limbs. The smaller-diameter 4/O suture is used to close smaller wounds on the trunk, limbs, hands, and feet. Although there are other suture types (such as nonabsorbable silk and absorbable synthetics), sizes (thick to so fine [ophthalmic] that it requires a magnifying glass to see them), and needles (such as small curved, and straight), these two suture setups will suffice for most situations in which a layperson might wish to stitch a wound. Ideally, you would use 5/O and 6/O (smaller diameter) suture material on the face, but this is more difficult to manipulate and tie if you—re inexperienced.
The instrument used to push the needle through the skin is a needle holder (Webster-style “needle driver”). It has finger handles like a scissors, and clamps open and shut with finger pressure to hold the needle firmly in its finely grooved jaws. It is held in a certain way to allow the wrist rotation that forces the curved needle through the skin.
The goal of stitching a wound is to bring the skin edges neatly together without excessive tightness, which would be manifested by a wound that is puckered up, and stitches that become buried. Most wounds swell a bit; thus, it is not necessary to cinch them closed with too much tension. After a wound is stitched, it should lie flat.
Wear sterile, nonlatex, nonpermeable surgical gloves if they are available, to avoid a reaction if you are allergic to latex. If you are not allergic to latex, latex gloves may be worn. If sterile gloves are not available, nonsterile gloves are acceptable. The needle should be placed into the jaws of the needle driver so that it can be clamped just behind (toward the suture) the midpoint of the curve (Figure 146). The needle should be oriented perpendicular to the skin and pushed through using a gentle rotating motion at the wrist; this pushes it out into the base of the wound (Figure 147). Then release the needle, reach down into the wound and regrip the needle that has exited into the wound, and pull the needle and suture through the wound until a 2 in (5 cm) tag is left outside the skin (Figure 148). The needle is once again grasped with the needle driver as before, pushed into the opposite side of the base of the wound at exactly the same depth as it entered into the wound on the other side (Figure 149), and rotated out through the external skin surface on the same side (Figure 150). Now you once again release the needle from the needle driver. The ideal suture placement is square or bottle shaped (Figure 151). As shown in this figure, the suture ideally crosses the wound close to its deepest point; slightly above (see Figures 148 to 151) or below (see Figure 151) is acceptable.
To tie a modified square knot, the long end (with the needle) of the suture is looped around the needle holder twice (Figure 152); then the short end of the suture—which was left as a 2 in (5 cm) tag—is grasped and lock-clamped tightly in the jaws of the needle driver (Figure 153). Holding the needle in one hand and the needle driver in the other, lay the double loop down flat against the skin to pull the wound together (Figure 154). To complete the knot, a single loop is thrown around the needle driver in the direction opposite the first (clockwise versus counterclockwise, or “over” versus “under”) (Figure 155), the short end of the suture once again grasped with the needle driver (Figure 156), and the knot pulled tight; cross your hands properly to lay the second loop-tie down flat (“square”) against the first (Figure 157). This process should be repeated three more times for a total of five “throws” to ensure that the knot won’t unravel. Cut the long ends ¼ in (0.6 cm) from the knot.
Place the stitches close enough together (approximately ¼ in [0.6 cm]) so that the wound is closed and there is no fat showing from underneath the skin. A nice way to close a wound is to place enough stitches to bring the wound edges into reasonable approximation and support the tension, and then close the remainder with cloth or paper adhesive strips. Put the first stitch at the midpoint of the wound, then at the midpoints of the remaining segments, and so forth. If you begin stitching at one end and work your way to the other, you run a much greater chance of misaligning the wound edges and ending up with a tear-shaped “dog-ear” that can’t be easily closed; this might force you to remove all of the stitches and begin all over again.
After you stitch a wound, it may ooze blood from the needle holes or the center of the wound. Apply firm, direct pressure with a gauze bandage or cloth for 10 to 15 minutes. To dress the wound, apply a thin layer of bacitracin or mupirocin ointment and an absorbent sterile bandage. Inspect the wound daily for signs of infection (see page 240). If an infection develops, remove a few stitches over the worst area to see if any pus is released. Allowing the wound to drain in one area may allow you to keep the other stitches in place for the normal duration of healing. When in doubt, however, take all of the stitches out and let the wound heal open or under loose approximation with adhesive strips.
Try to keep the wound dry for at least 4 days. Stitches are left in place for 14 days across the joints of the finger and hand, 10 days on the arms and legs, 7 days on the trunk and scalp, and 4 days on the face. After you remove a stitch, you can reinforce a wound with adhesive strips for a week to allow a margin of safety for healing.
If you are going to carry sutures with the intention of sewing a wound, you should have a physician teach you how to suture before you need to do it yourself. You can practice the technique on a pig’s foot, a chicken leg, or even a thick-skinned orange.
To remove a stitch from a healed wound, wash the wound carefully, and then cut the stitch on one side only of the visible knot. (If you cut on both sides of the knot, you may not be able to retrieve the buried portion of the stitch.) Grasp the knot with tweezers and pull the stitch out of the skin. If a crust has formed over the stitch, soften it up by applying moist compresses for 30 minutes before removing it.
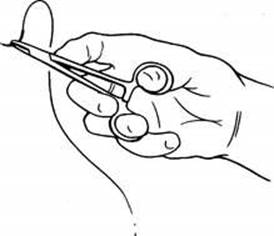
Figure 146 Gripping a suture needle with a needle driver.
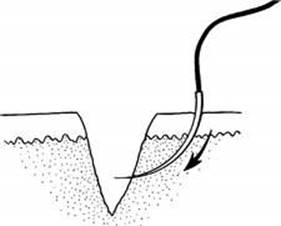
Figure 147 Pushing the needle through the skin and out into the base of the wound.

Figure 148 Pulling the suture through the first side of the wound.
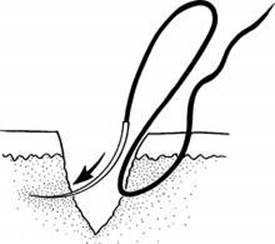
Figure 149 Pushing the needle into the base of the opposite side of the wound.
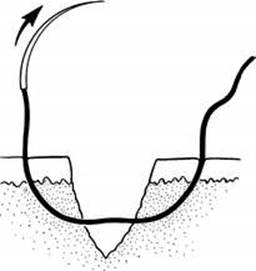
Figure 150 Rotating the needle out through the second (final) side of the wound.
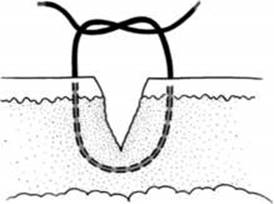
Figure 151 The U shape of proper suture placement.
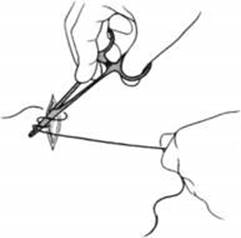
Figure 152 To tie a suture, first loop it around the needle driver twice.
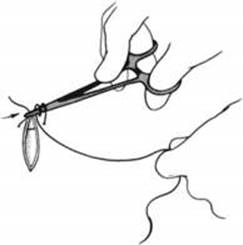
Figure 153 Grab the short end of the suture with the needle driver.
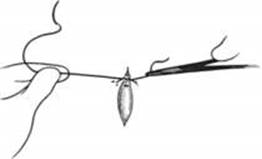
Figure 154 Laying down the first loop of a knot.
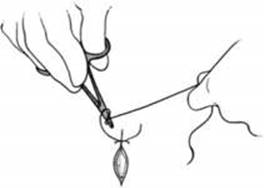
Figure 155 Creating the second loop of a square knot over the needle driver.
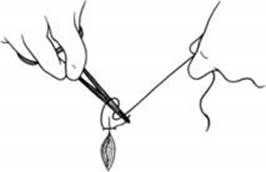
Figure 156 Once again, grab the short end of the suture with the needle driver.
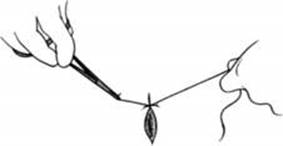
Figure 157 Completing the first square knot.
STAPLING A WOUND CLOSED
An excellent technique for closing relatively straight lacerations on the arm, leg, trunk, and scalp is stapling. A disposable surgical stapler, such as the Precise 5-, 15-, or 25-staple Disposable Skin Stapler (3M Medical-Surgical Division), allows precise placement of stainless-steel staples. The proper technique takes practice! Hold the skin edges together and press the business end of the stapler against the wound closure line, and then squeeze the stapler to discharge a staple into the skin (Figure 158). The recipient feels a quick pinprick. The closure is rapid and sturdy. The staples are left in place for 7 days on the scalp and trunk, and 10 days on the arm or leg. A disposable scissors-handle staple remover or smaller pinch-handle-style staple remover (Precise SR-1, 3M) is used to painlessly remove the staples (Figure 159).
If you are going to carry surgical staples with the intention of stapling a wound, you should receive proper instruction before the journey.
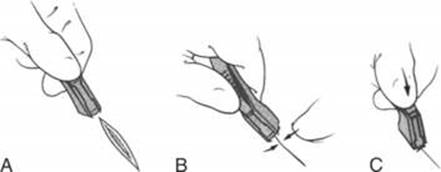
Figure 158 A, Preparing to staple a wound. B, Pressing the surgical tissue stapler against the skin while pushing the wound edges together. C, Squeezing the stapler to discharge the staple into the skin.

Figure 159 Removing a surgical staple.
GLUING A WOUND CLOSED
Tissue adhesives (“glue”), which can be applied in a thin layer on top of a wound (not within the wound) to bond the edges together, have been recommended for superficial cuts. Two examples are 2-octyl-cyanoacrylate (DERMABOND) and n-2-butyl-cyanoacrylate (Histoacryl Blue or GluStitch). The “octyl” tissue glue products are thought to be more flexible than the “butyl” products when dry, but to carry less tensile strength, which is probably not significant for the intended uses. DERMABOND is available in a ProPen applicator that makes this product quite easy to apply. Tissue adhesive wound closure creates a closure that, while not initially absolutely as strong across a highly stressed area, like the skin overlying a finger joint, ultimately results in a similar cosmetic outcome to sewing the skin together. It cannot be used on the eye, inner moist surfaces of the mouth and lips, or areas with dense body hair. Routine tape-strip reinforcement is recommended, and topical ointments should be avoided, as they will weaken the bond between the glue and the skin. After the wound is closed with tissue adhesive, the victim may wash off or shower, but should not soak the wound, swim, or bathe in a tub, because prolonged moisture loosens the bond. Blot, rather than wipe, the area dry. Superglue should not be used to close full-thickness wounds, because it liberates heat when it contacts skin and causes an intense inflammatory reaction.
5. Dress the wound. This is generally done in layers. The first layer is antiseptic cream or ointment, which should be sparingly applied to the surface of the wound, provided that there is good drainage and there are no large, open (deep) pockets in the wound. A thick antiseptic grease seal that prevents drainage may actually promote the development of a deep-space infection. Antiseptic ointment may soften and weaken a tissue glue closure. If an antiseptic is not available, honey applied topically on a wound may reduce infection and actually promote wound healing. It is also useful for infected wounds.
A nonadherent next (inner) layer of a bandage keeps the overlying dressing from sticking. This should be nonstick (preferably sterile) Telfa, or an impregnated (with petrolatum, for instance) gauze. If an antiseptic ointment or cream will prevent adhesion of the bandage, a prepackaged square of fine-mesh gauze can be used, but be advised that the ooze from a wound usually negates the lubricating features of most creams, and allows bandages to stick.
Special wound coverings include Spenco 2nd Skin, an inert hydrogel composed of water and polyethylene oxide. It absorbs fluids (so long as it doesn’t dry out), which wicks serum and secretions away from the wound and promotes wound healing. Other occlusive hydrogel-type dressings are NU-GEL (preserved polyvinyl pyrrolidone in water) and Hydrogel, which can absorb up to 2½ times its weight in fluids exuded from the wound.
The next layer is composed of absorbent sterile dressings, such as dry gauze pads (see “Bandaging Techniques,” page 276). If these are not available, use clean white cloth (the more absorbent, the better). Apply the entire bandage assembly snugly enough to control bleeding, but not to impede circulation (as judged by warm and pink fingers and toes). Keep dressings in place with conforming rolled gauze, which can also allow some air circulation. All dressings should be changed as frequently as they become soaked; if there is no significant drainage, they should be changed daily. If the skin is becoming macerated (wrinkled and pale colored; kept perpetually moist), lighten up on the ointment or cream, and apply a less occlusive dressing, while still keeping the wound protected.
Another technique for relatively “dry” wounds (nonseeping and nonbleeding) is to apply a layer of Tegaderm—a thin, semitransparent dressing material through which a wound can “breathe.” This is also available as a small patch packaged with a short (2 ⅜ in) Steri-Strip in a Wound Closure System (3M).
If you use tape to secure a dressing, you can apply tincture of benzoin to increase the stickiness of the skin. Do not let any benzoin run into the wound—it really stings. When dressings are applied, keep the body part in the position of function (normal resting position) (see Figure 39). Check all dressings daily for soaking, a snug fit, and underlying infection. If you wish to remove a dressing that is stuck to a wound, soak it off by moistening it with warm water or a brief application of hydrogen peroxide. Bandaging techniques are addressed in the next section.
6. Splint the wound (see page 74). For instance, if the injury involves the hand, also place the arm in a sling to minimize motion of the injured part. Movement delays healing and promotes the spread of infection.
7. There is always the risk of infection. If the wound is an animal bite, is of the hand or foot, is a puncture wound, has inadequate drainage, is within the mouth, is deep or complex (e.g., with visible bone or tendon; entering into a joint), is sustained by someone who is immunosuppressed (e.g., human immunodeficiency virus [HIV] infection, diabetes, chronic corticosteroid use), has resulted from a crush injury, or is very dirty (particularly if contaminated with soil)—or if you are more than 24 hours from medical care—the situation carries a high risk for infection and the victim should be treated with an oral antibiotic (dicloxacillin, erythromycin, or cephalexin) until the wound is healed or help is reached. This is also true for any large wound. For a cat (feline) bite, use ciprofloxacin in addition; a physician may substitute cefuroxime or cefoxitin.
8. Seek appropriate medical attention. Field cleansing and dressing are no substitute for proper irrigation, trimming, and wound management undertaken in a medical facility. Small nicks do not require fancy intervention, but if you are in doubt as to the seriousness of the injury, get good advice.
BANDAGING TECHNIQUES
Bandage application is an art form. The only way to become proficient is to practice. There is no inviolable rule other than to avoid excessive tightness, which might compromise circulation. Use square knots to tie bandage ends securely.
A triangular bandage is a three-cornered bandage, usually approximately 42 in (1 m) across the base. A cravat is a triangular bandage folded two or three times into a long strap (Figure 160).
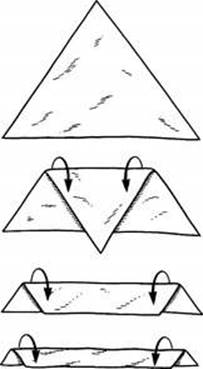
Figure 160 Making a cravat from a triangular bandage.
The following tips should prove useful:
Finger bandage. Fold a 1 in (2.5 cm) rolled gauze back and forth over the tip of the finger to cover and cushion the wound (Figure 161). Then wrap the gauze around the finger until the bandage is snug and not overly bulky. On the last turn around the finger, pull the gauze over the top of the hand, so that it extends beyond the wrist. Split this tail lengthwise. Tie a knot at the wrist, and wrap the two ends around the wrist; tie again to secure the bandage. Another technique involves not splitting the tail, wrapping it around the wrist twice, and then bringing it up over the top of the hand around the base of the finger from the side opposite where it originated, looping it over the hand back to the wrist, and tying it off (Figure 162).
Hand bandage. The hand should be bandaged as if for a fracture, in the position of function (see Figure 39). Take care to place gauze or cotton padding between the fingers to separate and cushion them. Use a simple figure-of-eight wrap across the palm.
Wrist bandage. Begin by wrapping the wrist 2 to 3 times (Figure 163). Continue over the top of the hand, and then through the space between the thumb and fingers, across the palm. Repeat the process in a figure-of-eight pattern until the desired thickness and rigidity is obtained.
Arm or leg bandage. Cover the wound(s) with a gauze pad(s). Overwrap the wound using simple spiral turns of rolled gauze or a figure-of-eight pattern (Figure 164). Secure the bandage with adhesive tape in a spiral pattern to avoid a tourniquet effect. Whenever possible, don’t apply tape directly to the skin.
Thigh and groin bandage. Wrap a 6-inch elastic bandage around the mid-thigh in an inner to outer direction and continue up toward the pelvis (Figure 165). At the groin crease, continue up and around the waist one time. This anchors the bandage. Then proceed back down the thigh to complete the figure-of-eight pattern. If the injury is to the quadriceps (“quads”) or hamstrings (“hammies”) muscles, put additional wraps on the thigh. If the injury is to the groin, alternate wrapping around the hip with wrapping the thigh. Since this is a large bandage, a double-length wrap serves best.
Foot bandage. The foot should be bandaged as if wrapped for an ankle sprain, using gauze instead of elastic wraps (see page 288).
Shoulder bandage. To make a shoulder bandage (Figure 166) from a triangular bandage, lay the base over the shoulder at a downward diagonal across the chest (front and back) with the apex pointed down the arm. Roll or fold the apex back down a few turns to create the beginning of a cravat; tie this just in front of the opposite armpit. Roll or fold the apex up the arm in the same manner until the bandage achieves the desired coverage, and then tie off this smaller cravat segment with the knot visible on the outside of the arm.
Chest bandage. To wrap the chest with gauze, circle the chest and upper abdomen for a few turns. To keep the bandage from slipping toward the hips, bring it up over the shoulder every third or fourth turn. Secure with adhesive tape.
Head bandage. Place the base edge of a triangular bandage just over the eyes (Figure 167). Fold the base edge 1 in (2.5 cm) under to create a hem. Allow the bandage to fall back over the top of the head, with the apex point (tail) dropping over the back of the head. Then cross the other two free corners (at the ends of the hem) over the tail and tie them in a single turn (half of a knot). Continue to bring them around to the forehead and tie a complete square knot. Tuck the hanging tail over and into the half knot behind the head. If more pressure is necessary, tie a cravat directly over a gauze or cloth bandage.
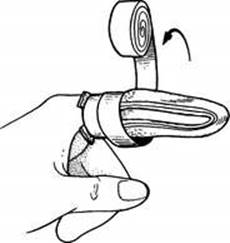
Figure 161 To begin a finger bandage, place layers of gauze over the fingertip.

Figure 162 To complete a finger bandage, wrap the gauze around the finger, and then bring it across the palm and around the wrist to tie off.

Figure 163 Creation of a wrist bandage. A, First, wrap around the wrist a few times. B, Continue across the top of the hand and then in the “web space” between the thumb and index finger. C, Continue back across the top of the wrist, and then (D) continue back over the hand (E) in a figure-of-eight pattern.
(Redrawn from Auerbach PS [ed]: Wilderness medicine [ed 5], Mosby, 2007, p 436.)
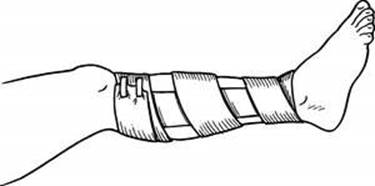
Figure 164 Spiral leg bandage.
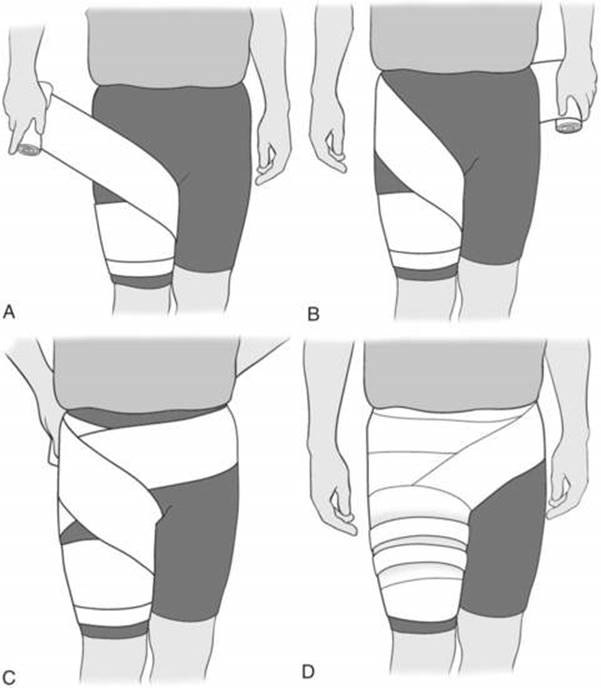
Figure 165 Creation of a thigh and groin bandage. A, Wrap a long 6-inch elastic bandage around the midthigh in an inner-to-outer direction, working upward. B, At the groin crease, continue to wrap around the waist one time, and then (C) wrap back down the thigh. D, Finish by wrapping around the thigh.
(Redrawn from Auerbach PS [ed]: Wilderness medicine [ed 5], Mosby, 2007, p 443.)
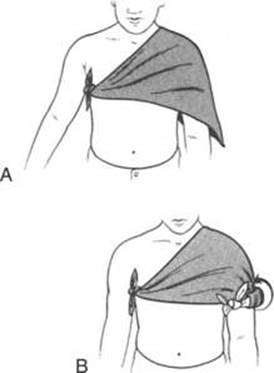
Figure 166 Shoulder bandage. A, Drape a triangular bandage over the shoulder. Begin to form a cravat and tie off in front of the opposite armpit. B, Complete the bandage.
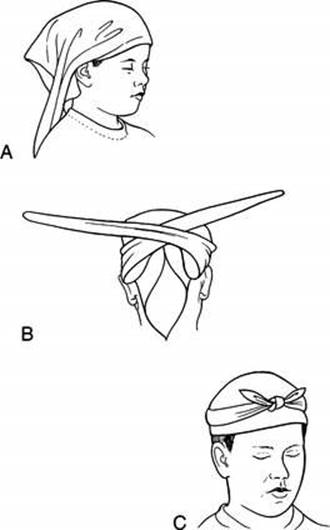
Figure 167 Head bandage. A, Drape a triangular bandage just over the eyes. B, Create a hem and cross behind the head, tying with a half knot to (C) fashion a square knot in the front. Tuck the tail that remains behind the head into the half knot.
Another way to secure a bandage to the side of the head, ear, or chin is to lay a cravat over the wound at the cravat’s midpoint, and then wrap it vertically over the head and under the chin (Figure 168). Cross the cravat on the side of the head at ear level, and wrap the ends in opposite directions horizontally so that one side loops across the forehead. Tie the knot behind the ear.
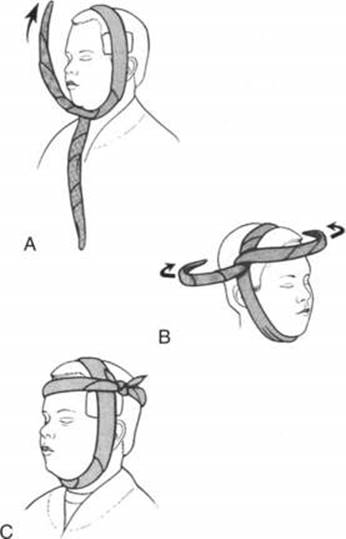
Figure 168 Securing a bandage to the side of the head. A, Lay a cravat over the wound. B, Cross the cravat and (C) tie it off behind the ear.
Eye bandage. See page 183.
WOUND INFECTION
Despite your best efforts, a wound may become infected. The most common bacteria that cause wound infections are Staphylococcus aureus and Streptococcus pyogenes. The common signs of an infection include redness and swelling surrounding the wound, pus or cloudy discharge (pink, green, or cream colored), a foul odor (this is variable), fever, increased wound tenderness, red streaking that travels to the trunk from the wound, and swollen regional lymph nodes (see Figure 126).
If a wound is infected, its edges should be spread apart to allow the drainage of any pus. To do this, you need to remove some or all fastening bandages (such as butterfly bandages). The wound should then be irrigated copiously and dressed with a dry, absorbent, sterile bandage without bringing the wound edges tightly together. Begin to apply warm, moist compresses, using disinfected water, to the wound at least four times a day; also begin the victim on an antibiotic (dicloxacillin, cephalexin, or erythromycin). For a cat bite, use amoxicillin-clavulanate, cefuroxime axetil, azithromycin, clindamycin plus ciprofloxacin, or penicillin plus dicloxacillin. For a wound incurred in ocean, river, or lake water, administer ciprofloxacin or trimethoprim-sulfamethoxazole as an additional antibiotic.
If a wound infection is advancing, the victim should be brought rapidly to a physician. If you see gas bubbles in a wound, if it is draining foul reddish-gray fluid, and/or if there is a feeling of “Rice Krispies” (crepitus) in the skin surrounding a wound, it may be the onset of gangrene. This is a life-threatening infection and requires immediate advanced surgical attention.
ABSCESS (BOIL)
See page 241.
SCALP LACERATION (CUT ON THE HEAD)
See page 65.
FISHHOOK REMOVAL
See page 476.
SPLINTER REMOVAL
See page 477.
BLISTERS
See page 247.