
Qi Gong Massage and Other Forms of Body Therapy
Massage, whether done solo, with a partner, or by a professional massage therapist, offers the energy of acupuncture, the serenity of meditation, and the spiritual refreshment that comes through being touched. Massage is an important part of your everyday health care routine. Just as you strive to integrate the dietary guidelines from chapter 8 and the exercise/meditation guidelines from chapter 10 into your daily self-care habits, so should you make room for massage as part of the routine you follow to strengthen your immune system and maintain your balance.
In this chapter, we look at Chinese Qi Gong self-massage, self-acupressure, self-ear acupressure, Shiatsu for partners, and Western Reflexology for the foot and hand to do with a partner or by yourself. There are many other forms of massage—such as deep tissue, lymphatic drainage, and Swedish—each valuable for restoring harmony. Although these forms of massage are not presented in detail in this book, you may want to explore them. They can be integrated into your comprehensive programs for preventive care and/or to treat disharmony.
In addition to massage, this chapter offers soaks, saunas, and compresses, to be used for deep muscle relaxation, stress reduction, and pain relief, in conjunction with massage or by themselves.
QI GONG MASSAGE
Qi Gong massage is an extension of Qi Gong exercise/meditation. Among the more skilled masters of the art, self-massage can be done with the mind, moving Qi and Xue through the Channels, relaxing muscles, and massaging Organ Systems mentally. For the rest of us, manual Qi Gong massage—done on ourselves or with a partner or practitioner—is an important part of any preventive health care program, because regular massage helps nourish the mind/body/spirit and maintains harmony in all systems.
WARNING
It is best if you do not perform self-massage or have a massage done to you on any area where you have a skin eruption, a localized infection, swelling, or localized malignancies, or where you’ve had very recent surgery. Pregnant women should have massage on the abdomen and torso only from a professional massage therapist.
If you exercise three or more times a week, go through the complete Ten Step Qi-Xue Self-Massage once a week. Use the specific self-massage routines for hand, ear, head, or foot as you feel the need.
If you are sedentary, have an injury that’s preventing you from exercising, or simply find you’re stuck at a desk and cannot exercise for a given period of time, do the foot and head massage every other day and practice the Ten Step Qi-Xue Self-Massage once or twice a week. You will help prevent the formation of disharmonies in the flow of Essential Substances and consequent problems in the Organ Systems.
The benefits of Qi Gong massage include working on the Channels to improve circulation of Essential Substances, particularly Qi and Xue; dilation of the blood vessels; stimulation of the lymph system and elimination of wastes and toxins; improved muscle tone; relief of stress and promotion of relaxation and sleep—and it just makes you feel good.
Ten-Step Qi-Xue Self-Massage
Based on the flow of the Essential Substances through the Channels and Organ Systems, this massage series provides you with a complete relaxation and rejuvenation routine. You may use all or any part of it any time you feel the need of a little repair work and a bit of TLC.1
Establish a slow, rhythmic pattern of breathing while doing self-massage. Inhale slowly for the count of three and exhale slowly for the count of six. As you become more comfortable with this entire series of exercises, try to inhale every time you change the position of your hands and exhale while you massage yourself. The count will give you an even tempo.
STEP ONE: GENERAL HEAD MASSAGE
Massage promotes general relaxation and the harmonious flow of Qi and Xue. It is particularly good if you are suffering from chronic sinusitis, respiratory allergies, temperomandibular joint disorder (TMJ), headaches, and anxiety or depression.
Using your middle fingers, massage the bridge of your nose on both sides. Complete five circular rubbing motions, moving from the top to the outside, down toward your nose, and then into the point above the inside corner of your eye.
Move your hands up from the bridge to the top center of your forehead.
Spread your hands apart, with the fingers of your right hand moving down to the right temple and fingers of the left hand moving down to the left temple. Massage the temple in a circular motion five times.
Move your hands up to the top of your head and bring them down to your neck. Rub the back of your neck up and down, along the tendons that extend on either side, five times.
Move your hands to the outside of the neck until you can feel the lower point of your jaw joint. Rub that five times.
Now move your hands back to the bridge of your nose and in a smooth motion trace the outline of your eyebrows to your temple and then move your hand down to the hollow of your cheek. Repeat this motion three times.
Slowly rotate your head around, stretching your neck so your right ear is almost touching your right shoulder. Then slowly shift your head to the front so your chin is touching your chest. Then swing your head to the left so the left ear is almost touching the left shoulder. Now move it slowly toward the back. Look up at the ceiling. Repeat three times, then reverse direction and repeat again.
STEP TWO: EYE MASSAGE
To improve the circulation of Qi and Xue and improve visual clarity, you want to direct Qi to your eyes.
Place your index and middle fingers on the inside points of your eyebrows. Massage in a circular motion five times.
Move your fingers to the outer corner of your eyes and rub gently.
Move your fingers down from the corners of your eyes to the top of your jawbone. Then move the fingers slowly down the length of your lower jaw until they almost meet at your chin.
Place your palms together and rub them back and forth across each other until they become quite warm. Cup your hands over your eyes to share your hand Qi with them. Do not touch your eyes.
STEP THREE: GENERAL EAR MASSAGE
Use of general ear massage tonifies the whole body—every Organ System, the joints, and all body parts—and keeps your hearing healthy.
If you are wearing large earrings, take them off. Using your two middle fingers, gently rub around the entire ear several times.
Place your thumbs inside your ears and your fingers along the widest part of the ear flap. Now pull gently outward so the thumb moves from the inside to the outer edge of the ear. Hold for a count of three. Repeat three times.
Take each ear lobe between your thumbs and forefingers and rub gently, pulling downward.
Place your palms over your ears and massage the entire ear. Repeat five times.
Press your palms against your ears and then remove quickly.
Shake out your hands and fingers. Sit quietly for two minutes.
STEP FOUR: NECK MASSAGE
This moves Qi and Xue along the spine.
Sit with your back straight and your head tipped ever so slightly forward.
Place your hands together in a prayer position. Open your fingers and then curl your fingers, allowing them to interweave. Spread your palms apart so your fingers are lying across the backs of your hands and both palms are parallel to the floor.
Place your hands like a cradle against the back of your skull. Your thumbs should be pointing straight down on either side of your neck.
Massage the tendons beneath your thumbs from top to bottom. Repeat five times.
Raise your thumbs up slightly to catch the point at the base of your skull where the bone meets the neck. Rub back and forth along this ridge. Go very slowly, probing the area, feeling where you want to apply more or less pressure. When you find the spot that is particularly tender to the touch, hold your thumb there for a slow count of six. Exhale while holding the point. Repeat as many times as you like.
STEP FIVE: TORSO MASSAGE
This step and the following one are important for anyone who wants to keep the Lung System clear and the Heart Xue flowing smoothly. The steps are particularly helpful for digestive problems, asthma symptoms, and congestion.
Open your palms. Place them on the front of your neck. Moving your hands from your neck to the front of your body, glide over your chest with long smooth strokes of your open palms. Repeat several times.
Cross your arms. Using your first and second fingers, massage a point about 2 inches (5 cm) above the center of each nipple. Circle your fingers on the right hand over your left nipple; your left hand over your right nipple. You may feel your lungs open up.
Placing your palms flat on each side of your torso (left hand on left side, right hand on right side), move the Qi (from the point above your nipple that you just massaged) to the side and bottom of your lungs. Massage in a smooth flat motion to the side of your torso and then down to your diaphragm.
STEP SIX: QI UP, QI DOWN
Place the tips of the fingers of your right hand on the pectoral muscle by the crook of your left arm.
Move your fingers in a circular motion, tracing a 3-inch (7.5 cm) circle from the top of your chest moving inward, down, to the outside and back up to the top. Repeat this, creating a spiral shape vertically down a line through the nipple. As you go in this direction (only!) move your hand down the full length of your torso.
Repeat the massage using the tips of your left-hand fingers on the right side of the torso. Make sure that you move your fingers from the top of your torso, toward your breastbone, then to your toes, and finally toward your arm.
STEP SEVEN: ABDOMINAL MASSAGE
This technique is helpful for anyone with digestive problems, PMS, or cramps, and it helps harmonize the Large Intestine, Small Intestine, Liver, Spleen, Stomach, and Gallbladder. You may want to use oil infused with cinnamon to warm your belly if it is generally Cold during your period or if you have loose stools and abdominal cramps due to Cold.
Lie on a flat, firm surface. If needed, place a small pillow under your knees to take strain off your lower back.
So there is less distraction, close your eyes halfway. Inhale slowly and deeply.
Place your right palm on your stomach, above your navel, with your thumb lying against the skin pointing toward your chin. Place your left hand so it is on top of the right. Breath in and out slowly, feeling the warmth under your hands. (If you are left-handed, place your left hand on your stomach first.)
Rub your stomach gently in a clockwise motion. Repeat twenty to forty times.
Raise your hands up to the lower edge of your rib cage on either side of your torso. Smoothly massage down the length of your lower torso into the pelvic area and the groin. Repeat five times.
Now move your hand to the center of your abdomen below your navel. Repeat the motion as above.
Sit facing forward; inhale. Turn your head and neck, but not your torso, and look over your left shoulder. Exhale. Now inhale as you turn your head and neck and look over your right shoulder. Exhale.
Take your right hand and place it along your waist on the left side of your body. Inhale. As you exhale slowly, move your palm forward along your waistline toward your navel. Reverse.
With your palm open and flat, rub the front of your lower torso over your hip bones and down onto the tops of your thighs. Use one long, slow motion.
Return to the first position with your right hand over your stomach and your left hand on top of the right. Slowly, gently, rub in a clockwise motion for the count of six. Breathe in on the count of three and out on the count of six. Keep your eyelids at half-mast.
STEP EIGHT: CIRCULATING THE LOWER QI AND XUE
To promote harmonious flow of Qi and Xue, a complete massage keeps the motion going from your head through your feet in a complete cycle. (If you aren’t going to give yourself complete massage but are stopping after the abdomen, take time to do a couple of leg swings and stretches given in the Qi Gong exercise chapter starting on page 175. If you are going to complete the massage cycle, remain seated with your feet flat on the floor about 8 inches [20 cm] apart.)
Sit on a firm, un-upholstered, but comfortable chair without arms. Sit with good posture, but not stiffly. Rub your inner thighs with the same circular motion that you applied to your torso, always moving in a circle that goes from the top of the thigh (twelve o’clock), down the outside toward nine o’clock, and up through six and three o’clock. Spiral down your thighs to your knees. Repeat three times.
Using your thumbs, press gently but firmly on the top center of your thighs and draw your thumbs down to your knees. If you feel any tender spots, stop at that point and gently vibrate your thumb back and forth. Repeat three times.
When you come down to the top of your knees for the last time, hold your thumbs in place and put your fingers across the center of the kneecaps. Rub gently. Then rub your hands down the outside of your calves, from top to bottom (but not back up) five times.
Cross one leg over the other so your calf is in easy reach and lying parallel with the floor.
Place your fingers in the ridge that is formed between the near side of your shin bone and the calf muscle. Slowly move your fingers down from your knee to your ankle. Press with a firm steady motion. If any point is tender, move your fingers in a circular motion on the point. Go from the top to the bottom. Repeat as desired with your other leg.
STEP NINE: GENERAL FOOT MASSAGE
In Chinese medicine, the feet play a crucial role in the functioning of the Channels. They are also associated with the harmonious balance of the Organ Systems and Essential Substances.
To help promote smooth flow of Qi and Xue and keep the Channels working smoothly, you can give yourself a general foot massage, rubbing each part of the foot, starting with your ankle and ending with your toes. Devote extra effort to rubbing your toes and pay attention to the areas between your toes and between the long, thin bones that run along the top of your foot. Foot massage oil can provide an extra soothing touch. Use peppermint-infused oil if you are Hot, and use cinnamon-infused oil if you are Cold.
As you rub your feet, you may want to target several acupuncture points for acupressure. Particularly important points to rub include:
Kidney 1: Directly in the center of each foot right below the ball is an important point to help keep the Kidney System working harmoniously, which impacts the functioning of all the other Organ Systems.
Spleen 4, Liver 3, and Gallbladder 41 are also important foot points to help harmonize Qi and the Organ Systems. (See the illustration on page 206 for their locations.)
STEP TEN: ARM AND HAND MASSAGE
After your arms and hands have worked hard massaging the rest of your body, it’s their turn to be pampered.
An arm massage should be done from your shoulder to the tips of your fingers in long, slow strokes along the inside and the outside of your biceps and forearm. Rub between or along the bones, rather than on top of them.
After you extend the Qi through your arm, return to the acupuncture point, Large Intestine 14, at the outside of the biceps below the armpit, the crook of the elbow, and the back of the wrist. On these points, press slowly and evenly. Breathe deeply.
A general hand massage can be done with your thumb moving in a gentle clockwise motion from your wrist to your fingertips, concentrating on the tissue between the bones and the areas around the knuckles and fingertips.
Once you’ve covered the entire surface of the hand, pull each finger out gently and rub the last section of your finger at the tip. Shake out your hands.
ACUPRESSURE MASSAGE
Acupressure massage uses the thumb and hands to stimulate the acupuncture points along the Channels. If you are massaging someone else, to gain maximum effect without hurting yourself or straining your hand, use the following guidelines:
• Work the points with the soft, padded part of your thumb—where your thumbprint is.
• Press down firmly and smoothly.
• Don’t jab or stab at a point.
• Always brace your thumb with the rest of your hand and fingers. For example, if you are massaging a point on your thigh, place your hand flat along the skin. Move your thumb into position, leaving the rest of your hand in contact with your leg. Press with your thumb. For more pressure or better leverage, don’t pick up your hand. If you are massaging someone else, raise yourself up over her or him and press downward. If you are massaging yourself, lean into the pressure.
For Alertness
Stomach 36 is located four finger widths from the hollow made when the knee is bent (below the kneecap) on the outside of the leg and one finger width over from the crest of the shin bone. Stimulating this point is also good for digestive problems, boosts energy, and is said by the Chinese to help strengthen the immune system. Stomach 36 was known in the old days as Three Miles, because when people hiked or walked to the point of exhaustion, if they stopped and rubbed that point, they were able to go 3 miles (4.8 km) more.
WARNING
Do not stimulate Large Intestine 4 when pregnant.
Large Intestine 4 is located in the webbing between the thumb and index finger. Press into the hollow against the bone from the index finger that extends down the length of the back of the hand. This point is also good for any problems above the neck, such as sinus problems and headaches. It is also beneficial for general inflammation, constipation, and diarrhea.
For General Health and Immune System Support
Stomach 36 is located four finger widths from the hollow made when the knee is bent (below the kneecap) on the outside of the leg and one finger width over from the crest of the shin bone.
Large Intestine 4 is located between the thumb and forefinger in the middle of the forefinger bone that goes from the knuckle to the wrist.
Liver 3 is located at the point where the bones of the big toe and the second toe meet and form a V. The point is slightly in front of their junction.
Lung 7 is located 1 1/2 inches (3.8 cm) above the transverse wrist crease on the back of the hand. It is above the large bump on the outside of the wrist bone.
Kidney 3 is located on the inside of the ankle in the depression between the tip of the ankle bone and the Achilles tendon.
WARNING
During pregnancy, acupressure and acupuncture should be received only from a practitioner skilled in management of pregnancy.
For Low Back Pain
Kidney 3 is located on the inside of the ankle in the depression between the tip of the ankle bone and the Achilles tendon. This is also good for immune support.
Urinary Bladder 60 is located midway between the ankle bone on the outside of the leg and the Achilles tendon, opposite Kidney 3.
Urinary Bladder 40 can be found in the center of the back of the knee. Points across the back of the knee correspond to the lumbar (lower back) vertebrae, so massage the entire crease. It is also good to massage down from Urinary Bladder 40 to Urinary Bladder 60.
Du 26 is located one-third of the distance between the bottom of the nose and the center of the top lip, in the slight indentation. This is known as the emergency point, and it is used if someone loses consciousness. For acute back pain, stand up and hold on to the back of a chair with one hand. With the other, press relatively hard on the point with your fingernail while you move the back gently in and out of the area of pain by swaying your hips and torso.
Pericardium 7 is in the middle of the wrist crease on the inside of the arm. It is also good for irregular heartbeat and tachycardia.
For General Pain
Pericardium 6 is located on the inside of the wrist three finger widths above the wrist crease, between the two bones. Also good for anxiety, nausea, and morning sickness.
Pericardium 6 with Triple Burner 5. Triple Burner 5 is located three finger widths above the wrist crease on the top of the arm between the two long arm bones. Press Triple Burner 5 and Pericardium 6 at the same time for extra relief. This is good for carpal tunnel problems. These points are regulating points, and they enhance overall calmness.
Ren 17 is located between the nipples at the center of the chest. It is used to release grief and improve breath by regulating Zong Qi. It is also the area that holds the Ancestral Qi.
Yintang is located between the eyebrows in the center of the bridge of your nose. It is used to ease pain and release tension. It is good for headaches and overall relaxation.
For the Shoulder
Triple Burner 4 is found on the top side of the wrist at the midpoint of the wrist crease, between the two arm bones.
Triple Burner 5 is located three finger widths above the wrist crease on the top of the arm between the two long arm bones.
Small Intestine 3 is located in the indentation below the little finger knuckle on the outside of the hand. It is good for the neck and shoulders. If you have a stiff neck, rotate your neck in and out of the area of stiffness while pressing the point. It is also good for clearing the mind.
For the Mid-Back
Liver 3 is located at the point where the bones of the big toe and the second toe meet and form a V. The point is slightly in front of their junction.
Gallbladder 40 is in the hollow indentation just to the front of the outside ankle bone.
For Gynecological Problems
Spleen 6 is located four finger widths above the tip of the inside ankle bone behind the shin bone.
Ren 4 and 6: Divide the line that runs from the navel to the pubic bone into five equal sections. Ren 4 is three sections below the navel. Ren 6 is one and a half sections below the navel.
Deep Touch Head Massage
To ease tension, calm the Shen, and stimulate the harmonious flow of Xue, you may want to perform a Deep Touch Head Massage. Use your two middle fingers or thumbs. Always move your hands upward and to the outside, down to the low point, and then upward along the inside. This massage is also effective for smoothing out wrinkles produced by tension.
First, wash your face with a mild cleansing solution. If you like, apply a gentle cream or oil that will not irritate your eyes.
Begin on the eyebrows (Point 1) and run your thumbs slowly and evenly the length of the brow from the inside to the outside.
Move to the lower orbit and rub around each eye, along the bone, moving from the outside, underneath to the inside, and then to the top of each eye.
On your cheek, target the four points on the diagram on page 201 and gently move your fingers out from those points to the edge of your ears. Repeat five times.
On your jaw in front of your ear at Stomach 7, rub downward to Stomach 6 and then along the jawline to your chin. Repeat three times.
Massage your ears by starting at the lobe, working your way around the rim, and moving into the center and then back out to the rim.
Move your two middle fingers to the center of your forehead at the hairline. Rub your right hand clockwise and your left hand counterclockwise.
Move to your neck at Gallbladder 20 and Urinary Bladder 10. Press gently and firmly on those points for the count of five. Release. Rub with your fingers flat, moving your hands in a circular motion.
Moving your hands around to the tops of your shoulder blades (Gallbladder 21 and Triple Burner 15), rub smoothly and deeply.
Lie back with eyes closed and keep your breathing slow, steady, and deep.

Lower Back Self-Massage
Much low back pain comes from Stagnant Qi and constricted muscles and tendons. This massage allows you to gently stretch them out and ease discomfort.
Sit on a chair with your feet flat on the floor about 6 inches (15 cm) apart.
Inhale. Roll your chin down to your chest as you exhale. Bend your back and drop your shoulders forward as you inhale. Continue downward until your chest is resting on your thighs as you exhale.
Make two fists. Bring your hands up behind your back.
Make circles with your hands all over your lower back.
Press deeply along the spine as far up as you can reach.
With loose fists, pound lightly along your lower back and hips and on either side of your spine. To increase the benefits, use the pounding motion to massage Large Intestine 4, an acupuncture point that is located in the webbing between the thumb and the index finger. Stimulating this point helps invite the low back pain to move downward from the back and disperse.
Let your arms and hands dangle at your sides.
Slowly roll back up, using your arms to help by walking them up your legs. Keep your chin tucked in and upper back rounded until you are sitting upright. Then let the spine straighten from the bottom up.
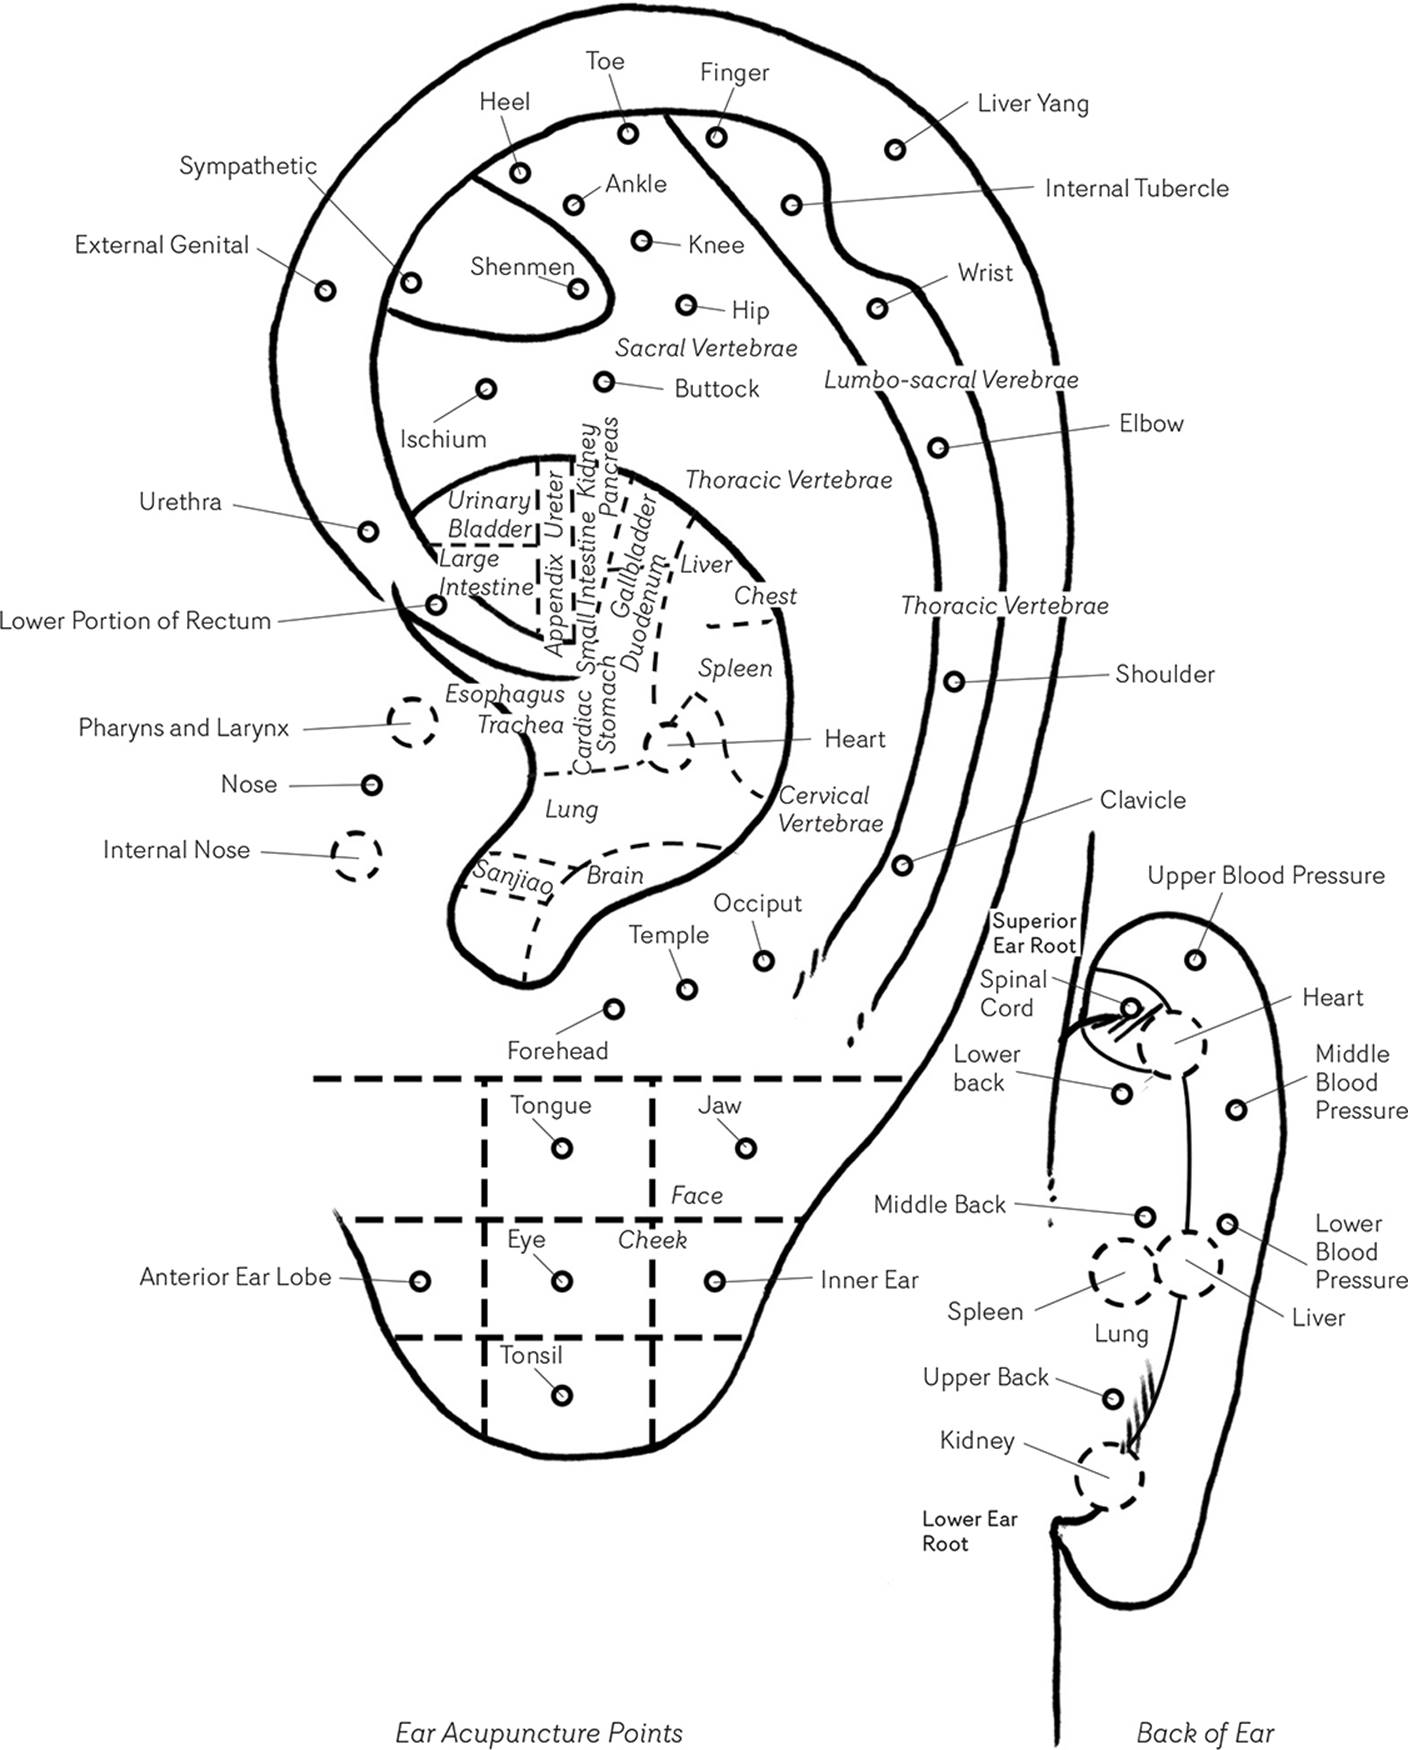
Amazing Ear Massage
If the eyes are the windows to the soul, then the ears are the road maps. Located in the external part of those two little organs are acupuncture points that provide a direct route to all of the important functions of the mind/body/spirit.
Ear acupuncture points can be as powerful—or even more so—than points located on the Channels. For example, the three “no smoking points,” known as Shenmen, Sympathetic, and Lung, are extremely effective in promoting nicotine detoxification.
To rub ear points, you may use your finger or a cotton swab or you can purchase an ear massage probe online or at a natural health store. Don’t worry about touching other points. You’ll be able to tell when you’re in the right position. Ear points become very sensitive and tender when there is a disharmony in the corresponding part of the body.
Shiatsu Partnered Massage
Japanese Shiatsu works by exerting deep pressure on the acupuncture points of the body, and it can be used to harmonize the Essential Substances and the Organ Systems and to relieve muscle pain and tension. (Acupressure massage is explained on page 197.)
The Shiatsu massage described here is adapted from the Shiatsu form I was taught by my wonderful teacher, Koichi Nakamura, O.M.D., L.Ac., in New York City in the early 1970s. That is where I began my forty-year practice of Asian medicine. For several years, I taught this form to acupuncture and Shiatsu students as part of their school curriculums. Over the years, I adapted the form to encompass new ways of teaching and new methods.
The following massage cycle provides a complete stimulation of all the Channels. You may extract sections from it to address specific body parts or enjoy the whole. A complete massage should take about fifty minutes. When you’re through, you’ll discover that it is as beneficial for the person doing the massage as it is for the person receiving it.
Proper breathing is important for both the person giving and for the person receiving the massage. Long, slow breaths with even slower exhalations help tranquilize the mind/body/spirit and assist in the smooth flow of Qi.
PREPARE FOR MASSAGE
Have the person receiving the massage lie on his or her stomach on a comfortable but firm surface, such as an exercise mat or plush carpet. Do not do this massage on a bed (which is too soft) or standard massage table.
BEGIN MASSAGE
The person who’s giving the massage kneels at the person’s left side, waist high.
Spinal stretch: Place your right hand on the lower back of the person, with your fingers pointing toward her or his toes. Place your left hand on the upper part of the back, with the heel of your hand just below the vertebra that protrudes below the bottom of the neck, at the top of the spine.
Gently rock the person’s body from side to side. Then, holding your right hand in place, stretch the spine upward by softly applying an upward pressure to the heel of your left hand. Continue gently rocking the body as you stretch the spine.
Now move your hands so that your right hand is on the person’s right hip and your left hand on their left shoulder blade. Stretch and rock. Then reverse sides and repeat.
Move your left hand, palm down, to the area between the shoulder blades and place your extended right hand, palm down, on top of your left hand.
Raise up slightly on your knees for more leverage and begin pushing around—but not directly on—the spine as you move your hand down toward the lower back. Work down to the tailbone and back up.
Leave your left hand between the shoulder blades and place your right hand on the tailbone and do another spinal stretch while gently rocking the body.
Leg stretch: Have the person adjust the legs so the toes are pointing slightly inward. Place your left hand on the back of the right leg along the crease between the thigh and the buttock. Cup your right hand over the right heel. Stretch the leg and rock it gently. Repeat on the left leg. Again, raise up on your knees if you need more leverage or to apply more pressure.
Back to the back: Now the person giving the massage should stand up and straddle the person receiving the massage, placing his or her feet alongside the person’s hips and facing forward. Never sit on the person because it constricts blood flow and tightens muscles. Bending over the person, use both hands to press down on the area just to the right and the left of the spine. Don’t press directly on the spine. Work the inner and outer Urinary Bladder Channel (see page 206).
Now slip your hands under the person at the hip bones and gently raise her or him up a little bit off the floor. Release the person and then press down gently on the sides of the back up from the hip bone.
Use your thumbs, supported by your fingers, to press and release as you massage out from the spine over the back above the hip bone.
Move the thumbs to press along the length of the tailbone. Then go to the buttocks and smoothly press along the outside, the middle, and the inner section of each cheek from the lower back to the top of the thigh.
Take a break, shake your hands, and do several shoulder shrugs.

ARM MASSAGE
Now move the person’s left hand up behind him or her so the back of your hand is resting against the lower back.
Take your thumbs and, beginning with the lower back, press them into the area between the spine and the ribs. Move up toward the left wing bone. Press with your thumb or thumbs in the area below and under the wing bone. Slip the edge of your hand under the bone and pull the wing bone up and out.
Find the point in the middle of the wing bone where there is a slight indentation. Press firmly but gently on that spot.
Move the person’s left arm so it is horizontal to the body. Holding his or her wrist in both hands, gently pull the arm out from the shoulder, shaking it slightly. Let the arm lie flat, extending it in a comfortable position out from the body.
Massage the upper left arm using both of your hands. Then hold the left wrist in your left hand and use your right thumb to massage down the Triple Burner Channel (see page 164). Then use your thumbs to work on the Large Intestine Channel (see page 163).
Bend the arm and locate Large Intestine 11 at the spot on the outside of the arm where the crease from bending the elbow ends (see page 206). Massage. Then work down the forearm with both of your hands.
Flex and extend the wrist. Work Large Intestine 4 (see page 206).
Turn the person’s hand over, and using both thumbs, rub the palm of the hand from below the fingers to the wrist.
Pull and slightly twist the fingers.
Shake out the wrist and arm.
Move to right side of the person and repeat on the other arm.
LEGS AND FEET MASSAGE
Kneel at the person’s left side. Make sure her or his toes are pointed slightly inward.
Put your left hand under the person’s right knee and lift it up slightly. Place your right hand flat on the back of the knee and press gently, massaging the crease at the back of the knee.
Work the right calf with both hands, combining your thumbs and the flat of your hand.
Concentrate on Kidney 3 and Urinary Bladder 60 (see page 206).
Lift the leg and support the knee while turning the foot out. Place your right hand on the person’s ankle. Use your left hand to rub the length of the Gallbladder Channel (see page 167) between the muscle and bone along the outside of the leg.
Then stretch the calf with one hand on the back of the knee and the other on the heel.
Switch to the other leg.
Sit cross-legged at the person’s feet and place the feet in your lap.
On the right foot, press on Kidney 3 and Urinary Bladder 60 (see page 206). Then work the heel with both of your thumbs and move down to the center of the foot, through the arch. Stop at the big toe and massage the area and Stomach 41 (see page 206). Move to the top of the foot and work the spaces between the bones and tendons, Liver 3 (see page 206). Massage the toes and pull out gently from the foot.
Rotate the foot to stimulate the ankle. Then slap the bottom of the foot and stretch the foot one more time. Let the feet rest gently on the mat.
Massage the other foot.
SHOULDER AND NECK LIFT
Have the person flip over onto his or her back. Place a small pillow under the person’s knees to ease tension on the small of the back if necessary. Kneel or sit cross-legged at his or her head.
Place your hands under the person’s shoulders along the shoulder blades. Draw the fingers of your left hand up along the person’s spine to the head. Hold the head with your fingers resting on the bony ridge at the top of the neck and the base of the skull.
Use your right hand to massage the neck.
Rub Du 15, Du 16, and Gallbladder 20 with your left hand and thumb at the base of the skull (see page 206).
Cradle the person’s head in both of your hands and turn it slowly from side to side and back and forth. Ask the person to inhale deeply. Then as he or she exhales, take the head and neck and ever so gently move it up and forward, stretching the back of the neck and moving the chin onto the chest. Release down slowly and carefully. Repeat.
HEAD, EARS, AND FACE MASSAGE
With the person’s head resting on the mat, move your hands to the ears and begin scratching lightly all around and behind. Then using your thumb and index finger, work the ear from the outer rim into the well. (For more extensive ear massage information, see page 202.)
Move to the scalp, rubbing vigorously. When you are finished, pull the hair gently.
Place one hand under the head, holding the lower part of the skull. Place your other hand so it is grabbing the person’s chin. Gently pull the head out from the neck. Hold for a few seconds. Release gently. (For a detailed face massage, see page 200.)
ABDOMEN MASSAGE
Rub the Ren Channel, starting at Ren 17 on the breastbone between the nipples (see page 40). Move to the ribs above the breastbone, using your thumbs to move from the center outward on both sides of the chest. Work Lung 1 and Lung 2 (see page 206).
Rub the stomach above the navel with both of your hands going clockwise. Use a rocking motion, alternating between the fingers and the heel of your hand. Move your hands down to the area below the navel. Focus on Ren 4 and Ren 6 (see page 40).
Hold your hands about 1 to 2 inches (2.5 to 5 cm) above the hara (or Dantien) area. Feel the flow of Qi.
LEGS MASSAGE
Sit along the left side of the person. Starting at the top of the thigh, take the left leg in both of your hands and work your thumbs down the leg toward Stomach 36 (see page 206). Bend the person’s left leg and draw his or her knee over toward your lap. Do not force it.
Use both of your hands and thumbs to work the Liver Channel that runs along the inside of the leg. Work Liver 8 and Kidney 10 along the calf (see page 206).
Straighten the leg out and squeeze along the top of the thigh to the knee. Massage the kneecap.
Move both of your hands alongside the shin bone, working the points on either side of it from the knee to the ankle.
Repeat on other leg.
FINISH
Help the person sit up.
Stand behind him or her so your knees support the back.
Lean over and work your thumbs into the tops of the shoulders. Remember to brace your thumbs with your hands; don’t jab. Then squeeze along the shoulders, working from either side of the neck out to the shoulders and down the arms, squeezing all of the time.
Pound the back and shoulders with your fist or open hand.
Breathe deeply, and shake out your hands.
Say thank you to the person.
WESTERN MASSAGE TECHNIQUES
Self and Partnered Hand Massage
Hand reflexology is a Western form of hand massage that correlates specific parts of the hand to internal organs and body parts as they are described in Western medicine. All hand massage can be done to yourself or by a partner.
To massage your hand using reflexology points, identify the location of your disharmony or disease in terms of Western anatomy and find the corresponding area for that body part on the chart. For example, if you hurt your knee jogging, use the hip and knee area on the chart. If you have irritable bowel syndrome, use all of the colon areas. If you have headaches, use the head area on the chart. If you have uterine cramps, use the womb area on the chart.
Use your thumb to rub the appropriate spot and use your fingers to hold the hand firmly but gently. Press with your thumb gently until you feel sensitivity, pain, or tenderness. Using the flat part of your thumb, draw it across the spot, rotating it gently in a clockwise motion. To use two thumbs, place them side by side on the appropriate area of the hand and draw them out and down in opposite directions, rubbing one in a clockwise and the other in a counterclockwise motion.

A REMINDER
For serious medical conditions, use these techniques in addition to medical treatment.
Self and Partnered Foot Massage
Reflexology also has a system of foot massage that has identified specific points on the foot that correlate to specific internal organs and parts of the anatomy. To massage your foot using reflexology points, use the same technique as describe earlier for hand reflexology.


HOT SOAKS, COMPRESSES, AND COOL SAUNAS
Hot soaks, compresses, and cool saunas can stimulate the flow of Qi and Xue and dispel Cold and Dampness. These immersion therapies should not be assaults on your body, making you turn beet red, sweat profusely, or become overheated. Instead, they should be gentle persuaders that soothe the Shen and calm the mind. They are often used to increase the effectiveness of acupuncture, massage, and herbal therapy.
Hot Soaks
You may soak your whole body by slipping into a deep tub of water, or you can just dip your hands or feet into a basin. In general, to avoid dehydration, you should soak for no more than thirty minutes. Always drink lukewarm herb tea or room temperature water while soaking. When you get out of a soak, it is important to use a plant-based cream, oil, or moisturizer to seal the skin and prevent dehydration and flakiness. Avoid mineral oils and those that are full of dyes, preservatives, artificial colors, and aromas.
GENERAL CALMING SOAKS
The following soaks are designed to calm the Shen and pacify the Heart.
LATTE DELUXE
Because there are fats in milk that are moisturizing, this bath may be helpful for sunburns and to reduce itching and dryness caused by conditions such as eczema and psoriasis.
4 cinnamon sticks (omit if you have Heat-related problems or very sensitive skin)
Bag made from unbleached cheesecloth
1 piece natural twine
1 tubful hot water
2 cups (470 ml) to 1 quart (1 L) whole milk (preferably organic)
Break the cinnamon stick into pieces, place them in the cheesecloth bag, and tie it closed with the twine.
Fill the basin or tub to the top with water from 100° to 106°F (38° to 41°C), depending on your comfort level. You will have to decide what feels good to you.
Stir in the milk. Drop in the bag of cinnamon sticks. Soak for 20 to 30 minutes.
SLEEP EASE
If you are having trouble relaxing and going to sleep, this is the soak for you.
1 cup (16 g) loose chamomile, or 1/2 cup (8 g) loose chamomile and 1/2 cup (8 g) loose valerian
1 large square unbleached cheesecloth
1 piece natural twine
1 tubful warm to hot water
Place the chamomile or chamomile and valerian on the cheesecloth and tie it into a ball, securing it with the twine.
Fill a basin or tub with water. Select the temperature that feels relaxing to you.
Place the cheesecloth in the water and steep it for 10 minutes. Soak for 20 to 30 minutes.
TO STIMULATE QI AND DISPEL COLD
GINGER BATH
1 cup (125 g) grated or sliced fresh ginger
1 large square unbleached cheesecloth
1 piece natural twine
1 tubful warm to hot water
Place the ginger on the cheesecloth and tie it into a tea ball, securing it with the twine.
Fill a basin or tub with warm to hot water.
Place the cheesecloth in the water and steep it for 10 minutes. Soak for 20 to 30 minutes.
THYME AND AGAIN
This bath is especially good if you are having sinus congestion.
1 tubful warm to hot water
2 to 5 drops thyme oil
Fill a basin or tub with warm to hot water. Place a few drops of thyme oil in the water. (Because the intensity of the oil varies, follow the instructions on the bottle.) Soak for 20 minutes. Rinse skin in cool water.
TO DISPEL HEAT
PEPPERMINT COOLER
For this soak, if you can buy or grow fresh peppermint, that is the best.
1/2 cup (48 g) fresh peppermint or other edible fresh mint
1/2 gallon (1.9 L) water
1 tubful cool water
Boil the mint in the 1/2 gallon (1.9 L) of water for 10 minutes to make peppermint tea. Using a strainer, strain the tea.
Draw a cool bath and add the peppermint tea to the tub. Slip in and soak until you begin to feel cool. Don’t wait to get out until you are cold.
TO FIGHT PERNICIOUS INFLUENCES
BLEACH BATH
The following soak may trigger detoxification reactions, such as achy sensations and irritability. These are natural reactions and they are nothing to worry about. The National Eczema Association recommends bleach baths for eczema.2 Other experts recommend bleach baths for various types of skin infections. However, if you have any negative reactions to bleach, do not use this soak and try others instead. Also, if you have any type of skin infection, ask your physician before using bleach baths. Only Clorox brand without any additives is recommended. If you are doing a cleansing diet, you may want to do this bath along with that.
1 tubful hot water
1/2 cup (120 ml) plain household bleach without additives, not concentrate (such as Clorox)
Add the Clorox to a hot bath and soak for 10 to 30 minutes.
Shower after bathing to make sure you don’t leave a trail of bleach on your carpet or have bleach residue on your skin. Also, make sure that you apply moisturizer after the bath.
Do one soak per week. (Some sources, such as the Mayo Clinic, recommend two or three times per week for people with skin infections if cleared with your doctor.)
SALTY DOG
Two of these baths a week are effective for muscle relaxation and detoxification.
1 tubful hot water
1 pound (455 g) sea salt
1 pound (455 g) baking soda
Fill a tub with hot water. Add the salt and baking soda to the water. Soak for 10 to 15 minutes. For a stronger cleansing, substitute Epsom salts for the sea salt in the same amount.
HERBAL FOOT REST
1/2 cup (65 g) yarrow root
1 basin boiled water
Steep the yarrow in the water. After 5 to 10 minutes, it should be cool enough to slip your feet into the water. Soak your feet for 20 minutes.
TO EASE DRYNESS
Prepared herbal oils, available at your local herb store or natural food store, can soothe or stimulate and keep your skin supple and smooth. They are a bonus for the senses when added to your soak. Choose those that appeal to you.
Compresses
Compresses can be either warm or cool. Warming compresses have the advantage of being able to deliver concentrated heat or cool and herbal infusions directly to the spot on your body that needs the attention. Compresses are recommended for chronic and acute stomach problems, gynecologic discomfort, headaches, strains, and sprains. These are the ones we suggest you can do at home. Your practitioner may prescribe other compresses, depending on your constitution and the presence of any disharmonies.
HOT SPOTS
These compresses are to dispel Stagnant Qi, Cold, and Dampness.
GINGERLY
1/3 large ginger root, grated or finely chopped
1 square unbleached cheesecloth
1 piece natural twine
2 quarts (2 L) boiled water
Place the ginger on the cheesecloth, roll it into a tea ball, and tie it securely closed with the twine.
Place the ginger in a pan with the water. Boil for 10 minutes. Remove the cheesecloth from the water and set it aside.
Soak a washcloth in the ginger brew and apply it over the troubled area. Repeat until you feel warm and more comfortable.
QUIET COUGH
1/2 cup (48 g) peppermint leaves, or 1/6 of a large ginger root, grated or finely chopped, and 1/4 cup (24 g) peppermint leaves
1 square unbleached cheesecloth
1 piece natural twine
2 quarts (2 L) boiled water
Place the peppermint on the cheesecloth, roll it into a tea ball, and tie it securely closed with the twine.
Place the peppermint in a pan with the water. Boil for 10 minutes. Remove the cheesecloth from the water and set it aside.
Soak a washcloth in the tea. Apply the compress to the upper chest, breathing in the peppermint aroma.
TO COOL A FEVER
3 or 4 drops eucalyptus oil
Cool water
Place 3 or 4 drops of eucalyptus oil on a washcloth saturated with cool water. Place on the chest. Breathe deeply. Repeat until the body temperature feels lower.
In addition to these homemade compresses, your practitioner may prescribe special herb compresses for problems such as eczema, psoriasis, acne, bruises, pain, and swelling.
You can also buy readymade compresses and herbal packs that become moist when warmed. You can buy these online or in your local cooperative or natural foods store.
Cool Saunas
Saunas can hit a devastating 108° to 112°F (42° to 44°C). In Chinese medicine, these temperatures are understood to create disharmony and cause Deficient Qi. In Western terms, they are hard on the heart, skin, and immune system. Cool saunas, on the other hand, offer many benefits. They cleanse the skin (the largest organ in the body), ease nasal congestion, and help the body detoxify through the skin.
Set the sauna temperature for 102°F (39°C). When your skin becomes moist and you feel warmed throughout, gently scrub your skin with a loofah or a soft bristle brush. This gets rid of dead skin and excreted toxins.