
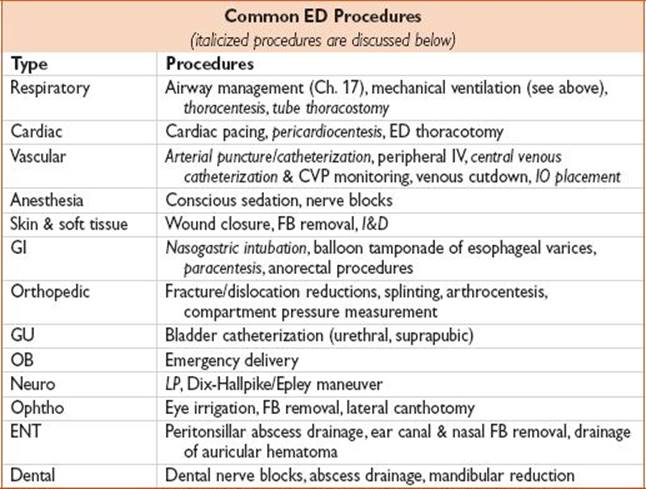
ARTERIAL PUNCTURE AND CATHETERIZATION
Purpose
• Puncture to obtain ABG; catheterization for continuous real-time BP monitoring or need for repeat arterial blood sampling
Equipment
• Puncture: Local anesthetic, 3-mL syringe, 22-gauge needle
• Catheterization: Arm board, tape, angiocath (size depends on artery cannulated), guidewire, pressure tubing, pressure transducer, suture, needle driver, sterile dressing
Positioning
• Ideally placed in the radial, femoral, or DP artery; brachial & axillary are also useable but they are terminal (no collateral supply) so worse prognosis if thrombosis occurs. Document Allen’s test prior to catheterization of radial artery.
Procedure
• Sterilize area, use sterile gloves, but generally drape & gown are not required
• Puncture: Palpate artery w/ nondominant hand, insert needle distal to palpated artery at a 30° angle to skin, advance until flash in syringe or angiocath, remove 1–2 mL blood, remove air bubbles, & send immediately to lab on ice
• Catheterization: Immobilize wrist in slight dorsiflexion using tape/arm board, insert needle as above until flash is observed, then advance another 2–3 mm, remove needle & leave catheter, pull back slowly until arterial blood flow is observed, pass guidewire into artery, advance catheter to hub along the guidewire, remove wire, check flow, attach to pressure tubing, suture in place, apply sterile dressing
Complications
• Hematoma, AV fistula, pseudoaneurysm, bleeding. Rarely: Catheter infection, thrombosis or stenosis of artery, hand/limb ischemia.
CENTRAL VENOUS CATHETERIZATION
Purpose
• Rapid volume resuscitation, emergency venous access, administration of spec medicines (ie, pressors, high concentration electrolytes), central venous pressure monitoring
• Sometimes used when peripheral access is not obtainable, but 1st consider external jugular, basilic, or cephalic vein catheterization, or IO access
Choice of Site
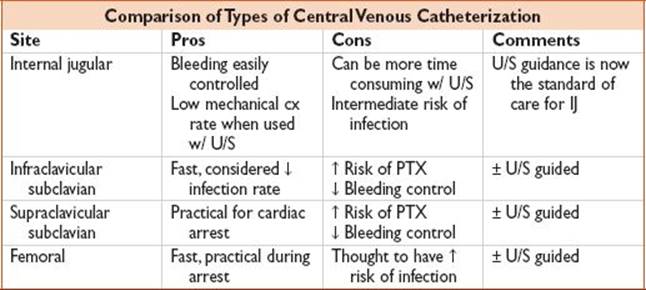
• Each site has advantages & disadvantages. Overall, no compelling evidence that one site is uniformly superior to others, or definite difference in infection risk. CDC recommends weighing risk/benefits for each pt, but avoiding femoral when possible (“Guidelines for the Prevention of Intravascular Catheter-related Infections”, 2011, CDC: www.cdc.gov).
Equipment
• Chlorhexidine, cap, mask, sterile drape/gloves/gown, catheter device kit (includes 1% lidocaine w/ 10-mL syringe & 25-gauge needle, catheterization needle/syringe, guidewire, scalpel, dilator, catheter, needle driver, scissors, suture, sterile dressing)
Positioning
• Supine pt, Trendelenburg position for IJ; can do subclavians upright (eg, in CHF)
• Internal jugular: Bedside U/S guidance recommended if available
• Locate the IJ vein (compressible) & carotid artery (pulsatile, noncompressible) using a sterile U/S probe w/i the triangle created by the clavicle & the sternal & clavicular heads of the sternocleidomastoid muscle
• Advance the needle toward the IJ vein & away from the carotid artery w/ needle at 30° angle to skin while observing the needle penetrate the vein on U/S
• Confirm venous cannulation via U/S once the wire is in place
• Infraclavicular: Insert needle 2 cm inferior & 2 cm lateral to the angle of the clavicle (located along the middle third), point toward spot just superior to the suprasternal notch & advance just posterior to the clavicle
• Supraclavicular: Insert needle at the junction of the middle & medial thirds of the clavicle, just posterior to the clavicle, point toward the contralateral nipple
• Femoral: Palpate femoral artery, then advance needle at 45° angle to skin toward the head just medial to the palpable artery
Procedure
• Rate of CVL-associated infection ↓ w/ use of observer & checklist (NEJM 2006;355:2725)
• Sterile technique. Attach catheterization needle to syringe, advance while aspirating.
• Remove syringe once vein is entered & check for free return of nonpulsatile blood
• Place the curved end of the guidewire into the needle & advance, check that the wire passes easily, & advance to estimated location of SVC
• Remove the needle while keeping the wire in position
• Make a 1-cm incision through the dermis where the wire meets the skin
• Advance the dilator over the wire several centimeters, then remove the dilator
• Advance catheter over wire, advance to the estimated location of the SVC, remove wire
• Suture in place, cover w/ sterile dressing, obtain CXR to r/o PTX (for all but femoral lines)
Complications
• Arterial puncture (if needle/wire puncture & compressible, apply prolonged pressure). If a major artery was dilated, leave in place & consult IR & vascular surgery.
• PTX: Always r/o w/ XR. Always stat XR if SOB during line placement.
• Bloodstream infection, air embolus, nerve injury (phrenic, brachial plexus, femoral)
INCISION AND DRAINAGE
Purpose
• Definitive tx of a soft-tissue abscess
Equipment
• Consider bedside U/S prior to procedure to confirm fluid collection. Hemostat, scissors, forceps, scalpel, packing gauze, 1–2% lidocaine w/ 10-mL syringe & 25-gauge needle.
Procedure
• Anesthetize skin over the most fluctuant area. Make a single, linear incision w/ scalpel over the entire length of the abscess cavity.
• Dissect wound using a hemostat & probe into all corners of the cavity to break up loculations & evaluate for an FB, then irrigate wound
• Place enough packing gauze to prevent wound closure but do not pack tightly
INTRAOSSEOUS CATHETERIZATION
Purpose
• Rapid temporary vascular access. Increasing use in adults & nonemergent cases.
Equipment
• IO needle w/ stylet & syringe, EZ-IO drill if available, gauze
Positioning
• Anteromedial aspect of the proximal tibia, 1–3 cm distal to the tibial tuberosity
• Secondary options include distal femur or proximal humerus
Procedure
• Sterile technique. Advance IO needle/stylet perpendicular to the bone w/ firm pressure & a twisting motion until the cortex is penetrated, remove stylet, attach syringe & aspirate to correct positioning of the needle. Secure in place w/ gauze pads.
Complications
• Infection, bleeding, fracture
LUMBAR PUNCTURE
Purpose
• Dx of meningitis (in the absence of elevated ICP), SAH, idiopathic intracranial HTN, other infectious, inflammatory, neoplastic processes
Equipment
• Careful neurologic exam beforehand (avoid in any pt w/ focal neurologic findings), sterile technique, 20–22-gauge spinal or Whitacre needle, LP tray (w/ collecting tubes, lidocaine 1%, manometer/stopcock, 25-gauge needle, 10-cc syringe, sterile drapes)
• Consider U/S in obese pts to identify nonpalpable landmarks
Positioning
• Lateral decubitus w/ shoulders/hips perpendicular to the bed (preferable & necessary to measure opening pressure) or sitting up on the edge of the bed
• Have the pt maximally flex neck, hips, & knees, & arch back, into a fetal position
• L4 spinous process is found at the intersection of a line b/w the spine & the iliac crests; enter through the interspace above or below this location
Procedure
• Anesthetize locally w/ lidocaine 1% using 25-gauge needle, then advance needle while aspirating → inject lidocaine into the interspinous ligament
• Advance spinal needle toward the umbilicus w/ bevel pointed toward the pt’s side (left or right) until a “pop” or sudden decrease in resistance is felt → remove the stylet
• Once clear fluid is obtained, attach the manometer & record opening pressure
• If fluid is not found, replace the stylet, pull back the needle to the level of SQ tissue, confirm that you are in midline, & reangle your needle slightly
• Obtain at least 1 cc in each collecting tube (more if extensive studies are necessary)
• Replace stylet, remove needle, place sterile dressing over wound
• Tests: Send for cell count (tubes #1, 4), protein/glucose (#2 or #3), gram stain & culture (#2 or #3)
Complications
• HA (5–40%), localized infection, epidural hematoma (rare), herniation (in cases of elevated ICP)
NASOGASTRIC INTUBATION
Purpose
• Aspiration of stomach contents in pts at risk for recurrent vomiting (eg, GI obstruction), stomach decompression during trauma or after intubation
Equipment
• 16- or 18-gauge NG tube, lubricant, 60-cc syringe, cup of water w/ straw, towel, tape, stethoscope, topical anesthetic jelly, nasal vasoconstrictor
Positioning
• Sitting up, chin down
Procedure
• Place towel over chest, estimate distance to stomach (from xiphoid to earlobe to stomach)
• Lubricate tube, spray patent nare w/ vasoconstrictor, apply anesthetic jelly, wait a few minutes
• Advance tube posteriorly along the floor of the nose until it enters the oropharynx, then have pt continuously sip water through straw while the tube is advanced into esophagus; once in the esophagus, quickly advance the tube to the desired distance
• Confirm placement by insufflating the NG tube w/ air using 60-cc syringe & listening over stomach for gush of air, & aspiration of GI contents. Obtain upright CXR if any concern.
• Secure tube using tape attached to the nose & wrapped around the tube from each side; tape should also be used to attach a 2nd segment of the NG tube to the gown
Complications
• Vomiting during placement, tracheal intubation, small risk of intracranial penetration (contraindicated in facial fractures), bleeding, esophageal rupture (h/o esophageal stricture/alkali injury)
PARACENTESIS
Purpose
• Diagnostic: Removal of peritoneal fluid in a pt w/ ascites to (a) diagnose the cause of new ascites; (b) assess for spontaneous bacterial peritonitis
• Therapeutic: Relieve sxs in pts w/ tense ascites (eg, hypoxia from mass effect)
Equipment
• Use bedside U/S prior to procedure to confirm ascites & identify large pocket
• Sterile technique
• 25-gauge needle, 1% lidocaine. For diagnostic tap, only need 20–22-gauge needle & large syringe to aspirate fluid. For therapeutic tap, use paracentesis kit w/ 18-gauge needle, catheter sheath, & vacuum-sealed collection bottles.
Positioning
• Supine; identify entry site: Usually 4–5 cm cephalad & medial to anterior superior iliac spine, lateral to the rectus muscle sheath, being careful to avoid any visible veins
Procedure
• Check for severe coagulopathy prior to procedure
• Perform w/ real-time bedside U/S if possible
• Anesthetize locally w/ lidocaine 1% using 25-gauge needle
• Z-tract: Pull the skin 2 cm caudad before advancing the larger-bore needle, then place the needle perpendicular to the skin, advance needle slowly while occasionally aspirating, until ascitic fluid is aspirated, then release skin
• It may be necessary to make a 0.5 cm stab incision at the dermis to allow passage of the needle/catheter
• After aspirating fluid, advance catheter 1–2 cm & remove needle → connect catheter to stopcock, & collect fluid into sterile containers
• Fluid: Send for cell count, albumin, culture. Consider total protein, glucose, LDH, amylase, gram stain.
Complications
• Hypotension (can have severe fluid shifts in large-volume tap), ascitic fluid leakage, abdominal wall hematoma, localized infection, hemoperitoneum, viscera perforation
PERICARDIOCENTESIS
Purpose
• Emergent tx of pericardial effusion/tamponade in a pt w/ cardiac arrest (often PEA) or periarrest; hemorrhagic tamponade is best treated w/ thoracotomy
Equipment
• 16- or 18-gauge spinal needle attached to a 30- or 60-cc syringe
Positioning
• Supine pt, angle needle 30°–45° to the skin, insert b/w xiphoid process & left costal margin, aim needle toward left shoulder
Procedure
• Sterile technique. Bedside U/S guidance recommended if available. Advance needle slowly while aspirating until fluid is removed (presence of blood suggests ventricular puncture).
Complications
• “Dry tap,” PTX, myocardial laceration, coronary vessel laceration, hemopericardium, ventricular penetration
THORACENTESIS
Purpose
• Diagnostic eval (new/unclear etiology) or therapeutic tx of pl effusion
Equipment
• 20- or 22-gauge needle w/ catheter or thoracentesis kit
Positioning
• Pt sitting upright, needle angled 90° to skin, insert in intercostal space above rib (no lower than 8th intercostal space) in midscapular line
Procedure
• Sterile technique. Bedside U/S guidance is recommended for locating height of effusion & distance of lung from the parietal pleura.
• Anesthetize locally w/ lidocaine 1% using 25-gauge needle, then advance needle while aspirating → inject lidocaine → advance while aspirating further, until pl fluid is aspirated
• Remove needle, make a small 0.5 cm incision at the insertion site, then insert 20- or 22-gauge needle w/ catheter → advance while aspirating
• After aspirating fluid, advance catheter & remove needle
• Connect catheter to stopcock, & collect fluid into sterile containers
• Goal: Diagnostic (50–100 mL), therapeutic (relief of dyspnea, up to 1000 mL)
• Fluid: Send for LDH, protein, glucose, cell count, amylase, cytology, gram stain, culture
• Obtain postprocedure CXR
Complications
• PTX, bleeding (caution if PLT <50000 or >1.5 × nl PT/PTT), cough, infection, hemothorax, diaphragmatic penetration
TUBE THORACOSTOMY
Purpose
• Drainage of air (PTX), blood (hemothorax), or fluid (pl effusion, empyema) in the pl space that threatens cardiac or pulmonary function
Equipment
• #10 scalpel, Kelly clamp, #0 or 1 suture, chest tube (28F minimum, larger for hemothorax)
Positioning
• Supine pt, shoulder abducted (raised overhead), enter at midaxillary line @ 4th–5th intercostal space (nipple line), lateral to pectoralis major
Procedure
• Sterile technique
• Create wheal using lidocaine 1% w/ epinephrine (1:100000) & a 25- or 27-gauge needle, then advance needle while aspirating, & infiltrate broadly through muscle, periosteum & parietal pleura, staying above the rib; ±intercostal nerve block
• Make 3–4 cm incision parallel & just over rib, through skin & fat overlying the rib
• Perform blunt dissection w/ a Kelly down to the rib & just above it, ± up one rib space
• Apply firm pressure w/ the Kelly closed to pop through the parietal pleura
• Look/listen for rush of fluid or air. Leave Kelly in place & spread to open the pleura further.
• Insert finger into the chest wall (Kelly still in place) to verify that it is the pl space (feel lung, ensure no abdominal organs)
• Keep finger in place, remove Kelly, pass the tube over finger while gently spinning the tube
• Typically, direct tube superiorly & posteriorly (can go anteriorly if certain there is only air)
• Rotate the tube 360° to ↓ kinking & ensure all the tube holes are in the pl space
• Attach to water seal or suction. Never clamp a chest tube.
• Confirm placement: Condensation w/ respiration, bubbles in water seal w/ coughing, CXR
• Suture in place, place petroleum gauze over wound, cover w/ dry gauze & tape in place
Complications
• Infection, intercostal vessel/nerve laceration, lung laceration, intra-abdominal entry, solid organ tube placement, subcutaneous placement, air leak