
ERGONOMICS IN DENTISTRY
Ergonomics is defined as ‘the study of man in relation to his working environment: the adaptation of machines and general conditions to fit the individual so that he may work at maximum efficiency’.
The application of these principles concerns every aspect of design within the building and streamlining of procedure. Within the surgery, the contemporary dental unit is a masterpiece of design incorporating as many ergonomic features as possible to enable the operator, dental nurse and patient to experience the minimum of stress and fatigue. It is evident, furthermore, that this environment must facilitate a high standard of dental treatment as clinical techniques become ever more complex and exacting.
This transformation began with the general adoption of a comfortable, supported and seated position for the operator and the consequent supine positioning of the patient. However, the necessary changes in posture and working procedures were largely overlooked and, despite the convincing work and publication of Paul1, it would seem that many dentists persist in working in inefficient, distorted postures that must frequently lead to excessive fatigue if not skeletal damage.
The operator’s chair
This should be fully adjustable and mobile, provide a broad, preferably anatomically contoured seat and give support in the lumbar region. It should be adjusted in height to suit each individual operator in order to distribute the weight equally between the thighs and feet.
The dental nurse chair differs only, but importantly, in that it must adjust to at least a 10 cm increase in height and provide a corresponding ‘bar stool’ type rim rest for the feet.
1
POOC01 02/18/2005 04:32PM Page 2
2 Chapter 1
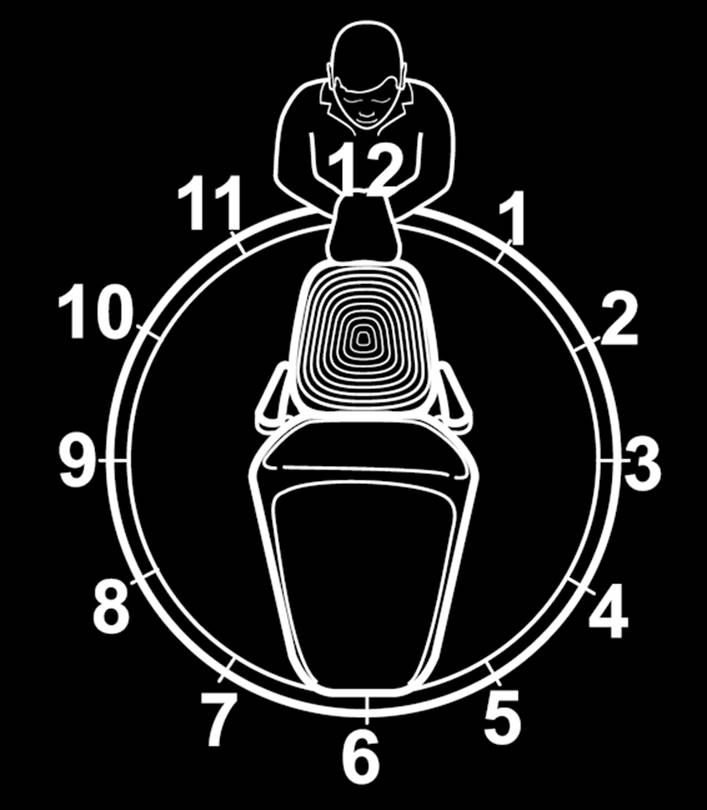
Fig. 1.1 Position of operator relative to chair.
Operator and nurse positions
The dentist will normally work within a range from the 12 o’clock to the 9 o’clock position relative to the patient’s head. However, most operative procedures are completed from, at, or near, the 12 o’clock position. The dental nurse will normally remain in a fixed position at 4 o’clock (Fig. 1.1) but at a considerably higher position in order to look down or forward to the mouth. This height not only facilitates the different tasks, but enables the nurse to visualise the back of the mouth and remove any accumulation of debris or water.
Operator’s vision
There can be no doubt that any tooth is best visualised by direct vision (Fig. 1.2). However, the nature of operative dentistry demands that, whenever possible, the line of vision is perpendicular to the tooth surface. Clearly, those surfaces inaccessible by direct vision must be visualised indirectly through a mirror (Fig. 1.3). Nevertheless, it remains important, however difficult, to position the mirror and attempt a near perpendicular view. Magnification of the working area provides a major advantage in both the reduction of eye strain and the promotion of high standards.


POOC01 02/18/2005 04:32PM Page 3
Basic principles 3
Fig. 1.2 Direct vision.
Fig. 1.3 Visualisation in mirror.
Patient position
Adoption of the supine patient position by most dental practitioners has focused attention on the optimal position of the patient’s head in relation to the seated operator. Paul1 compares this relationship in

POOC01 02/18/2005 04:32PM Page 4
4 Chapter 1
Fig. 1.4 The home position.
dentistry to any other precision activity by a seated operator and describes the ‘home position’ in which the objective is raised to the mid-sternal position and the head tilted forward to observe the fingers. Most dentists will gradually adopt this position by trial and error and indeed many will programme the dental chair to return and permit this situation for every patient (Fig. 1.4).
Observation of a large number of operators over many years reveals, however, that for some procedures, with a supine patient, a large proportion will adopt distinctly uncomfortable, distorted and fatiguing positions. Furthermore, it would appear that the reasons for this distortion are principally related to:
• An attempt to adopt a direct visual approach, despite severe postural distortion, when an indirect approach is more appropriate.
• The natural, almost in-built attempt to visualise the tooth surface via the perpendicular approach, without appropriate positioning and rotation of the patient’s head.
The former situation should be corrected by training, practice and a disciplined procedure but the latter can only be corrected by a different patient posture provided by a modified chair position.
Specifically, the difficulty lies in viewing the lower posterior teeth in the fully supine patient. In this situation, it can undoubtedly be an

POOC01 02/18/2005 04:32PM Page 5
Basic principles 5
Fig. 1.5 The home position for lower teeth.
advantage to position the chair base considerably lower but tilted forward to approximately 40° from the waist to return the patient’s head to the ‘home’ position (Fig. 1.5). The correctly seated operator will have a visual approach near perpendicular to the posterior surfaces.
Illumination
There can be no better illustration of the recent transformation in working procedures than in the area of illumination. Indeed, it is a tribute to the dentists of the past that they accomplished such complex tasks with little other than an anglepoise lamp.
The enormous advantage of halogen unit lamps is self-evident. No doubt the future will prove even brighter with light emitting diodes (LEDs). In addition, the increasing use of fibre-optic handpieces ensures constantly focused illumination of the working area and eliminates the need to use the mirror as an additional aid to reflect unit-sourced light. Despite these advances, when using light-sensitive materials such as resin composites, it remains necessary to work with low light levels as high intensity light will lead to premature polymerisation of the material, thus preventing manipulation.
POOC01 02/18/2005 04:32PM Page 6
6 Chapter 1
Magnification is a further major step forward in enhancing the vision of the work surface and the use of telescopic loupes, sometimes fitted with their own light source, is understandably commonplace.
Four-handed dentistry
The term four-handed dentistry is now rooted in professional terminology but implies no more than the importance of team effort. The dental team normally comprises the operator and nurse (four hands), but it is not uncommon for an additional nurse to make six.
Principles of four-handed dentistry
There are many ways in which the dental team can work efficiently, along ergonomic principles. Nevertheless, the underlying principles are:
• Rationalisation and standardisation. The repetitive nature of so much in dentistry offers the ideal opportunity to ration the immediate supply of instruments to those most commonly used and, also, to standardise technique so that, with practice, considerably greater efficiency will be achieved.
• Delegation. Delegation is the transfer of any task to a person who is both qualified and capable. This remains an area in which many dentists fail to take full advantage of the skills of the dental nurse.
• Anticipation. The experienced dental nurse will quickly learn the individual methods of the operator and begin to anticipate almost every situation. As a member of a regular dental team, rather than one based on rotational duty, the advantages can be significant.
• Safety. The focus and control achieved in all the various approaches to four-handed dentistry is undoubtedly matched by improved safety for both patient and operator. However, while there has been understandable concern that a supine patient may be at greater risk of ingestion or inhalation of foreign matter, it has been shown that, in this position, the tongue rests against the soft palate to provide a seal2. Nevertheless, some posterior pooling of fluid will inevitably occur and the responsibility of both nurse and operator in the control and removal of this accumulation cannot be overstated.
In procedures carrying higher risk, such as endodontics, the total protection of the airway utilising rubber dam is self-evident.

POOC01 02/18/2005 04:32PM Page 7
Basic principles 7
Fig. 1.6 Exchange of instruments in the transfer zone.
However, it is essential that no dental procedure should take place without appropriate airway protection, irrespective of patient position.
All patients, and indeed members of the dental team, should be provided with protective eyewear and for the supine patient, no transfer of materials or instruments should occur over the face.
• Methods. The concept of four-handed, ergonomic dentistry is open to varied individual approach and has been described in detail by Paul1. However, the underlying principle demands that all delivery, discard and transfer takes place in the area of safety and convenience around and below the chin – the so-called ‘transfer zone’ (Fig. 1.6). This practice demands maximal delegation to the dental nurse and requires concerted effort and understanding.
However, the advantage to the operator, and hence the patient, of an undistracted focus on the tooth is considerable.
A comparison is with that of the general surgeon awaiting the appropriate instrument, correctly positioned for immediate grasp and use. The dentist’s hands should therefore remain whenever possible in the transfer zone, instruments and materials should be asked for, not looked for, and be received to enable correct grasp with no risk of injury.
POOC01 02/18/2005 04:32PM Page 8
8 Chapter 1
If both hands are free, instrument transfer is simple but more commonly the task must be completed in one hand. This method of instrument retrieval by the fourth finger, rotation of the wrist, and supply from thumb to first fingers is easily mastered and is undoubtedly efficient.
Therefore, it is clear that when due attention is paid to basic procedural aspects and organisation, the clinical scenario is efficient, effective, enjoyable and professional. On the other hand, without such discipline, there is the potential for inefficiency, lower standards and a lost opportunity to maximise the potential for a fulfilled professional career.
EXAMINATION OF THE DENTITION – OCCLUSION
Before examining any individual teeth that may require restoration, it is important to look at all the teeth, how they meet and how they move against each other. These relationships are collectively termed the occlusion. The occlusion will affect not only the functional load to which a tooth or restoration is subjected, but can also influence the shape and form of a restoration. For example, if a molar tooth is separated by a considerable amount from its antagonist tooth during movement of the mandible, than there is plenty of height for cusps to be carved into a restoration. Conversely, if restoring a tooth that rubs against its antagonist during movement of the mandible, then cusps are likely to be more shallow, and care must be taken that excess load is not placed onto the restoration during function.
Preoperative examination of the occlusion is essential. Note must be taken of existing relationships, both static and dynamic/excursive.
The use of thin articulating paper to mark the teeth and identify contacts is required. Differing colours may be used for static and dynamic contacts. Study models, mounted with a face bow record on an articulator, may also prove to be useful, especially if multiple units or units involving guiding surfaces are to be restored. An explanation of occlusal terminology and relationships follows.
Intercuspal position (ICP)
The intercuspal position is the static position of maximum interdigitation of the cusps of the teeth, where the mandible is in its most closed position: it is also an habitual position. This position may be easily reproducible and identified on study models as ‘best fit’ (e.g. in
POOC01 02/18/2005 04:32PM Page 9
Basic principles 9
a fully dentate patient) or may be difficult to identify and perhaps variable (e.g. in a patient with tooth wear). It is a changeable and unstable position as it will change as the teeth change throughout the lifetime of the patient. It is also called maximum interdigitation position (MIP) and centric occlusion (CO).
Retruded axis position (RAP)
The retruded axis position is not a fixed point, but an ‘arc’ defined by the movement of the mandible when retruded, at which only hinge movements are possible. It is also called terminal hinge axis or centric relation (CR). RAP is also defined anatomically as the position where the condyles are most superiorly placed within the glenoid fossae, with the articular discs in a close-packed position. It is a relaxed relationship and is the only true reproducible position.
Retruded contact position (RCP)
The retruded contact position is the point of first contact (between a maxillary and mandibular tooth) when closing on the retruded arc of closure (see RAP above). The movement from the RCP to ICP is termed a slide, and note should be taken of the magnitude of this slide as well as direction (i.e. vertical, horizontal – anterior to posterior and lateral components).
Excursion/excursive movements
Excursion relates to the dynamic movements of the mandible, as in:
• Lateral excursion – to the side (left or right)
• Protrusion – forward/anterior movement of the mandible
• Retrusion – backward/posterior movement of the mandible Working side
The working side is the side to which the mandible moves when making a lateral excursive movement.
Non-working side
The non-working side is the opposite side from that to which the mandible moves when making a lateral excursive movement.
Sometimes called the balancing or orbiting side.
POOC01 02/18/2005 04:32PM Page 10
10 Chapter 1
Anterior/posterior determinants and guidance Determinants of mandibular movements are the influences determining the envelope of possible movements of the mandible. These influences may be:
• Posterior determinants (i.e. the temporomandibular joints and anatomical structures associated with them, also termed condylar guidance/posterior guidance).
• Anterior determinants (i.e. the teeth).
The tooth surfaces that are in contact during an excursive movement are said to ‘guide’ movement of the mandible. The type of guidance may be divided as below, the divisions broadly describing the teeth that provide the guiding surface:
• Anterior guidance – the tooth surfaces that are in contact during a protrusive excursion. This is normally the incisor teeth, and hence is then termed incisal guidance: in some cases (for example an occlusion with an anterior open bite) it may actually be the posterior occlusal tooth surfaces that provide the anterior guidance.
• Canine guidance – when a lateral excursion is made, the canines on the working side are the only teeth to make contact.
• Group function – when a lateral excursion is made, multiple pairs of teeth on the working side make contact .
Tooth contacts during dynamic excursive movements that do not provide a smooth guidance, or separate guiding surfaces, may be termed an interference.
Non-working contact
A non-working contact is a contact between a pair of tooth surfaces on the non-working side during an excursive movement that does not otherwise interfere with the smooth movement of the mandible nor cause the guiding surfaces on the working side to be separated.
Non-working interference (NWI)
A non-working interference is a contact between a pair of tooth surfaces on the non-working side, during an excursive movement, that interferes with the smooth movement of the mandible and/or
POOC01 02/18/2005 04:32PM Page 11
Basic principles 11
causes the guiding surfaces on the working side to be separated. It is important to identify such contacts as they are thought to cause high lateral loads on teeth and a subsequent predisposition to mechanical failure of a restoration.
Any new restoration must be in harmony with the existing occlusion if this is satisfactory. Where occlusal contacts are present that may cause treatment difficulties or a predisposition to failure, then steps should be taken to address this. For example, a cavity margin might be extended to avoid a contact at the potentially weak tooth-restoration interface or a non-working side interference reduced or eliminated (Chapter 2). Similarly, where indirect restorations are planned, these may be used to create a new occlusal relationship in situations when the existing pattern is not satisfactory.
EXAMINATION OF THE DENTITION – CHARTING
A dental charting is a stylised record of the patient’s current dental status. It is good clinical practice to record the dental status at initial presentation and subsequent follow-up appointments. A full dental charting should be recorded in all patients’ notes, thus forming part of the medico-legal record. It is not necessary to map the patient’s restorations in detail on the charting, it is sufficient to record the type of restoration and/or cavity, not its exact dimensional extent. The object of a dental chart is to record:
• All teeth present.
• Teeth that are absent or unerupted.
• Presence and condition of existing restorations (including partial dentures and bridgework).
• Presence and extent of dental caries and other dental abnormalit-ies, (e.g. non-carious tooth tissue loss, fractures, developmental defects and discoloration).
Tooth notation
Several different systems are available for tooth reference; there are however three systems that most practitioners should be aware of in order to be familiar with the increasing internationalisation of dental journals, conferences and other forms of communication. Most systems divide the mouth into four quadrants, which are indicated as if one is viewing the patient from the front:
POOC01 02/18/2005 04:32PM Page 12
12 Chapter 1
upper right
upper left
lower right
lower left
Palmer system
The permanent teeth are numbered from 1 to 8, from central incisor to third molar. Each tooth also has be identified by the quadrant, thus the upper right first permanent molar is designated 6|, while the upper left first permanent molar is designated |6:
Patient’s right
87654321
12345678
Patient’s left
87654321
12345678
The primary (deciduous) teeth are represented by the letters A to E, from central incisor to second deciduous molar and also have to have a quadrant designation e.g. the upper right deciduous central incisor is A|.
Patient’s right
EDCBA
ABCDE
Patient’s left
EDCBA
ABCDE
It is advisable to use capital letters when referring to the deciduous dentition using the Palmer notation. If lower case letters are used, b can look like 6, and vice versa. This is especially important when patients are being referred for dental extractions.
Federation Dentaire Internationale (FDI) system
This system is commonly used in Europe. Each tooth is given a two-digit number; the first digit identifies the quadrant in which the tooth is situated and the second digit identifies the tooth in that quadrant.
In the permanent dentition, the quadrants are numbered from 1 to 4
starting with the upper right, which is quadrant 1, and continuing round in a clockwise direction to the lower right, which is quadrant 4.
The teeth are numbered from 1 to 8 in each quadrant starting with 1
being the central incisor and continuing to 8 being the 3rd permanent molar. The permanent dentition is:
Quadrant 1
Quadrant 2
18 17 16 15 14 13 12 11
21 22 23 24 25 26 27 28
48 47 46 45 44 43 42 41
31 32 33 34 35 36 37 38
Quadrant 4
Quadrant 3
POOC01 02/18/2005 04:32PM Page 13
Basic principles 13
In the deciduous dentition, the quadrants are numbered from 5 to 8
starting with the upper right, which is quadrant 5, and continuing round in a clockwise direction to the lower right, which is quadrant 8.
The teeth are numbered from 1 to 5 in each quadrant starting with 1 being the central incisor and continuing to 5 being the second deciduous molar. The deciduous dentition is:
Quadrant 5
Quadrant 6
55 54 53 52 51
61 62 63 64 65
85 84 83 82 81
71 72 73 74 75
Quadrant 8
Quadrant 7
Universal system
This system is commonly used in America. The teeth are given individual numbers from 1 to 32, starting with the upper right third molar and moving clockwise round the arch to the lower right third molar.
1 2 3 4 5 6 7 8
9 10 11 12 13 14 15 16
32 31 30 29 28 27 26 25
24 23 22 21 20 19 18 17
Surfaces of teeth
When describing a cavity or restoration, the location can be described by the surfaces of the tooth that are involved. These are as follows:
• Mesial: nearest to the midline of dental arch
• Distal: further from the midline of dental arch
• Labial: next to lips (anterior teeth)
• Buccal: next to cheeks (posterior teeth)
• Lingual: next to tongue (lower teeth)
• Palatal: next to palate (upper teeth)
• Incisal: cutting edge of anterior teeth
• Occlusal: chewing surface of posterior teeth
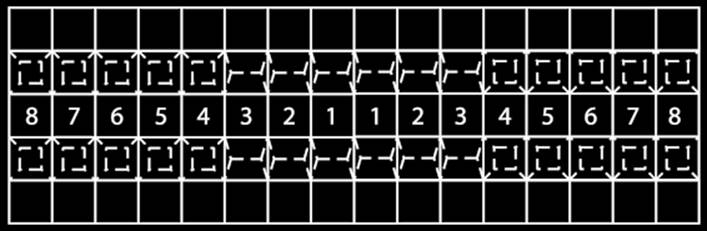
These surfaces can be represented diagrammatically as a box with five areas, each of which represents a surface (Fig. 1.7). A series of such boxes is used to represent all of the teeth (Fig. 1.8).

POOC01 02/18/2005 04:32PM Page 14
14 Chapter 1
Fig. 1.7 Representation of tooth surface.
Fig. 1.8 Typical charting matrix.
DENTAL CARIES
Dental caries is a disease process resulting in the demineralisation of dental hard tissues by microbial activity. It is a readily preventable disease and can be arrested or reversed in its early stages. The pattern of dental caries has changed in recent years; new lesions are more likely to develop in pits and fissures, with smooth surface lesions becoming less common3.
Aetiology
Dental caries has a multifactorial aetiology; however four principle factors are necessary for the production of a carious lesion:
• Bacteria in dental plaque
• Substrate such as a fermentable carbohydrate (dietary sugars)
• A susceptible tooth surface
• Time
POOC01 02/18/2005 04:33PM Page 15
Basic principles 15
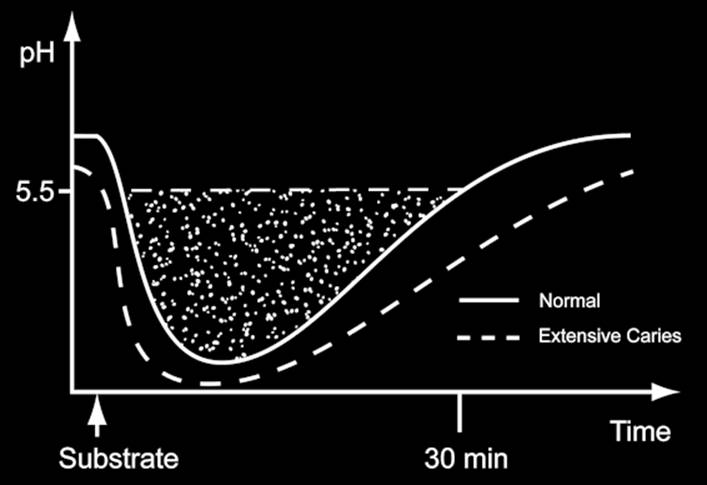
Fig. 1.9 Stephan curve.
Elimination of one or more of these factors is required for the prevention of dental caries. There is no single test that can take into consideration all the above factors and accurately predict an individual’s susceptibility to caries. The diet type and frequency of intake is thought to play a significant role in the carious process. Bacteria in the dental plaque are capable of fermenting suitable carbohydrate substrates to produce acid, causing the pH to fall within minutes, resulting in demineralisation of the tooth tissue4. The plaque remains acidic for some time, taking 30–60 min to return to its normal pH in the region of 7. These changes in pH can be represented graphically over a period of time following a glucose rinse, which is frequently referred to as a Stephan curve (Fig. 1.9). The shaded area represents the risk of carious attack to the tooth surface: this area is larger in a patient with extensive caries.
Caries diagnosis and assessment
As with all diagnostic tests, there is the potential for operator error, therefore careful interpretation is required.
Visual examination
Visual inspection of the tooth is the first and most widely used method; however it may be surprisingly inaccurate. The tooth must
POOC01 02/18/2005 04:33PM Page 16
16 Chapter 1
be clean, dry and well illuminated when carrying out a visual examination. A blunt probe may be useful to clean debris off the tooth surface or gently feel for cavities; however, a probe, blunt or otherwise, must not be pushed against the tooth surface (especially into fissures) as there is the risk of causing cavitation of delicate early demineralised lesions. The diagnosis of frank cavitation is relatively easy, but slight discoloration, which is suggestive of caries, is much more difficult.
Enhanced visual examination
Transillumination
This uses an intense beam of visible light, usually directed on the lateral surface of the tooth to transilluminate it and aid with caries diagnosis. This technique is most useful in the diagnosis of anterior approximal caries and cracked teeth.
Fibre-optic transillumination
This technique uses a fibre-optic light source placed palatal to anterior teeth to aid diagnosis of anterior approximal caries. With the increased number of fibre-optic handpieces available, it is feasible to have a fibre-optic tip attached to dental units.
Magnification
This is most commonly in the form of magnification loupes, to aid with clinical examination and radiographic evaluation.
Dyes
A variety of different dyes that stain caries are currently available.
These help to make the visualisation of caries easier. However, they are primarily used during cavity preparation and result in over preparation and hence are not used routinely.
Radiographic examination
Radiographs can be used to confirm a clinical suspicion of caries, detect early lesions and for monitoring disease activity. Bitewing radiographs are the view of choice for diagnosis of occlusal and proximal caries in posterior teeth; however diagnostic problems may arise because of superimposition of the cuspal pattern and contact
POOC01 02/18/2005 04:33PM Page 17
Basic principles 17
point overlap. Periapical radiographs are required for anterior teeth.
Extraoral radiographs such as dental panoramic radiographs should not be used for the diagnosis of dental caries owing to their lack of sensitivity5,6.
Laser fluorescence
Lasers can be used as an aid to detection of caries, especially early enamel lesions. The principle is based on laser fluorescence. Caries illuminated by a laser will fluoresce, the degree to which this occurs is an indicator of the disease process. However, heavy fissure staining can affect the degree of laser fluorescence.
Electrical conduction methods
This principle is based on electrical conductance and the fact that sound enamel is a good electrical insulator; however, carious teeth (with porosities) allow the passage of an electrical current more readily, resulting in a drop in the electrical resistance. The degree to which the resistance drops is an indicator of the extent of caries.
Caries risk assessment
During the initial history, examination and treatment planning for every patient, it is important that there is also an assessment of the patient’s individual risk of developing further carious lesions or progression of existing lesions7. This procedure is termed caries risk assessment. Assuming that all aetiological factors remain equal, this should help in identification of the main causative factors and aid with recommending specific preventive or restorative measures for that individual patient’s needs. Dental management of caries may involve operative intervention, but should always incorporate preventive measures. Caries risk assessment carried out during treatment can serve as a monitoring aid for the success of treatment.
This assessment should be based upon:
• Caries experience
—
the extent and number of previous restorations (indicator of past disease)
—
the extent and number of new lesions
—
the progression of new lesions.
• Fluoride use – type and frequency.
POOC01 02/18/2005 04:33PM Page 18
18 Chapter 1
• Oral hygiene and the extent of plaque present.
• Dietary factors – eating habits, number of main meals, snacks, frequency of fermentable carbohydrate intake.
• Bacterial activity – the presence and amount of cariogenic bacteria, specifically Lactobacillus and Streptococcus mutans. This may include special laboratory tests.
• Saliva – both the amount (quantity) and buffering capacity (quality).
• Socio-economic status – to evaluate the patient for compliance.
Caries tends to be a disease of deprivation and is more prevalent in patients with lower socio-economic status.
The patient’s risk of developing further caries can be classified according to the number of caries risk factors present as being high, moderate or low. It is important to bear in mind that a patient’s risk assessment can change with time and periodically the assessment of their caries risk should be re-evaluated.
Caries prevention
A decision to intervene in the management of dental caries is probably one of the most important decisions a dentist will make. Early restorative intervention should be avoided if possible as tooth preparation is irreversible and commits the tooth to the restorative cycle8.
All restorations fail at some time and require either repair/refurbishment or replacement, resulting in yet another insult to the tooth tissues. This repeated insult can ultimately lead to the loss of the tooth.
A delayed start on this cycle is advised wherever possible, and there is a resurge in providing early preventive and remineralisation treatment and minimal intervention of carious lesions8.
Diet
Decreasing the frequency of fermentable carbohydrate consump-tion and elimination or substitution is essential as this will result in reduced periods of acid production and less risk of demineralisation of the tooth tissue9.
Fluoride
Fluoride supplements can be either patient or dentist applied. The effects of fluoride on caries in different sites are variable10. Fluoride has produced the following reductions in caries:
POOC01 02/18/2005 04:33PM Page 19
Basic principles 19
• 20% in occlusal caries
• 55% in interproximal caries
• 61% in smooth surface caries
It is clear that occlusal caries will still be a significant clinical problem. The topical and systemic effects of fluoride have, however, made the clinical diagnosis of caries more difficult.
Oral hygiene
A well maintained oral hygiene regime helps to maintain the bacterial balance within the oral cavity and can also help to deliver topical fluoride on a regular basis.
MOISTURE CONTROL
The oral cavity is intrinsically a wet environment. The presence of oral fluids (saliva, blood, gingival crevicular fluid and water coolant spray) on the surface of a preparation is likely to:
• Dilute or displace etchant or bonding materials.
• Impair the creation of a bond between tooth and restoration.
• Interfere with cohesion of successive increments of restorative material.
• React with restorative material and thus impair its strength or dimensional stability, e.g. with zinc containing amalgams leading to porosity and expansion.
• Discolour tooth-coloured resin restorations, e.g. with blood contamination.
• Prevent the creation of a marginal seal where a cement lute is employed, e.g. for an indirect restoration.
• Contaminate a site that should preferably have as low a bacterial load as possible, e.g. pulp exposures and root canal therapy.
For these reasons it is necessary to isolate a preparation from moisture, especially when placing restorative materials and undertaking endodontic therapy.
Rubber dam
Rubber dam is the most effective method of moisture control11–13
and tooth isolation (Fig. 1.10). Rubber dam is available in latex and

POOC01 02/18/2005 04:33PM Page 20
20 Chapter 1
Fig. 1.10 Rubber dam.
latex-free sheets, it can also be obtained in different colours, grades or thickness. Rubber dam has distinct advantages over other methods of moisture control and tooth isolation in that it prevents preparation contamination, protects the airway, aids visibility and reduces the risk of cross infection from patient to operator14. The quality of restorations, particularly resin-bonded restorations, is significantly improved by using rubber dam15. There is also evidence that patients prefer rubber dam isolation.
It is usual practice, when carrying out restoration placement, to isolate a quadrant or sextant with the tooth under treatment being in the middle. Expertise and experience enhance its convenience. In situations where close application to the cervical margin is difficult, a seal can be obtained by application of a caulking agent or some other sealant, such as light-activated resin.
There are many different techniques for placing and retaining rubber dam. Traditionally, the rubber dam was retained using clamps; however, alternative methods are now available. These include ligatures, such as dental floss or the placement of an alternative interdental retainer such as a portion of rubber dam material, a wooden wedge or commercially available rubber dam retaining aids. If a clamp is used, three different techniques may be employed for placement. These include application of the rubber dam and clamp simultaneously, the rubber dam before the clamp or the clamp before the rubber dam.
POOC01 02/18/2005 04:33PM Page 21
Basic principles 21
Types of clamps for use with rubber dam
A vast array of rubber dam clamps is available, but there are principally four design factors that differ between them. First, and most obvious, is that of size – small clamps are designed to be used on small single-rooted teeth whereas the larger clamps are for use with molar teeth. Clamps are available in a wide variety of sizes reflecting the broad range of sizes of teeth (especially molars) that may be encountered. It is important to realise that if too small a clamp is used then damage to the tooth structure may occur during placement or removal and sensitivity may occur because of pulpal irritation arising from the increased pressure on the tooth with too small a clamp. In addition, if a clamp is too small for a particular tooth, then the bow of the clamp will be stretched to such an extent that fracture of the bow may occur either during, or after, placement. It is for this reason that many clinicians secure one jaw to the other with a floss ligature before application of the dam (though if the floss is left in situ after dam placement it may cause leakage).
The jaws of clamps differ in two aspects, namely the presence or absence of ‘wings’ and the orientation of the jaws. Winged clamps are designed with an extension to the jaws so that the clamp may be positioned into the rubber dam, and clamp and dam applied simultaneously. Winged clamps also have the added advantage that the working area is increased as the wings displace the rubber dam.
Wingless clamps do not have extension of the jaws and are placed at a separate stage to the rubber dam, either before or after.
Clamps are retained on the tooth either through engaging the tooth below the maximum bulbosity of the crown, or by actively ‘gripping’
the tooth surface. The former may be termed bland (or passive) clamps and the jaws have a fairly flat orientation, the latter may be termed ‘active’ clamps and these often have jaws that are angled gingivally with the points of the jaw closer together than a bland clamp. Active clamps are usually more stable as they are more likely to achieve four-point contact with the tooth. However, the tight fit may cause some post-placement sensitivity and the gingival orientation of the jaws may traumatise the gingivae, as the area of engagement with the tooth is more apical (though this may be an advantage if some gingival retraction is required).
The final design difference relates to clamps that are specifically for retaining rubber dam on anterior teeth while also having the ability to retract the gingivae. These clamps, termed ferrier or butterfly clamps, have a double bow and fine jaws that may be bent to alter the amount

POOC01 02/18/2005 04:33PM Page 22
22 Chapter 1
Fig. 1.11 Rubber dam clamps.
of soft tissue retraction that is provided. As the jaws of these clamps are fine, they are not particularly stable and may require support (e.g.
with impression compound) to prevent scraping and damaging of the tooth surface.
Thus, clamps for use with rubber dam (Fig. 1.11) may be:
• Various sizes depending on which tooth they are intended for
• Winged or wingless
• Bland or active
• Specifically for anterior teeth and gingival retraction Other methods of moisture control
Saliva ejector
This may be used routinely during restorative procedures. The flange design is a useful protector and displacer of the tongue when the air turbine is used, it can also be used to reflect light. The saliva ejector is generally held in position by the patient and is therefore dependent on co-operation. It is inadequate on its own, when materials are placed in preparations, but may be supplemented by any of the other moisture control techniques. Cotton wool rolls can be used to stabilise the flange in situ and also serve to augment moisture control.
Aspirator
This is a very efficient high volume, low vacuum suction device. It needs continuous chairside assistance for effective operation and therefore cannot be used effectively in single-handed operative dentistry.
POOC01 02/18/2005 04:33PM Page 23
Basic principles 23
Absorbent systems
Cotton wool rolls
These are essential supplements to the saliva ejector during placement of both direct and indirect restorations. They act by absorption and therefore have a limited service life and must be replaced frequently when saturated. The typical requirements for any posterior tooth in a supine patient is three rolls; one in the upper buccal sulcus, one in the lower buccal sulcus and one in the lower lingual sulcus, in order to cope with salivary duct outflow and to collect pooling fluids. Cotton wool rolls are inserted with a rolling action away from the alveolus for stability. In anterior teeth, two rolls are needed in the lower, one buccal and one lingual, while in the upper a minimum of one roll in the upper buccal sulcus. It will be appreciated that rubber dam placement is a more efficient technique.
Cotton wool pellets
These are available in a range of sizes and are useful for drying preparations and cleansing but they have the same limitation of service life and cross infection risk as cotton wool rolls.
Absorbent plaques
These are sheets of absorbent material, which can be adapted to the mucosa, and are arguably more stable than cotton rolls. They have similar limitations of service life but are longer lasting due to the barrier effect.
It is important to note that all absorbents can produce painful after effects, termed cotton burns, if they adhere to dry mucosa and are then forcibly removed. Where such adherence occurs they should be first soaked with water and then gently peeled off.
Air-jet
This is usually applied via an air–water syringe (3-in-1 or triple syringe). It acts merely by forcibly displacing the fluid layer. If applied longer to achieve evaporation effect this technique can result in desiccation of the dentine, which may be injurious to the underlying pulp.
POOC01 02/18/2005 04:33PM Page 24
24 Chapter 1
Matrix bands
This is a convenient supplement to other techniques but the coffer dam effect provided by the encircling band can be useful in extreme situations. The band must be well adapted and wedged to be effective in this role.
Pharmacological
This group of agents may have systemic medical implications and are very rarely used in routine practice.
Astringent solutions
These may be applied to control gingival haemorrhage but may cause gingival trauma, if not used with care, as many are caustic or have a low pH.
Adrenaline
One in one thousand adrenaline solution may be applied topically for a short period (up to 2 min) on a cotton pellet to control local gingival bleeding.
Antisialogogues
Antisialogogues, drugs that inhibit oral secretions, appear in all lists of moisture control techniques. However, the use of such drugs is extremely rarely indicated and is generally unsuitable for the ambulant outpatient situation.
Hypnosis
This technique has been suggested for controlling patients’ salivary flow rate.
REFERENCES
1.
Paul E. A practical guide to assisted operating. 1. Principles of assisted operating. Br Dent J, 1972; 133: 258–61.
2.
Paul J.E. Four-handed dentistry. 1. Principles and techniques: a new look. Dent Update, 1983; 10: 155–7, 159–60, 162–4.
POOC01 02/18/2005 04:33PM Page 25
Basic principles 25
3.
Kidd E. and Joyston-Bechal S. Essentials of Dental Caries – The Disease and its Management, 2nd edn. London, Oxford University Press, 1997.
4.
Hicks J., Garcia-Godoy F. and Flaitz C. Biological factors in dental caries enamel structure and the caries process in the dynamic process of demineralization and remineralization (Part 2). J Clin Pediatr Dent, 2004; 28: 119–24.
5.
Rushton V.E. and Horner K. The use of panoramic radiology in dental practice. J Dent, 1996; 24: 185–201.
6.
Horner K., Rout P.G.J., Rushton V.E. and Wilson N.H.F. Interpreting Dental Radiographs. London, Quintessence Publishing, 2002.
7.
Reich E., Lussi A. and Newbrun E. Caries-risk assessment. Int Dent J, 1999; 49: 15–26.
8.
Anusavice K.J. Management of dental caries as a chronic infectious disease. J Dent Educ, 1998; 62: 791–802.
9.
Moynihan P. and Petersen P.E. Diet, nutrition and the prevention of dental diseases. Public Health Nutr, 2004; 7: 201–26.
10.
Jacobsen P. and Young D. The use of topical fluoride to prevent or reverse dental caries. Spec Care in Dent, 2003; 23: 177–9.
11.
Liebenberg W.H. Extending the use of rubber dam isolation: alternative procedures. Part I. Quintessence Int, 1992; 23: 657–65.
12.
Liebenberg W.H. Extending the use of rubber dam isolation: alternative procedures. Part II. Quintessence Int, 1993; 24: 7–17.
13.
Liebenberg W.H. Extending the use of rubber dam isolation: alternative procedures. Part III. Quintessence Int, 1993; 24: 237–44.
14.
Kidd E.A. Rubber dam – a reappraisal. Dent Update, 1983; 10: 233–40.
15.
Christensen G.J. Using rubber dams to boost quality, quantity of restorative services. J Am Dent Assoc, 1994; 125: 81–2.
POOC01 02/18/2005 04:33PM Page 26
POOC02 02/18/2005 04:33PM Page 27