
INTRODUCTION
Endodontology is related to processes that take place in, or originate from, contents of the pulpal chamber. Under normal conditions, the pulp is protected by the hard tissues of the tooth and an intact periodontium. Kakehashi et al. 1 showed that when the dental pulps in germ-free rats were exposed, reactionary dentine was formed.
However, surgical exposure of teeth in rats kept in a conventional microbial environment resulted in the development of pulpal necrosis and apical periodontitis. Therefore, micro-organisms (such as those associated with the caries process) and their by-products may gain access to the pulp and stimulate an inflammatory response. The pulp may maintain its function, but continued stimulation will result in its irreversible destruction and complete breakdown. A necrotic pulp does not have a defence mechanism, and the enclosed environment of the pulp chamber is a favourable medium in which anaerobic bacteria may proliferate. This inflammatory process may then spread beyond the confines of the pulp chamber and into the periapical tissues with consequent tissue damage and resorption of periapical bone. Early signs may be seen on a radiograph as loss of apical lamina dura, more extensive destruction of the periapical tissues may result in stimulation of epithelial cells in the apical region, which can then cause formation of a cyst.
Therefore, treatment of the irreversibly damaged or necrotic pulp should be by removal of the damaged tissue and its replacement with a root filling, the overall aim being to control the intra-canal infection.
The canal system is cleaned with files and antimicrobial irrigating solutions before being filled with an inert material (root filling) to prevent further microbial ingress. It is also necessary to have excellent moisture control, so that the canal system can be dried when required, 51
POOC03 02/18/2005 04:33PM Page 52
52 Chapter 3
and also to ensure that contamination of the canal system with salivary bacteria does not occur: airway protection is also required owing to the risk of dropping the small instruments. To achieve these objectives, placement of a rubber dam is essential.
The response to endodontic treatment is measured in terms of clinical signs and symptoms and radiographic evidence of healing.
If healing is not satisfactory it is necessary to make a decision as to whether the tooth should be re-treated, treated via a surgical approach or extracted.
DIAGNOSIS AND ASSESSMENT
A problem in endodontics is that both the healthy and the damaged pulp are in an enclosed environment (the pulp chamber), hence cannot be directly subjected to diagnostic testing. A further complicating factor is that pain is notoriously subjective and if severe, it may be difficult to identify the causative tooth with certainty. More than one tooth may be involved, so it is essential that the clinical signs and symptoms and the diagnostic tests and radiographs are interpreted carefully and related to the provisional diagnosis.
In determining endodontic requirements, the clinician must decide whether or not there is any pulpal or periapical pathology. This means differentiating between those teeth that are normal, reversibly inflamed, irreversibly inflamed and necrotic. Periapically, it must be determined whether teeth are normal, root treated and normal, or have apical pathology.
Clinical manifestations
The most common clinical manifestation of pulp disease is that of pain. The nature and duration of pain is related to the type and stage of the disease process and may vary from a transient discomfort to throbbing incessant pain. Other diagnostic signs include extra-oral swelling, intra-oral swelling, sinus formation, tooth mobility, periodontal pocketing, tooth discoloration, tooth fracture and caries.
Assessment of pulp vitality
It is understood that in a non-vital tooth there is an absence of both neural and vascular supplies. However, almost all conventional pulp tests employ assessment of the neural supply.
POOC03 02/18/2005 04:33PM Page 53
Principles of endodontics 53
Endodontic treatment should not be undertaken on the basis of pulpal status alone. The patient’s medical history, the overall treatment plan and the periodontal status must also be taken into consideration. There are also contraindications to endodontics. These may be divided into general aspects such as factors in the medical history of relevance, poor access, poor oral hygiene and local factors, for example the tooth being unrestorable, the periodontal support being poor, the presence of advanced resorptive defects and complex root morphology.
Electronic testers
In the past, these have been of limited value due to the high incidence of false readings. The latest testers, however, appear to be promising but their use is limited if full coverage restorations are in place. Pulp testers stimulate neural tissue, and there is not necessarily a direct correlation between the existence of nervous tissue and a viable blood flow. Additionally, patients’ pain thresholds vary. The actual reading is not important, as it cannot measure any degree of degeneration.
However, testing contralateral teeth can give the clinician an indication of pulpal involvement.
Thermal tests
Cold is the more useful test as it is safer and uses a constant temperature. The use of a cotton pellet soaked in a volatile liquid (for example ethyl chloride) is a common method, though sticks of ice may also be used. Although heat is not routinely used, it is helpful when the only symptom is that of heat sensitivity and the patient cannot identify the tooth. Heat may be applied with a warm stick of gutta-percha, though care must be taken to lubricate the tooth surface to be tested with petroleum jelly to prevent the hot gutta-percha from sticking to the tooth and possibly causing a thermal injury. Another method of applying heat is to isolate an individual tooth with rubber dam and syringe hot water over the tooth.
Percussion
The most reliable indication of significant periapical inflammation is that of tenderness to percussion. Periodontal inflammation, which produces milder symptoms, can be identified by finger pressure applied to the tooth in question.
POOC03 02/18/2005 04:33PM Page 54
54 Chapter 3
Selective analgesia
This test has gained popularity in recent years, but is generally more effective in localising affected areas rather than individual teeth.
Transillumination
This method is useful in the diagnosis of vertical crown fractures.
Radiography
Radiographic examination is a useful and necessary diagnostic aid.
However, it must be remembered that pathology does not result in immediate radiographic changes and periapical changes are not usually seen until the cortical plate within the socket becomes involved (seen radiographically as a loss of definition of the lamina dura).
It may be necessary to take more than one radiograph at different angles. Good quality radiographs, a paralleling technique and proper film development are essential for accurate diagnosis.
ENDODONTIC IMAGING
Endodontic radiology utilises periapical radiographs2. Diagnosis, treatment and follow-up radiographs for endodontic treatment are preferably taken by the paralleling technique using special film holders.
Preliminary radiographs
A preliminary radiograph of the tooth is necessary before endodontic treatment3. There must be minimal distortion of the final image; a paralleling technique and film holder should be used. Any pre-existing radiographs of the tooth should be consulted as they may contribute useful information about progression of a periapical lesion and anatomy of the tooth and neighbouring structures.
Ideally, a periapical radiograph should cover the full length of the tooth root(s) and at least 2 mm of periapical bone. Should there be evidence of a periapical radiolucency the area of the entire lesion and an area of surrounding normal bone should be visualised. It is sometimes impractical to achieve this on a periapical film in which case an occlusal or an extra-oral projection may be required.
POOC03 02/18/2005 04:33PM Page 55
Principles of endodontics 55
The radiograph should be carefully examined in a systematic manner. Reference should be made to adjacent anatomical structures, the condition of the surrounding bone and associated periodontal ligament space. The anatomy of the pulp chamber and root canals should be examined, details regarding the presence of caries, features of the coronal restoration, number and anatomy of the roots being particularly important. It must be remembered that a radiograph is only a two dimensional representation of a three-dimensional object and although roots may appear to have mesial or distal curves, they are also likely to curve in buccal or lingual directions. Magnification aids will assist interpretation of the radiograph.
Working length estimation – ‘diagnostic’ radiographs These allow the clinician to determine the working length of the tooth, that is, the distance between a fixed coronal reference point and the apical limit of instrumentation. This must be determined for every canal in the tooth to be treated. A combination of knowledge of the expected working length and tactile sensation will assist in initial placement of the diagnostic instrument.
When multiple canals in a single tooth or a multi-rooted tooth are being considered, more than one periapical radiograph may be necessary. In some instances it is possible to take a single radiograph with instruments in different canals. If it is suspected that there are two canals in the same buccolingual plane, these may be distinguished by exposing the film with a mesial and/or a distal angulation on the X-ray tube.
With experience, measurements may be taken from radiographic images although allowances must be made for the inherent linear distortion and magnification present in all radiography. If the apex of the tooth and/or the end of the instrument is not visible then the radiograph is of no diagnostic value.
During diagnostic radiography for working length estimation, it is customary to remove the rubber dam frame to facilitate film placement. The rubber dam and clamp should remain in place during radiography.
Master cone radiographs
Although every care is taken during calculation of the working length, errors can, and do, occur. As a final check before root filling/
obturation, a dry run, or ‘cone-fit’, radiograph may be taken. A
POOC03 02/18/2005 04:33PM Page 56
56 Chapter 3
gutta-percha cone is positioned at the full working length and a radiograph taken to ensure that it is in the anticipated place. This radiograph also allows the shape of the preparation to be assessed.
Any errors in the preparation or position of the gutta-percha can be corrected before final obturation. Some clinicians also advocate a radiograph part way through obturation, called a ‘mid-fill’ radiograph, the rationale being that the first cone of gutta-percha may move in the initial stages of obturation.
Follow-up radiographs
Radiographic follow-up is an adjunct to, but should not replace, clinical follow-up. A periapical radiograph is an important aid for evaluating the success or failure of endodontic treatment. The first follow-up radiograph is taken directly after completion of endodontic treatment, preferably by the paralleling technique. Subsequent, follow-up radiographs should be exposed under the same conditions and using the same technique in order to permit comparisons.
The recommended intervals for radiographic follow-up of symptom-free teeth are 6, 12 and 24 months4. If resolution is questionable at 2 years, further annual radiographs may be justified. However, it must be remembered that patient exposure to radiation must always be kept as low as reasonably achievable (ALARA).
In cases of teeth that become symptomatic during follow-up, other radiographs may be required according to clinical judgement.
ACCESS CAVITIES
An access cavity is a preparation (usually into the clinical crown) through which treatment of the dental pulp or pulp space is effected.
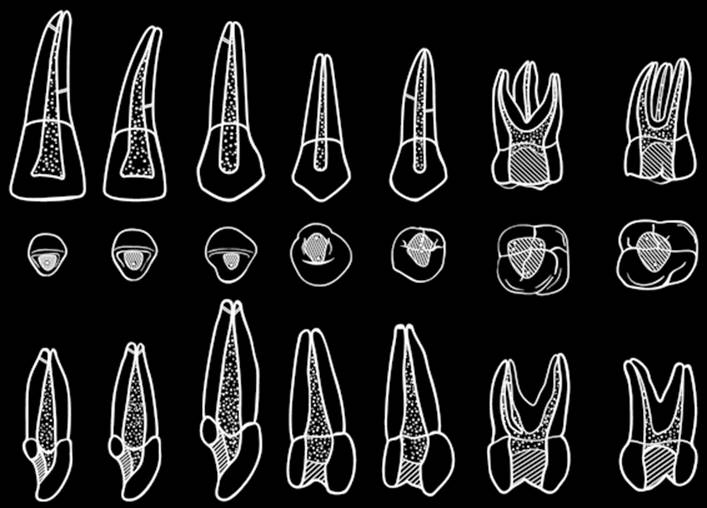
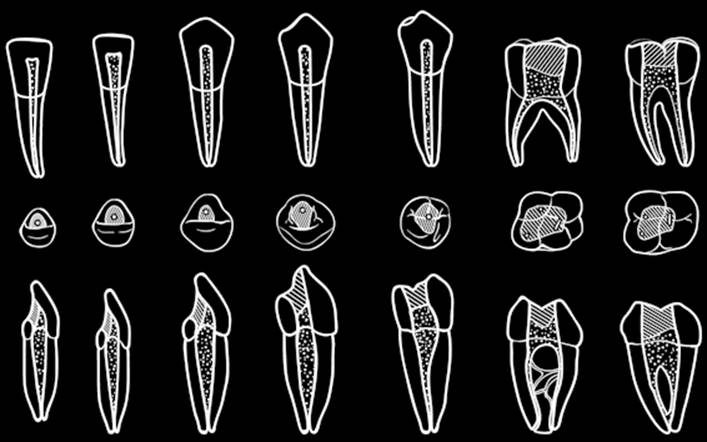
It is essential that the operator has a good understanding of normal tooth and root canal anatomy (Figs 3.1, 3.2).
Objectives
The objectives of preparation of an access cavity are:
• To remove the entire roof of the pulp chamber so that the chamber can be fully debrided and its floor examined to locate canals.
• To facilitate root canal shaping by providing straight-line access to the apical third of the root canals.
POOC03 02/18/2005 04:33PM Page 57
Principles of endodontics 57
Fig. 3.1 Anatomy and access cavity outline for maxillary teeth.
Fig. 3.2 Anatomy and access cavity outline for mandibular teeth.
POOC03 02/18/2005 04:33PM Page 58
58 Chapter 3
• To enable a temporary seal to be placed securely.
• To conserve as much tooth tissue as possible (while satisfying the previous objectives).
Design considerations
Preparation form
A straight-line access for the root canal instruments should be achieved whenever possible. Undue bending of instruments during insertion renders them more liable to distortion or fracture and makes access to some part of the pulp space problematical. Having to force an instrument around curves makes a perforation more likely.
Furthermore, sufficient freedom of movement of an instrument, when in the canal, is necessary to permit effective cleaning and shaping of all parts of the pulp walls.
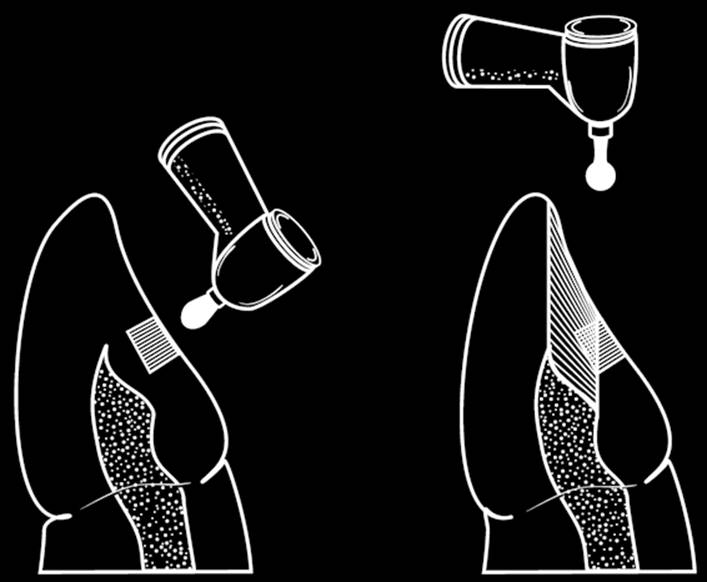
The access cavity itself should therefore have a rounded outline and be symmetrically placed about fissures and away from crown margins. This will reduce the incidence of fracture of porcelain crowns. Palatal and lingual openings on anterior teeth are preferred for aesthetic reasons but lingual inclination, especially of lower anteriors (and sometimes premolars), may indicate access cavity preparations involving the labial or buccal surface (Fig. 3.3).
Preparation is related to the form and position of the pulp chamber and the root canals extending from it rather than to the overlying fissure pattern.
Unnecessary tissue removal should be avoided because of the functional need to preserve the strength and integrity of root and crown structure. An access cavity through the roof of the pulp chamber significantly weakens the tooth – in the extreme case of a molar with a mesio-occluso-distal preparation, tooth tissue is left only in the furcation area leading to a high risk of fracture if remaining cusps are still in high functional load. Occlusal reduction of a molar undergoing endodontic treatment may be helpful. Subsequent placement of a cuspal coverage restoration will permit restoration of occlusal function.
Therefore, the access cavity should be of sufficient size only to satisfy endodontic objectives.
Removal of infected dentine
It is necessary to eliminate any direct source of canal contamination and potential pathway of contamination from the mouth. All unsound
POOC03 02/18/2005 04:33PM Page 59
Principles of endodontics 59
restorations and tooth structure should be removed and cavities on the axial wall of the crown thoroughly excavated and, if below the rubber dam, sealed before isolation. If the pulp chamber is opened at this stage it is helpful to protect the floor and the opening(s) to the root canal(s) with a gutta-percha or cotton pellet, which fills the pulp chamber, before placing sealants or new restorations. Total removal of extensive restorations may, however, be undesirable as this could compromise support from weakened residual coronal tissues and make isolation more difficult.
Technique
This may be divided into stages:
• Initial access cavity outline and isolation
• Pulp chamber entry
• Pulp chamber roof removal
• Preparation margin modification
• Cavity refinement
• Irrigation
• Canal orifice opening
Initial access cavity outline and isolation
The initial access stage may be executed before placement of rubber dam (required for isolation) in order to aid orientation.
Pulp chamber entry
Careful reference to preoperative radiographs will give an indication of pulp size or position. Long shank bur designs improve visibility but it is essential that landmarks on the floor of the pulp chamber are maintained. The dust of enamel, dentine or dressing created at this stage may be gently cleared using a three-in-one syringe and aspirator across the mouth of the cavity. Air (or fluids) under pressure should not be blown into the pulp chamber because impaction of debris into the canal may cause blockage and there is a risk of air embolus.
Pulp chamber roof removal
The cavity is then opened up to afford smooth-walled access to the pulp cornua. Extension of the preparation cervicolingually, especially
POOC03 02/18/2005 04:33PM Page 60
60 Chapter 3
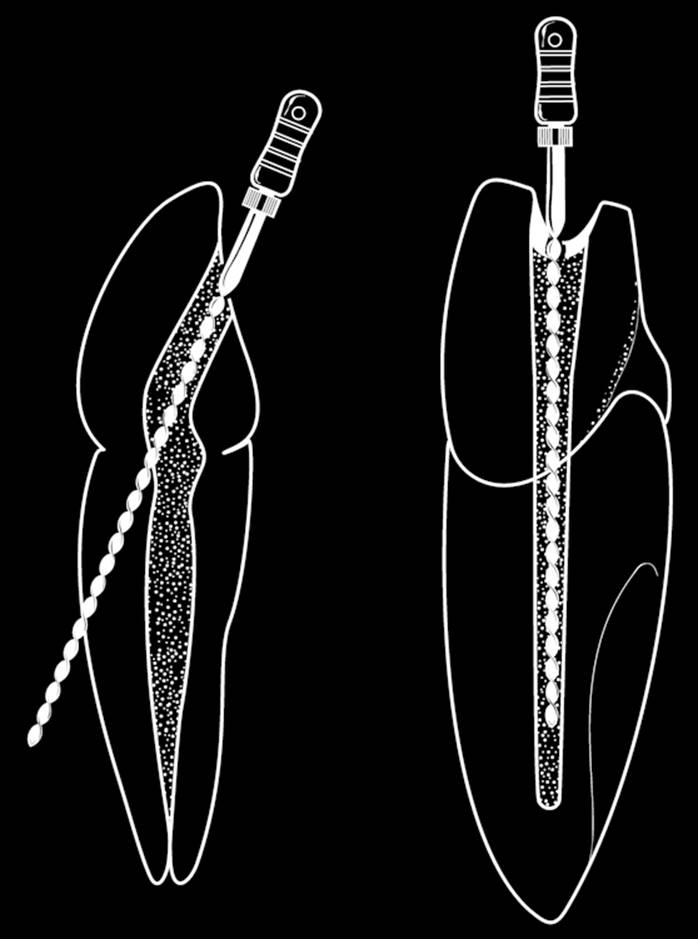
Fig. 3.3 Axial access for a lower incisor. (Straight line access to the root canal requires extension of the access to the incisal edge.) Fig. 3.4 Coronal opening.
in lower incisors, improves access to the buccolingual extremities of an elliptical pulp space (Figs 3.3, 3.4). The use of magnification in the form of loupes or an endodontic microscope has very much enhanced the ease of identification of root canals. Another aid is the use of ultrasonically powered instruments used at low power and without water
POOC03 02/18/2005 04:33PM Page 61
Principles of endodontics 61
cooling. Careful use of specially designed tips facilitates the widening of the opening of root canals that may be partially obliterated by calcific material.
Preparation margin modification
Refinement of the preparation margins is carried out, if necessary, to facilitate reproducible positioning of instrument handles against a reliable reference point. Location of the pulp chamber may prove to be difficult under prosthetic crowns. Alignment of the root relative to the crown may be confirmed by imaging techniques, by palpation and by subgingival probing.
Cavity refinement
Creation of pulpally converging walls on opposing aspects of the access cavity is achieved by the use of a safe-ended, non-cutting bur (e.g. a Batt bur) which will prevent damage to the floor of the pulp chamber.
Irrigation
Copious irrigation with sodium hypochlorite (NaOCl) will arrest any haemorrhage, assist in the removal of pulpal remnants (dissolves organic material) and debris obstructions, and assist in the prevention of extension of contamination from crown to root apex (i.e. acts as a disinfectant). A variety of concentrations of sodium hypochlorite (from 0.5% to 5%) are advocated. Higher concentrations act more quickly, although the risk of tissue irritation, if the irrigant is extruded past the apex and into the peri-radicular tissues, is greater. Lower concentrations are also antibacterial, and are less irritant to tissues, but require longer contact times and greater volumes.
Canal orifice opening
The entrances to the canals can be identified with the aid of a sharp probe such as a DG16. There is no sharp delineation between the access preparation stage and canal cleaning and shaping, and to a large extent, the transition stage occurs when initial widening of the canal orifices is carried out. This stage is a natural extension of access preparation, and leads to canal cleaning and shaping. Not withstanding the above, this stage involves use of either hand or
POOC03 02/18/2005 04:33PM Page 62
62 Chapter 3
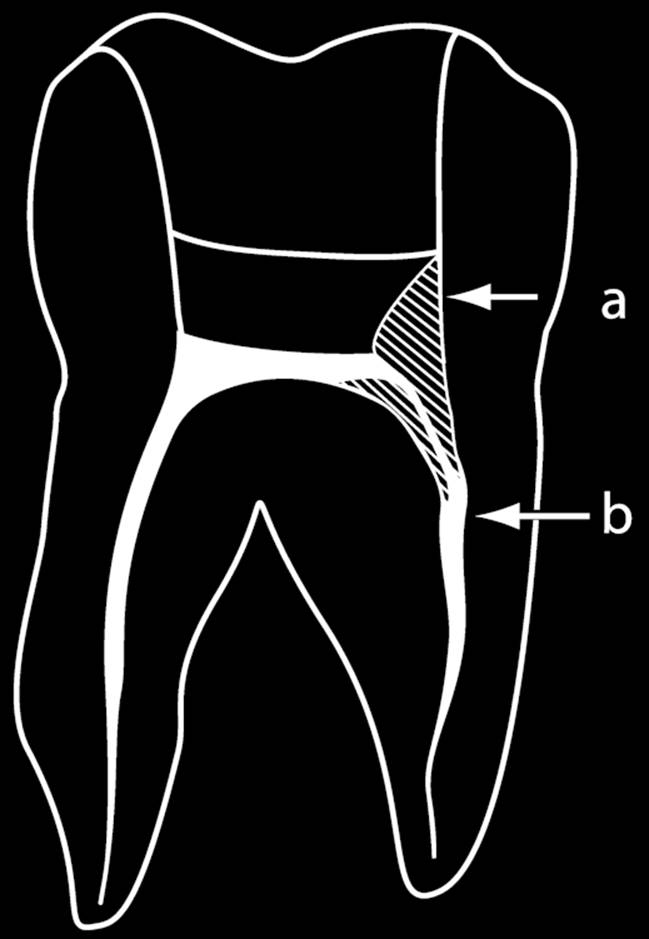
Fig. 3.5 Coronal shaping – ledge removal at (a) gives straight line access to (b).
rotary instruments to widen the orifices of the canals. A sequential series of instruments should be used in decreasing order (larger to smaller), sometimes referred to as ‘stepping down’.
The aims of this procedure are to remove any features of the canal wall anatomy which may preclude straight-line access to the canal terminus, to create a greater space in which irrigating solutions are effective and to assist the ease of canal location (Figs 3.4, 3.5). Gates Glidden drills are effective for this procedure (see section on cleaning and shaping).
ENDODONTIC INSTRUMENTS
ISO standardisation
Before a standardised configuration was adopted, endodontic instruments varied greatly from one manufacturer to another. The configuration adopted is that set by the International Organization for Standardization (ISO) and is laid down in ISO specification No. 3630.
All ISO hand instruments, along with paper points, silver points and standardised gutta-percha points, conform to this system. ISO
standardised files have a cutting length of 16 mm, have a specified diameter at the tip (termed D ) and increase in diameter by 0.02 mm 1
for each millimetre along the file, so that at the end of the cutting part (16 mm along the file) the diameter (termed D ) is 0.32 mm greater 2
than at D . This is called an .02 taper. Files may vary in length, any 1
extra length is provided by a ‘blank’ portion. The nominal size of
POOC03 02/18/2005 04:33PM Page 63
Principles of endodontics 63
the instrument is based on the diameter of its tip (the diameter at D ) 1
expressed in hundredths of a millimetre. Thus an ISO size 50 file will have a tip diameter of 0.50 mm.
ISO standardisation also uses a colour for each size, as shown below:
Colour
Nominal Size
Pink
06
Grey
08
Purple
10
White
15
45
90
Yellow
20
50
100
Red
25
55
110
Blue
30
60
120
Green
35
70
130
Black
40
80
140
Specialised half sizes are colour-coded in the following way: Purple/Gold
12
White/Gold
17
Yellow/Gold
22
Red/Gold
27
Blue/Gold
32
Green/Gold
37
The length of the instrument is measured in millimetres and is indicated on the packaging. The normal lengths available are 21, 25, 28 and 31 mm.
Endodontic instruments vary according to metal alloy, tip design, mode of manufacture and shape of cutting flutes. There are also a large number of files available that are non-ISO and these vary in taper and length of cutting blade.
Alloys
The properties of root canal instruments are related to the alloy, taper and cross-sectional configuration. Most instruments are constructed either from stainless steel or nickel titanium.
Nickel titanium is composed of approximately 55% nickel and 45%
titanium by weight, and instruments constructed from this material are about three times as flexible as stainless steel instruments of the same dimensions. This flexibility facilitates the shaping of very curved canals. Nickel titanium has shape memory; that is, when deformed, it will return to its original shape. This is in contrast to many other metal alloys (for example stainless steel) that, if bent or twisted, may remain permanently deformed. This difference in mechanical properties
POOC03 02/18/2005 04:33PM Page 64
64 Chapter 3
influences the method of construction. Files made from stainless steel may be made by taking a blank of material, with a rectangular or square cross-section, and twisting it to form cutting flutes. This is not possible with nickel titanium due to its shape memory, so in order to create cutting flutes, the shape must be machined from a blank rather than being twisted.
A major advantage of nickel titanium files is that they are flexible at greater tapers than stainless steel and they may therefore be used in rotary handpieces. A disadvantage is that they are prone to fracture and removal of separated fragments may be difficult.
Hand instruments
Traditionally, hand files were manufactured by twisting square or triangular shafts of metal around their long axis. Recently, computer-assisted machining has enabled the modification of existing file geometries. The principal endodontic instruments are files.
Reamers
Reamers are made from stainless steel and are of square (smaller sizes) or triangular (larger sizes) cross-section. The blank is twisted to create an instrument with cutting flutes at predetermined intervals.
These instruments have the disadvantage in that they are relatively inflexible and therefore are restricted to the shaping of canals of round cross-section.
Files
A wide variety of hand files are available, these differ in their configuration and mode of action. Below is a summary of the features of the more common types of files.
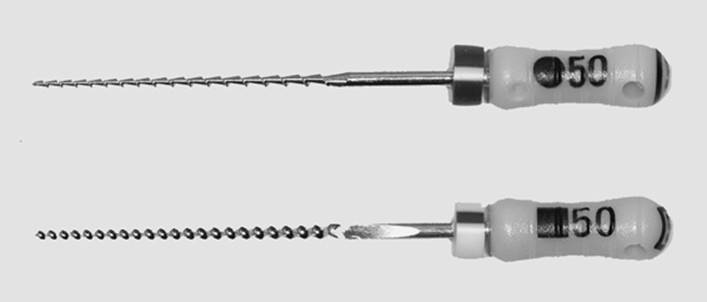
Hedström files (Fig. 3.6)
• These are machined from a round tapered blank. A spiral groove is cut into the shank to produce a sharp blade. They are less flexible than K-type instruments and only the smaller sizes may be pre-curved owing to the risk of deformation or fracture.
• Cutting occurs during withdrawal of the file from the canal.
• Hedström files are very efficient in a planing action for removal of dentine.
POOC03 02/18/2005 04:33PM Page 65
Principles of endodontics 65
Fig. 3.6 Typical files used in endodontics, Hedström (top) and K-file (bottom).
• They should be inserted slowly with avoidance of rotation (except for a slight rocking motion to aid negotiation).
• They should not be rotated anticlockwise.
• The files are used by withdrawal up each aspect of the root canal in a circumferential filing motion.
K-type files (Fig. 3.6)
• These are probably the most widely used of the ‘classical’ designs of root canal instrument.
• K-type files are formed by twisting a tapered steel wire of square or triangular cross-section. This method of manufacture results in work hardening and therefore produces a ‘springy’ instrument with enhanced stiffness for insertion into narrow canals but it will then elastically recoil against the canal wall. These instruments are normally used with a filing action.
• K-type files are less aggressive in planing than the Hedström design.
K-Flex files
• Their cross-sectional geometry is rhomboid to produce alternate high and low flutes so the action is to cut and clean. The high flutes cut and the low flutes allow space for dentinal shavings and more efficient debris removal.
• This cross-sectional configuration results in a reduction in metal, producing increased flexibility without a significant reduction in strength.
POOC03 02/18/2005 04:33PM Page 66
66 Chapter 3
FlexoFiles
• Using computer-assisted grinding technology, it has been possible to fabricate these files from a round blank, similar to the K-type file.
• These files have sharper flutes to increase their cutting efficiency and have a deeper space between flutes to transport dentine shavings more efficiently but they are more prone to fracture.
Greater taper (GT) hand files
• These files are constructed from nickel titanium. They are non-ISO
files and are available in four sizes with varying taper, increasing from 0.06, 0.08, 0.10 to 0.12; all have a size 20 tip (i.e. 0.20 mm).
Gutta-percha cones are available in the same range of tapers, though the terminology used is often (confusingly) different: 0.06
taper is termed fine, 0.08 is fine-medium, 0.10 is medium and 0.12 is medium large.
• GT files are designed to be active in a counter-clockwise direction.
• The most apical extent of a GT file should never engage dentine, rather it should passively follow the canal direction.
Rotary instruments
Gates Glidden drills
The six instruments in this series are made from stainless steel. Each instrument has a long shaft and a flame-shaped cutting head. Gates Glidden drills are ideally used to cut dentine on the withdrawal stroke. They are confined to the straight section of the canal and are used serially and passively in a step-back manner, such that each successively larger drill is worked shorter than the preceding smaller one. They may also be used in a step-down manner. Used properly, these drills are inexpensive, safe and beneficial. However, they must be used with care as they may separate and over-aggressive use may result in perforation of the canal wall.
Nickel titanium rotary instruments
The use of nickel titanium instruments reduces the risk of procedural errors during cleaning and shaping, such as blocks, ledges, transporta-tions and perforations (see later). However, their use is associated with an increased incidence of instrument separation.
POOC03 02/18/2005 04:33PM Page 67
Principles of endodontics 67
There is a wide range of instruments which vary in cross-sectional configuration to some degree. Most have a radial land, that is, a flat planing surface (in contrast to the sharp planing/cutting flutes of twisted hand files), which centralises the instrument in the canal and prevents the instrument from cutting into the canal walls. Cutting of dentine is achieved by engagement of the flutes in the canal walls, debris being theoretically extruded in a coronal direction. Recommendations regarding techniques vary according to the system, but the basic principles remain the same in that the canal should be rendered free from infected material and shaped in such a way that it may be adequately obturated. As is the principle for hand shaping procedures, coronal opening should precede apical and mid-root shaping.
Electronic apex locators
The latest generation of these devices is useful in determining the position of the apical constriction. Many recent models measure impedance rather than electrical resistance, and are less sensitive to ionic solutions within the canal. They should therefore function in the presence of NaOCl, EDTA solution, blood or pus.
Following coronal flaring, one lead from the device is attached to an earthing clip and is positioned on the patient’s lip to complete an electrical circuit. The floor of the access cavity and 2–3 mm into the canal is dried. The other lead is clipped to the top of a file. The machine is switched on and the file is slowly advanced into the canal. Some devices show a digital display as the apex is reached and emit an audible bleep. Other devices have a visual display indicating the position at which the end point is reached. The figures should not be taken as an accurate indicator of file tip distance from the apex until zero is reached. If the apex locator is used through a metallic restoration (such as amalgam or a crown), care must be taken to prevent contact of the file with the restoration otherwise shorting of the reading will occur.
When a zero reading is displayed, the distance stop on the file is moved to contact a suitable reference point and the file then removed.
The distance between the file tip and the stop is measured and recorded together with the reference point. A diagnostic radiograph is then exposed as described previously.
POOC03 02/18/2005 04:33PM Page 68
68 Chapter 3
CLEANING AND SHAPING
Objectives of cleaning and shaping
The objectives of cleaning and shaping are to:
• Create a continuously tapering preparation.
• Maintain the original anatomy.
• Retain the position of the apical foramen.
• Keep the foramen as small as possible.
Step-down is now regarded as the preferred preparation technique5.
In this method, the coronal part of the canal is prepared before the apical region. The canal working length is determined following the step-down stage and before apical preparation is commenced.
The outcome of this approach to treatment is improved for the following reasons:
• There is better tactile control of instruments in the apical third.
• Pre-enlarged canals can hold a greater volume of irrigant to enhance cleaning.
• Pre-enlarged canals promote the removal of dentine mud.
• Post-treatment problems are reduced as the bulk of bacteria and their toxins will have been removed.
• Identification of the foramen is facilitated.
It is useful to remember that most teeth range from 19 to 25 mm in length. Most crowns are about 10 mm, and most roots range from 9 to 15 mm. The root may be divided into thirds: coronal, middle and apical.
Summary of cleaning and shaping procedures
• Preoperative radiograph
• Administration of a local anaesthetic
• * Rubber dam placement
• * Access cavity
• Identification and widening of canal orifices
• Investigation of canal patency
• Coronal two-thirds shaping
• Working length determination (using radiographs and/or an apex locator)
• Apical shaping
• Mid-third shaping and canal refinement
POOC03 02/18/2005 04:33PM Page 69
Principles of endodontics 69
*It may be appropriate to carry out access cavity preparation before isolation.
Negotiation of the coronal two-thirds
Coronal shaping is usefully preceded by negotiation of the canal with small flexible hand files. The aims are to:
• Reveal information about the cross-sectional diameter of a canal and the presence of any constrictions/pulp stones, etc.
• Confirm the presence of straight line access.
• Provide information about the anatomy of the root canal system.
Coronal two-thirds shaping
Coronal flaring (Fig. 3.5) may be accomplished in either a step-back or a crown-down approach. The step-back technique is the sequential use of instruments starting with the smaller sizes and progressing towards the larger. A crown-down approach is the serial use of instruments, starting with the larger and progressing to the smaller.
Usually, nickel titanium rotary instruments are used in a crown-down technique, whereas ISO hand files and Gates Glidden drills are best used in a step-back technique for the following reasons:
• Smaller instruments can be placed at a deeper level and cut on the up stroke (thus facilitating the removal of debris).
• The coronal two-thirds can be moved and relocated from the region of the furcation and towards the greatest bulk of dentine.
Working length determination
The working length establishes the apical extent of canal shaping and the end of the root canal filling and should be determined accurately before preparation of the apical third of the canal. When the coronal two-thirds has been pre-enlarged, there is excellent access for negotiation and preparation of the apical one-third.
A file of no smaller than a size 20 should be used as a diagnostic instrument as it may be difficult to distinguish the position of the tip of smaller size files by radiographic means. The file (pre-curved if necessary) is placed in the canal until it has reached this estimated length and a radiograph taken or an apex locator used. A locating stop on the handle of the file should be carefully positioned against a
POOC03 02/18/2005 04:33PM Page 70
70 Chapter 3
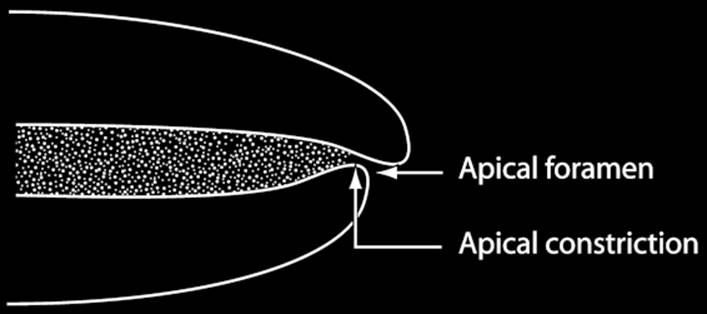
Fig. 3.7 Apical anatomy for working length determination.
reproducible reference point on the tooth to define the coronal aspect of the diagnostic length.
Following working length determination, apical preparation continues by the successive use of progressively larger instruments at the full working length. Copious irrigation and frequent recapitulation with a fine file will prevent build-up of canal debris.
Apical preparation
The terminal extent of shaping should be at the junction between the pulpal and periodontal tissues. This occurs at the apical foramen.
Usually, the apical foramen is the narrowest part of the root canal and this narrowing is termed the apical constriction (Fig. 3.7). It has been shown by Kuttler6 that this position is 0.5–1 mm from the radiographic apex in the majority of cases. However, this is not always the case, for example when the deposition of secondary cementum has occurred. In addition, canal anatomy is variable and the constriction may be at some distance from the foramen. It must also be remembered that the primary root canal does not necessarily exit at the radiographic apex.
Careful apical preparation is fundamental to the success of treatment and several factors should be considered including the apical extent of preparation, relative to the radiographic apex, and the three-dimensional shape and size of the pulp chamber.
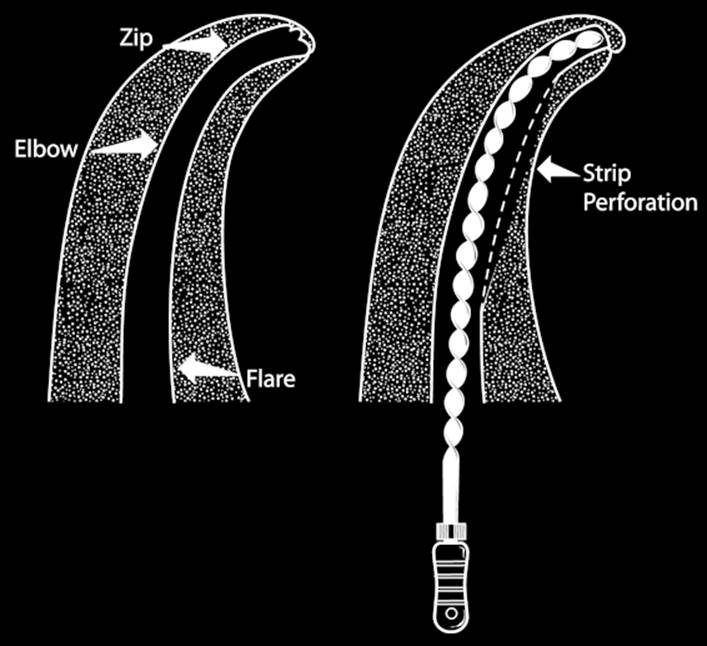
Most canals have some degree of curvature. An instrument placed in a curved canal will tend to cut the outer dentine wall to produce a widened, apically directed funnel which is tear-shaped in cross-section. The apical flare is called a zip and the section more coronal to it is called the elbow (Fig. 3.8). To overcome these problems, it is essential that shaping should reflect the canal size and curvature.
The degree to which the apical end of the canal should be prepared is subject to discussion. There is an argument that any significant
POOC03 02/18/2005 04:33PM Page 71
Principles of endodontics 71
Fig. 3.8 Apical errors.
widening is unnecessary if there has been adequate coronal flaring and adequate irrigation. There is also the risk of zipping or stripping the canal walls when larger size files are used, especially in curved canals. A counter argument is that there needs to be a minimum degree of preparation of the apical third so that infected dentine is removed. It is also easier to fill canals that have a larger apical preparation.
The shape of the apical preparation has also been considered and the terms ‘apical seat’ (or ‘apical box’) and ‘apical taper’ have been described. The fundamental philosophy is that if the terminal end of the canal is wide, then creation of an apical seat reduces the risk of overextension of the filling material. However, if the canal is fine and curved in its apical extremity, then production of an apical seat runs the risk of creation of apical stripping or zip formation.
Whichever method is adopted, it should be possible to place a spreader (a tapered, blank, pointed instrument used to push gutta-percha to one side when obturating) to within 2 mm of the radiographic apex.
‘Stepping back’ by using sequentially increasing size files at 1-mm increments short of the working length produces an apical taper. In between each larger file, the master apical file (or a fine file) is inserted
POOC03 02/18/2005 04:33PM Page 72
72 Chapter 3
to the full working length and irrigation is used to eliminate debris; this is termed ‘recapitulation’. The step back process is continued until this portion of the preparation reaches and blends with the coronal preparation.
Patency filing
Despite the careful and frequent use of irrigation, there is a risk that the accumulation of canal debris may result in apical blockage. It has been argued that this may be avoided by penetration of the apical constriction of the canal with a small file during the shaping procedure7,8.
This is thought both to direct the irrigating solution apically and also to dislodge the apical debris into the canal. Subsequent irrigation results in its removal. A counter argument is that this only applies to the main canal and there is a risk of inoculating infected canal contents further apically.
Mid-third shaping
The ideal shape for obturation purposes is that of a continuously tapering cone9. However, over-shaping brings with it the risk of weakening the tooth structure or stripping the canal walls. On the other hand, under-shaping may result in the accumulation of residual infected dentine and debris.
Curved canals – the balanced force technique There are a number of techniques for avoiding problems associated with curved canals including step-back, pre-curving of files and anticurvature filing10 (the preferential filing of the outer curve of the canal to reduce the chance of a strip perforation). The Balanced Force Technique11 is the use of instruments in a step-down manner to initi-ate pre-enlargement procedures and to gain access to the apical third efficiently. This is basically a reaming technique and adopts a 60–90°
clockwise action, for file insertion and dentine engagement, followed by a 120–180° anticlockwise movement with apically directed pressure for dentine removal. A final clockwise movement allows the file flutes to be filled with debris and removed from the canal. This method is said to be efficient and less likely to cause stripping of the canal walls due to the instrument being centrally located. There is also thought to be less risk of apical extrusion of debris.
POOC03 02/18/2005 04:33PM Page 73
Principles of endodontics 73
Smear layer management
When the blades of any file engage and cut dentine, a smear layer of organic and inorganic debris forms on the walls of the preparation.
Whether or not to remove the smear layer or leave it intact is still debated. If the smear layer is removed then a tighter interface between the obturation materials and the dentine walls is possible. If the smear layer is left, then the root canal system is incompletely sealed and the potential for microleakage increases. EDTA in its aqueous form, flooded into well-shaped preparations has been shown to remove the inorganic component of the smear layer, and when used in conjunction with sodium hypochlorite will eliminate the smear layer.
INTER-APPOINTMENT MEDICAMENTS
In asymptomatic teeth in which complications are not anticipated, cleaning, shaping and filling can be carried out in one visit. However, as it has been shown that elimination of intra-canal infection cannot be achieved at one treatment session, the use of intra-canal medicaments and filling of the canals at a second visit is justified12.
Theoretically, therefore, teeth with apical periodontitis should have a better prognosis when treated in more than one visit and when an intra-canal medicament is placed. However, this hypothesis is not always supported clinically as some studies indicate that teeth with apical periodontitis can perform well when treated in one visit12,13.
The requirements of an inter-appointment medicament are that it should be:
• Intact for the period of dressing
• Easy to apply and remove
• Antibacterial
• Eliminate any space for bacterial growth
In order to place an inter-appointment medicament, the canal is rendered clean and dry following cleaning and shaping before being filled with the paste material. This may be delivered on a pre-measured paper point, file or Lentulo spiral filler to the anatomic apex. Careful application of pressure using a cotton pellet ensures that the paste is condensed towards the apex. Excess material is blotted dry from the pulp chamber and the cavity sealed with a temporary cement overlaid with a more rigid material.
POOC03 02/18/2005 04:33PM Page 74
74 Chapter 3
A variety of materials have been proposed for this purpose including antiseptic pastes and other relatively toxic solutions and tinctures.
Calcium hydroxide
Calcium hydroxide has many of the properties of an ideal medicament. A non-setting paste of calcium hydroxide may either be made by mixing a powder form and sterile water, or purchased as a commercial product. It has the following properties:
• Strongly alkaline
• Antimicrobial and antibacterial
• Has low solubility
• Controls seepage of inflammatory exudates
• Induces calcific barrier formation
Iodine compounds
Most organisms are susceptible to calcium hydroxide, but this material is not always effective in teeth of complex root morphology in which complete filling of lateral canals cannot be guaranteed. In addition, some organisms, and particularly those implicated in retreatment cases, such as Enterococcus faecalis, are resistant to calcium hydroxide. They are, however, susceptible to iodine-containing compounds such as iodine potassium iodide. The presence of a smear layer inhibits penetration, hence the rationale for removal of the smear layer before placement of the inter-appointment medicament.
Iodine-containing compounds have good penetration effects, and will diffuse into dentinal tubules and lateral canals, but they are also short-lasting. It is therefore considered that a mixture of calcium hydroxide and 5% iodine potassium iodide is an appropriate inter-appointment medicament in re-treatment cases.
Steroid–antibiotic compounds
Commercial combinations of a steroid with an antibiotic are available and are used by some practitioners to alleviate the symptoms of an acute or terminal pulpitis. The steroid component suppresses the inflammatory response while the antibiotic addresses the microbial infection. However, such products should not be used as an alternative to meticulous cleaning and shaping procedures.
POOC03 02/18/2005 04:33PM Page 75
Principles of endodontics 75
Mineral trioxide aggregate
Although not an inter-appointment medicament, mineral trioxide aggregate (MTA) is an innovative material that appears to induce the formation of new bone and is used for perforation repair. Root perforations are an unfortunate recognised hazard associated with endodontic treatment and post-space preparation. The communication is likely to stimulate an inflammatory response and consequent resorption in the adjacent bone. It is therefore important to seal the defect as soon as possible. This is achieved by placement of a pellet of MTA cement over the defective site and by dressing the tooth. At a second visit, the temporary material is removed and the MTA is checked to ensure that it has set. The canals may then be obturated conventionally and the tooth kept under clinical and radiographic review.
OBTURATION (ROOT FILLING)
Rationale
The pulp space of a non-vital tooth is a potential reservoir for the stagnation and degeneration of tissue fluids to occur, and may act as a source of initiation and maintenance of periapical disease. If these stagnant and necrotic substances are contaminated with micro-organisms there is a potentially inaccessible source of persistent and progressive disease. To prevent this from happening, complete, three-dimensional obturation of the cleaned and shaped root canal with an impervious filling should be carried out to seal off communication between the pulp space and periodontal membrane.
Objectives
The objectives of filling, or ‘obturating’, the canal space are:
• To prevent percolation of peri-radicular exudates into the pulp space via the apical foramina or lateral canals.
• To prevent proliferation and spread of micro-organisms from the canal into the surrounding tissues.
• To seal the canal from coronal leakage.
• To encompass any residual bacteria.
POOC03 02/18/2005 04:33PM Page 76
76 Chapter 3
Sealers
Gutta-percha is the most commonly used root canal filling material but does not adhere to dentine. Warm gutta-percha may contract away from the root canal walls, leaving a potential space into which fluids may percolate. There is therefore a need to use a sealant material that bridges the gap between the filling and the walls of the canal and fills any potential spaces into which micro-organisms may proliferate.
A sealer may fulfil any one or more of the following functions:
• Acts as a luting agent
• Fills any discrepancy between the canal walls and core material
• Fills any discrepancy between gutta-percha points
• Acts as a lubricant
• Acts as a bactericidal agent
• Fills any lateral canals
Requirements
A sealer should have the following properties:
• Be capable of achieving a thin film
• Have high tissue tolerance
• Be of uniform consistency
• Have good rheological properties
• Be of low solubility
• Have an adequate working time
Groups
There is a variety of sealers available, and these may be simply split according to their constituents:
• Zinc oxide based
• Calcium hydroxide based
• Resin sealers
• Glass-ionomer sealers
In the initial setting phase, sealers may be cytotoxic; hence, overextension of the sealer beyond the confines of the canal should be avoided.
Gutta-percha
Gutta-percha has been used for more than 100 years. It is a form of rubber mixed with zinc oxide and other agents. Although not ideal,
POOC03 02/18/2005 04:33PM Page 77
Principles of endodontics 77
its advantages are that it is inert, is dimensionally stable, is non-allergenic, antibacterial, non-staining, radiopaque, compactable, may be softened by heat and organic solvents and may be removed from the canal.
Filling techniques
There are various techniques. These may be divided into:
• Solid gutta-percha techniques
• Softened gutta-percha techniques
Gutta-percha may be softened using either heat or solvents
Solid core techniques
Solid core techniques may utilise a single cone of gutta-percha or may employ lateral condensation of multiple cones of gutta-percha. For these methods, a gutta-percha cone is selected to match the size of the apical preparation, i.e. a master cone of the same size as the master apical file is chosen. Although a master cone is selected to match the size of the master apical file, the apical preparation may be larger than the nominal size due to the filing action of the file. Therefore, the selected master cone may, in fact, be a loose fit. In order to achieve a good friction fit (termed ‘tug-back’), the tapered master cone is shortened slightly so that it has a slightly larger diameter at its end.
Several trial fits may be necessary to obtain the required tug-back at the correct length.
In the single cone method, the gutta-percha cone is selected to match the canal preparation dimension. Although this is a quick technique, the main disadvantage is that only canals of circular dimension may be adequately filled and this rarely represents the true clinical situation. Should this method be used in non-circular canals, there will not be a three-dimensional fill.
In the lateral condensation technique (the favoured method for solid core techniques), a master gutta-percha cone, corresponding to the apical preparation dimension, is placed in position, alongside which are condensed additional accessory gutta-percha points. The advantage is that the canal may be filled in all dimensions, the final material being a mass of gutta-percha points joined by a thin layer of sealant material. This is, however, a technique-sensitive method, it can be time consuming and is not appropriate in cases of internal resorption, for example. It must also be remembered that filling of lateral canals by sealant cannot be guaranteed.
POOC03 02/18/2005 04:33PM Page 78
78 Chapter 3
A gutta-percha point of the same size as the master apical file should wedge slightly at 0.5–1.0 mm short of the full working length and a ‘dry run’ root filling radiograph is useful to confirm its position.
Measurement of a spreader (a tapered, blank, pointed instrument used to push the gutta-percha to one side) to 2 mm short of the working length ensures that apically directed pressure will not result in overextension of the gutta-percha.
The walls of the canal to 2 mm short of the apex should be coated with an even, thin film of sealant and this also facilitates placement of the master gutta-percha point by acting as a lubricant.
Controlled placement of the coated master cone allows extrusion of excess sealer in a coronal direction before it is seated with firm pressure and a twisting action. Insertion of either a hand or finger spreader to the depth indicated by the stop, alongside the master cone, pushing it to one side and oscillating and withdrawing the spreader results in creation of space for the placement of additional wedging or lateral cones. When excess filling material at the base of the pulp chamber has been seared off using a hot ‘plastic’ instrument to the level of the canal orifice, a check root filling radiograph should be carefully assessed to confirm that the root has been adequately obturated.
Softened gutta-percha methods
Several methods have been described to plasticise gutta-percha.
These may be divided into:
• Heat applied inside the canal
—
warm vertical condensation
—
warm lateral condensation
—
thermomechanical compaction
• Heat applied outside the canal
—
injection technique
• Carrier-based methods
—
heat applied outside the canal
—
mechanical sources of heat
• Solvent methods
Warm lateral condensation involves the use of a heated spreader applied to a master gutta-percha cone inside the canal. Heat may be derived either from an external source (such as a warm Bunsen) or from a thermostatically heated spreader. Pressure is applied and the heated mass is adapted to the canal walls. The warm spreader is
POOC03 02/18/2005 04:33PM Page 79
Principles of endodontics 79
removed and a cold spreader creates space for further cones to be added. This process is repeated.
Warm vertical condensation involves a process similar to the above, except vertically directed forces are applied. The disadvantage is that there is a danger of overextension of filling material and sealant if there is not good resistance to apical extrusion.
Gutta-percha may be warmed in a thermostatically heated delivery gun and applied/injected into the canal via a needle14. A cold vertical condenser is used to compact the material. This method is particularly useful to fill root canal systems of non-conventional morphology (e.g. internal resorption). Again, there is a danger of overextension of material in the absence of a positive apical stop. Prior placement of a master cone precludes this potential problem.
Use of a mechanically operated thermomechanical compacter softens a gutta-percha cone which is adapted to the canal walls.
Placement of a gutta-percha cone is essential to preclude overextension of material. Disadvantages include the risk of instrument separation, results may be inconsistent and even if a master cone is placed, apical extrusion of material may result.
Coronal seal
Studies have shown that the quality of the coronal seal has a significant effect on the outcome of endodontic treatment with coronal leakage being associated with a less favourable result15,16. A number of studies have shown that coronal leakage is reduced if the smear layer is removed17. Leakage will also be prevented if an adhesive restoration is placed in the coronal aspect of the tooth, hence the justification for placement of a resin-modified glass-ionomer material over the gutta-percha followed by provision of a well-sealed temporary or permanent filling.
REFERENCES
1.
Kakehashi S., Stanley H.R. and Fitzgerald R.J. The effects of surgical exposures of dental pulps in germ-free and conventional laboratory rats.
Oral Surg Oral Med Oral Pathol, 1965; 20: 340–9.
2.
Faculty of General Dental Practitioners [FGDP]. Radiographs in endodontics. In: Selection Criteria for Dental Radiography, 2nd edn.
London, FGDP(UK), 2004, pp. 63–71.
3.
Fava L.R. and Dummer P.M. Periapical radiographic techniques during endodontic diagnosis and treatment. Int Endod J, 1997; 30: 250–61.
POOC03 02/18/2005 04:33PM Page 80
80 Chapter 3
4.
Consensus report of the European Society of Endodontology on quality guidelines for endodontic treatment. Int Endod J, 1994; 27: 115–24.
5.
Goerig A.C., Michelich R.J. and Schultz H.H. Instrumentation of root canals in molars using the step-down technique. J Endod, 1982; 8: 550–4.
6.
Kuttler Y. Microscopic investigation of root apices. J Am Dent Assoc, 1955; 50: 544–52.
7.
Schilder H. Cleaning and shaping the root canal. Dent Clin North Am, 1974; 18: 269–96.
8.
Buchanan L.S. Working length and apical patency: the control factors.
Endod Rep, 1987; 16–20.
9.
West J.D. and Roane J.B. Cleaning and shaping the root canal system. In: Cohen, S. and Burns, R.C. (eds) Pathways of the Pulp, 7th edn. London, Mosby, 1988, pp. 203–57.
10.
Abou-Rass M., Frank A.L. and Glick D.H. The anticurvature filing method to prepare the curved root canal. J Am Dent Assoc, 1980; 101: 792–4.
11.
Roane J.B., Sabala C.L. and Duncanson M.G., Jr. The ‘balanced force’
concept for instrumentation of curved canals. J Endod, 1985; 11: 203–11.
12.
Sjogren U., Figdor D., Persson S. and Sundqvist G. Influence of infection at the time of root filling on the outcome of endodontic treatment of teeth with apical periodontitis. Int Endod J, 1997; 30: 297–306.
13.
Pekruhn R.B. The incidence of failure following single-visit endodontic therapy. J Endod, 1986; 12: 68–72.
14.
Yee F.S., Marlin J., Krakow A.A. and Gron P. Three-dimensional obturation of the root canal using injection-moulded, thermoplasticized dental gutta-percha. J Endod, 1977; 3: 168–74.
15.
Ray H.A. and Trope M. Periapical status of endodontically treated teeth in relation to the technical quality of the root filling and the coronal restoration. Int Endod J, 1995; 28: 12–18.
16.
Saunders W.P. and Saunders E.M. Coronal leakage as a cause of failure in root-canal therapy: a review. Endod Dent Traumatol, 1994; 10: 105–8.
17.
Taylor J.K., Jeansonne B.G. and Lemon R.R. Coronal leakage: effects of smear layer, obturation technique, and sealer. J Endod, 1997; 23: 508–12.
POOC04 02/18/2005 04:35PM Page 81