Moira Davenport, Dennis Hanlon and Ryan Friedberg
Orthopedic Emergencies, ed. Michael C. Bond, Andrew D. Perron, and Michael K. Abraham. Published by Cambridge University Press. © Cambridge University Press 2013.
Local anesthetics
Key facts
· Ester anesthetics: procaine, tetracaine
· Amide anesthetics: bupivacaine, lidocaine
· Cardiac lidocaine is preservative free and may be used in patients with previous lidocaine allergy
· Onset of action and duration of action varies based on agent used, concentration of agent, amount of agent and location of injection
· Attention should be paid to the amount of anesthetic given to avoid toxicity
o Lidocaine w/o epi max dose = 4 mg/kg
o Lidocaine with epi max dose = 7 mg/kg
· CNS excitation and lightheadedness are typically associated with toxicity
· Lidocaine with epinephrine may be used on digits, nose, etc
· Ensure that anesthesia is achieved prior to starting the procedure
· Always use sterile gloves when administering local anesthetic agents
Indications
· Local anesthesia for procedures
o Sutures
o Fracture/dislocation reduction
o Incision and drainage
Contraindications
· Cellulitis/infection at injection site
· Bleeding disorders (relative)
o Anticoagulant use
· Previous allergic reactions to anesthetic agent
Risks
· Infection
· Bleeding
· Nerve damage
· Anxiety/agitation (particularly in children)
· Tissue distortion (particularly with larger volumes)
General suggestions
· Always obtain informed consent before performing a block or a procedure
· Aspirate slightly before injecting anesthetic to ensure that the needle is not in a vascular structure
· If paresthesias are elicited during a block it is likely that the needle is in close proximity to a nerve/nerve sheath. If this occurs withdraw the needle slightly and reassess location before continuing the injection
Regional anesthetics
Hematoma block
· Easily performed
· Achieves reasonable anesthesia
· Ideal for distal radial fractures, gaining popularity with ankle fractures
· Time to onset: approximately 5 minutes
Contraindications
· Open fracture
· Grossly contaminated skin
Supplies needed
· Chlorhexidine swabs (or other cleaning solution)
· Lidocaine 1% or 2%
· 10 cc syringe
· 25-gauge needle (length dependent on patient habitus) for injection
· 18-gauge needle (for preparation/aspiration of solution to be injected)
Technique
· Place the injured extremity in a position of relative comfort
· Clean the skin overlying the hematoma with chlorhexidine swabs
· Fill the 10 cc syringe with lidocaine
· Insert the needle into the center of the hematoma
o Enter the skin at a 90° angle
· Advance the needle until it hits bone
· Pull the needle back 0.5–1 cm
· Draw back blood to confirm placement of the needle in the hematoma
· Inject the lidocaine in a fan-like distribution
o Goal: Anesthetize bone and periosteum
· Remove the needle
· Cover the injection site with a sterile bandage
· Proceed with necessary reduction(s)
Regional anesthesia
(Bier block)
Indications
· Anesthesia of large portion of a limb
o Large lacerations
o Burn
o Foreign body
o Long-bone fracture
Contraindications
· Hypertension
· Altered mental status patient
· Crush injury (relative contraindication)
Supplies
· Lidocaine 0.5% solution
o Dose: 3 mg/kg
o Mini Bier block dose: 1.5 mg/kg
· Sterile saline (for dilution)
· Pressure control pneumatic tourniquet
· 20-gauge (or larger) IV catheter
· 50 cc syringe
· Compression bandage
· Gauze pads
· 18-gauge needle for preparation/aspiration of anesthetic
· Chlorhexidine swabs (or other cleaning solution)
Procedure
· Dilute the lidocaine to 0.5% (if not prepackaged at this concentration)
· Apply the pressure controlled pneumatic tourniquet to the proximal aspect of the affected extremity
· Place the 20-gauge IV on the affected extremity
· Secure the IV
· Elevate the extremity to facilitate effective exsanguination
o Compression of proximal arteries (axillary artery in the upper extremity, femoral artery in the lower extremity) may increase the efficacy of exsanguination
· Wrap the extremity (distally to proximally) with a compression bandage to further facilitate exsanguination
· Inflate the tourniquet to 50 mm Hg above systolic blood pressure
· Place the extremity in a neutral position
· Slowly inject the lidocaine 0.5%
· If less than complete anesthesia is achieved, inject 10–20 cc of normal saline
· Perform the necessary procedure
· Deflate the tourniquet in a cyclic fashion
o Do not deflate the tourniquet until 30 minutes after infusion of the anesthetic
o Deflate for 10 seconds, reinflate for 1–2 minutes
o Repeat four to five times before removing tourniquet completely
· Remove the IV
· Serial neurovascular checks should be performed every 15 minutes following the procedure until neurologic function returns to baseline
Two-tourniquet technique
· Updated technique designed to limit systemic lidocaine toxicity
· Place two tourniquets in close proximity to each other on the proximal aspect of the affected extremity
· Proceed with the exsanguination process as in a classic Bier block
· Inflate the proximal cuff first (to 50 mm Hg above systolic blood pressure)
· Inject the anesthetic
· Inflate the distal tourniquet to 50 mm Hg above systolic blood pressure
o Do not inflate the distal tourniquet until at least 25 minutes after anesthesia is achieved
· Deflate the proximal tourniquet as per the classic technique
· Perform therapeutic procedure
· Deflate the distal tourniquet as per the classic technique
Results
· Anesthesia progresses distally to proximally
· Onset of anesthesia: 3–5 minutes
· Complete anesthesia: 10–20 minutes
· Muscle relaxation typically follows complete anesthesia
· Sensation returns within 5–20 minutes of cuff deflation
Ulnar nerve block at the elbow
· Not recommended because of high rate of chronic nerve complications
Ulnar nerve block at the wrist
Supplies
· 25-gauge needle for injection (length dependent on patient habitus)
· 18-gauge needle for preparation/aspiration of anesthetic
· 10 cc syringe
· Skin cleaning solution
· Lidocaine 1% or 2%
Positioning
· Place the patient in a position of comfort
· Keep the elbow in a position of comfort
· Supinate the hand
Anatomy
· Identify the flexor creases of the wrist (Figure 9.1)
· Palpate the ulnar artery
· Identify the flexor carpi ulnaris tendon by flexing the patient’s wrist
· The ulnar nerve runs between the flexor carpi ulnaris tendon and the ulnar artery in the area between the proximal and distal palmar creases

Figure 9.1 The needle cap is pointing to the location of the ulnar nerve where the block should be placed. The correct location is between the flexor carpi ulnaris tendon and the ulnar artery, which is medial to the nerve. (Image courtesy of Michael Bond, MD.)
Procedure
· Identify the landmark
· Clean the skin
· Enter the skin at a 90° angle
· Inject 1–2 ml of lidocaine to the skin and subcutaneous tissue
· Advance the needle to the anatomic location of the ulnar nerve
o The ulnar nerve is relatively superficial, sitting less than 1 cm deep
· Inject 3–5 ml of lidocaine
Radial nerve block at the elbow
· Not recommended because of high rate of chronic nerve complications
Radial nerve block at the wrist
Supplies
· 25-gauge needle for injection (length dependent on patient habitus)
· 18-gauge needle for preparation/aspiration of anesthetic
· 10 cc syringe
· Skin cleaning solution
· Lidocaine 1% or 2%
Positioning
· Place the patient in a position of comfort
· Keep the elbow in a position of comfort
· Place the hand in a neutral position
Anatomy
· Identify the flexor creases of the wrist (Figure 9.2)
· Palpate the radial artery at the level of the proximal flexor crease
· The radial nerve runs just lateral to the radial artery at this location

Figure 9.2 The needle cap is pointing to the location of the radial nerve where the block should be placed. The radial nerve is just lateral to the radial artery at the flexor crease. (Image courtesy of Michael Bond, MD.)
Procedure
· Identify the landmark
· Clean the skin
· Enter the skin at a 90° angle
· Inject 1–2 ml of lidocaine to the skin and subcutaneous tissue
· Advance the needle to the anatomic location of the radial nerve
o The radial nerve is relatively superficial, sitting less than 1 cm deep
· Inject 3–5 ml of lidocaine
Digital block
Supplies
· 25-gauge needle for injection (length dependent on patient habitus)
· 18-gauge needle for preparation/aspiration of anesthetic
· 3 cc syringe
· Skin cleaning solution
· Lidocaine 1% or 2%
Positioning
· Place the patient in a position of comfort
· Keep the elbow in a position of comfort
· Pronate the hand
Anatomy
· Fingers are innovated via digital nerves, which run along both sides of the phalanx
· Identify the web space on both the radial and the ulnar aspects of the affected digit
· Identify the metacarpal head of the affected digit
Procedure
· Identify the landmarks
· Clean the skin
· Enter at the midportion of the web space (Figure 9.3) or at the base of the metacarpal (Figure 9.4)
· Hold the needle at a 90° angle to the skin
· Advance the needle to the anatomic location of the digital nerve
o The digital nerves are relatively superficial, sitting less than 1 cm deep
· Inject 1 ml of lidocaine
· Repeat the procedure on the other side of the affected digit

Figure 9.3 The needle cap is pointing to one of the locations where a digital nerve block can be placed. (Image courtesy of Michael Bond, MD.)
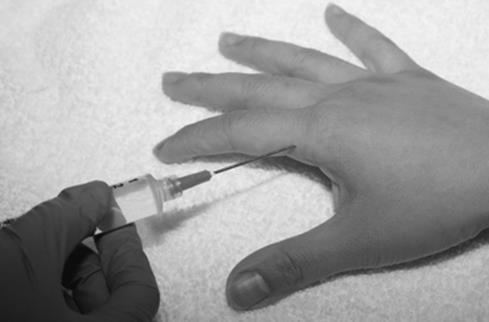
Figure 9.4 An alternate location for a digital nerve block is at the base of the metacarpal head. The needle cap is pointing to this location. (Image courtesy of Michael Bond, MD.)
Ring block
Supplies
· 25-gauge needle for injection (length dependent on patient habitus)
· 18-gauge needle for preparation/aspiration of anesthetic
· 3 cc syringe
· Skin cleaning solution
· Lidocaine 1% or 2%
Positioning
· Place the patient in a position of comfort
· Keep the elbow in a position of comfort
· Pronate the hand
Anatomy
· Fingers are innovated via digital nerves, which run along both sides of the phalanx
· Identify the web space on both the radial and ulnar aspects of the affected digit
· Identify the metacarpal head of the affected digit
Procedure
· Identify the landmarks
· Clean the skin
· Enter the radial aspect of the affected digit at the metacarpal head (Figure 9.5)
· Advance the needle horizontally across the base of the affected phalanx
· Inject 1 ml of lidocaine across the dorsum of the phalanx while withdrawing the needle to the point of insertion
· Remove the needle and then reinsert the needle, advancing toward the volar aspect of the digit
· Inject another 1 ml of lidocaine along the side of the digit
· Remove the needle
· Supinate the hand
· Insert the needle at the radial side of the volar aspect of the affected digit
· Advance the needle horizontally across the base of the affected phalanx
· Inject 1 ml of lidocaine across the volar surface of the phalanx while withdrawing the needle to the point of insertion

Figure 9.5 A ring block can be performed by infiltrating anesthetic in a ring-like distribution around the base of the finger. The needle is shown where you would typically enter the skin to place the anesthetic. (Image courtesy of Michael Bond, MD.)
Femoral nerve block
Supplies
· 25-gauge needle for injection (length dependent on patient habitus)
· 18-gauge needle for preparation/aspiration of anesthetic
· 30 cc syringe
· Skin cleaning solution
· Lidocaine 1% or 2%
Positioning
· Place the patient supine on a stretcher
· Externally rotate the leg approximately 15–20°
Anatomy
· The femoral nerve runs in parallel with the femoral artery and femoral vein in the inguinal area
o The mnemonic NAVEL (nerve, artery, vein, empty space, lymphatic) is often used to remember the anatomy, with the femoral nerve being the most lateral of the structures
· The ideal approach is at the midpoint between the anterior superior iliac spine and the lateral aspect of the pubic symphysis, approximately 2 cm distal to the inguinal ligament
Procedure
· Identify the landmarks
· Clean the skin
· Palpate the femoral artery
· Inject 1–2 ml of lidocaine to the skin and subcutaneous tissue just lateral to the palpable femoral pulse
· Enter the skin at a 90° angle
· Advance the needle to the anatomic location of the femoral nerve
o The needle is in the correct area when the patient develops paresthesias
· Pull the needle back 5 mm (or until paresthesias resolve) before injecting 15–20 ml of lidocaine
Arthrocentesis
Indications
· Diagnosis of joint disease (septic versus crystal-induced arthritis)
· Relief of pain from a large, tense joint effusion or acute hemarthrosis
· Inject lidocaine or steroids for pain relief in inflammatory arthritis
· Evaluating a joint to see if a laceration violates the joint capsule
Contraindications
· Absolute
o Infection overlying the joint
· Relative
o Known bacteremia
o Bleeding diathesis
o Prosthetic joint
Equipment
· Sterile drapes and gloves
· Skin preparations
· Local anesthetic
· Syringe
· Needles
· Collection tubes
Technique
· Use strict aseptic technique
· Local anesthesia
· Identify landmarks
· Ultrasound may help to localize the joint fluid collection
· 18–22-gauge needle attached to syringe (a 3-way stopcock may be used with large effusions)
· Aspiration of synovial fluid should flow easily. If fluid stops, advance or retract slightly, rotate bevel, or decrease the force of aspiration. If the needle is blocked, a small amount of sterile fluid may be injected
· Remove as much synovial fluid as possible
Key anatomy
· Specific sites
o Knee
§ The knee should be near full extension (flexed 10–15°) but not locked as the quadriceps must be relaxed
§ The middle or superior portion of the patella is the landmark
§ Insert an 18-gauge needle 1 cm inferior to the medial aspect of the patella (Figure 9.6). Alternatively, a lateral approach can be used
§ Compression of the joint effusion can increase the amount of fluid removed
o Wrist
§ Lister’s tubercle, the dorsal radial tubercle, is a prominence located in the center of the distal end of the dorsal radius
§ The extensor pollicis longus (EPL) runs in a groove on the radial aspect of this tubercle
§ Flex the wrist 20–30° with some ulnar deviation while applying traction to the hand
§ Insert a needle perpendicularly distal to Lister’s tubercle on the ulnar side of the EPL (see Figure 9.7)
o Elbow
§ Palpate the radial head with the arm extended then flex the elbow to 90° with the forearm pronated
§ Insert the needle from the lateral aspect at the center of the triangle between the radial head, olecranon, and the lateral epicondyle. Palpate a depression just proximal to radial head to identify this entry site (see Figure 9.8)
§ Direct the needle toward the distal edge of the antecubital fossa while keeping it perpendicular to the radius
o Ankle (medial approach)
§ The medial malleolus sulcus is bordered by the medial malleolus medially and the anterior tibial tendon laterally
§ Plantar flex the foot
§ Insert a 20–22-gauge needle just medial to the anterior tibial tendon directed at anterior edge of medial malleolus and advance 2–3 cm to penetrate joint

Figure 9.6 An arthrocentesis of the knee is performed by placing an 18-G needle 1cm inferior to the medial aspect of the patella as shown. (Image used with permission from McGraw-Hill; originally published in Emergency Orthopedics.)

Figure 9.7 The optimal site for arthrocentesis of the wrist is shown. (Image used with permission from McGraw-Hill: originally published in Emergency Orthopaedics.)

Figure 9.8 The optimal site for arthrocentesis of the elbow is shown. The needle should be inserted into the palpable depression just proximal to the radial head. (Image used with permission from McGraw-Hill; originally published in Emergency Orthopedics.)
Fluid analysis
· Gram stain, culture, and sensitivity
· Cell count with differential
· Crystals
· Lactate
· Glucose, protein
· May see fat globules if occult fracture
Complications
· Infection
· Bleeding
o In hemophiliacs, clotting factor is administered before arthrocentesis
· Dry tap
• PEARLS:
· Aseptic technique is essential
· Most important aspect of technique is palpating the bony landmarks to define joint space. Ultrasound may assist
· Approach is usually on the extensor surface as major vessels and nerves are located on the flexor side
· Mild flexion and traction may open up the joint spaces that are being tapped from the extensor surface
· Prosthetic joints are at high risk for infection. Have a low threshold for orthopedic consultation
Nail trephination
Indications
· Subungal hematoma
o Common, painful
o Caused by nailbed injury
o Described by the percentage of nail under which blood can be seen
Techniques
· Hot microcautery unit
o Prep with povidone–iodine solution (not alcohol, which catches fire)
o Apply slight downward pressure
o Stop applying pressure when resistance gives way, to avoid damage to the nailbed
· Heated paper clip
o Same as above
· Needle
o Prep with povidone–iodine solution
o Apply slight downward pressure to needle as you rotate it back and forth
o Widen opening to encourage continued drainage
o Some authorities advocate multiple holes
Complications
· Nail loss or deformity (always warn patient)
· Paronychia
· Osteomyelitis (rare)
PEARLS:
· > 50% subungal hematoma may warrant nail removal for nail bed repair (traditional teaching, now controversial)
· Intact nail provides splint and better long-term results (modern philosophy)
· X-ray to rule out underlying fracture (not mandatory, may use clinical judgement)
· Trephination provides excellent pain relief
General fracture-reduction techniques
Indications
· Displaced fracture with neurovascular compromise requires immediate reduction
· Displaced fracture that will be definitively managed with a closed reduction
Key anatomy/techniques
· General principles
o Always assess and document neurovascular status before and after reduction
o The periosteum on the side of the fracture to which the fragment is displaced usually remains intact
o This periosteum forms a hinge to relocate the displaced distal fragment (see Figure 9.9)
o The type of fracture and the degree of displacement will determine how much force and manipulation are required (see Figure 9.10)
o After a regional block, hematoma block, or procedural sedation, traction is applied to the distal fragment with countertraction applied to the proximal fragment
o The deformity is exaggerated if necessary, and any rotational deformity is corrected
o The distal fragment is then reduced as the angular deformity is corrected
o Appropriate immobilization is then applied. The method of immobilization varies with the specific injury involved
o How do you tell if reduction is adequate?
§ Rotational deformity is completely corrected regardless of age
§ Angular deformity is corrected for adults
§ Children tolerate some angular deformity (15–20°) if it is near the joint and in the same plane of motion
§ Weight-bearing joints require precise, anatomic reduction
§ Proper length is mandatory in lower extremity injuries
§ Anatomic reduction is confirmed by repeat radiographs, portable fluoroscopy, or bedside ultrasonography as clinical assessment of reduction is difficult

Figure 9.9 A diagram of how the periosteum acts as a hinge is shown.

Figure 9.10 A: The fracture at baseline before any reduction attempt is made. Notice how the distal fragment is displaced superiorly in the photo; this could be reduced with longitudinal traction. B: Shows a distal fragment that is shortened and overlaps the proximal bone. The longitudinal traction will need to be applied to the distal fragment to disengage the bone from the proximal portion and pressure is applied to push the distal fragment into its proper position. C: Demonstrates the next step where the distal fragment is then swung into proper position. D: Shows how the well-reduced bone is properly aligned. Force was applied to points 1 and 2 while point 3 was stabilized in order to get a good reduction.
Specific sites
· Distal radius fractures
o Colles fracture – refer to orthopedist after reduction because of high incidence of complications (stiffness, arthritis, compartment syndromes)
§ Only reduce those without intra-articular involvement
§ Procedural sedation, hematoma block, or Bier block can be used for anesthesia
§ Longitudinal traction (finger traps if available) to disimpact the distal fracture fragment (see Figure 9.11)
§ Recreating the mechanism of injury and the position of the bony fragments at injury to relax the periosteal ligaments allows more effortless reduction of the fracture
o Extend the wrist to 90°, with the elbow fixed and the forearm supinated, and pull the distal segment back, up, and out at approximately 120°
o Apply dorsal pressure over distal fragment with both thumbs and apply volar pressure. With the thenar eminence of physician’s hand over fracture site, direct the fragment in an ulnar and volar direction to achieve proper position
o Immobilize the wrist at 15° of flexion and with 20° of ulnar deviation. (Though some orthopedists prefer pronation) application of a plaster sugar tong splint or bivalve cast with the wrist held in slight flexion, with slight ulnar deviation and pronation of the forearm
o Obtain post-reduction radiographs
§ Goals for adequate reduction
§ Restore length of radius. Normal distance from articular surface of ulnar to tip of radial styloid is 12 mm
§ Normal radial inclination is 15–30° (see Figure 9.12)
Achieve at least a neutral volar tilt (0°). Optimally, re-establish a normal volar tilt (10–15°) (see Figure 9.13)
§ Reassess and document neurovascular status of the extremity after reduction. Document function of the median nerve and the sensory branch of the radial nerve
· Metacarpal neck fractures
o Evaluate for rotational deformity
o Mechanism of injury results in angulation of distal segment toward palm (volarly); usually occurs as a result of a direct blow to the knuckles
o Index(2nd) and middle(3rd) fingers:
§ Eliminate angulation at the fracture sites of these fingers. Patients cannot tolerate more than 10–15° angulation of these fractures. Goal is minimal angulation to precise anatomic reduction
o Ring(4th) and little(5th) fingers:
§ The metacarpals of the ring and little fingers allow flexion and extension at carpal attachments. These patients can tolerate greater angulation at the fracture site without loss of function. Although up to 30–40° of angulation is acceptable, the goal is 10–15° of angulation or less for 4th metacarpal neck fractures and 20–30° of angulation or less for 5th metacarpal neck fractures
o Closed reduction
§ After hematoma block, apply longitudinal traction either manually or with finger traps to disimpact the distal fragment
§ Flex the involved finger to 90° at MCP joint and 90° at PCP joint with the palm facing the floor
§ Stabilize the metacarpal and apply force longitudinally upward through the proximal phalanx to reduce angulation deformity (see Figure 9.14)
§ Immobilize with ulnar gutter splint for 4th and 5th metacarpal fractures with the wrist extended 20–30° and the MCP joint flexed 90°. Immobilize with a radial gutter splint for 2nd and 3rd metacarpal fractures
§ Metacarpal neck fractures are easy to reduce but hard to maintain. These fractures often require wire placement to maintain alignment

Figure 9.11 A: The fingers are placed in fingertraps and weight is applied to the flexed elbow in order to introduce traction that will separate the bone fragments. B: The fracture, that is under traction, is then manipulated with volar pressure to reduce the fracture. C: Longitudinal traction can be further applied to ensure proper alignment. D: A posterior arm or sugar tong splint can be applied while traction is maintained to ensure the reduction is maintained until splinted. E: The arm is shown with finished splint in place.

Figure 9.12 A goal of reduction is to ensure there is a normal radial inclination of 15–30°.

Figure 9.13 A goal of reduction is to ensure there is a normal volar tilt of 10–15°, but you need to ensure that the volar tilt is at least neutral. The volar tilt angle is shown.

Figure 9.14 In order to reduce a metacarpal shaft fracture, longitudinal traction is applied to the distal finger while palmar pressure is applied to the dorsal proximal metacarpal to cause the reduction.
Complications of closed reductions
· Irreducible fractures
· Failure to maintain reduction
· Neurovascular injuries
· Malrotation
PEARLS:
· Closed reduction is ineffective for spiral fractures or comminuted fractures as the ends cannot be engaged to prevent shortening
· Accurate reduction of the fracture is essential for obtaining good functional results
· Early reduction lessens morbidity and improves patient comfort
· Pediatric Salter–Harris Type III and IV fractures require precise anatomic reduction to prevent growth disturbance
Ankle dislocation
Key facts
· Tibiotalar dislocations without fracture are rare and often are open dislocations caused by the amount of force required to cause the dislocation
· Bimalleolar and trimalleolar fractures often are associated with tibiotalar subluxation or dislocation
· Early reduction is recommended to prevent further osteochondral injury and vascular injuries
· Subtalar dislocations are rare with medial dislocation making up 85% of these dislocations
Clinical presentation (see Chapter 5: Foot and ankle emergencies)
PEARL: Evaluate for vascular compromise, specifically dorsalis pedis artery, which is often compressed with anterior dislocations.
Fast facts
· Lateral ankle fracture dislocations are most common, followed by posterior and then anterior. Usually there is obvious deformity of the foot and ankle with foot displaced laterally and skin very taut medially
· Foot is usually plantar flexed and shortened
· Decreased dorsalis pedis pulse is common with anterior dislocations
· Open dislocations occur in up to 25% of ankle dislocations
Reduction techniques (see Figure 9.15)
· Always flex hip and knee to 90° to relax gastroc-soleus complex
· Posterior dislocation: Grasp heel with one hand and dorsum of mid-foot with other hand. Pull longitudinal traction and then anterior traction. Second practitioner can place hands under distal thigh and pull countertraction while hip and knee are 90° flexed. Can also perform one person reduction while patient is seated with leg hanging off edge of stretcher
· Anterior dislocation: Grasp foot in same way as posterior dislocation. Initially dorsiflex the foot slightly to disengage the talus. Then apply axial traction followed by pushing foot posteriorly. Second practitioner can hold traction on tibia while pulling it anteriorly
· Lateral dislocation: Apply distal traction to plantar flexed foot and then rotate to proper anatomic position

Figure 9.15 Ankle dislocation reduction. An assistant should stabilize the proximal leg as marked by the red arrow. The provider will apply longitudinal traction as noted by (1) while applying first an upward force (2) and then a downward force (3) to cause the reduction. (Images courtesy of Ryan Friedberg, MD.)
Post reduction
· Check pulses after reduction. If pulses are not palpable after reduction, emergent orthopedic and vascular consultation are needed
· Splint in posterior and sugar tong splint
o Often dislocation is very unstable and proper splinting with foot in 90° flexion is important to maintain reduction
Clavicle dislocations/fractures
Key facts
· Sternoclavicular joint is made up of sternoclavicular ligament and costoclavicular ligament
· Acromioclavicular joint is made up of acromioclavicular ligament, coracoclavicular ligament and coracoacromial ligament
· Posterior sternoclavicular dislocation can be a true orthopedic emergency because of other injuries including tracheal rupture, pneumothorax, esophageal injuries or vascular injuries, thus requiring emergent reduction
Clinical presentation (see Chapter 2: Shoulder and elbow emergencies)
PEARL: Always evaluate for associated injuries because of a high-energy mechanism causing sternoclavicular dislocation.
Fast facts
· High-energy mechanism such as motor vehicle crash, fall or collision sport are usual cause
· Anterior sternoclavicular dislocation more common than posterior
· Anterior: Protrusion of proximal clavicle with obvious asymmetry
· Posterior: Unable to palpate medial end of clavicle
o Soft-tissue swelling could give impression of anterior dislocation
· Numbness and edema in the extremities can occur secondary to venous compression from posterior dislocation
Treatment
· Procedural sedation often required for reduction of posterior dislocations
Closed reduction technique (Figure 9.16)
· Patient in supine position with folded sheet between scapula with arm abducted to 90°
· One practitioner pulls traction on arm, while second practitioner pushes down on proximal clavicle for anterior dislocations and pulls out on clavicle for posterior dislocations
· If unable to reduce posterior dislocations, towel clips could be used to grasp clavicle to aid reduction
o Use lidocaine to anesthetize skin
o Use aseptic technique
o Make small incision where puncture sites will be
o Grasp sides of clavicle
o Be careful of underlying vascular structures

Figure 9.16 Clavicle dislocation reduction. A sheet should be placed across the patient’s chest and held by an assistant. Traction is applied to the arm (as shown by red arrow), while pressure is applied to the clavicle to cause the reduction. (Image Courtesy of Ryan Friedberg, MD.)
Post reduction
· Place pressure dressing on joint after anterior reduction with figure-of-8 sling
· Posterior dislocations can be placed in figure-of-8 sling or shoulder sling
o Posterior dislocations are usually stable, once reduced
· All posterior dislocations that are not reducible by closed treatment should be reduced with open reduction by orthopedic or thoracic surgeon
· Decision to reduce anterior dislocations not reducible by closed methods should be made by orthopedic or thoracic surgeon as these dislocations can be unstable and often re-dislocate
Elbow dislocations
Key facts
· 90% of elbow dislocations are posterior
· Common mechanism is fall on to extended and abducted arm
· Neuropraxia can occur in 20% of dislocations with ulnar and median nerve being most common
· Anterior dislocations more likely to cause vascular injury of brachial artery
Clinical presentation (see Chapter 2: Shoulder and elbow emergencies)
PEARL: Examine whole upper extremity for shoulder and/or wrist injuries.
Fast facts
· Common mechanism for posterior dislocation is fall on to extended and abducted arm
· Common mechanism for anterior dislocation is a result of a blow to olecranon while the elbow is in extension and forearm is supinated
· Patients present with obvious deformity of elbow usually with olecranon protruding posteriorly
· Elbow held in flexed position: posterior dislocation
· Elbow held in extension: anterior dislocation
PEARL: Fractures can occur in up to 60% of elbow dislocations with supracondylar fractures in children and medial epicondyle fractures in adults being most common.
Prior to reduction attempts
· Always check skin integrity as open dislocations should always be evaluated by orthopedic surgery
· Evaluate neurologic function distal to elbow
· Evaluate for vascular injury
· Evaluate for compartment syndrome in forearm
· Evaluate shoulder and wrist for associated injuries
· Obtain AP and lateral plain radiographs before and after reduction
Treatment
· Procedural sedation will likely be needed to reduce the elbow dislocation
· Posterior reduction techniques:
o Traction–counter-traction
§ Patient lies supine while one person grabs wrist and forearm and applies longitudinal traction, while other person holds counter-traction by grasping mid-humerus
§ Person holding forearm then flexes elbow while keeping longitudinal traction
§ Palpable clunk should be felt as elbow is reduced (Figure 9.17)
o Alternate position for traction–counter-traction:
§ Patient lies prone while one person grasps forearm and applies longitudinal traction with elbow in extension
§ Second person applies counter-traction by grasping mid-humerus
§ The first person then flexes elbow and can use thumb on olecranon to help guide elbow back in place (Figure 9.18)
o Stimson technique
§ Prone position: Hang weight from hand with elbow flexed at 90°
§ With muscle relaxation the elbow will typically self-reduce
§ If not self-reduced the provider can help push the olecranon into position
· Anterior dislocation: Rare
o Higher concern for neurovascular compromise
o Consider urgent orthopedic consultation
o Reduction technique:
§ Patient is supine while one person grasps wrist and applies in-line traction while other hand applies downward pressure to proximal forearm
§ Second person applies counter-traction by grabbing humerus
· Medial/lateral dislocations:
o Same reduction technique as posterior dislocations

Figure 9.17 Elbow dislocation reduction. – An assistant should stabilize the proximal arm as shown by red arrow. The provider will apply longitudinal traction as noted by 1, and then flex the elbow in direction 2 to reduce the dislocation. (Image courtesy of Ryan Friedberg, MD.)

Figure 9.18 Elbow dislocation reduction. With the patient lying prone, the arm can be hung off the edge of the bed. Longitudinal traction is applied on the distal arm while the proximal arm is stabilized with your other hand. (Image courtesy of Ryan Friedberg, MD.)
Post reduction
· Post-reduction films should be done to evaluate for fractures and proper reduction
· Neurovascular status should be evaluated post reduction
· Patients should be splinted with posterior splint in 90–100° of flexion to prevent redislocation and then sling for comfort
· If concerned about elbow instability in splint, place forearm in pronation with elbow in 90–100° of flexion
· Orthopedic follow up within 1 week
Prognosis
· Redislocations are rare with posterior dislocation
· Early protected mobilization within 2 weeks is recommended to prevent flexion contracture
· Be aware that delayed vascular compromise could occur
Fibular dislocations
Key facts
· Rare injury that accounts for less than 1% of knee injuries
· Reported in football, ballet, snowboarding, and parachuting
· Easily missed on plain radiographs and comparison views are recommended when it is suspected
Clinical presentation (see Chapter 4: Knee and leg emergencies)
PEARL: Always check for proximal fibular pain with ankle sprains.
Fast facts
· Anterolateral dislocations account for ![]() 85% of dislocations
85% of dislocations
· Posterior medial dislocations: ![]() 10%
10%
· Superior dislocations: ![]() 2%
2%
· Associated with peroneal nerve injuries
· Congruity of the proximal tibiofibular joint on lateral views is the key to diagnosis
Treatment
· Pain medication or procedural sedation may be necessary for reduction
· Reduction techniques:
o Attempt closed reduction
§ Flex knee to 90°, evert, and dorsiflex ankle
§ Then apply direct pressure to the fibular head (Figure 9.19)
§ If unable to reduce, will need ORIF by orthopedic surgery

Figure 9.19 Fibula reduction – flex knee to 90°, evert and dorsiflex the ankle with one hand while applying direct pressure to the fibular head with the other. (Image courtesy of Ryan Friedberg, MD.)
Post reduction
· If reduction successful, place in posterior and sugar tong splint with crutches and non-weight-bearing
· Patient should follow up with orthopedic surgeon within 1 week for repeat radiographs to make sure fibula is stable
Prognosis
· If closed reduction is successful, patients usually will not need surgical fixation
· If unable to reduce closed, open reduction with capsular and ligament repair is performed
· Missed dislocations could result in chronic pain and disability
Finger dislocations
Key facts
· PIP joint dislocations are the most common finger dislocation
· Dorsal dislocations much more common then volar dislocations, which are rare
· The volar plate can become trapped inside the joint, making reduction difficult
Clinical presentation (see Chapter 1: Hand and wrist emergencies)
PEARL: Make sure to evaluate skin integrity, as open PIP dislocations are not uncommon.
Fast facts
· MCP joint dislocations are rare. Dorsal dislocation most common
· Classic presentation is the joint held in 60–90° of hyperextension with the finger ulnar-deviated
· Complex dislocations can be subtle. Findings could include dimpling of palmar skin or palpable metacarpal head on volar surface
· Volar dislocations often involve rupture of central slip and can result in a Boutonniere deformity
· Volar plates are usually disrupted in both dorsal and volar PIP dislocations
· DIP dislocations are usually dorsal and often result in an open dislocation
Treatment
PEARL: Avoid urge to apply direct longitudinal traction initially during reduction as this may trap volar plate in joint and prevent reduction.
PEARL: Use a metacarpal or digital nerve block for anesthesia.
· Reduction techniques
o MCP dislocations:
§ Dorsal:
§ Place wrist in flexion to relax flexor tendons
§ Hyperextend joint and then apply pressure at base of proximal phalanx while bringing finger into flexion
§ Volar:
§ Very difficult to reduce because of volar plate entrapment. Often need open reduction
§ Attempt close reduction by first pushing proximal phalanx toward metacarpal and then hyperflex finger
§ Once hyperflexed, pull traction and then attempt to extend finger
§ Can attempt to guide base of proximal phalanx back into position with thumb
o PIP dislocation:
§ Dorsal:
§ Place wrist in flexion and hyperextend joint followed by gentle longitudinal traction and then dorsal pressure on base of middle phalanx while moving digit back into flexion
§ Use other hand to stabilize proximal phalanx
§ Volar:
§ Place the wrist in flexion
§ Hyperflex the PIP joint
§ Apply gentle longitudinal traction and then extend middle phalanx
§ Lateral: Gentle extension and longitudinal traction
o DIP dislocation:
§ Dorsal:
§ Place wrist in flexion and hyperextend joint followed by gentle longitudinal traction. Apply dorsal pressure on base of middle phalanx while moving digit back into flexion
§ Volar:
§ Place the wrist in flexion
§ Hyperflex the PIP joint
§ Apply gentle longitudinal traction and then extend middle phalanx
Post reduction
· MCP dislocation – Splint with MCP joint in 30° flexion
· PIP dislocation – Splint with PIP in 30° flexion
· DIP dislocation – Splint DIP joint in extension
· Hand surgeon should be consulted if unable to reduce dislocation or signs of ischemia exist after reduction
Prognosis
· Most dislocations are stable after reduction and do not usually require operative intervention
· Because of possible complications associated with finger dislocations, patients should follow up with hand specialist within two weeks
Hip dislocation
Key facts
· Posterior dislocations make up 90% of hip dislocations
· Native hips should be reduced within 6 hours to decrease risk of avascular necrosis
· Look for acetabular rim fractures with dislocation
Clinical presentation (see Chapter 3: Pelvic emergencies)
· Posterior dislocations usually present with hip flexed, adducted and internally rotated
· Anterior dislocations usually present with hip abducted and externally rotated
PEARL: On AP radiographs, the femoral head will migrate superiorly with posterior dislocations and inferiorly or medially with anterior dislocations.
Treatment
· Make sure an associated femoral neck fracture is not present prior to reduction. If fracture present, orthopedic consultation recommended prior to attempted reduction
· Procedural sedation is often necessary for hip reductions
· Hip reduction techniques:
o Allis technique
§ Patient is supine with hip flexed
§ One person holds counter-traction on pelvis while other person bends knee to 90°
§ Apply traction in-line with femur until reduction successful (Figure 9.20)
§ Slow steady traction is better than abrupt pulls that can increase muscle spasm
§ Alternative technique is to use a strap or sheet to secure pelvis to bed when additional providers are not available to provide counter-traction
o Lateral position
§ Place patient in lateral position with affected side up
§ Use same two-person technique with one person holding counter-traction on pelvis and other person pulling in-line traction of femur
o With patient in supine position
§ Grab foot and ankle and apply traction axially while internally and externally rotating hip
§ Use slow steady traction
§ A palpable clunk is usually felt when hip is reduced
§ Works well with anterior dislocations
o Captain Morgan technique
§ Place patient in supine position
§ Provider stands on floor or step stool with one foot on the bed
§ Flex the patient’s knee and drape patient’s leg over the provider’s knee
§ While holding patient’s leg firmly to the provider’s knee, the provider lifts up on toes, which lifts the leg, causing the reduction (Figure 9.21)
§ Slow steady lifting is ideal
o When having difficulty reducing patients with a hip arthroplasty, consider the type of liner they may have had placed. Certain liners can make reduction very difficult and must have open reduction by an orthopedist

Figure 9.20 Hip dislocation reduction. Allis technique – with the patient supine, have an assistant stabilize the pelvis or secure the patient to the bed with a strap or sheet across the pelvis. Flex the hip and knee to 90°. While standing over the patient, grab the patient’s knee and apply longitudinal traction to the leg. (Image courtesy of Ryan Friedberg, MD.)

Figure 9.21 Hip dislocation reduction Captain Morgan technique – with the patient supine, have an assistant stabilize the pelvis or secure the patient to the bed with a strap or sheet across the pelvis. Flex the hip and knee to 90°. The provider should have one leg on the floor and the other flexed with their foot on the bed. Drape the patient’s leg across your knee. The provider lifts up on their toes, while pushing down slightly on the patient’s distal leg. While standing over the patient, grab the patient’s knee and apply longitudinal traction to the leg. (Image courtesy of Ryan Friedberg, MD.)
Post reduction
· Obtain post-reduction films
· Consider CT if concerned about occult fracture
· Use hip abduction pillow or knee immobilizer to prevent repeat dislocation
· Admission usually required after reduction
Prognosis
· Concern for avascular necrosis of native hip dislocations
· Simple dislocations (without associated fracture) usually do not need surgery
Knee dislocation
Key facts
· A true orthopedic emergency
· High risk of popliteal artery and vein injury
· Peroneal nerve injuries occur in 20–40% of dislocations
· Reduction should be performed as soon as possible
Clinical presentation (see Chapter 4: Knee and leg emergencies)
PEARL: Be aware of dislocations reduced in the field. Be sure to evaluate neurovascular status pre and post reduction techniques.
Fast facts
· Anterior dislocations (40%) usually occur from a hyperextension injury causing tearing of the anterior cruciate ligament (ACL) and partial or complete tear of posterior cruciate ligament (PCL)
· Posterior dislocations (33%) are usually caused by a direct force on the proximal tibia with the knee slightly flexed
· Up to two-thirds of knee dislocations can present already reduced
· A grossly unstable knee after trauma with a normal radiograph should be considered a reduced dislocation
· Foot drop (loss of dorsiflexion) is a sign of peroneal nerve injury
· Avoid hyperextension during examination or splinting, to prevent traction on popliteal artery or peroneal nerve
Treatment
· Urgent orthopedic consultation
· Rapid reduction should be performed
· Procedural sedation is often required for reduction
· Reduction techniques:
o Posterior dislocation reduction technique (Figure 9.22)
§ Practitioner holds distal femur and applies counter-traction
§ Second practitioner holds proximal tibia and pulls distally and then anteriorly
§ Knee should be flexed from 30–90°
§ Reduction should be done with gentle force to prevent further arterial injury
o Anterior dislocation reduction technique
§ Practitioner holds traction on proximal tibia and gently distracts distally
§ Second practitioner holds distal femur and pulls proximally and anteriorly (Figure 9.23)
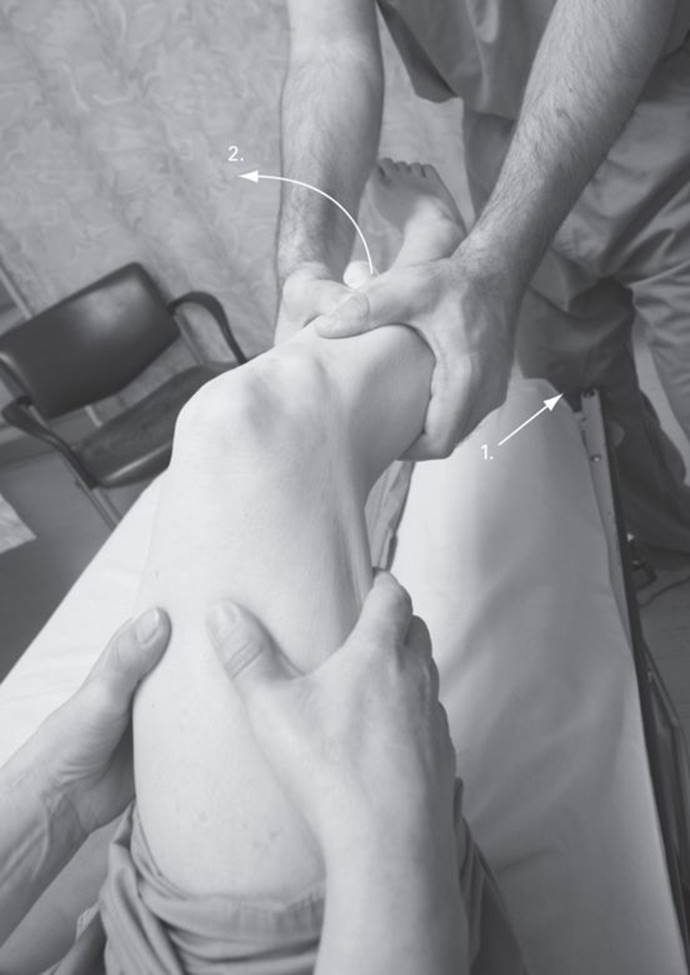
Figure 9.22 Knee dislocation reduction. An assistant stabilizes the proximal femur while the provider applies longitudinal traction (1) to the distal leg while guiding the tibia back into the proper position (2). (Image courtesy of Ryan Friedberg, MD.)
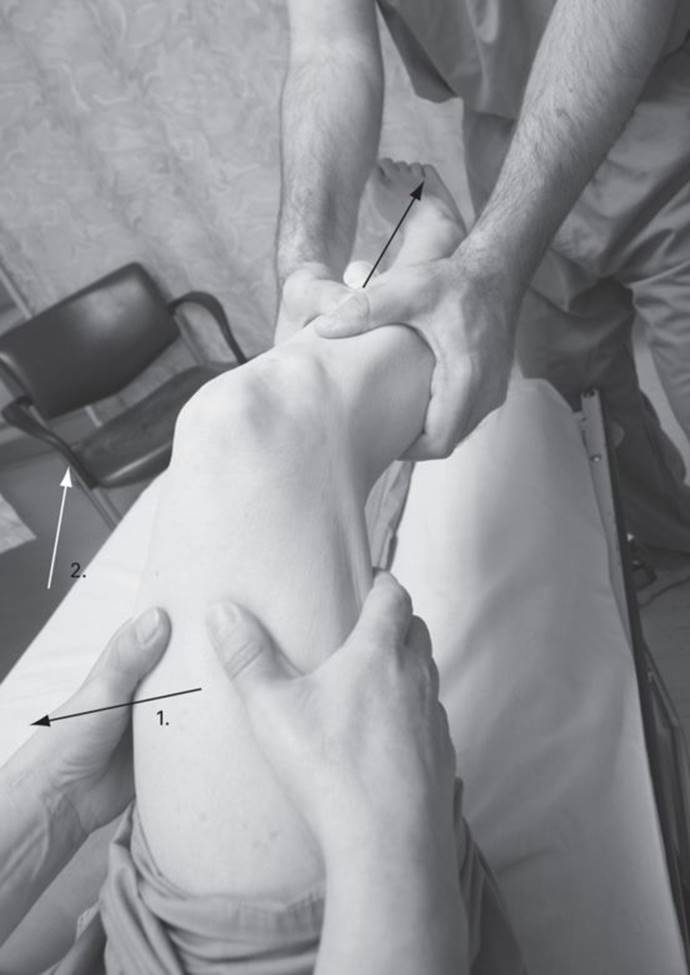
Figure 9.23 Knee dislocation reduction. An assistant stabilizes the proximal femur while the provider applies longitudinal traction to the distal leg while guiding the tibia back into the proper position (2). The assistant can also guide the femur into the proper position (1). (Image courtesy of Ryan Friedberg, MD.)
Post reduction
· Check neurovascular status after reduction
o If pulses absent after reduction, immediate vascular consultation
o If pulses present after reduction, perform ankle brachial index (ABI)
§ If ABI < 0.9, vascular surgery consultation and consider arteriogram vs. ultrasound
§ If ABI > 0.9, admit for serial examination
· After reduction, place in posterior leg splint in 10–15° flexion
· Most patients will require operative repair of the ligamentous injuries
Patella dislocations
Key facts
· Almost all patella dislocations are lateral
· Adolescent females are most commonly affected
· Dislocations are most often the result of indirect trauma
Clinical presentation (see Chapter 4: Knee and leg emergencies)
PEARL: Consider patellar dislocation with spontaneous reduction in patients with knee effusion and a history that suggests a dislocation.
Treatment
· Consider procedural sedation in patients that are very anxious
o Because of usual ease and rapidity of reduction, author’s preference is to manage pain and reduce without sedation
o This method is often successful and very tolerable by the patient. It eliminates risk of sedation and need for monitoring post reduction
· Reduction technique:
o Closed reduction
§ Gentle flexion of hip
§ Have patient sit at 20–30°on stretcher
§ Slowly bring knee into extension with one hand while holding traction on patella with other hand (Figure 9.24)
§ Holding traction on the patella should decrease pain and prevent forceful reduction of patella
§ Once knee is extended allow the patella to slide back into its proper position. Some medial pressure can be applied as needed
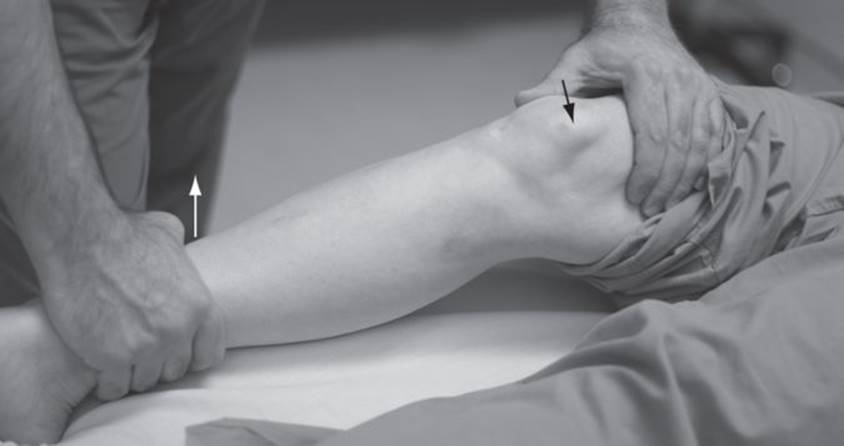
Figure 9.24 Patellar dislocation reduction. The provider should hyperextend the knee while holding the patella. Once the knee is extended the provider can apply pressure to the lateral side of the patella until it reduces. (Image courtesy of Ryan Friedberg, MD.)
Post reduction
· Place patient in a knee immobilizer
· Obtain post-reduction radiographs to confirm reduction and evaluate for occult fractures
· Place patient on crutches with partial weight-bearing as tolerated
· Arrange for orthopedic follow-up within 1 week
Radial head subluxation/dislocation
Key facts
· Radial head subluxation or nursemaid’s elbow usually occurs in children age 2–4 years, but has been described in children up to 6 years old
· The mechanism of a nursemaid’s elbow is sudden traction of the wrist or hand in an upward motion such as when a parent picks a child up by the wrist to prevent a fall
· Isolated radial head dislocations in adults are very rare. Usually caused by high-force injury and associated with other injuries such as complete elbow dislocations and Monteggia fractures (associated ulna fracture)
Clinical presentation (see Chapter 7: Pediatric orthopedic emergencies)
PEARL: Consider other injuries such as fracture or infection if the history or examination is not consistent with radial head subluxation.
Fast facts
· Children with a radial head subluxation present with the arm slightly flexed and pronated. They are unwilling to move arm
· Nursemaid’s elbows are not swollen or warm. If there is bruising, swelling or warmth, consider other etiologies
· Adults with radial head dislocation present with arm flexed to 90° and resist all movements of the elbow including pronation and supination
PEARL: Always get radiographs before attempting reduction on children with swelling or bruising to elbow, or if mechanism does not suggest radial head subluxation.
Treatment
· Sedation not usually required for reduction of radial head subluxation
· Reduction technique for radial head subluxation in children:
o Hyperpronation/extension:
§ Cradle elbow with one hand with thumb on radial head and grasp wrist with other hand
§ Hyperpronate forearm. If not reduced with pronation, then gently extend elbow (Figure 9.25)
§ Click of radial head usually felt with reduction
§ 95% initial success rate
o Supination/flexion:
§ Cradle elbow with one hand with thumb on radial head and grasp wrist or distal forearm with other hand
§ First supinate forearm
§ If not reduced, then gently flex elbow (Figure 9.26)
§ Click of radial head usually felt with reduction
§ 77% initial success rate

Figure 9.25 Nursemaid’s elbow. The forearm should be hyperpronated and then the elbow can be extended to cause the reduction. Proximal pressure on the radial head can help ease the reduction. (Image courtesy of Ryan Friedberg, MD.)

Figure 9.26 Nursemaid’s elbow. The forearm is supinated and then the elbow flexed to cause the reduction. (Image Courtesy of Ryan Friedberg, MD.)
Post reduction
· Child should be observed in ED until witnessed to be moving extremity in normal fashion
· Post-reduction imaging not necessary
· Immobilization is not necessary
· Adult radial head dislocation
o Anesthesia with joint injection or procedural sedation
o Reduction techniques:
§ Anterior dislocation
§ Supinate arm and flex elbow to 115°
§ Grasp elbow with one hand and apply posterior pressure to radial head with thumb
§ Apply distal traction to wrist with other hand
§ Assistant could assist with counter-traction by holding humerus in counter-traction (Figure 9.27)
§ Posterior dislocation
§ Arm is held supinated in extension at patient’s side
§ Grasp elbow with one hand and apply anterior pressure to radial head with thumb
§ Other hand is grasping wrist and applying distal traction
§ Assistant could assist with counter-traction by holding humerus in counter-traction (Figure 9.28)
§ Lateral
§ Same as posterior technique, but apply medial pressure to radial head

Figure 9.27 Anterior radial head dislocation in adult. Supinate arm and flex elbow to 115°. Grasp elbow with one hand and apply posterior pressure to radial head with thumb while applying distal traction to wrist with other hand. Assistant could assist with counter-traction by holding humerus in counter-traction. (Image courtesy of Ryan Friedberg, MD.)

Figure 9.28 Posterior radial head dislocation in adult. Arm is held supinated in extension at patient’s side. Grasp elbow with one hand and apply anterior pressure to radial head with thumb while other hand is grasping wrist and applying distal traction. Assistant could assist with counter-traction by holding humerus in counter-traction. (Image courtesy of Ryan Friedberg, MD.)
Post reduction
· Post-reduction radiographs should be performed
· Reassess neurovascular status
o Posterior interosseous nerve is the most commonly injured nerve. Results in weakness of finger or thumb extension
· Place in posterior splint with elbow at 90° flexion and forearm in supination
· If Monteggia-type fracture, orthopedic surgeon should be consulted as radial head will usually self-reduce once ulna is stabilized intraoperatively
Shoulder dislocations
Key facts
· Anterior dislocations very common (95% of shoulder dislocations)
· Posterior dislocations (5%)
o Usually caused by falls, seizures, or electric shocks
· Inferior dislocations (luxatio erecta) are very rare
· Axillary nerve injury is the most common neurologic injury (12%)
· Hill–Sachs lesions are defects in the posterolateral portion of humeral head
· Bankart lesions are defects of the glenoid labrum (rim)
Clinical presentation (see Chapter 2: Shoulder and elbow emergencies)
PEARL: The mechanism of injury is usually abduction and external rotation of the arm.
· The majority of patients will present with their arm at their side supported by unaffected arm
· The acromion is usually prominent with an empty sulcus (absence of humeral head)
· Patient usually very resistant to any movement
· If unable to externally rotate shoulder, be concerned for posterior dislocation
· Arm raised above head with inability to lower arm suggests inferior dislocation
PEARL: Posterior shoulder dislocations are often missed because of suboptimal radiographic evaluation. An axillary or Y-view can be diagnostic.
Fast facts
· Evaluate sensory and motor function of arm
o Specifically test axillary nerve
· Axillary lateral radiograph – most sensitive to diagnose dislocation, but hardest to accurately perform in dislocated patient
· Pre-reduction radiographs are not necessary if:
o Sure of diagnosis clinically
o Multidislocator
o Atraumatic
o Under 40
Treatment
· Procedural sedation is not always required
o Consider for patients who are unable to co-operate with reduction techniques because of pain or anxiety
· An intra-articular lidocaine injection can be used to decrease pain and decrease time to discharge (when compared with procedural sedation)
· Anterior dislocation reduction techniques:
o Cunningham technique – massage technique
§ Have patient sit in chair (or on stretcher)
§ Have arm fully adducted with elbow flexed
§ Patient must be relaxed
§ Massage trapezius of affected side
§ Massage biceps tendon
§ Alternate massaging trapezius, deltoid, and biceps until reduction occurs
o Self-reduction
§ Have patient adduct shoulder and touch nose with fingers
§ Walk fingers up to forehead
§ Results in internal rotation and forward flexion of shoulder
o Stimson technique (Figure 9.29)
§ Place patient in the prone position
§ Elevate the stretcher and apply 10–20 lbs of weight to the affected arm
§ Shoulder will typically reduce in 20–30 minutes
§ If not effective, practitioner can apply traction while externally and then internally rotating arm
o Scapular manipulation (Figure 9.30)
§ Place the patient in the prone position
§ This technique can be combined with the Stimson technique with weight applied to the affected arm
§ Once relaxed, apply pressure to the inferior border of the scapula in order to rotate it medially, while the superior border is rotated laterally
§ Slow steady pressure will often reduce the shoulder
o External rotation (Hennepin) (Figure 9.31)
§ Patient can be supine or sitting in a chair
§ Flex the patient’s elbow to 90°, and forward flex the shoulder approximately 20°
§ With the elbow at the patient’s side, externally rotate the arm outward
§ If reduction has not occurred when arm is at 90° external rotation, you can attempt to adduct the shoulder to accomplish reduction
§ Author’s note: Having patient in supine position using other hand to apply downward pressure to humeral head can decrease pain and improve effectiveness
o Milch technique
§ Place the patient in the supine position
§ Abduct the arm to greater than 90° with the arm externally rotated (once again, recommend applying pressure to humeral head)
§ Reduction normally accomplished as the arm extends past the shoulder
o Traction–counter-traction (Figure 9.32)
§ A technique often favored by many
§ Recommended as the last method of reduction
§ Procedural sedation should be used
§ Requires two providers
§ Place the patient in the supine position
§ Place a sheet around torso under the ipsilateral axilla and tie around the waist of the provider providing counter-traction. The provider should just lean back and provide a steady force
§ Second provider should flex elbow to 90° and place a sheet across the patient’s forearm and tie it around their waist
§ The second provider then applies steady constant traction on the forearm and arm in the inferolateral direction until reduction is successful
§ If unable to reduce with traction can try internally and externally rotating the arm to facilitate the reduction
· Posterior dislocation
o Consider orthopedic consultation prior to reduction
o Place the patient in the supine position
o The traction–counter-traction method can be used with the second provider applying axial traction on the flexed and adducted shoulder
o Forward pressure can be applied to the humeral head to facilitate the reduction
· Inferior dislocation (luxatio erecta)
o Procedural sedation recommended
o Place the patient in the supine position
o Set up for traction and counter-traction
o The counter-traction sheet should be placed over the patient’s shoulder (supraclavicular) with the provider standing by the patient’s hip
o The second provider should apply axial traction with added hyperabduction of the shoulder
· Two-step reduction (Figure 9.33)
o Convert the inferior dislocation to an anterior dislocation and then reduce anterior dislocation
o Push/pull technique
§ Push hand is placed on the lateral aspect of the mid-shaft of the humerus
§ Pull hand is placed on the medial epicondyle of elbow
§ Push hand manipulates humeral head from an inferior to an anterior position
§ Pull hand provides gentle superior (cephalic) directed force at distal humerus
o Once humeral head is anterior, switch to your preferred anterior dislocation technique

Figure 9.29 Stimson technique for shoulder dislocation. With the patient lying prone apply weight to the wrist/hand. Wait 20–30 minutes and the shoulder will typically self-reduce; if not, additional traction with internal rotation of the arm can help cause the reduction. (Image courtesy of Ryan Friedberg, MD.)
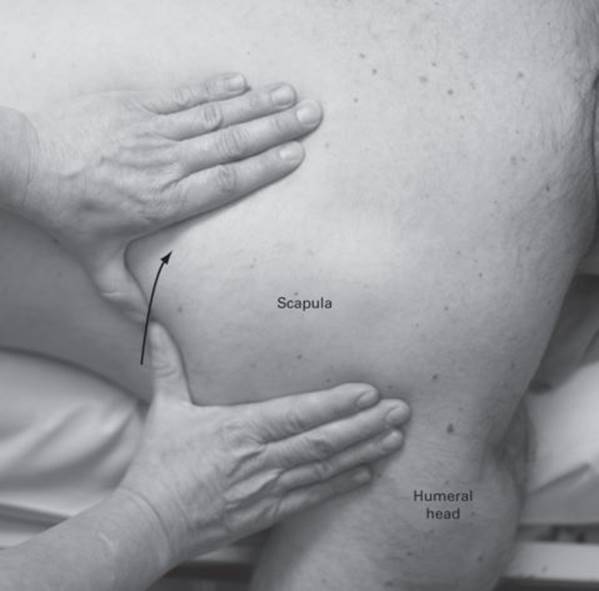
Figure 9.30 Scapular manipulation technique for shoulder dislocation. With the patient lying prone, a gentle force is applied as shown by red arrow to rotate the scapula and cause the reduction. This can be combined with the Stimson technique. (Image courtesy of Ryan Friedberg, MD.)

Figure 9.31 External rotation method for shoulder dislocation. With the patient lying supine the patient’s elbow is flexed to 90° and the arm is flexed approximately 20° forward. With the elbow remaining at the patient’s side the arm is externally rotated. Applying pressure to the humeral head as shown (hand on shoulder) can reduce pain and improve effectiveness. (Image courtesy of Ryan Friedberg, MD.)

Figure 9.32 Traction–counter-traction shoulder reduction method. With the patient supine a sheet is applied across their chest and held by an assistant (counter-traction). The affected arm is flexed at the elbow. A sheet applied to the flexed forearm and wrapped around the provider’s waist allows for steady gentle traction to be applied without risk of the provider’s hands slipping. The arm can also be internally and externally rotated while traction is applied to cause the reduction. (Image courtesy of Ryan Friedberg, MD.)

Figure 9.33 Two-step reduction method for luxatio erecta. Push/pull technique – push hand is placed on lateral aspect of mid-shaft of humerus. Pull hand on medial epicondyle of elbow. Push hand manipulates humeral head from an inferior to an anterior position. Pull hand provides gentle superior-directed force at distal humerus. (Image courtesy of Ryan Friedberg, MD.)
Post reduction
· Obtain post-reduction radiographs
· Place patient in sling
o If first-time dislocator, consider placing the patient in a sling with 30° external rotation. This has been shown to reduce the risk of multiple dislocations
· Follow up with an orthopedist
Wrist fractures/dislocations
Key facts
· Radiocarpal dislocations are very rare and usually caused by a high-energy mechanism
· Associated injuries including fractures, ligamentous rupture and neurovascular injuries are common
· Fall on to an outstretched hand is the most common mechanism for distal radius fractures
· Be aware of median nerve injuries with volar angulated fractures (Smith fractures)
Clinical presentation (see Chapter 1: Hand and wrist emergencies)
PEARL: Always examine the proximal forearm and elbow for associated injuries.
Treatment
PEARL: Consider using C-arm fluoroscopy guidance, if available, to help with reduction.
· Perform a hematoma block for analgesia
· Consider procedural sedation
· Radiocarpal dislocation reduction technique
o Dorsal dislocation
§ Grasp hand with your hand and their forearm with your other hand
§ Hyperextend their wrist, and apply traction to the hand with flexion of the wrist to reduce wrist into position
§ Use other hand to apply counter-traction
o Volar dislocation
§ Hyperflex wrist and apply traction while extending the wrist
· Distal radius fracture-reduction technique
o Traction technique with finger traps and hanging weight
§ Place thumb, index, and middle finger in finger trap and hang 10 lb weight from arm for 10 minutes (Figures 9.34 and 9.35)
§ Use thumbs to reposition fracture while still hanging
o Manipulation
§ Dorsal angulated fractures
§ Place thumbs opposite each other on dorsum of fracture site
§ Initially hyperextend the fracture
§ Apply longitudinal traction
§ Finally, flex the arm into the properly aligned position
§ Volar angulated fractures
§ Place thumbs opposite each other on volar aspect of fracture and initially hyperflex fracture
§ Apply longitudinal traction
§ Finally extend the arm into proper alignment

Figure 9.34 Finger traps. An image of the fingers placed in a finger trap in order to place traction on the arm. (Image courtesy of Ryan Friedberg, MD.)

Figure 9.35 Weights are applied to the flexed elbow to apply gentle traction and cause the reduction. (Image courtesy of Ryan Friedberg, MD.)
Post reduction
· Dorsal dislocation
o Immobilize in volar splint with 10° of extension
· Volar dislocation
o Immobilize in volar splint with 10° of flexion
· Distal radius fracture
o Recommend sugar-tong splint with wrist in neutral position or slight extension
· Follow up with orthopedic surgery within 1 week
References
Abraham A. Emergency treatment of ankle fracture dislocations – a reliable technique for early reduction. Ann R Coll Surg Engl. 2003;85(6):427.
Ahmad R, Case R. Dislocation of the fibular head in an unusual sports injury: a case report. J Med Case Reports. 2008;2:158.
Beecroft M, Sherman SC. Posterior displacement of a proximal epiphyseal clavicle fracture. J Emerg Med. 2007;33(3):245–8.
Bitar AC, Demange MK, D’Elia CO, Camanho GL. Traumatic patellar dislocation: non-operative treatment compared with MPFL reconstruction using patellar tendon. AM J Sports Med. Jan;40(1):114–22.
Capps GW, Hayes CW. Easily missed injuries around the knee. Radiographics. 1994;14:1191–210.
Dislocation of the elbow. Wheeless’ Textbook of Orthopaedics.
Ellis C. A case of isolated proximal tibiofibular joint dislocation while snowboarding. Emerg Med J. 2003;20:563–4.
Evans EM. Pronation injuries of the forearm, with special reference to the anterior Monteggia fracture. J Bone Joint Surg Am. 1949;31B(4):578–88.
Garrick JG. Patellofemoral disorders. Orthopaedic Knowledge Update Sports Medicine 3. 2004:217.
Hamilton W, Parkes JC 2nd. Isolated dislocation of the radial head without fracture of the ulna. Clin Orthop Relat Res. 1973;9:94–6.
Hendey GW. Necessity of radiographs in the emergency department management of shoulder dislocations. Ann Emerg Med. 2000;36(2):108–13.
Hendey GW, Avila A. The Captain Morgan technique for the reduction of the dislocated hip. Ann Emerg Med. 2011;58(6):536–40.
Horan J, Quin G: Proximal tibiofibular dislocation. Emerg Med J. 2006;23:e33.
Horlocker TT. Regional anaesthesia in the patient receiving anti-thrombotic and antiplatelet therapy. Brit J Anaesth. 2011;107(S1):i96–106.
Macias CG, Bothner J, Wiebe R. A comparison of supination/flexion to hyperpronation in the reduction of radial head subluxations. Pediatrics. 1998;102(1):e10.
McDonald J, Whitelaw C, Goldsmith LJ. Radial head subluxation: Comparing two methods of reduction. Acad Emerg Med. 1999; 6(7):715–18.
Mercier LR. Practical Orthopedics. 6th edn. Philadelphia, PA: Mosby/ Elsevier. 2008.
Myderrizi N, Mema B. The hematoma block:an effective alternative for fracture reduction in distal radius fractures. Med Arh. 2011;65(4):239–42.
Negi AK, Pestonji MD, Iyer S. Isolated posterior dislocation of the radial head in an adult. J Postgrad Med. 1992;38(3):143.
Nho Sj, Dodson CC, Bardzik KF, et al. The two-step maneuver for closed reduction of inferior glenohumeral dislocation. J Orthop Trauma. 2006;20:354–7.
Ogden JA. Subluxation and dislocation of the proximal tibiofibular joint. J Bone Joint Surg Am. 1974;56:145–54.
Perron AD, Brady WJ, Sing RF. Orthopedic pitfalls in the ED: Vascular injury associated with knee dislocation. Am J Emerg Med. 2001;19(7):583–8.
Reichman E, Simon R. Emergency Medicine Procedures. 1st edn. New York, NY: McGraw-Hill. 2004.
Roberts JR, Hedges JR. Clinical Procedures in Emergency Medicine. Philadelphia, PA: Saunders/Elsevier. 2010.
Ross A, Catanzariti AR, Mendicino RW. The hematoma block: A simple, effective technique for closed reduction of ankle fracture dislocations. J Foot and Ankle Surg. 2011;50:507–9.
Schutzman SA, Teach S. Upper-extremity impairment in young children. Ann Emerg Med. 1995;26(4):474–9.
Shah K, Mason C, eds. Essential Emergency Procedures. Philadelphia, PA: Lippincott, Williams & Wilkins. 2008; pp. 249–51.
Simon RR, Brenner BE. Emergency Procedures and Techniques. Philadelphia, PA: Lippincott, Williams & Wilkins. 2002.
Simon RR, Sherman SC, Koenigsknecht SJ. Emergency Orthopedics: The Extremities. New York, NY: McGraw-Hill, Medical Pub. Division. 2007.
Sternoclavicular Joint Injury. Wheeless’ Textbook of Orthopaedics.
Wascher DC, Dvirnak PC, DeCoster TA. Knee dislocation: Initial assessment and implications for treatment. J Orthop Trauma. 1997;11(7):525–9.
Watson JA, Hollingdale JP. Early management of displaced ankle fractures. Injury. 1992;23(2):87–8.