Medial Distal Tibia Guided Growth with Retrograde Medial Malleolus Screw
1. Indications
a. Pain due to lateral hindfoot impingement and/or medial hindfoot soft tissue strain caused by exaggerated congenital or acquired valgus deformity of the ankle joint (see Assessment Principles #11 and 21, Chapter 3; Valgus Deformity of the Ankle Joint, Chapter 5)
b. If there is coincident valgus deformity of the ankle joint and the subtalar joint, the ankle deformity should be corrected first (see Management Principle #23-6, Chapter 4; Valgus Deformity of the Ankle Joint and the Hindfoot, Chapter 5).
2. Technique (Figure 8-1)
a. Make a 7-mm longitudinal incision immediately distal to the medial malleolus in the midcoronal plane of the tibia
b. Insert a guide pin for the 4.5-mm cannulated screws retrograde from the intersection of the medial-to-lateral center of the medial malleolus with the midcoronal plane of the tibia, using mini-fluoroscopy for guidance. Anterior placement could result in recurvatum and posterior placement in procurvatum.
i. Ensure placement in the midcoronal plane of the tibia by visualizing a true lateral image of the ankle on mini-fluoroscopy, i.e., the posterior cortex of the fibula and the posterior cortex of the tibia are colinear. Using the “dome of the talus” as the alignment guide for a true lateral image of the ankle is unreliable in children because of immature ossification of the talus and/or malformations/deformities of the talus. The midcoronal plane of the tibia is typically in line with the anterior cortex of the fibula.
c. Insert the guide pin parallel with, and immediately adjacent to, the medial cortex of the tibial metaphysis. The more medial the screw, the more medial the mechanical center of rotation of angulation (CORA), and the more rapid will be the deformity correction.
d. Use the cannulated reamer up to, but not across, the physis
e. Insert a fully threaded cannulated 4.5-mm screw. Generally, a 52-mm-long screw is a good length.
f. Countersink the head of the screw into the medial malleolus. Be aware that the tip of the medial malleolus might be cartilaginous and, therefore, not visible on fluoroscopy.
g. Use a 4-0 absorbable subcuticular suture
h. No immobilization is required.
3. Pitfalls
a. Correction of subtalar/hindfoot valgus deformity before correction of ankle valgus
b. Failure to countersink the head of the screw, thereby leaving a metallic prominence under the medial malleolus
c. Anterior screw placement resulting in the development of recurvatum while correcting the valgus deformity
d. Posterior screw placement resulting in the development of procurvatum while correcting the valgus deformity
e. Lateral screw placement across the physis. The more lateral the screw crosses the physis, the more lateral the CORA and the longer the time to deformity correction. If the screw crosses the center of the physis, it could result in epiphysiodesis. Crossing the physis lateral to the midline will result in increasing the valgus deformity.
f. Failure to account for rebound valgus deformity. Several degrees of recurrent valgus deformity develop after screw removal in most cases. Therefore, overcorrect a few degrees before removing the screw.
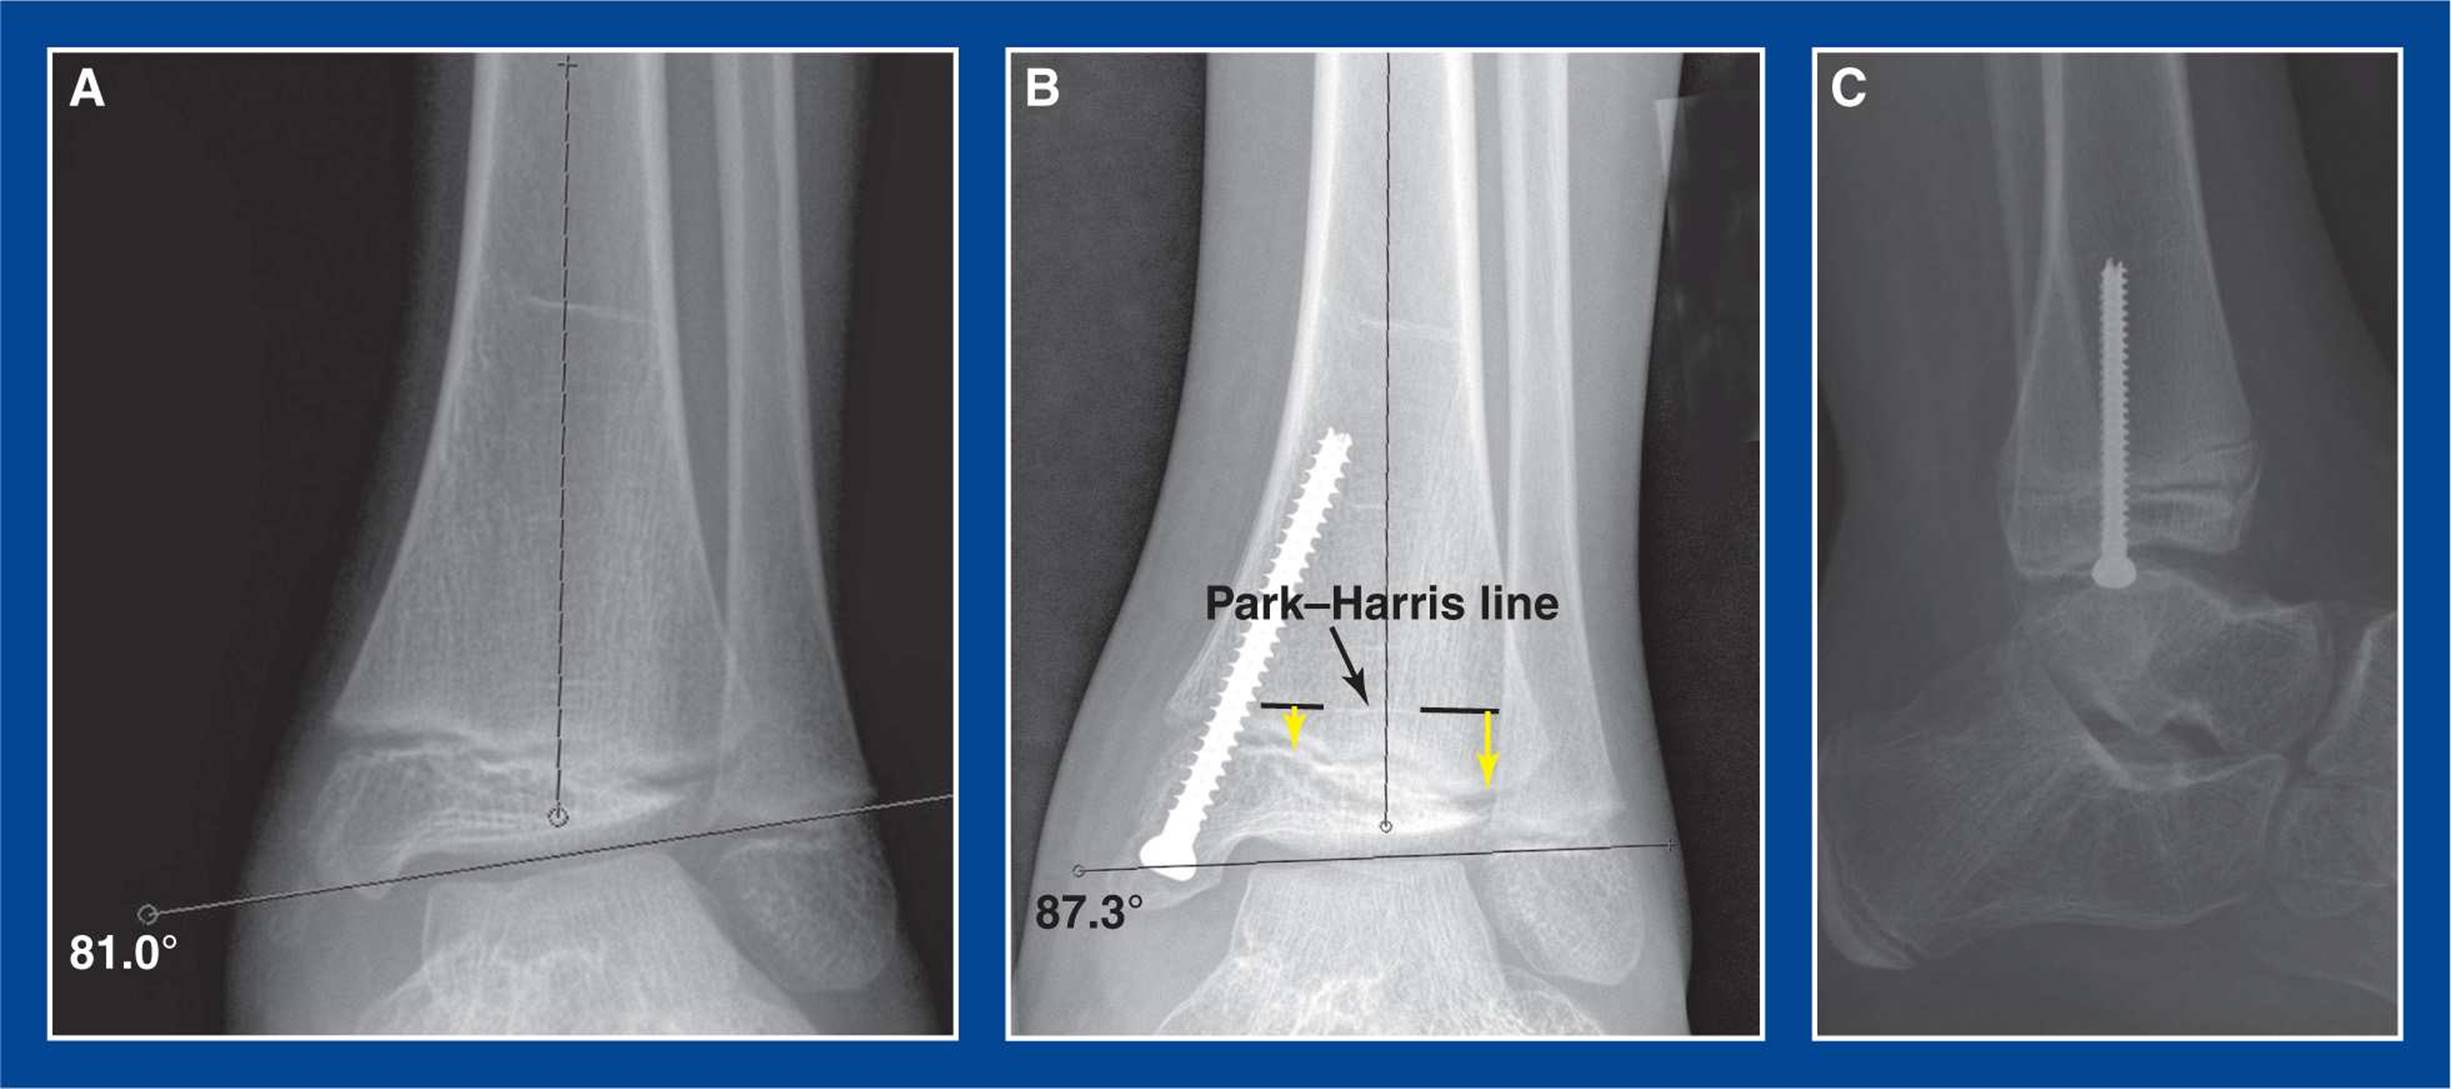
Figure 8-1. Medial malleolus screw hemiepiphysiodesis for guided growth correction of ankle valgus deformity. A. Preoperative AP ankle x-ray showing 9° of valgus deformity. B. 3° of valgus deformity persist 6 months after retrograde insertion of a screw across the medial side of distal tibial physis with a starting point in the center of the medial malleolus. The Park–Harris line (dashed black lines with white P–H line visible between them) confirms deformity correction. The yellow arrows indicate the differential growth of the physis from the P–H line following screw insertion months earlier. C. Lateral radiograph shows that the screw is in the midcoronal plane. This is a true lateral projection of the ankle joint, confirmed by colinear alignment of the posterior cortices of the tibia and fibula at the level of the tibial meta-epiphysis. (see Assessment Principle #20, Chapter 3).
4. Complications
a. Broken screw
i. Avoid by using a large enough screw, which is 4.5 mm in diameter in all but the youngest children. The screw must bend as the angular deformity is corrected. Larger screws resist fracture.
b. Continued physeal growth
i. Avoid by using a fully threaded screw. The threads of a fully threaded and a partially threaded screw are stable in the metaphysis. The head of the screw and the smooth shank of a partially threaded screw are not sufficient to keep the distal portion of the screw stable in the epiphysis of the medial malleolus. The physis will continue to grow, effectively dragging the head of the screw into the medial malleolus. The threads of a fully threaded screw maintain stable fixation in the medial malleolus.
c. Exaggerated overcorrection
i. Avoid by ensuring timely patient follow-up with radiographs. Anticipate deformity correction at approximately 1° per month.
Anterior Distal Tibia Guided Growth with Anterior Plate–Screw Construct
1. Indications
a. Failure of non-operative management to relieve the anterior ankle impingement pain that is most often due to a flat-top talus in a treated clubfoot (see Chapter 5)
2. Technique (Figure 8-2)
a. Make a 4- to 5-cm longitudinal incision over the anterior aspect of the ankle joint lateral to the anterior tibialis tendon
b. Avoid or retract the superficial peroneal nerve
c. Release the proximal portion of the extensor retinaculum longitudinally
d. Incise the anterior ankle joint capsule longitudinally and retract the edges medially and laterally to expose the distal tibial metaphysis and epiphysis
e. Apply a guided growth plate–screw construct across the physis in the midsagittal plane of the tibia using mini-fluoroscopy for assistance.
i. Insert the epiphyseal screw half way between the physis and the articular cartilage
ii. Insert the metaphyseal screw perpendicular to the shaft of the tibia
f. Repair the capsule over the plate with 2-0 absorbable sutures, if possible
g. Repair the extensor retinaculum with 2-0 absorbable sutures
h. Approximate the skin edges with interrupted subcutaneous 3-0 absorbable sutures and a running subcuticular 4-0 absorbable suture
i. Do not lengthen the tendo-Achilles. That would increase the anterior ankle impingement. Reorientation of the ankle joint into recurvatum will improve painless ankle dorsiflexion.
j. Immobilize the ankle in a CAM boot for 1 week to allow the soft tissues to heal
k. Remove the plate and screws after the joint has reoriented and the pain has been resolved for a few months
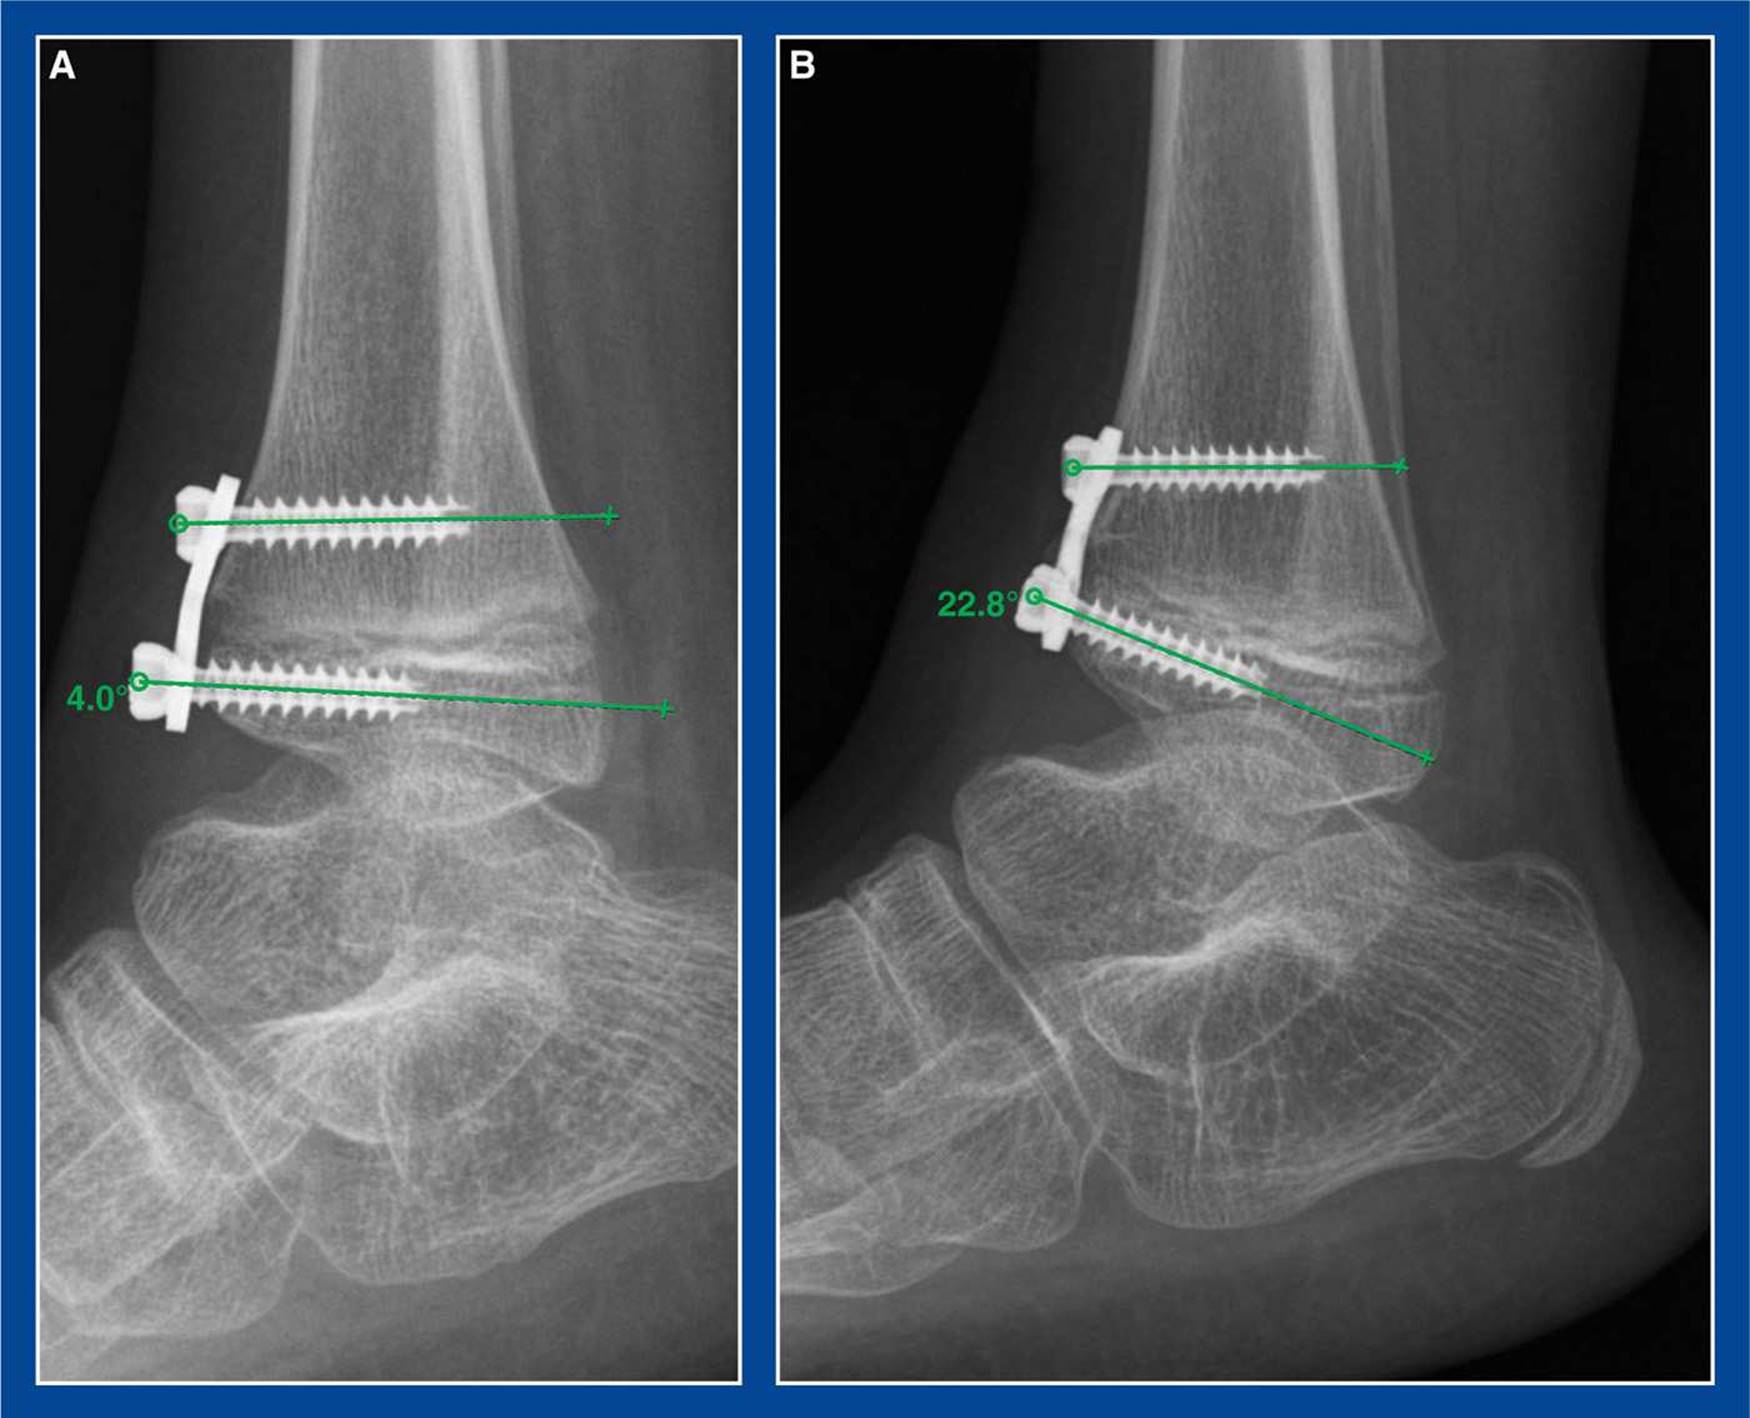
Figure 8-2. Guided growth for anterior ankle impingement. A. Plate/screw construct is seen bridging the anterior distal tibial physis. B. Several months later, the joint has reoriented and grown into recurvatum, thereby increasing dorsiflexion and decreasing the painful anterior ankle impingement.
3. Pitfalls
a. Using a plate so large or poorly positioned that it impinges on the dorsal talar neck more than the offending anterior distal tibial epiphysis already was
b. Concurrent lengthening of the tendo-Achilles. The goal is to move the anterior distal tibial epiphysis away from the dorsal talar neck. Therefore, first reorient the joint into recurvatum/dorsiflexion with guided growth. Then determine if a heel cord lengthening is necessary.
4. Complications
a. Overcorrection
i. Avoid by ensuring patient follow-up
b. Screw insertion into the physis or the joint
i. Avoid by inserting the epiphyseal screw first and using mini-fluoroscopy for guidance
c. Injury to the superficial peroneal nerve
i. Avoid by isolating and retracting/protecting it