
Children today are tyrants. They contradict their parents, gobble their food, and tyrannize their teachers.
—Socrates
Rainy days aren’t necessarily bad. In fact, I began writing books as a result of too many rainy days. The west coast of British Columbia, where we live, is often called “the wet coast.” I’ve had more experience than I’d care to remember dealing with homebound babies, toddlers, and preschoolers. When my three oldest children were young, there were many rainy days when everyone was up at 5:00A.M., and our entire day’s worth of activities had been completed by 8:00 A.M. And there, stretching before us, were eight or nine more hours to fill until Daddy came home. The rain forced me to be creative in keeping my kids busy for all those hours, and the writing saved my sanity!
Now that the school years have arrived, our weekdays are filled with learning, sports, lessons, and other activities. Maybe we’re too busy to pay attention to the weather during the week, but it sure seems that when the weekend comes, it’s likely to be raining! Around here there’s an oft-told joke that asks, “What follows two days of rain?” Answer? “Monday!”
But rainy days with school-age children are quite different from rainy days with preschoolers and toddlers. Most six-to-ten-year-olds don’t need constant supervision and can work independently on crafts, games, hobbies, or other projects. So although our weekend plans may go out the window when the weather won’t cooperate, it doesn’t mean we can’t have fun! It just means that we have to be a little more creative deciding how we’re going to spend our time. Don’t give in to the temptation to use computer or video games or TV to pass the time. A rainy afternoon can be a real blessing, reminding us how much fun it is to eat popcorn and play games, to work on a puzzle together, or to build an indoor tent with couch cushions, sheets, and clothespins.
Sometimes playing indoors together for a prolonged period results in bickering. Children who are laughing and having fun together one minute can be angry and not speaking to each other the next minute. I find that the following ideas from 101 Activities for Siblings Who Squabble by Linda Williams Aber help relieve tension and get kids playing together again:
• Give each child an equal number of paper lunch bags. Have the children stand about six feet apart (or in a circle, if there are more than two children), blow into a bag to fill it with air, hold it tightly closed with one hand, then pop it with the other. Continue popping until laughter replaces squabbling.
• Designate one child “heads” and the other “tails,” then flip a coin. The winner holds the coin and tells his side of the story. The other child may not speak while the player with the coin is talking. When the first child is finished, he passes the coin to the second child, who then tells his side of the story. The coin is passed back and forth until the children run out of things to say. They cannot repeat what they’ve said on a previous turn. Then they pass the coin back and forth three more times, with each child saying one nice thing about the other child on each turn.
• Give each child a supply of scrap paper and a wastebasket. Have each child stand about five feet from a basket, ball up a piece of paper, and toss it into his basket. As the children throw, let them express their anger out loud. For example, they might yell, “Take that!” Their anger will soon subside, and the children will be ready to play with each other again.
The games and activities in this chapter include ideas for children playing indoors on their own, with an adult, or with friends and siblings. Other chapters, such as “Arts and Crafts”, “Kids in the Kitchen”, “On the Move”, and “My Family and Me”, also have lots of ideas for things to do indoors. Even outdoor games like marbles and hopscotch can be played indoors. And if you like the indoor games and activities in this chapter, many can be adapted easily for outdoor play when the weather clears up.
ALL BY MYSELF
It’s a rainy Saturday afternoon. Your active six-year-old is bored. He’s called all his friends, but no one’s available to play. The neighbor kids have gone out for the day. His older brother is doing homework, and his little sister, a last resort, is playing house. He has absolutely nothing to do. Sound familiar? Before you turn on the TV or a computer game, try one of the following activities. Children can do these all by themselves, but they’re also fun for an adult and a child or for two or more children to do together.
Ping-Pong Pinball
Utility knife
Shallow box (from a 24-pack of soda)
Ping-Pong ball
Use a utility knife to cut three or four holes slightly larger than a Ping-Pong ball in a random pattern across the bottom of a shallow box. Have your child place a Ping-Pong ball at one end of the box, then hold the box and maneuver it so the ball reaches the other end without falling through a hole. For more challenge, cut more holes in the box or play with more than one ball at a time.
Coin Toss
Coin
How many times can your child flip a coin without dropping it? The coin must spin in the air without touching anything, and he must catch it in the palm of his hand. See if your child can beat his previous record for catches or use an egg timer to see how many catches he can make before the time is up. Have him play against a sibling or friend to see who can make the most catches or who can toss the coin the highest without dropping it.
Flashlight Fun
Scissors
Uninflated balloons (one red, one yellow, and one blue)
Flashlight
Rubber bands
Cut the rounded ends from the balloons. Stretch one balloon end over a flashlight and hold it in place with a rubber band. In a darkened room, have your child shine the flashlight on the ceiling or a wall to see the colorful light. Change colors. Layer balloons to see how mixing the colors creates new ones: yellow over blue to make green, red over yellow to make orange, and so on.
If you have three flashlights, place a different color on each. Shine two or more colors on the same spot to create a new color.

Scavenger Hunt
Grocery bag
List of things to collect
Give your child a grocery bag and a list of things to collect. The list may include things like a small toy, a Lego piece, a comb, a book, or anything else your child can find indoors. Set a time limit—perhaps twenty minutes for ten objects. (If the items are fairly obvious and easy to find, you’ll need to shorten the time.) Reward your child with a small prize (for example, a pack of gum or an ice cream cone) for finding all the items on his list.
If your child isn’t reading independently yet, draw pictures instead of writing a list of words.
For group play, prepare one list for each child. You can make the list of objects the same for each player or have players look for different things. The first player to find all the items on his list is the winner.
Grid Game
Large sheet of poster board or paper (at least three feet square) or old bed sheet
Pen or marker
Beanbag
On a large sheet of poster board or paper or an old bed sheet, draw a grid pattern of five columns by five rows. Across the top of the grid, label each column with an adjective like big, small, hard, soft, round, long, short, and so on. Down the side of the grid, label each row with a common color name like red, green, yellow, blue, black, white, and so on.
Lay the grid on a floor or other flat surface. Have your child stand several feet away from the grid and toss a beanbag on it. Your child must then find an object that matches the characteristics of the square into which the beanbag lands. For example, if the beanbag lands on a square in the “red” row and the “round” column, he must find something round and red like a ball, balloon, or marble.
To vary the grid, change the labels to correspond with different objects in your home. To include younger children, label the grid to correspond with stuffed animals (white cat, pink bear), toys (red Duplo piece, blue car), clothing (green sock, white T-shirt), and so on.
Library
Cataloging books is a good rainy day project for the bookworm in your family.
Paper
Pencil
Books
Notebook, index cards and recipe box, or simple computer database
Date stamp (optional)
Compile a list of your family’s books, starting with your child’s bookshelf. Show your child how to write a list that includes at least the title and author of each book. If you like, your child might also include each book’s subject, publisher, and year of publication.
Your child can list the books alphabetically in a notebook, note each book on an index card and keep the cards in a recipe box, or enter the information into a simple computer database so it can be sorted by author, title, or subject.
Once you’ve cataloged your books, open your library for loans to friends and family members. If you like, create a library card for each borrower and record the items you’ve loaned out. Your little librarian may enjoy using a date stamp for stamping due dates.
What’s in the Bag?
Paper bag
Four or five small, hard-to-identify household objects
Fill a paper bag with four or five small household objects. Science Wizardry for Kids by Margaret Kenda and Phyllis S. Williams suggests hard-to-identify items, such as a small battery, a marble, a grape, an olive, an unshelled nut, and a pincushion with no pins in it. Look around your home to see what else you can come up with.
Have your child reach into the bag and try to identify the objects in it without looking. If you like, have him challenge a parent, sibling, or friend to identify the objects in the same way.
Shuffleboard
Four or five flat, circular, unbreakable objects (lids from milk jugs or baby food jars, plastic hockey pucks, checkers, and so on)
Ruler
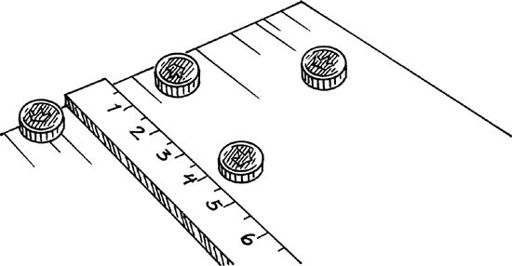
Seat your child at the edge of a table with four or five flat, circular, unbreakable objects in front of him. If possible, use similar items rather than a mixture of objects. Ask your child to try to slide the objects one at a time toward the opposite end of table without sending them over the edge. Award points as follows: one point for coming within six inches of the edge, two points for coming within an inch of the edge, three points for touching the edge, and four points for hanging over the edge. How many points can your child win in five tries? If you like, have him play against a friend to see who gets the most points.
Trick Your Fingers
This trick has a scientific twist, and most kids will think it’s pretty neat.
Three bowls
Water
Ice cubes
Fill one bowl with cold water and ice cubes. Fill a second bowl with hot tap water (hot to the touch, but not hot enough to feel uncomfortable or burn your child’s skin). Fill a third bowl with room-temperature water.
Put one of your child’s hands in the bowl of ice water. Put the other hand in the bowl of hot water. After a minute, put both hands in the bowl of room-temperature water. Although both hands are in the same bowl, the water will feel cold to the fingers that have been in the hot water and hot to the fingers that have been in the cold water.
Cards in a Hat
Hat
Playing cards
Put the hat on the floor in the middle of a room. Have your child stand at a distance from the hat and try tossing cards one at a time into it. Keep track of how many make it in, then play again so he can try to improve his record.
For two players, separate the red and black cards. For three or four players, divide the cards by suit. Give one set to each child and have the children stand at equal distances from the hat and take turns tossing cards. Whenever a player gets a card in the hat, he gets another try. When all the cards have been tossed, the player with the most cards in the hat wins the round.
House of Cards
Building a house or castle with cards is a tricky thing to do. Using old cards with slits cut into them makes building less frustrating and more fun for young children.
Old playing cards
Scissors
Help your child cut two half-inch slits about two inches apart in each long side of each card. Show him how to fit the cards together to build a house, castle, or other structure.

Card Toss
Playing cards (Old, incomplete, or mismatched decks are okay.)
Have your child stand several feet away from a wall and toss cards at its base. The object of the game is to get a card to lean upright against the wall instead of falling flat on the floor. When a card falls flat, it stays where it is. Whenever your child gets a card to lean, he wins all the cards lying on the floor. The game is over when he runs out of cards. See how long your child can keep this game going.
For two or more players, divide the cards equally among the players. Have the players take turns tossing their cards against the wall. Play until one player has all the cards or until you want to end the game.
ANOTHER KIND OF ALPHABET
Children around the world enjoy making up secret codes to communicate with each other. Your child may enjoy not only making up his own secret code, but also learning other ways of communicating with his friends using sign language, Braille, Morse code, or semaphore (a flag-based system).
American Sign Language
Most kids enjoy learning sign language—especially when they realize they can use it as a secret code. Help your child practice the manual alphabet illustrated below. Look for a poster you can hang in your child’s room or a place mat that can turn mealtimes into practice times. You might also learn signs for basic words and phrases like please, thank you, more, enough, and so on.
Check your local library or bookstore for Talking with Your Hands, Listening with Your Eyes by Gabriel Grayson, Mary Beth Miller, and George Ancona and Nursery Rhymes from Mother Goose by Harry Bornstein and Karen Saulnier. Or look for Beginning American Sign Language VideoCourse, a set of fifteen DVDs produced by Sign Enhancers.

Braille
Paper and pen or pencil
Flat piece of Styrofoam
People with visual impairments use their fingers to read Braille, a system of raised dots named after its creator, Louis Braille. Different arrangements of six dots represent the alphabet, numbers, punctuation marks, and so on.
Show your child how to write the Braille letters shown below by punching holes in a sheet of paper (laid on a flat piece of Styrofoam) with the tip of a pen or pencil. Because Braille is read by feeling the raised dots on the reverse side of the paper from left to right, it must be written backward—from right to left. Begin by helping your child write his name in Braille. With practice, he’ll soon be able to write phrases, sentences, and even entire messages.
If your child would like to learn more about Louis Braille, you’ll enjoy reading Russell Freedman’s Out of Darkness: The Story of Louis Braille together.

Morse Code
Morse code is a series of dots and dashes transmitted by sound or light. Developed in the 1830s by Samuel Morse, it was used by telegraph operators before the advent of the telephone. It is still used today in situations where there is no other means of communication. Although Morse code signals are commonly referred to as dots and dashes, the correct term for the short signal is dit, and the term for the long signal is dah. A dah is three times as long as a dit. Letters are separated by a signal the length of three dits; words are separated by a signal the length of seven dits.
Help your child learn Morse code (illustrated below). If you like, write each letter on an index card and use the cards to review the code. Begin by tapping out letters and having your child tell you what the letter is. As he learns, tap out names, words, and phrases. If you like, darken the room and use a flashlight to transmit the code.

Semaphore
Semaphore is a flag-based system of communicating used by the military, pilots, sailors, and railroad workers. One flag is held in each hand; the flags are positioned in various combinations to represent letters and numbers.
Two flags
Help your child learn semaphore. Begin with the alphabet, then your child’s name, common words, and so on. Your child will enjoy using semaphore to communicate with friends across the yard or street.

Chicken Scratch
Chicken scratch is a code in which one symbol represents each letter of the alphabet. At first you’ll need a copy of the key in order to write and read chicken scratch messages. But with practice, you’ll be able to write and read chicken scratch without looking at the key.
Chicken scratch key
Paper
Pencil
Have your child write a message on a sheet of paper. Help him use the key below to find the symbols that represent the letters in his message. Then have him copy his message in code on a separate sheet of paper. He can give his message and a copy of the key to a friend and challenge his friend to decipher what he’s written.

Top-Secret Code
Paper
Pencil
To create a top-secret code, your child should write the alphabet on a sheet of paper. After each letter he should write a symbol, such as a heart for A, a star for B, and so on. Once he’s developed the code, make a copy of the key for a friend to whom he’d like to send secret messages.
Now have your child write a message on a sheet of paper. Next, he should rewrite the message on a separate sheet of paper, replacing the letters with code symbols. Then he can give the encoded message to his friend to decipher.
If you have a computer, codes are easy to write using fonts like Wingdings and Symbol or other alphabets like Arabic, Greek, or Hebrew. Just type your message in English, then highlight the message and change the font. I wrote the following message on my computer. Use the code to see if you can read what it says.

Here’s the key:

CARD GAMES FOR ONE PLAYER
Solitaire games are a great way to pass the long hours of a rainy afternoon, a sick day, or those inevitable times when “there’s no one to play with.” When I played cards by myself as a child, I knew only three ways to play solitaire. What a delight it was to discover that there are many enjoyable card games one can play alone.
The games that follow are fun to play yet simple enough for six-to-ten-year-olds. If your child enjoys playing cards—and most do—the book 101 Best Family Card Games by Alfred Sheinwold provides games the whole family can enjoy.
Accordion
Deck of playing cards
Deal four cards faceup in a row from left to right. Compare each card with the two cards on its left (if available) to see if it matches with either card in number or suit. If so, place the card on top of its match. Moving the card creates a space in the row. Move the cards together to close up the space and check to see if new matches have appeared as a result.
Add one new card from your deck to the right of the row. Check to see if it is a match with the two cards on its left. Move the piles of cards accordingly if it is. If not, deal another card to the right of the row. Repeat.
The object of the game is to get the whole deck of cards into one pile. This is difficult to do, so ending up with five piles is a good outcome.
Aces Up
Deck of playing cards
Deal four cards faceup in a row. If two of the cards are of the same suit, discard the lower-value card. In this game, aces are the cards with the highest value. Fill the resulting empty space with a card from the deck. Continue until one card of each suit is displayed.
Deal a second row of cards on top of the first row. Compare the top cards of each pile. If two cards are of the same suit, discard the lower-value card. Fill any empty space with a card from the deck. Continue comparing and discarding until one card of each suit is displayed.
Continue dealing rows, comparing, discarding, and filling empty spaces until the entire deck of cards has been dealt. The object of the game is to discard all the cards except the aces.
Klondike
Deck of playing cards
Deal the cards facedown into seven columns of overlapping cards. The first column contains one card, the second column two cards, the third three cards, and so on. Turn the last card of each column faceup. Stack the leftover cards facedown to form a stock pile. The object of this game is to move the four aces to four foundation piles above the seven columns, then build each foundation pile up in suit from ace to king.
To play, turn three cards at a time faceup from the stock pile to form a waste pile. Only the top card of the waste pile and the last card of each column may be moved to a foundation pile. To move cards from the waste pile to the columns or to move cards among the columns (to expose new cards for play), build columns downward in sequence and alternating colors. (For example, lay a black ten on a red jack, a red nine on a black ten, and so on.) You may also move a sequence of cards together from the end of one column to the end of another. (For example, move a red five and a black four together from the end of one column to another column ending with a black six.) When a facedown card in a column is exposed, turn it faceup. An empty column may only be filled with a king. When the stock pile is empty, turn the waste pile facedown and use it as a stock pile. The game ends when either all the foundation piles are filled or when no more moves are possible.
Monte Carlo
Deck of playing cards
Deal the cards faceup into five rows of five cards each. The rows should not overlap.
Remove all pairs of adjacent cards (cards next to each other horizontally, vertically, or diagonally) that match each other in number. Then close up the holes in the layout by moving cards to the left and up, keeping the cards in the same order in which they were dealt. Deal new cards faceup to fill out the bottom row(s), so you end up with five rows of five cards each again.
Continue removing pairs, closing up holes, and dealing new cards until the entire deck has been dealt. The object of the game is to discard the entire deck in pairs.

Thirteens
Deck of playing cards
Deal five cards faceup in a row. Remove any kings or pairs of cards that add up to thirteen: an ace and a queen, a two and a jack, a three and a ten, a four and a nine, a five and an eight, or a six and a seven. Discard all the pairs, then deal a new row of five cards on top of the first row. Discard any pairs of top cards that add up to thirteen. Continue in this way until the whole deck is dealt. The object of the game is to discard the entire deck in pairs that add up to thirteen.
Fourteens
Deck of playing cards
Deal twelve cards faceup in a row. Deal three more rows overlapping the first row, then deal the remaining four cards as a fifth row on the first four columns. All the cards should be visible. Remove any pairs of cards in the bottom row that add up to fourteen: an ace and a king, a two and a queen, a three and a jack, a four and a ten, a five and a nine, a six and an eight, or a seven and a seven. The object of the game is to discard the entire deck in pairs that add up to fourteen.
CARD GAMES FOR TWO OR MORE PLAYERS
Card games are fun to play as a family. They help children learn about numbers and provide practice in logical thinking for both children and adults. Card games also provide opportunities to practice appropriate winning and losing behavior. And unlike many board games that are either too complex for children or too simple for adults, well-chosen card games are enjoyable for everyone because they allow children and adults to play as equals.
If you’re planning to play a new card game, make sure you have a good grasp of it before you try teaching it to your children. When you’re teaching your children the game, be sure to set aside time to play it with them. After your children understand the rules, they can play it without an adult. If your children tend to bicker when they play together, explain before each game what type of behavior you expect. Rudeness, name calling, cheating, gloating, and pouting should not be tolerated.
The following games are nice alternatives to old favorites like crazy eights, old maid, go fish, concentration, and war. You might even consider sweetening each game with a treat for the winner.
Go Boom
Deck of playing cards
Two players can play this game, but it works best with three or four. Deal seven cards facedown to each player and place the remainder of the deck facedown on the table.
The first player places one of his cards faceup on the table. The player to his left must play a card that matches it in number or suit. If the player to the left cannot do so, he must draw one card at a time from the deck until he gets and plays a matching card. Play continues with the next player to the left and so on.
The game ends when one player has no cards left in his hand. If the last card in the deck is drawn before the game ends, reshuffle the played cards and continue the game until one player runs out of cards.
Variation
When the last card is drawn from the deck, the player with the fewest cards in his hand wins the game.

Pigs
Deck of playing cards
Up to thirteen players can play this game, but it works best with three to six. Assemble four cards of the same number for each player. Shuffle the cards and deal four to each player.
Each player looks at his cards to see if he has four of a kind (of the same number). If nobody does, each player passes one unwanted card facedown to the player on his left. The players look at their cards again. If nobody has four of a kind, the players pass again until someone has four of a kind. When someone has four of a kind, instead of passing a card he quietly makes a pig snout by pushing up the tip of his nose with his finger. As the other players notice the player making a pig snout, they stop passing and do the same. The last player to make a pig snout must deal the cards for the next game.
Variations
Donkey: The first player with four of a kind quietly lays his cards on the table but continues passing cards. As each player notices, he does the same. The last player to notice gets a D. Play until one child gets D-O-N-K-E-Y.
Spoons: In the middle of the table place a pile of spoons (one spoon fewer than the number of players). When one player gets four of a kind, he grabs a spoon. As the other players notice, they quickly grab spoons, too. The player left without a spoon deals the cards for the next game.
Play or Pay
Deck of playing cards
Counters (poker chips, dry beans, pennies)
Deal an equal number of cards to each player. Place any leftover cards faceup in the center. Give each player an equal number of counters.
The player to the left of the dealer begins the game by laying an ace from his hand or from the leftover cards faceup on the table. If he can’t do so, he must put a counter in the kitty. The next player to the left lays down the next card of the same suit (in this case, the two) from his hand or from the leftover cards. If he can’t do so, he must put a counter in the kitty. The game continues in this way until the king is played. The player who plays the king makes the first play in the next round.
The player who runs out of cards first wins the game. Every other player puts one counter in the kitty for each card left in his hand. The winner takes all the counters in the kitty.
Slapjack
Deck of playing cards
This game is best played with three or four players at a small table. Deal the cards facedown evenly among the players. Stack any extra cards in the middle of the table. Each player should stack his cards facedown in front of him.
The player to the left of the dealer turns over a card and drops it faceup on the middle stack (in a way that lets everyone see it at the same time). The next player to the left does the same. Play continues in this way until someone turns over a jack. Players slap the jack to win the pile of cards. If more than one player slaps the jack, the player whose hand is at the bottom of the pile wins. The winner places his new cards facedown under the others in his stack. Then play continues.
If a player slaps a card that isn’t a jack, he must give the top card facedown from his stack to the person who played the card he slapped. If the false slapper has no cards left, he’s out of the game.
When a player has turned over all his cards, he can still watch for the next jack and try to slap it to get more cards. If he misses, he’s out of the game. The game ends when someone wins all the cards.
Jiggety, Joggety, Jig
Deck of playing cards
Three to thirteen players can play this game. Deal the cards facedown evenly among the players. Place any extra cards faceup in the middle of the table. Each player holds his cards so that he can see them, but no one else can.
The dealer chooses any card from his hand and lays it faceup in front of him. The player to the dealer’s left checks for a card of the same number in his hand or among the leftover cards. If he finds one, he lays it down and shouts, “Jiggety!” If he doesn’t, the next player to the left takes a turn.
The next player to find a match lays it down and shouts, “Joggety!” The third player to find a match lays it down and shouts, “Jig!” which ends the round. The “jigger” gets to start the next round.
The player who runs out of cards first wins the game.
Seven of a Suit
Deck of playing cards
Three to five players can play this game. For three players, assemble three suits of seven cards each (twenty-one cards total). For four players, assemble four suits of seven cards each (twenty-eight cards total). For five players, assemble three suits of nine cards each and one suit of eight cards (thirty-five cards total). Shuffle the cards and deal seven to each player.
The object of the game is to collect seven cards of one suit. One at a time, each player passes a card from his hand, facedown, to the player on his left. This should be a card that doesn’t match the suit he is trying to collect. Play continues until a player collects seven cards of one suit.

INDOOR GARDENING
Gardening is usually considered an outdoor activity, but gardens can be grown indoors, too. Indoor gardening is fun and rewarding whether you live in an apartment with no outdoor garden space, need a class science project, or simply want to grow some seedlings to plant outdoors in the spring. An indoor garden can be grown in pots on a balcony, in containers on a windowsill, in hanging baskets, or in window boxes.
One of the best guides for indoor gardening projects is Gardening Wizardry for Kids by L. Patricia Kite. It provides many easy-to-read, easy-to-do indoor plant projects and experiments for children and explains gardening history, folklore, games, crafts, and more. Best of all, the projects don’t need a lot of space, time, money, or parental involvement.
The following activities are simple and fun and will introduce your child to the wonderful world of gardening.
Herb Garden
Because growing requirements vary among herbs, be sure to read each seed packet before you begin.
Marker
Popsicle sticks
Empty coffee cans or other leakproof containers
Potting soil
Herb seeds, such as basil, thyme, rosemary, parsley, sage, marjoram, oregano, dill, cilantro, mint, or chives
Spray bottle full of water
Help your child write the name of each herb on a Popsicle stick. Fill each container two-thirds full of potting soil. Plant the seeds according to the instructions on the packets, using a different container for each herb. Mark each container with the appropriate Popsicle stick. Spray each container with water until the surface of the soil is completely damp. Place the containers by a sunny window.
Spray the containers regularly to keep the soil damp but not wet. Seedlings will appear in two to four weeks, depending on the herb. Let the plants grow for several weeks. Use the leaves for cooking and freeze or dry any surplus. You can freeze herbs by chopping them, mixing them with a bit of water, and freezing them in ice cube trays. To dry herbs, see the instructions.
Green Onions
Green onions, or scallions, are easy to grow indoors from seed and are a nice addition to salads and other dishes.
Leakproof container, such as a large yogurt or cottage cheese tub or a small coffee can
Potting soil
Green onion seeds
Spray bottle full of water
Have your child fill a container about two-thirds full of potting soil. Sprinkle the seeds on top of the soil and cover them lightly with more soil. Spray the surface of the soil with water until it’s completely damp. Place the container in an artificially lit or partially sunny place.
Spray the containers regularly to keep the soil damp but not wet. Seedlings will appear in two weeks. When the plants are about three inches tall, thin them so the remaining plants are about an inch apart. When the stems are as thick as a pencil, the onions are ready to be picked.

Peanuts
Glass or plastic container (about six inches wide and four inches deep)
Potting soil or earth without lumps
Sand
Fresh, unroasted peanuts in the shell
Water
Have your child fill a container about two-thirds full of potting soil or earth without lumps. Mix a little sand with the soil. Remove the shells from five peanuts and place the nuts on top of the soil in your container. If you are using a clear container, place the nuts near the edge so you can see them grow. Cover the peanuts with one inch of soil. Place the container in a warm, sunny spot and keep the soil damp.
In about two weeks, round leaves will begin to sprout. When the tallest plant is about five inches high, remove the other plants from the container and throw them away. When the plant is about a foot tall, it will have yellow flowers on it that will fall off. Smaller flowers that form on each stalk will develop fruit that will start bending toward the soil. The fruit will push its way into the soil, and a peanut will form at each tip. You can dig up the peanuts when the leaves begin to turn yellow.
Fruit and Veggie Plants
Lemon, orange, grapefruit, and/or potato
Knife
Leakproof containers
Water
Potting soil or earth without lumps
Plastic wrap and rubber band
Large bucket
Lemon, Orange, or Grapefruit Plant
Soak the seeds in water overnight. Have your child fill a container about halfway with soil or earth. Poke the seeds about a half-inch into the soil. Cover the container with plastic wrap secured with a rubber band. Place the container on top of your refrigerator. In about three weeks, plants will sprout.
Potato Plant
Have your child fill a large bucket about halfway with soil or earth. Lay two small potatoes on the soil and cover them with about one more inch of soil. Water the soil until it’s slightly damp, then place the bucket in a warm, sunny place. Leaves will sprout in a week or so, then purple flowers, then maybe even tiny potatoes beneath the soil. (Caution: Potato plants can be poisonous if handled improperly. Keep your plant away from small children and animals. Keep your potatoes away from light by covering them with plenty of dirt and storing them in a dark place. Never eat a potato with green spots.)
Seedlings
Your child should grow seedlings indoors about one month before he wants to plant them outside.
Styrofoam cups
Potting soil
Seeds
Pen
Tray
Spray bottle full of water
Plastic wrap
Fill Styrofoam cups with potting soil. Plant the seeds according to the instructions on the seed packets, then label each cup with the name of the plant in it. Put the cups on a tray and spray them with water until the soil is damp. Cover the tray with plastic wrap and place it on top of your refrigerator. Don’t put the tray in a sunny spot.
Every day, lift the plastic from the cups for an hour. Water the plants when the surface of the soil looks dry. When green sprouts appear, remove the plastic wrap and place the tray in a sunny spot. When the plants are four inches tall, you can transplant them. Help the plants adjust by putting the seedlings outside for a few hours each day before you transplant them. After a week, they’ll be ready for planting in your garden.
Dried Flowers
Drying flowers is a wonderful way for your child to enjoy their beauty all year long.
Variety of flowers
Rubber bands or string
Coat hangers
Florist’s foam (optional)
Vase or pot
Choose a variety of flowers to dry. Some flowers that dry well are baby’s breath, thistles, roses, strawflowers, statice, dahlias, black-eyed Susans, and poppies. Use rubber bands or string to tie flower stems together in groups of five. Tie the bunches by their stems to coat hangers. Be sure the bunches don’t touch each other. Hang the coat hangers in a closet or in a dark, dry, well-ventilated room. The darkness prevents the flowers from fading, and the dryness and ventilation prevent the growth of mildew. After about two weeks, the flowers should be dry. If you like, place a piece of florist’s foam in a vase or pot to help hold the flowers in place. Arrange the flowers however you wish.

COLLECTOR’S CORNER
Kids love to collect things. When I think of all the things my kids have collected over the years, I recall that their interest in fad items waned quickly. Collections of coins, stamps, and sports cards, however, stand the test of time and have long been enjoyed by both children and adults.
Collecting is a valuable hobby for children. Collections can teach children about other cultures, history, art, sports, animals, nature, and more. Collecting requires children to be observant, encourages skills like sorting and classifying, and gives children the opportunity to interact with fellow collectors of all ages. Children appreciate receiving additions to their collections as gifts, and organizing a collection is a wonderful way to pass the hours of a rainy afternoon.
Most collections require a minimal amount of special equipment to get started. Look for books on the subject of your child’s collection at your local bookstore, library, or online. Ask friends and relatives to be on the lookout for interesting and unusual coins, stamps, rocks, and so on, and to add to your child’s collection at birthdays and holidays. Encourage togetherness by starting a collection as a family. Collecting can be enjoyed by all ages, and collections can be worked on and expanded as time and money permit.
Coins
Coins have been a popular item to collect for hundreds of years. They tell fascinating stories about kings and queens, gods and goddesses, history, nature, and more. Beginning a coin collection is easy—just start with the money you have in your pocket or lying around the house. My family’s interest in coins was sparked by a special series of “millennium” quarters circulated by the Royal Canadian Mint in 1999 and 2000. My children have continued to pay special attention to the coins they see, and one of our daughters has taken over a collection of international coins that I began as a child.
Be sure to let your family and friends know that your child has begun a coin collection. Most people have at least a few interesting coins around the house, and they’ll probably be happy to share them with someone who will appreciate them. Special uncirculated (or mint) sets are fairly affordable and make wonderful gifts.
For additional information on collecting coins, check your local bookstore or library for a book like A Kid’s Guide to Collecting Coins by Arlyn G. Sieber. Mints publish colorful catalogs several times each year and will, on request, put you on their mailing list. In the United States, call 800-USA-MINT (872-6468) or order online at www.usmint.gov. In Canada, call 800-267-1871 or order online atwww.mint.ca.
Stamps
Stamp collectors require some special equipment, but your child may begin his collection simply by saving the stamps that come in your mailbox each day. Ask friends and relatives to save interesting stamps, too, and you’ll be surprised at how quickly your child’s collection grows. If you want to kick-start his collection, you can buy bags of stamps from around the world at a hobby shop, stamp dealer, stamp show, or online for as little as five dollars for five hundred stamps.
Look online for information on stamp collecting from national philatelic organizations and the postal service. In the United States, kids can join clubs such as the Young Stamp Collectors of America and the All Star Stamp Club by visiting The American Philatelic Society’s web site at: www.stamps.org/Young-Philatelists.
In Canada, the Canada Post Corporation has a stamp collecting club kids can join called The Stamp Quest Club. To find out more, visit www.canadapost.ca or call 800-565-CLUB (2582).
Rocks
Some people like to collect old things—and rocks are the oldest things one can collect. They date back to the beginning of time! Collecting rocks is a great way to learn about the natural world. Rock collectors hunt for specimens, carry out experiments, and learn how rocks, minerals, and fossils are formed. Clubs and societies allow members to share their information and provide information on mail-order dealers, rock shops, and good places to look for specimens.
Whether your child wants to become a true rock collector or just display some interesting specimens he finds, a book like The National Audubon Society Pocket Guide to Familiar Rocks and Mineralswill provide your child with basic information about rocks and help him identify the specimens he finds.
For more information on rocks, minerals, and fossils, go to www.usgs.gov/ask/index.php or write to U.S. Geological Survey National Center, 12201 Sunrise Valley Drive, Reston, VA 20192 or call 888-ASK-USGS. Or contact the American Museum of Natural History at Central Park West at 79th Street, New York, NY 10024-5192 or 212-769-5100. You can also visit the web sites of many organizations, institutions, and rock lovers around the world.
Sports Cards
The most popular types of sports cards are baseball cards, followed by football, basketball, and hockey cards. Cards are also made and sold for other sports, such as golf, boxing, lacrosse, soccer, tennis, wrestling, and so on. Kids who play amateur sports often have the opportunity to have cards of themselves made when their team photo is taken.
Collecting sports cards is a fun hobby for sports-loving kids. It’s also a great way for them to learn more about the people and events associated with a sport they enjoy. Help your child decide what cards to collect. He may want to focus on a certain sport, team, or year or collect only rookie cards, superstar cards, or cards with mistakes on them.
A number of web sites have information on sports cards, such as Beckett Media (www.beckett.com) and Sports Card Forum (www.sportscardforum.com). Your child will also enjoy visiting a sports cards store and may want to join a sports cards club or subscribe to a sports cards magazine. (Ask at a sports card store for a list of magazines.)

Leaves
Leaves
Paper towel
Newspaper
Cardboard
Heavy book
Wax paper
Iron
Thin paper
Crayons
Tree identification book
Have your child collect a variety of fresh leaves. Gently dry wet ones with a paper towel. Preserve them by pressing, waxing, or rubbing.
To press the leaves, place them between two sheets of newspaper. The leaves shouldn’t touch each other. Place the newspaper between two pieces of cardboard. Set a heavy book on the cardboard and let it sit for three weeks.
To wax the leaves, place them between two sheets of wax paper with the waxy sides of the sheets touching the leaves. Cover the wax paper with a sheet of newspaper and press it with a medium-hot iron for about thirty seconds. Then separate the waxed leaves from the paper.
To make leaf rubbings, place fresh leaves under a sheet of thin paper and rub the paper with the side of a crayon.
Identify your leaves with the help of a book like Diane Iverson’s My Favorite Tree: Terrific Trees of North America.
Sand
Legend says that if you bring home sand from a beach, you’ll visit that beach again. Whether that’s true, collecting sand is a fun way to remember your visits to the beach and to see how sand differs from beach to beach.
Small containers (pill bottles, film canisters, and so on)
Labels
Pen
Camera
Magnifying glass
The next time you go to a beach, have your child fill a small container with sand (or bring home extra sand in a larger container to use for an arts-and-crafts project). Label the container with the name of the beach and the date. Help your child take a photo of the beach, too.
Look at the sand with a magnifying glass. Compare it with other samples in your collection. Notice the different colors, textures, and grain sizes. Store the sand collection on a shelf in your child’s room. Every time he looks at it, he’ll remember all the fun of his visits to the beach!
INDOOR OLYMPICS
The following games are quite physical and are great for using up excess energy on a rainy afternoon. Most are fun for one child playing alone and can also be played as contests among multiple children. If you like, award a small prize like a bite-size chocolate bar or small pack of gum to the winner of each game or hand out homemade medals (foil-covered cardboard circles stapled to ribbon). Don’t forget to write the names of the record holders in your Family Book of Records. And if your children like these games, encourage them to think up other silly sports that they can play indoors.
Long Jump
String or tape
One marker (plastic jug lid, bingo chip, or labeled slip of paper) per player
Mark a starting line with string or tape. Have your child stand at the starting line and jump forward. Place a marker where he lands. Have him jump again. If his second jump is farther than his first, move the marker to the second landing spot; otherwise, leave the marker where it is. Have your child jump five times. Leave his marker at his farthest landing spot.
Let each child have a turn jumping as described above. The child who jumps the farthest wins.

Discus Throw
String or tape
Paper plates
Mark a square at one end of a room with string or tape. Have your child stand back several feet and try to throw paper plates into the square. A child playing alone can see how many plates land in the square in a designated time. Two or more children can take turns throwing plates to see who has more successful throws. You may want to color-code each child’s plates or label them with the child’s name.
Javelin Throw
Tape or string
Toothpicks
Mark two lines ten feet apart on the floor with tape or string. Give each player five toothpicks. Have the players take turns standing behind one of the lines and throwing their toothpicks, one at a time, toward the second line. Award points for toothpicks that cross or touch the line. The child with the most points wins.
Shot Put
Tape or string
Balloons
Ribbon or medal
Mark two lines several feet apart on the floor with tape or string. Give each player a balloon. Have the players take turns standing behind one of the lines and throwing their balloons, one at a time, toward the second line. Balloons won’t travel far, so any player whose balloon crosses or touches the line deserves a ribbon or a medal!
Newspaper Golf
Newspaper
Tape
Masking tape, paper, or empty tin cans
One golf or tennis ball per player
Make a “golf club” for each player by rolling up several sheets of newspaper and taping them securely. Mark several “holes” on the floor with masking tape, sheets of paper, or empty cans lying on their sides. Have your child use his club to try to roll the ball into the holes.
Beanbag Throw
Tape or string
Beanbags (at least one per player)
Laundry basket or cardboard box (optional)
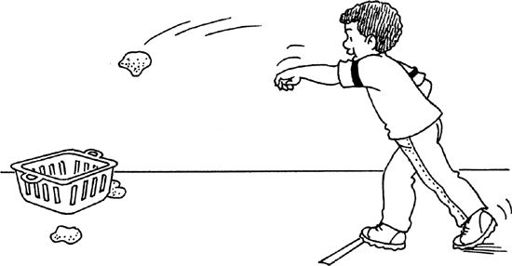
Mark two lines six feet apart on the floor with tape or string. Have the players take turns standing at one line and throwing a beanbag toward the other line. The winner is the player whose beanbag comes closest to the line without crossing it.
If you like, have the players aim for a laundry basket or cardboard box instead. Have the players take turns throwing all the beanbags one at a time toward the basket or box. The winner is the player who gets the most beanbags into the basket or box. If there’s a tie, have a play-off round to determine the winner.
Ring Toss
Scissors
Small paper plates
Wine bottle, candlestick, or other tall, steady object
Cut the center out of each paper plate, leaving a one-inch-wide ring. Set a wine bottle, candlestick, or other tall, steady object on the floor. Have your child stand back several feet and try to throw the rings so that they land encircling the bottle or candlestick.
A child playing alone can see how many rings he tosses successfully in a designated time. Two or more children can take turns tossing rings to see who has more successful tosses. You may want to color-code each child’s rings or label them with the child’s name.
Beanbag Race
Tape or string
One beanbag per player
Mark two lines ten feet apart on the floor with tape or string. Give each player a beanbag and have the players stand at the starting line. Announce, “Ready, set, go!” and have the players race toward the finish line in one of the following ways:
• Crawling, while balancing beanbags on their backs
• Running, while squeezing beanbags between their knees
A player is disqualified if his beanbag falls before he reaches the finish line.
A child playing alone can race against the clock and try to cross the finish line within a designated time. He’ll have fun trying to better his time with each try.
Cross the Creek
Rope or string
Mark two lines two feet apart on the floor with rope or string to make a “creek.” Have each player take a turn jumping across the creek. Widen the creek by moving the ropes apart another three or four inches. Have the players jump again. Keep widening the creek and having the players jump until they fail to make it across. The winner is the player who’s able to cross the widest creek.
Pillowcase Race
Tape or string
One pillowcase per player
Mark two lines ten feet apart on the floor with tape or string. Have each player stand inside a pillowcase, holding its top, at the starting line. At your signal, have the players jump to the finish line in their pillowcases. The winner is the first to reach the finish line.
Hide the Clock
This game works well with mixed age groups.
Clock or timer that ticks loudly
Have all the kids leave the room while you hide the clock or timer. At your signal, the kids return and search for the clock. The winner is the first player to find the clock.
Penny Hunt
Pennies
One cup or dish per player
Have all the kids leave the room while you hide pennies every-where—under cushions, in drawers, behind curtains, on top of books, and so on. Have all the kids return and give each a cup or dish. At your signal, have the players start searching for pennies. After five minutes, call off the hunt and have the players count their pennies. The player with the most pennies wins. Let the kids keep the pennies they find.
Blind Penny Hunt
One blindfold per player
Pennies
One paper bag per player
Use a large, open room for this game. Remove any objects that may be dangerous if children crawl into them or knock them over. Blindfold each player, then scatter pennies on the floor. Give each player a paper bag. At your signal, have the players crawl on their hands and knees, feeling for pennies. After five minutes, call off the hunt and have the players count their pennies. The player with the most pennies wins. Let the kids keep the pennies they find.

Dress-Up Relay
This funny game requires four or more players. It’s great for families, as children think it’s hilarious when adults play along.
Two suitcases or boxes
Dress-up clothes (hats, scarves, jackets, skirts, pants, boots, and so on)
Fill two suitcases or boxes with equal amounts of clothing. The clothes must be big enough to fit all the players. Place the suitcases or boxes at one end of the room.
Divide the players into two equal teams. If there’s an odd number of players, one player on the team with fewer players takes two turns. Have the teams form two lines at the end of the room opposite the suitcases.
At the word go, the first player from each team runs to one of the suitcases or boxes and dons all the clothes in it over the clothes he’s already wearing. Decide ahead of time whether buttons, zippers, and so on must be fastened. When a player is completely dressed, he then quickly removes all the dress-up clothes, puts them back in the suitcase or box, and runs to the end of his team’s line. The next player then takes a turn and so on until everyone on the team has had a turn. The first team to finish wins.
Indoor Obstacle Course
As you design your obstacle course, keep in mind the ages, abilities, and number of children involved as well as the space you have. Make the course simple at first and change the stations as they’re mastered. If you like, time the kids to see who can complete the course fastest. Below are a few ideas to get you started. Ten stations is a good number for most kids.
• Crawl under or over a row of chairs.
• Crawl under a string stretched between two chair legs.
• Jump into and out of a Hula-Hoop five times.
• Walk on a balance board.
• Throw a beanbag into a laundry basket.
• Run while balancing a beanbag on your head.
• Do a ring toss.
• Play one hole of Newspaper Golf.
• Ride a tricycle along a predetermined route.
• Somersault from one point to another.
• Do a handstand.
• Skip in place while reciting a jump rope rhyme.
• Do ten jumping jacks.
INDOOR GAMES FOR TWO OR MORE
Most of these games require two or more players, but some can be modified for a child playing alone.
What’s Different?
This game requires at least two players. Stand in front of your child and tell him to study you. Leave the room and change something about your appearance. For example, you might turn a baseball cap backward or remove a sweatshirt. Return to your child and challenge him to tell what’s different about you.
Table Hockey
Blocks or hardcover books
Popsicle sticks
Wad of paper
Create a rectangular “rink” on a large table or the floor by lining up blocks or hardcover books to make walls. Leave an opening at each end of the rink to make goals.
The players use Popsicle sticks to shoot a wad of paper (the “puck”) toward each other’s goals and to guard their own goals. Let the kids play hockey-style (each player tries to gain possession of the puck and then score) or penalty shot–style (the players take turns trying to score).
Cork Drop
Glass or bowl of water
Towel, old sheet, or plastic tablecloth (optional)
Ten corks
Place a glass or bowl full of water on the floor. If you like, place a towel, old sheet, or plastic tablecloth under it to catch splashes.
Have the players take turns. Standing over the bowl or glass with his arm extended at shoulder level, each player drops the corks one at a time into the water. Award points for successful drops. The player with the most points after each player has dropped ten corks is the winner. A child playing alone can see how many corks he drops successfully in a designated time.

Observation
Fifteen to twenty small household objects (key, bottle cap, paper clip, safety pin, coin, and so on)
Tray or tabletop
Towel or sheet
Paper
Pencils
Place fifteen to twenty small household objects on a tray or tabletop. Cover the objects with a towel or sheet. Have the players stand around the tray or table so each has a good view. Remove the sheet or towel and let the players look at the objects for one to two minutes. Then cover the objects again. Give each player a sheet of paper and a pencil. Challenge the players to write down as many objects as they can recall. The winner is the player who correctly recalls the most objects.
If a young child who can’t write is playing, pair him with an older child or adult. After the younger child has viewed the objects, have him dictate what he recalls to his partner, who writes it down.
Charades
Choose a player to start the game. The player thinks of a book title, a famous person’s name, a saying, a movie title, or a song title to pantomime. He should choose something with which the others will be familiar. If you like, designate a category like sports or Disney. The player then pantomimes the word or phrase he’s chosen to the other players. Here are some common clues used in charades:
• To indicate a book, pretend to read a book.
• To indicate a song, pretend to sing.
• To indicate a movie, pretend to crank an old movie camera.
• To indicate the number of words, hold up that many fingers. (Then hold up one finger before pantomiming the first word, two fingers before the second, and so on.)
• To pantomime a word that rhymes with the word you want players to guess, first tug on your ear to say “sounds like.”
The first person to guess the word or phrase gets a point.
If you like, divide into teams before playing. Players from each team take turns pantomiming for their teammates. The first team to guess the word or phrase gets a point.
Keep track of the points earned by each player or team. The one with the most points at the end of the game wins.
3-D Tick-Tack-Toe
Tape or string
At least two beanbags
Markers like plastic lids, blocks, or index cards (optional)
Pen (optional)
This game requires two players. Mark a large tick-tack-toe grid on the floor with tape or string. Give each player five beanbags of a color different from the other player’s beanbags. If you don’t have ten beanbags, give each player one beanbag and five markers labeled with his name.
The first player stands several feet away from the grid and tosses his beanbag into any square. If he has five beanbags, he leaves the tossed one where it landed. If he has only one beanbag, he places one of his markers in the square where the beanbag landed, then removes his beanbag. The second player takes a turn. Play continues until one player has three beanbags or markers in a horizontal, vertical, or diagonal row. The other player begins the next round.

Tossup Topics
The more players in this game, the better! Before you play, learn the Tossup Topics jingle and its rhythmic accompaniment:
|
(slap knees) |
(clap hands) |
(snap left hand) |
(snap right hand) |
|
Toss- |
up |
Top- |
ics |
|
Arctic |
to the |
trop- |
ics |
|
Tossup |
Topics |
now |
begins |
|
Starting |
with the |
top- |
ics. |
The players sit in a circle on the floor. To begin, they recite the jingle together while slapping, clapping, and snapping as shown above. All the players continue to slap, clap, and snap as the first player declares a topic: for example, birthdays. The player to his left then must name something related to birthdays: for example, cake. Play continues around the circle. Each player must name something related to the topic during one slap-clap-snap-snap pattern. If a player is stumped or names something that’s already been said, he must drop out. To resume the game, the remaining players recite the jingle again and declare a new topic. The last player remaining after all the others have dropped out is the winner.
Swap Meet
Occasionally the kids in our neighborhood have an informal swap meet. They dig through their closets and drawers for tradable treasures, then spend hours (and sometimes days!) pondering the treasures and bartering with each other. It’s a great way for kids to recycle their belongings and get new things without spending money.
Items to trade (books, toys, sports cards, DVDs, CDs, stickers, knickknacks, and so on)
Each child chooses the items he’s ready to part with. He should also label his items with his name and have his parents okay his choices. You can hold the swap meet in two different ways:
• The children meet in a central area and barter directly with each other for items they’d like to trade.
• Each child has a turn to display his items and entertain trade offers from other children.
Trades can be temporary or permanent. If trades are temporary, be sure to agree on the term of each trade. If trades are permanent, give the children a two- or three-day trade-back period in case they change their minds.