
Asif M. Ilyas, Neal C. Chen, and Chaitanya S. Mudgal
DEFINITION
 Safe surgical dissection and exposure require an in-depth knowledge of anatomy. In no place is this more relevant than in the surgical approaches to the hand, wrist, and forearm.
The critical aspect of successful surgical approaches is the use of internervous planes.
 These planes lie between muscles that are innervated by different nerves.
This allows extensive mobilization and exposure without risk of muscle denervation.
Unique to the hand, wrist, and forearm is the complex relationship of not only the muscles overlying bone but also the close proximity and delicate balance of accessory anatomic structures, including tendons, vessels, and nerves.
ANATOMY
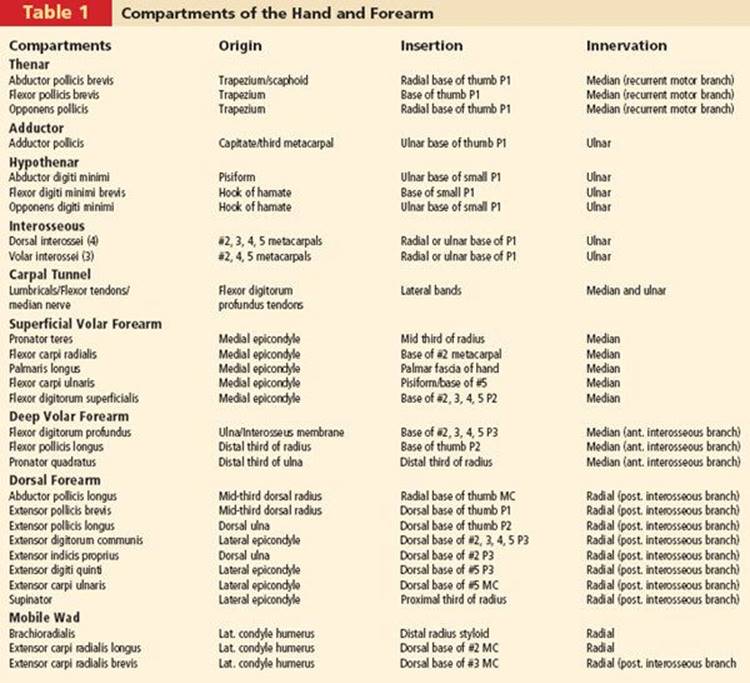
The anatomy of the hand, wrist, and forearm is intricate and can be discussed in many ways and in extensive detail. For the discussion in this chapter, anatomy will focus on the compartments of the hand and forearm, and their relevance to surgical approaches (Table 1).
SURGICAL MANAGEMENT
All surgical approaches to the hand, wrist, and forearm warrant sound understanding of surface and deep anatomy, internervous planes, and surgical technique.
Planning the surgical approach begins by identifying reliable surface anatomy.
Preoperative Planning
Arrangements for instruments, sutures, microscope, imaging support, implants, and assistants should be made before the day of surgery.
Anatomy, radiographic templating, surgical approach, procedure, and alternatives should be reviewed.
Positioning
Most approaches to the hand, wrist, and forearm can be performed with the patient supine and the operative extremity extended on a hand table and the surgeon and assistants seated.
The hand table should be stable and well secured and should allow adequate space for both the operative limb and the surgeon's elbow and forearm to minimize fatigue and enhance stability.
The stool should be stable and comfortable, with the height set such that the knees are level with the hips and the feet are resting flat on the ground.
The lights should be angled directly over the hand table, and not from behind the surgeon or assistant's shoulder, to prevent shadows on the operative field.
The use of a pneumatic tourniquet is advised to maintain a bloodless field and clear visualization of all anatomic structures.
Approach
Multiple approaches to the hand, wrist, and forearm exist and are best divided into the anatomic site and direction of exposure.
The approach should be chosen based on the indication for surgery.
TECHNIQUES
SKIN INCISIONS OF THE HAND
 Incisions in the hand can be placed almost anywhere as long as certain principles are respected.
Incisions should be outlined by sterile surgical markers before making the actual incision to confirm appropriate position, to confirm the adequacy of skin bridges should multiple incisions be used, and to help guide closure.
Incisions can be made in skin creases on the volar aspect of the hand but incisions in deep creases should be avoided due to the thin subcutaneous tissue, tendency for maceration due to moisture, and tendency toward poor apposition of skin edges on closure.
Incisions perpendicular to a volar flexion crease should be avoided to prevent scar formation and secondary skin contractures that can lead to loss of motion and functional impairment (TECH FIG 1A,B).
Incisions on the dorsal surface of the hand can be smaller due to the more mobile and loose nature of the dorsal skin (TECH FIG 1C).

TECH FIG 1 • Examples of volar (A,B) and dorsal (C) incisions for the hand and digits.
 Vertical, horizontal, and curved incisions can all be used with good facility as long as adequate skin bridges are maintained.
Fingers can be exposed dorsally, volarly, or midaxially.
Dorsal incisions can be longitudinal or curvilinear.
Volar incisions are best facilitated by a zigzag pattern that crosses creases laterally and at angles.
Midaxial incisions are best placed at the junction of glabrous and nonglabrous skin, with attention being paid to the neurovascular bundle that sits in the plane of the flexor sheath. The neurovascular bundle can be taken volarly with the volar flap or can be left in place by carrying the dissection superficial to it.
APPROACH TO THE INTERPHALANGEAL JOINTS
Straight dorsal longitudinal incisions can be made or a variety of curved incisions can be used, including an Stype and a chevron style (TECH FIG 2A).
In the distal interphalangeal joint, caution must be paid to the germinal matrix, which is about 1 mm distal to the attachment of the extensor tendon.
At the proximal interphalangeal joint, there is no internervous plane and the extensor mechanism should be immediately evident (TECH FIG 2B).
The integrity of the central slip inserting in the middle phalanx guides exposure of the proximal interphalangeal joint.
Three techniques can be employed to approach the joint:
The lateral bands can be freed and gently retracted dorsally, allowing a lateral approach into the joint.
When more exposure is required, the lateral bands can be incised in line with the extensor mechanism and repaired later.
Lastly, to maximize exposure of the joint, the extensor mechanism is cut dorsally in a long distally based V-shaped flap, raised, and later repaired.
It is critical not to detach the central slip distally and to maintain continuity of the extensor mechanism through the lateral bands on each side (TECH FIG 2C).
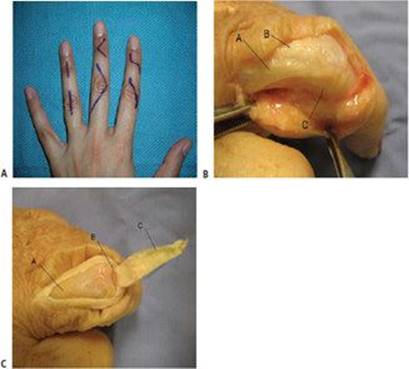
TECH FIG 2 • A. Examples of dorsal proximal and distal interphalangeal joint skin incisions. B. Extensor mechanism at the proximal interphalangeal joint. A, lateral band; B, extensor mechanism; C, proximal interphalangeal joint. C. Exposure of the proximal interphalangeal joint by a distally based V-flap elevation of the extensor mechanism. A, proximal phalanx; B, proximal interphalangeal joint; C, reflected extensor tendon.
APPROACH TO THE METACARPOPHALANGEAL JOINT
With the metacarpophalangeal joint flexed, identify the apex of the joint, which is the metacarpal head, and the extensor tendon.
Make a straight dorsal longitudinal incision centered over the metacarpophalangeal joint.
If multiple joints are being approached, a transverse incision centered dorsally connecting each of the joints may be used (TECH FIG 3A).
There is no internervous plane. The extensor mechanism should be immediately evident. Sensory branches of either the radial or ulnar nerve, depending on which joint is being approached, should be identified and protected (TECH FIG 3B).
Three techniques can be employed to approach the metacarpophalangeal joint:
The sagittal band that runs like a sling around the joint can be freed and retracted distally, exposing the dorsal capsule of the metacarpophalangeal joint.
 This technique is best used for a dorsal capsulotomy or capsulectomy.
When further exposure is required, the extensor mechanism is incised centrally and longitudinally through the substance of the tendon. Extensile exposure of the joint will be obtained immediately deep to the tendon.
This technique maintains balance of the extensor mechanism and avoids postoperative subluxation and deviation.
The tendon split should stop before the level of the proximal interphalangeal joint to avoid compromise of the central slip.
The extensor mechanism can be incised along the ulnar sagittal band in line with the tendon.
Release of the radial sagittal band should be avoided to prevent postoperative ulnar subluxation of the tendon.
This technique also provides extensile exposure of the metacarpophalangeal joint as well as the collateral ligaments but risks postoperative tendon subluxation or finger deviation (TECH FIG 3C,D).

TECH FIG 3 • A. Examples of metacarpophalangeal skin incisions. A straight longitudinal incision can be placed over each joint. If multiple joints are being approached, a single straight transverse incision can be used. B.Extensor mechanism overlying the metacarpophalangeal joint. A, extensor tendon; B, ulnar sagittal band. C. The ulnar sagittal band is incised in line with the extensor mechanism revealing the metacarpophalangeal joint. A, extensor tendon; B, reflected ulnar sagittal band; C, metacarpophalangeal joint. D. The metacarpophalangeal joint is arthrotomized dorsal to the collaterals.
APPROACH TO THE METACARPALS
Palpate the metacarpal subcutaneously. Identify overlying extensor tendons.
Make a straight dorsal longitudinal incision over the metacarpal. If more than one metacarpal is being approached, then place the incision between adjacent metacarpals (TECH FIG 4).
There is no true internervous plane. Overlying extensor tendons must be identified and protected.
Juncturae tendinae may cross over the field while connecting two tendons. They should be maintained if possible; if not, they should be released and tagged for repair before closure.
Dorsal interossei are attached to either side of the metacarpal.
Incise the periosteum of the metacarpal longitudinally along its exposed dorsal ridge and raise the interossei medially and laterally in a subperiosteal fashion.

TECH FIG 4 • Incision for approaching multiple metacarpals.
APPROACH TO THE CARPAL TUNNEL
The carpal tunnel is an enclosed fibro-osseous tunnel that contains nine flexor tendons and the median nerve. Its borders include the transverse carpal ligament (the roof), the carpal bones (the floor), the hook of hamate (ulnar wall), and the scaphoid (radial wall).
The proximal extent of the tunnel lies at the level of the distal wrist crease.
Identify the interthenar depression, which lies between the thenar eminence radially and the hypothenar eminence ulnarly (TECH FIG 5A).
Palpate the hook of hamate and pisiform bone along the ulnar base of the hand.
Determine the cardinal line of Kaplan, the estimated distal extent of the transverse carpal ligament.4 The cardinal line of Kaplan runs from the base of the first web space (with the thumb abducted in the plane of the palm) parallel to the proximal palmar crease toward the hook of hamate.
Multiple incisions can be used depending on the surgeon's preference, ranging from a limited approach (TECH FIG 5B) to an extensile one.
The incision should be centered within the interthenar depression and in line with the third web space to avoid injury to the palmar cutaneous branches of the median and ulnar nerves.8
The internervous plane occurs between the palmar cutaneous branches of the ulnar and median nerves.
Incise the subcutaneous fat in line with the skin incision. Deep to the fat lies the longitudinally oriented superficial palmar fascia (TECH FIG 5C).
Incise this fascia in line with the incision.
Avoid raising flaps radially or ulnarly to prevent skin devitalization and injury to branches of the palmar cutaneous branch of the median and ulnar nerves.
Deep to the superficial palmar fascia lies the thick transverse carpal ligament.
Release this ligament in line with the skin incision, paying attention to the median nerve lying deep to it as well as being cautious of the recurrent motor branch of the median nerve, which could cross through or across the transverse carpal ligament (TECH FIG 5D).
Distal to the transverse carpal ligament, confirm release of the ligament both proximally and distally.
Distal release is confirmed on visualization of the “sentinel” pad of fat, which has a distinct yellow color different from that of the subcutaneous fat.
Proximal release is confirmed both visually and by feel and usually corresponds to the confluence of the transverse carpal ligament with the deep forearm fascia, generally located at the level of the distal wrist crease.

TECH FIG 5 • A. Surface anatomy of the volar hand. A, radial artery; B, flexor carpi radialis tendon; C, flexor carpi ulnaris tendon; D, pisiform; E, hook of hamate; F, distal pole of scaphoid; G, cardinal line of Kaplan. B.Incision for the limited incision carpal tunnel approach. C. Superficial palmar fascia of the hand. D. Partial release of the transverse carpal ligament with the median nerve lying deep to it. A, retracted superficial palmar fascia; B, partially released transverse carpal ligament; C, median nerve.
APPROACH TO CANAL OF GUYON
The canal of Guyon is an enclosed fibro-osseous space at the ulnar base of the hand through which the ulnar neurovascular structures travel before innervating and perfusing the intrinsic structures of the hand.
Its borders include the volar carpal ligament (the roof), the transverse carpal ligament (the floor), the pisiform (ulnar wall), and the hook of hamate (radial wall).
Palpate the pisiform bone, which lies subcutaneously at the ulnar base of the hand immediately distal to the wrist flexion crease in line with the flexor carpi ulnaris (see TECH FIG 5A).
Palpate the hook of hamate, which lies about 2 cm distal and 2 cm radial to the pisiform bone.
This may be difficult to palpate in patients with large hands or those with well-developed hypothenar musculature.
Palpate the flexor carpi ulnaris tendon, which runs along the ulnar aspect of the forearm and inserts into the pisiform upon crossing the wrist flexion crease.
Make a zigzag or curved incision between the pisiform and hook of hamate and extend it proximally (TECH FIG 6A).
Avoid crossing the wrist flexion crease perpendicularly. Extend it proximally along the radial border of the flexor carpi ulnaris tendon (TECH FIG 6B).
Identify the flexor carpi ulnaris proximal to the wrist flexion crease and mobilize it ulnarly by releasing the fascia along its radial border. The ulnar artery and nerve will lie just deep and radial to the tendon, with the nerve more superficial and ulnar to the artery.
Follow the ulnar artery and nerve distally into the hand.
In the hand, the flexor carpi ulnaris tendon will insert into the pisiform and the ulnar artery and nerve will dive deep to the volar carpal ligament.
Releasing the volar carpal ligament radial to the pisiform opens the roof of the canal of Guyon and decompresses the ulnar artery and nerve. In the canal of Guyon, the nerve splits into its motor and sensory branches. The motor branch of the ulnar nerve dives below a fibrous arch formed by the hypothenar musculature originating from the hook of hamate (TECH FIG 6C).
There is a high frequency of anatomic variations of the ulnar neurovascular structures within the canal of Guyon, and a release of the canal must include not only the roof but also the distal extent of it as it enters below the fibrous arch below the hypothenar muscles.5

TECH FIG 6 • A. Surface anatomy and incision for the approach to the canal of Guyon. A, pisiform; B, hook of hamate. B. The ulnar neurovascular structures in the base of the hand after release of the volar carpal ligament. A, ulnar nerve; B, ulnar artery and vein; C, pisiform with origin of the hypothenar muscles. C. Fibrous arch formed by the hypothenar muscles over the motor branch of the ulnar nerve. A, ulnar nerve; B, sensory branch of ulnar nerve; C, motor branch of ulnar nerve.
VOLAR APPROACH TO THE RADIUS
Identify the flexor carpi radialis at the wrist flexion crease distally and follow it subcutaneously proximally (TECH FIG 7A).
Its tendinous nature will give way to muscle at roughly the middle of the forearm.
Identify the brachioradialis, which originates along the lateral epicondylar ridge of the distal humerus and is the most superficial muscle mass along the lateral forearm. Distally and laterally it has a broad insertion along the flare of the radial border of the radius.
Identify the biceps tendon, which is the broad and taut extension of the biceps tendon that crosses anterior to the elbow joint and dives toward its insertion into the radius medial to the brachioradialis.
Identify the radial artery at the wrist. It is found between the flexor carpi radialis and brachioradialis tendons.
With the forearm supinated, begin the incision proximal to the wrist flexion crease and immediately radial to the flexor carpi radialis tendon and extend the incision proximally parallel to the tendon.
The incision can end lateral to the biceps tendon and distal to the elbow flexion crease.
The incision can be extended as shown by the dotted extensions in Techniques Figure 7A.
The length of the incision depends on the extent of bone that needs to be exposed.
As described by Henry,3 the internervous plane distally occurs between the flexor carpi radialis (median nerve) and the brachioradialis (radial nerve). Proximally it occurs between the pronator teres (median nerve) and the brachioradialis (radial nerve).
Distally the interval between the flexor carpi radialis and the brachioradialis is developed (TECH FIG 7B).
The radial artery lies just ulnar to the brachioradialis tendon and lies underneath the brachioradialis in the middle of the forearm. Dissection should not drift ulnar to the flexor carpi radialis, for the median nerve lies just deep and ulnar to this tendon.
The superficial radial sensory nerve exits from under the brachioradialis at the middle of the forearm, about 8 to 10 cm proximal to the radial styloid, and travels adjacent to the tendon distally.1 The nerve arborizes proximal to the wrist joint.
Proximally the interval between the pronator teres and brachioradialis is developed.
An alternative to the volar approach of Henry is the trans–flexor carpi radialis approach.
In this approach, the incision is placed directly over the flexor carpi radialis tendon.
The flexor carpi radialis sheath is opened sharply in line with the tendon.
The tendon is retracted ulnarly and the floor of the tendon sheath is opened sharply, leading directly into the deep layer between the finger flexors and the pronator quadratus, also known as the space of Parona.6
Several muscles lie over the radius in the deep layer. Distally, the pronator quadratus and flexor pollicis longus cover the radius (TECH FIG 7C). On the middle third of the radius lie the flexor carpi radialis and pronator teres.
To expose the radius, these muscles are released along the volar radial aspect of the radius and are raised in a subperiosteal fashion ulnarly.
Proximally, the supinator muscle covers the radius. Through its substance travels the posterior interosseous nerve as it travels to the dorsal compartment of the forearm.
To expose the radius proximally, the forearm must be fully supinated and the supinator is released along the ulnar border of the radius and raised radially. The forearm must be kept fully supinated to protect the posterior interosseous nerve.

TECH FIG 7 • A. Surface anatomy and incision of the volar forearm. A, flexor carpi radialis; B, radial artery; C, brachioradialis; D, biceps tendon. B. Superficial exposure of the volar radius showing the palmaris longus (A) and the internervous plane between the flexor carpi radialis (B) and the brachioradialis (D). C, radial artery. C. Deep exposure of the volar distal radius showing the pronator quadratus (B) covering the distal radius. A, flexor carpi radialis; C, radial artery.
DORSAL APPROACH TO THE RADIUS
Identify the tubercle of Lister at the distal and radial aspect of the radius. It is the most prominent bony protuberance on the dorsal distal radius, and the extensor pollicis longus tendon curves around it (TECH FIG 8A).
Identify the “mobile wad of three,” which is the common muscle mass composed of the brachioradialis and the extensor carpi radialis longus and brevis.3
Identify the lateral epicondyle of the distal humerus, which is the bony prominence most easily palpable proximal to the radial head along the lateral aspect of the elbow.
With the forearm pronated, make the incision from the tubercle of Lister and extend it proximally along the medial border of the “mobile wad” toward the lateral epicondyle.
The length of the incision depends on the extent of bone that needs to be exposed (TECH FIG 8A).
As described by Thompson, the internervous plane distally occurs between the extensor carpi radialis brevis (radial nerve, posterior interosseous nerve, or both) and the extensor pollicis longus (posterior interosseous nerve).7
Proximally it occurs between the extensor carpi radialis brevis (radial nerve; inconsistent innervation) and the extensor digitorum communis (posterior interosseous nerve).
Distally, develop the interval between the extensor carpi radialis brevis and the extensor pollicis longus with the tubercle of Lister positioned between them (TECH FIG 8B).
Exposing proximally, the interval between the extensor carpi radialis brevis and the extensor digitorum communis is identified by the emergence of the outcropping abductor pollicis longus and the extensor pollicis brevis (TECH FIG 8C).
Distally the radius sits immediately below the superficial extensor tendons.
To expose the distal radius, the extensor retinaculum and the sheath of the extensor pollicis longus tendon is opened and the tendon is retracted radially.
The floor of the tendon sheath is incised longitudinally and the extensor tendons are raised subperiosteally, with the extensor carpi radialis longus and brevis taken radially and the finger extensors taken ulnarly.
Proximally, the abductor pollicis longus and extensor pollicis brevis cover the middle third of the radius.
To expose the radius, these muscles are released along their radial border, to avoid denervation, and raised ulnarly.
The proximal third of the radius is covered by the supinator. Within its substance and between its two heads runs the posterior interosseous nerve.
Exposure of the dorsal radius proximally requires exposure and protection of this nerve before elevating the supinator off the radius.
First, identify the nerve as it exits between the two heads of the supinator.
Follow the nerve proximally through the substance of the supinator's superficial head while taking care to preserve all its branches.
Once the nerve is identified along its entire course, the supinator can be released along its radial border and raised ulnarly.
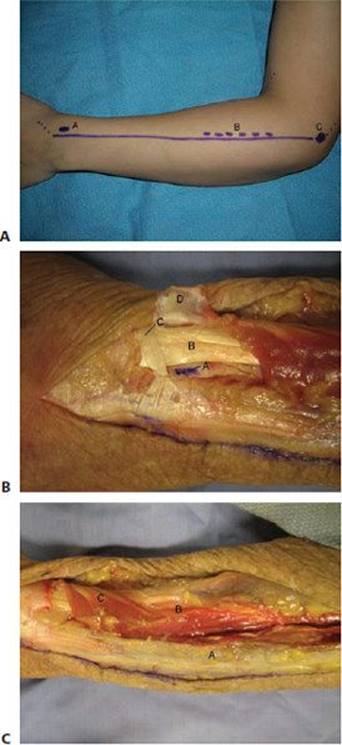
TECH FIG 8 • A. Surface anatomy and incision of the dorsal forearm. A, tubercle of Lister; B, ulnar border of the “mobile wad of three”; C, lateral epicondyle. B. Superficial exposure of the dorsal distal radius. A, tubercle of Lister; B, extensor carpi radialis longus and brevis; C, extensor pollicis longus; D, reflected extensor retinaculum. C. Musculature of the dorsal forearm. A, extensor digitorum communis; B, extensor carpi radialis brevis; C, abductor pollicis longus and extensor pollicis brevis.
APPROACH TO THE ULNA
Identify the ulnar head and styloid distally with the forearm in neutral rotation (TECH FIG 9).
Identify the subcutaneous border of the ulna.
Identify the tip of the olecranon proximally.
With the forearm in neutral rotation, begin the incision at the level of the head of the ulna but proximal to the styloid. Extend the incision across the subcutaneous border of the ulna proximally toward the olecranon. The length of incision depends on the extent of the bone that needs to be exposed.
Distally, the internervous plane occurs between the flexor carpi ulnaris (ulnar nerve) and the extensor carpi ulnaris (posterior interosseous nerve).
Proximally, at the level of the olecranon, the internervous plan occurs for a short length between the flexor carpi ulnaris (ulnar nerve) and the anconeus (radial nerve).
Distally, the interval between the flexor carpi ulnaris and the extensor carpi ulnaris occurs along the subcutaneous border of the ulna.

TECH FIG 9 • Surface anatomy and incision for the ulnar shaft. A, ulnar head and styloid; B, subcutaneous border of ulna.
Both muscles can be raised volarly and dorsally off the ulna, respectively, in a subperiosteal fashion.
The ulnar artery and nerve travel deep and radial to the flexor carpi ulnaris. The nerve is protected by careful subperiosteal elevation of the flexor carpi ulnaris.
The dorsal branch of the ulnar nerve branches about 8 cm proximal to the pisiform and crosses the subcutaneous border of the ulna as it travels dorsally about 5 cm proximal to the pisiform.2
Proximally the interval remains along the subcutaneous border of the ulna.
The proximal aspect of the ulna receives the insertion of the triceps tendon.
When exposing the ulna proximally during deep dissection, the integrity of the triceps tendon is maintained by incising the tendon in line with its fibers across the border of the ulna and raising it medially and laterally in a subperiosteal fashion.
The ulnar nerve travels around the medial epicondyle and dives between the two heads of the flexor carpi ulnaris.
Before exposing the ulna's most proximal and medial portion, the ulnar nerve should be identified and protected, followed by subperiosteal elevation of the flexor carpi ulnaris.
REFERENCES
1. Abrams RA, Brown RA, Botte MJ. The superficial branch of the radial nerve: an anatomic study with surgical implications. J Hand Surg 1992;17:1037–1041.
2. Botte MJ, Cohen MS, Lavernia CJ, et al. The dorsal branch of the ulnar nerve: an anatomic study. J Hand Surg 1990;15:603–607.
3. Henry AK. Extensile exposure, 2nd ed. Edinburgh: E&S Livingstone, 1966.
4. Kaplan EB. Functional and surgical anatomy of the hand, 2nd ed. Philadelphia: JB Lippincott, 1965.
5. Konig PS, Hage JJ, Bloem JJ, et al. Variations of the ulnar nerve and ulnar artery in Guyon's canal: a cadaveric study. J Hand Surg 1994; 19:617–622.
6. Parona F. Dell'oncotomia negli accessi profundi diffuse dell'avambrachio. Annali Universali di Medicina e Chirurgia Milano, 1876.
7. Thompson JE. Anatomical methods of approach in operations on the long bones of the extremities. Ann Surg 1918;68:309–329.
8. Watchmaker GP, Weber D, Mackinnon SE. Avoidance of transection of the palmar cutaneous branch of the median nerve in carpal tunnel release. J Hand Surg 1996;21:644–650.