
Michael R. Boland
DEFINITION
 Motion in the human forearm is a complex interaction between the radius and ulna produced by the combination of multiple muscles working coherently and hinged at the proximal and distal radioulnar joints.
Surgical reconstruction of diaphyseal forearm fractures requires precise realignment of both radius and ulna to minimize complications and maximize function.
Ingenious surgical approaches have been described that allow the surgeon to follow defined internervous planes to the bones for internal fixation. The design of the forearm allows near 180-degree rotation combining with considerable elbow flexion–extension and wrist circumduction. To achieve this, the ulna is enlarged proximally, making it a principal bone of the elbow, and is smaller distally, while the reverse is true for the radius, with the enlarged radius being the primary articulation with the carpus. The result for the diaphysis of each bone is that the proximal ulna is metaphyseal for about 25% to 30% of its length but distally less than 10%, with the reverse holding true for the radius. Implant design has taken these differences into account, with many whole systems available for metaphyseal distal radius and proximal ulna fractures.
The importance of maintaining the radial and ulnar heads has only recently been understood. New developments are taking place, therefore, for the management of distal ulna and proximal radius fractures.
This chapter discusses ulna fractures distal to the junction of the proximal and middle thirds to the distal margin of the pronator quadratus (PQ) and radius fractures distal to the biceps tuberosity down to the distal flare of the radius.
 Pediatric fractures, distal radius and ulna fractures, olecranon and radial head fractures are not covered.
Diaphyseal forearm fractures usually are classified according to the AO classification.
ANATOMY
The surgical approaches to the forearm bones for fracture osteosynthesis involve five steps:
Finding an interval between longitudinally oriented superficial muscles
Finding and preserving vessels and nerves
Understanding the anatomy of deeper muscles that cross the forearm obliquely or transversely
Knowing where to lift these muscles to expose the bone
Understanding the shape of the bones themselves and their relation to one another
Radius and Ulna
Motion of the forearm involves a complex interaction between the radius and ulna.
The radius rotates around a longitudinal axis that passes through the center of the radial head at the proximal radioulnar joint and through the center of the ulnar head distally.
With rotation, the radius rotates around the ulna, and the ulna moves in a varus–valgus direction about 9 degrees at the elbow. This allows the ulnar head to move out of the way of the rotating radius distally.
At the distal radioulnar joint (DRUJ), motion between 50 degrees pronation and 50 degrees supination is almost pure rotation, but at the extremes the radius translates in a dorsal direction during pronation and a palmar direction during supination.
Movement at the proximal radioulnar joint (PRUJ) is primarily rotation.
The radius and ulna have two bows that assist in getting out of the other’s way. Schemitsch and Richards22 quantified the importance of the distal of the two bows in the radius. Restoration of this bow is the single most important step in reconstruction of the forearm after diaphyseal fracture.
To determine whether the bow has been restored after osteosynthesis, draw a line from the biceps tuberosity to the sigmoid notch. A perpendicular line from the apex can then be measured (FIG 1). The normal range of bow is 15.3 ± 0.3 mm at a point at 60% of the radius measured between the bicipital tuberosity and the distal radius at the sigmoid notch.
At the apex of this bow on the convex side is the insertion of the pronator teres. This provides a biomechanical advantage for pronation.
The biceps insertion is at the apex of a smaller proximal bow. As a result, the biceps needs to be much larger to overcome the disadvantage of insertion into a small bow for balanced supination.
The arrangement in the ulna is the converse of the radius: a longer shallower proximal bow (the anconeus inserts into the apex for valgus of the elbow), and a small distal bow for the insertion of the PQ.
The radius and ulna are bound together essentially throughout their length, with the annular ligament at the PRUJ, the interosseous ligament through the middle 75%, and the ligaments of the triangular fibrocartilage complex (TFCC) distally. The TFCC ligaments are the palmar and dorsal radioulnar ligaments, which attach to the distal rim of the sigmoid notch and the fovea of the ulna. Disruption of these ligaments often is associated with fractures of the radius and ulna and may lead to DRUJ incongruity (ie, Galeazzi fractures) or radial head dislocation (ie, Monteggia fractures).

FIG 1 • The method of Schemitsch and Richards for quantifying the maximum radial bow and its location relative to the length of the entire radius.1
Muscles and Ligaments
The forearm is criss-crossed with longitudinal, oblique, and transversely directed musculotendinous units. These muscles are in layers, with longitudinal muscles more superficial and crossing muscles deeper.
Most activities performed by the forearm, wrist, and hand occur from the midpronation position, with the wrist moving into extension and radial deviation (ERD), then in an arc accelerating past neutral again, to flexion and ulnar deviation (FUD, end of deceleration) before returning to wrist neutral. The forearm is designed to maximize the ability to perform this motion. This wrist motion is commonly known as the “dart thrower's motion” or primary wrist motion.
The extensor carpi radialis longus (ECRL), the cocking or lifting muscle of primary wrist motion, originates proximal to the lateral epicondyle on the supracondylar ridge, is positioned “above” the forearm, and inserts into the radial and dorsal aspect of the index metacarpal.
On either side of the ECRL is the brachioradialis (BR), which originates high on the lateral supracondylar ridge, inserting on the radial styloid deep to the first dorsal compartment, and the extensor carpi radialis brevis (ECRB), which originates more distally just above the lateral epicondyle and inserts into the long finger metacarpal. ECRL and ECRB share the second dorsal compartment at the wrist.
Together the BR, ECRL, and ECRB form a mobile wad above the forearm (in the functional position). They are innervated directly by the radial nerve and are best palpated just distal to the elbow.
In a posterior approach to the radius, which is performed in pronation, after incising the deep fascia, the dissection interval is between the ECRB and the extensor digitorum communis (EDC) muscle. The EDC originates from the lateral epicondyle (where it shares a common origin with the extensor digiti minimi) and passes essentially in a straight line down the forearm, then through the fourth dorsal compartment at the wrist, just ulnar to Lister's tubercle.
In an anterior approach, which is performed in supination, the deep fascia is incised along the medial border of the BR. The BR is then mobilized radially and the interval between it and flexor carpi radialis is developed. The FCR, like the EDC, has a straight course in the forearm from the medial epicondyle to the scaphoid tubercle (where it passes en route to the index metacarpal).
The muscle of utmost importance in approaches to the ulna is the flexor carpi ulnaris (FCU). It is the primary accelerator of the wrist, and thus has a large tendon (equal to the mechanical strength of the ECRL and ECRB combined), which originates from two heads, one from the medial epicondyle and one from the ulna. It proceeds straight down the forearm along the ulna border and inserts into the pisiform. From the distal tip of the lateral epicondyle originates the extensor carpi ulnaris, which runs down the forearm on the extensor side of the subcutaneous border of the ulna, sharing a septum with the FCU.
The ulna is approached along this septum. The anterior surface and posterior aspects of the ulna can be approached this way. The true anterior approach to the ulna is along the radial edge of the FCU, mobilizing the ulna neurovascular bundle and going between the FCU and the flexor digitorum profundus (FDP). The FDP occupies the floor of most of the flexor compartment of the forearm.
Crossing the forearm in its deepest parts are a series of obliquely oriented muscles. The supinator plays a role in both the anterior and posterior approaches to the radius. It has two heads of origin and probably can be thought of as two muscles, because the fibers of each head traverse in different directions.
The ulnar head attaches to the supinator crest on the radial side of the ulna. Its fibers are transverse (like those of the PQ distally) and attach to the most proximal part of the radius, deep to the posterior interosseous nerve (PIN).
The humeral head attaches to the lateral epicondyle, deep to the ECU and anconeus. Its fibers slope down the forearm more longitudinally, and wrap over the deep or ulnar head to attach to the radius distal to the ulnar head of the supinator and proximal to the insertion of the pronator teres.
In an anterior approach to the radius, the forearm is supinated, protecting the PIN, and the humeral head of the supinator is lifted from its most ulnar attachment.
The pronator teres originates mainly from the medial supracondylar ridge, arches obliquely across the ulnar artery and median nerve, and inserts into the apex of the larger bow of the radius. Proximally, it is superficial, but distally, where it must be lifted from the radius, it is deep to the BR muscle (FIG 2). It must be lifted from the most radial aspect of the radius in the anterior approach.
Distally in the floor of the anterior compartment the PQ muscle comes into play in anterior approaches to the radius and ulna. It must be lifted from the radial border in an approach to the radius and the ulna border in an approach to the ulna.
In a posterior approach to the radius, the abductor pollicis longus muscle drapes across the radius just distal to its midpoint. It can be lifted to allow plate fixation to this part of the radius. Its ulnar origin is always left intact.

FIG 2 • Anterior approach. The interval between the brachioradialis and flexor carpi radialis is entered, and the radial artery is retracted laterally. The supinator, pronator teres, flexor pollicis longus, and flexor digitorum superficialis can be seen.
Nerves
The forearm is traversed longitudinally with three major nerves plus an additional three sensory nerves, only one of which is of surgical importance. Once the interval between muscles is breached, care is taken to find these nerves. Each nerve enters the forearm from the arm in a predictable place, and each gives off key branches that must be protected.
Although the radial nerve supplies all the extensor muscles of the arm and forearm, it is an anterior structure after it pierces the lateral intermuscular septum 10 cm above the elbow.
At the elbow the radial nerve lies between the BR and the brachialis and gives off the PIN.
The radial sensory nerve continues deep to the BR muscle, on its undersurface. Here, the nerve generally lies close to the radial artery. The anterior approach to the radius is through the interval between the nerve and artery.
The posterior interosseous branch leaves the main nerve just distal to the elbow and passes through the supinator muscle, between its two heads, to enter the dorsal or extensor compartment of the forearm.
 As it leaves the supinator, it fans into multiple variable branches to supply the EDC, EDM, and ECU, with the majority of the nerve continuing distally deep to the interval between EDC and ECRB.
The course of the ulnar nerve is represented by a line drawn from the medial epicondyle to the pisiform. Throughout the forearm the nerve is deep to the FCU muscle and lies deep and slightly radial to the tendon of this muscle at the wrist. Throughout most of the forearm the nerve is between the FCU and the FDP.
The median nerve enters the forearm between the brachial artery and the tendon of the biceps brachii. It lies deep to the pronator teres, then passes deep to the fibrous arch of the FDS. The nerve is closely associated with the undersurface of the FDS as it travels distally.
Blood Supply
The vascular anatomy is of critical importance in the flexor compartment.
The brachial artery enters the forearm deep to the lacertus fibrosus, next to the median nerve. It almost immediately branches into radial and ulnar arteries.
The ulnar artery passes deep to the arch of origin of the FDS to lie next to the ulnar nerve throughout the distal two thirds of the forearm.
The radial artery is pushed more superficial by the bulk of the FDS and the pronator teres lying just deep to the fascia along the medial border of the BR muscle.
PATHOGENESIS
The degree of injury and specifics of the fracture are directly related to the magnitude, direction, and duration of energy.
Both-bone forearm fractures are common in motor vehicle trauma.
Industrial trauma often is associated with a high level of soft tissue injury.
Forearm fractures occur relatively commonly in some sports, eg, rugby in all its forms and wrestling.
The most common mechanism of injury is a direct blow to the mid-forearm. If this blow is directed primarily at the ulna, an isolated ulna shaft fracture results (“nightstick” fracture).
An isolated radius fracture often is associated with a fall onto an outstretched hand.
NATURAL HISTORY
Normal function of the human forearm requires the radius to rotate around the ulna.
Matthews15 showed in a cadaveric study that 10 degrees of angulation of one or both bones of the forearm results in a loss of 20 degrees of pronation and supination. Thus, the natural history is highly dependent on the position of healing of the two forearm bones.
It is reasonable to consider nonoperative treatment of an isolated ulna fracture with less than 10 degrees angulation,21 but nonoperative treatment of both-bone forearm fractures has a poor outcome.8,13
PATIENT HISTORY AND PHYSICAL FINDINGS
In most cases, the initial presentation of a radius or ulna diaphyseal fracture makes the diagnosis obvious. Most fractures are displaced due to the high-energy nature of the traumatic event and, therefore, deformity is common. Patients with nondisplaced fractures usually have considerable pain and swelling in the forearm.
Despite the ease of initial diagnosis, the treating physician must be on guard for significant associated injuries and complications, not only of the bone and joint but also of soft tissue.
A systems approach to these associated injuries is as follows:
Skin: Look at the skin for any evidence of laceration or abrasion. A laceration may communicate with the fracture site; therefore, a contaminated abrasion at the site of surgical incision should be allowed to heal before surgery.
Fascia: Tense tissues to palpation over the flexor or extensor compartments and pain with passive finger extension are evidence of compartment syndrome, and compartment release must be considered.
Vascular: Radial and ulnar pulses distal to the site of injury must be palpated and compared to the uninjured side. These pulses can be difficult to palpate due to the proximity of the fractures, so checking capillary refill in the digits is the next step. In the multiply injured patient, the peripheries are shut down, making capillary refill and pulses difficult to perform. In such a situation, a needle stick to the digit should reveal bright red blood.
Nerve: Assessment of nerve injury is summarized later in this chapter.
Bone: The joints above and below the fracture must be palpated for associated joint disruption.
For any upper extremity injury, a history of the causative event is essential to understand the degree of energy that the limb has had to absorb. Given the common association with high energy, the patient must be assessed according to an appropriate trauma checklist protocol.
The patient must be questioned specifically regarding elbow or wrist pain, and neurologic symptoms of numbness, tingling, or unusual sensation in the hand. Severe pain should suggest the possibility of compartment syndrome or vascular injury.
Palpation of the mid-forearm should be gentle, step by step feeling along the radius and ulna. A tense forearm may indicate a compartment syndrome.
Palpation should then proceed over the DRUJ and ulnar head plus PRUJ and radial head. Palpation should be performed of the medial and lateral epicondyles, of the scaphoid in the snuff box, and over carpal bones and the carpometacarpal joints.
A systematic examination of the median, ulnar, and radial nerves involves examination of sensory and motor aspects (Table 1).
The sensory examination involves static two-point discrimination of the digital nerves and light touch over the autogenous zones of each nerve.
Motor examination is graded by Medical Research Council (MRC) grading and is done by stressing the appropriate joint and palpating the affected muscle.
IMAGING AND OTHER DIAGNOSTIC STUDIES
High-quality plain radiographs of the forearm, wrist, and elbow are the mainstay of diagnosis of diaphyseal radius and ulna fractures.
Mino16 described a technique to interpret the lateral wrist radiograph whereby the radial styloid is aligned with the center of the lunate, and an assessment of the overlap of the radius and ulna is made. The head of the ulna should be completely obscured by the radius. If only part of the ulnar head is obscured by the radius, then there is subluxation of the head; if the ulnar head is clearly seen, there is dislocation. Any shift in the ulnar head is a subluxation and, when combined with a radius fracture, represents a Galeazzi fracture-dislocation.9
A CT scan in neutral, pronation, and supination is useful in interpreting the degree of DRUJ congruity. This is rarely used in the acute setting.
On a lateral radiograph of the elbow, the radial head should align directly with the capitellum of the distal humerus. Monteggia17 in 1814 described a fracture of the proximal third of the ulna with an anterior radial head dislocation, and Bado2 later subclassified these according to direction (FIG 3).
DIFFERENTIAL DIAGNOSIS
Pathologic fracture may result from a number of causes.
Metabolic causes: osteoporosis, estrogen deficiency, renal transplantation, vitamin D deficiency, parathyroid disease, Cushing disease, hyperthyroidism, hypogonadism, hypophosphatasia
Primary tumors: osteosarcoma, Ewing sarcoma and primitive neuroectodermal tumors, chondrosarcoma, myeloma, fibrous histiocytoma, desmoplastic fibroma, hemangioma, intraosseous lipoma, acute myeloid leukemia, Langerhans' cell histiocytosis, fibrous dysplasia, chondroblastoma
Metastatic tumors: breast, thyroid, lung, prostate, melanoma
Infection: osteomyelitis, tuberculosis
Congenital disorders: Turner syndrome, neurofibromatosis pseudoarthrosis, osteogenesis imperfecta
Iatrogenic fracture: post–plate/screw removal; post– osteocutaneous radial forearm flap; post–elbow, forearm, and wrist manipulation
Stress fracture
NONOPERATIVE MANAGEMENT
Slight deviations in the spatial orientation of the radius and ulna will significantly decrease the forearm's ability to rotate, impairing hand function.


FIG 3 • The Bado classification of Monteggia lesions lists four types, depending on the direction of the radial head. In type I lesions the head is anterior to the distal humerus. In type II lesions it is posterior, and in type III lesions it is lateral. Type IV fracture-dislocations involve a dislocation of the radial head associated with a fracture of both the radius and the ulna.
Fractures of the radius and ulna can be regarded as articular fractures in the sense that functional restoration requires anatomic reduction.
The only indication for nonoperative treatment is a nondisplaced fracture of the ulna,14,21 or if the patient's general condition makes operative treatment ill advised.
In the case of a displaced fracture, closed reduction and cast immobilization sometimes is possible but is unreliable. Loss of initial satisfactory reduction is common.3,8,12,13
The treatment of choice for adult diaphyseal forearm fractures is open reduction and internal fixation.1,7,20
SURGICAL MANAGEMENT
The most common scenario is fractures of the radius and ulna in the middle third of both bones. The most common questions confronting the surgeon are considered here.
Which approach should be used?
The anterior surface of the radius and ulna is the best location for a plate. This surface is broad and flat on both bones, and a plate on this surface is covered with muscle, resulting in less plate irritation for the patient.
Consequently, I prefer the anterior approach to both the radius and the ulna. In addition, the patient is positioned supine for these approaches, reducing the need to reposition the patient during the procedure.
Should one or two incisions be used?
Use of two incisions markedly decreases the risk of synostosis, decreases the length of the incision, and reduces tension on the skin and soft tissue by retractors.
Which bone should be stabilized first?
The fracture with the least comminution should be approached first and stabilized. This allows for length to be restored in the forearm, allowing easier judgment of length in the more comminuted bone.
Where there is equal comminution or no comminution, the radius is generally approached first.
Should fixation be completed on one bone before approaching the other?
I recommend not completing fixation but stabilizing one bone before proceeding to the next. This allows reduction of the second bone.
In a stable, non-comminuted fracture, “temporary stability” may mean a plate and one screw through two cortices on each side of the fracture. In a comminuted fracture, it may mean four cortices and two screws on each side.
Completion of fixation should occur after the second bone is reduced and stabilized.
What implant and what length of implant should be used?
The plate must span the fracture complex and provide six cortices of fixation in stable bone, both proximally and distally.
Non-comminuted transverse fractures require at least a six-hole small fragment limited contact–dynamic compression (LC-DC) or locking plate.
Oblique fractures and comminuted fractures require a longer plate. Oblique fractures are treated with an interfragmentary screw or screws at right angles to the fracture line and a seven-hole plate.
A unicortical locked screw can be considered “bicortical,” but practically speaking, this rule is used only for the screw hole furthest from the fracture. In almost all situations there must be three screw holes in the plate over stable bone away from the fracture complex.
In distal metaphyseal, diaphyseal fractures of the ulna, it often is impossible to get six cortices of fixation. In this situation, two mini fragment plates (with 2.7-mm screws) applied at a 90-degree angle to each other provides excellent fixation.
Anterior and posterior approaches can be used to treat fractures along the entire length of each bone. The anterior approach to the radius is preferred when possible.
This location allows for excellent soft tissue coverage, reducing the need for plate removal.
Most diaphyseal forearm fractures are best stabilized by plates and screws, but other implants sometimes are indicated.
External fixation may be used in the following settings:
Open fractures with severe soft tissue damage, as a temporizing measure until reconstruction can safely be undertaken
Maintenance of length in fractures with severe bone loss (this usually occurs in open fractures)
Patients with multiple injuries (“damage control” surgery)
The Ilizarov technique is useful in segmental fractures, especially when the fractures are very close to the wrist and elbow joints.
Intermedullary nailing is used in the following settings:
Young women who desire a better cosmetic result
Segmental fractures
Re-fracture at the bone plate interface in a contact athlete or following plate removal
Preoperative Planning
The surgeon must develop a strategy to achieve satisfactory alignment of the radius and ulna with congruency of the PRUJ and DRUJ.
Factors that must be considered include the following:
Operating room time and availability (ideally within 7 days of the injury)
Implant and equipment availability (eg, a distraction device)
Patient factors and patient support factors (in outpatient surgery a supportive family or friend is needed in the early postoperative period)
Regional versus general anesthesia
Standard AO planning18 consists of drawing the fragments on transparent paper; superimposing the transparent sheets to align the bones; adding a chosen implant template; and drawing the final outcome corresponding to the expected postoperative radiograph. With experience in fracture management, these steps are intuitive.
AO principles of internal fixation using plates and screws should be reviewed by the surgeon before attempting internal fixation.
Positioning
Generally, the patient is positioned supine and the hand table is attached to the main table so the midpoint of the hand table is directly opposite the patient's shoulder. The shoulder is directly over the adjoining point of the hand and main tables. The arm is abducted to 90 degrees at the shoulder, so the entire arm lies across the midpoint of the hand table.
In the case of a posterior approach to the proximal ulna, the patient is positioned supine and a pillow is placed across his or her chest and secured with broad paper tape to the operating table. A hand table is used to rest the instruments rather than support the upper extremity. If other forearm fractures are present, however, the arm table may then be available.
A non-sterile tourniquet is applied to the upper arm before prepping and draping the patient.
The surgeon usually is seated on the side of the hand table closest to the bone being reduced and stabilized.
For the anterior approach to the radius, the surgeon is on the side of the table closest to the patient's head. The forearm is supinated and the elbow extended. For a posterior approach to the radius, the forearm is pronated and the elbow extended.
For a posterior or subcutaneous approach to the ulna, the elbow is flexed, and the forearm is in a neutral position.
Approach
The anterior approach to the radius is the standard approach for a radius fracture, but the posterior approach is useful when soft tissue lesions are posterior or the anterior approach is compromised in some way.
The posterior or subcutaneous approach to the ulna is the common approach. I prefer an anterior approach, however, because the anterior border of the ulna is flat, and, therefore, the plate fits better and is buried deep to the FCU and FDP muscles, reducing plate irritation.
In general, the incision is 2 cm longer than the implant to be utilized.
TECHNIQUES
ANTERIOR APPROACH TO THE RADIUS
 The anterior approach to the radius, first described by Henry,17 is one of the classic approaches in orthopaedic surgery.
A straight metallic instrument is placed on the forearm skin, and a C-arm image is taken to judge the position of the fracture. The skin is marked (TECH FIG 1A).
The biceps tendon and radial styloid are found and marked. The diathermy cord is extended between these points (TECH FIG 1B), and the skin incision is marked centered on the fracture site (TECH FIG 1C).


TECH FIG 1 • Anterior approach to the radius. A. The patient is positioned supine, with the forearm supinated. In this image the elbow is to the left and the wrist to the right. A straight metal instrument is placed across the forearm, and a C-arm fluoroscopic image is taken to confirm the level of the fracture. B. The estimated level of the fracture is marked. The radial styloid and biceps tuberosity are marked, and the diathermy cord is placed between these two points to align the incision. C. The incision is centered on the fracture. The length of the incision depends on fracture comminution, the primary determinant of implant length. The most common implant used is a seven-hole 3.5-mm small fragment plate, and the incision is 2 cm longer than the implant. D. The incision is made and the lateral cutaneous nerve of the forearm is isolated in the superficial fat and preserved. E. The incision is continued to the deep fascia, and the fascia is swept with a Raytech sponge (Raytech Industries, Middletown, CT). The fascia is incised at the ulnar edge of the brachioradialis. F. The brachioradialis muscle and tendon are mobilized. G. The radial artery and radial nerve are located, and the dissection is continued through the fascia between these structures. H. The radius is exposed over the length of the incision. I. The pronator teres insertion is dissected off the radial shaft from the radial aspect of the bone, in this case exposing the distal fragment. J. In this image, the elbow is at the top. For proximal exposure of the radius, the superficial radial nerve is traced proximally to the posterior interosseous branch. K. The elbow is to the right in this image. The supinator is dissected from the ulnar aspect of the radius to protect the posterior interosseous branch of the radial nerve, exposing the proximal fracture fragment.
The skin is incised, and the superficial tissues are carefully dissected, looking for the lateral antebrachial cutaneous nerve (lateral cutaneous nerve of the forearm) (TECH FIG 1D).
At the level of the deep fascia, a Raytech (Raytech Industries, Middletown, CT) is used to sweep the soft tissues so that the ulnar edge of the BR can be seen (TECH FIG 1E).
The deep fascia is incised along the ulnar edge of the BR, and the BR is mobilized and lifted (TECH FIG 1F). The radial nerve and radial artery are found deep to the BR.
The interval between the radial artery and nerve is opened (TECH FIG 1G, H), exposing the radius.
The radial aspect of the pronator teres insertion is dissected off the radial shaft, in this case exposing the distal fragment (TECH FIG 1I).
For more proximal exposure, follow the radial sensory nerve proximally to the place where it and the posterior interosseous nerve bifurcate (TECH FIG 1J).
The supinator is dissected off the ulnar aspect of the radius to protect the PIN, thus exposing the proximal fragment (TECH FIG 1K).
The fracture is then reduced and held following AO principles. I prefer six cortices of screw fixation on either side of the fracture and currently use the Synthes Small Fragment Locking Compression Plates as fixation.
POSTERIOR APPROACH TO THE RADIUS
The posterior approach to the radius also is known as the dorsolateral approach or Thompson's approach.24
Lister's tubercle is palpated at the dorsal aspect of the distal radius and marked. The lateral epicondyle of the humerus is palpated and marked.
 The diathermy cord is extended between these bony prominences, and the skin incision is centered on the fracture site.
A straight metal instrument is placed transverse to the forearm, and fluoroscopy is used to find the level of the fracture site, which is marked with a transverse line.
The approach uses the theoretical internervous plane between the ECRB (radial nerve) and the extensor digitorum (PIN; TECH FIG 2A).
The ECRB is part of the mobile wad of Henry,10 which also includes the BR and the ECRL. This usually can be palpated and can help guide placement of the skin incision.
After the skin incision and superficial dissection are performed, the interval between the ECRB and EDC is opened distally where the abductor pollicis longus transversely spans the forearm (TECH FIG 2B).
Extending the interval proximally reveals the PIN as it leaves the supinator. Here, it is always accompanied by a leash of vessels, the posterior interosseous artery, and its venae communicantes.
The surgeon must be cautious at this stage, because as it leaves the supinator, the PIN quickly gives off small branches to the EDC and ECU. The main nerve at this stage can become relatively small, taking on the appearance of a branch.

TECH FIG 2 • Posterior approach to the radius. A. After incising the deep fascia, the interval between the extensor carpi radialis brevis and the extensor digitorum communis muscles is identified. B. The interval between the extensor carpi radialis brevis and extensor digitorum is developed. C. Further dissection of the interval proximally with splitting of the aponeurotic origin of the extensors reveals the supinator and the posterior interosseous nerve as it leaves the arcade of Frohse. D. Development of the interval between extensor carpi radialis brevis and extensor pollicis longus reveals the radius distal to the extensor pollicis brevis. Proximally, the nerve can be mobilized where it exits the supinator if required. The posterior interosseous nerve should be identified and protected throughout the whole procedure.
Branches to the long muscles to the thumb also can come off relatively high, giving a fan-like appearance to the nerves and branches (TECH FIG 2C).
The PIN must be mobilized from the deep head of supinator. The deep head is then split to reach the radius proximally. Fibers of the pronator teres encroach into the field over the middle radius, and distally the abductor pollicis longus must be carefully lifted from the radius to provide room for the plate (TECH FIG 2D).
The fracture is then reduced and held with a plate and screws. I prefer a locked small fragment plate (Synthes) with six cortices on either side of the fracture.
The deep fascia is closed, followed by the skin.
ANTERIOR APPROACH TO THE ULNA
The anterior approach is my preferred approach for fixation of the distal two thirds of the ulna, because the plate is buried deep to the FCU and FDP muscles and the anterior surface of the ulna is flat, much like the anterior surface of the radius. This allows for minimal contouring of the plate and minimal overhang of the plate over the borders of the bone.
The bony landmarks for the incision are the medial epicondyle of the humerus and the ulnar aspect of the pisiform at the wrist.
As with the radius approach, the diathermy cord can be extended between these two points, a straight metal instrument can be placed on the patient transverse to the long axis of the forearm, and a C-arm image taken to confirm that the incision is centered on the fracture site (TECH FIG 3A).
The skin incision should be through skin and dermis only.
If the fracture is relatively distal, care should be taken to avoid injuring the dorsal branch of the ulnar nerve, which exits between the FCU and the ulna about 4 cm proximal to the ulnar head.
The dissection continues directly deep down to the fascia overlying the FCU muscle. The epimysium and fascia are incised in the line of the incision (TECH FIG 3B), and the dissection continues superficial to the FCU muscle ulnarly around onto the ulna (TECH FIG 3C).
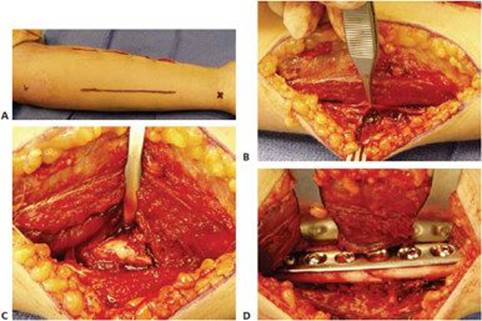
TECH FIG 3 • Anterior approach to the ulna. A. The radial incision has been temporarily closed with staples. The medial epicondyle and ulnar aspect of the pisiform are marked. Using a similar technique to that described in Tech Fig 1A, with C-arm fluoroscopy and diathermy lead, the incision is centered on the fracture. B. The deep fascia and epimysium of the flexor carpi ulnaris are opened. The fascia is mobilized off the FCU and followed around the ulnar border of the muscle. C. The interval between the flexor carpi ulnaris and extensor carpi ulnaris is incised, and the ulna exposed subperiosteally at the level of the fracture site. A Hohmann retractor lifts the FCU. D. The flexor digitorum profundus and distally the pronator quadratus are lifted, the fracture is reduced, and a locked small fragment plate applied. (The elbow is to the left and the wrist to the right.)
Dissection is continued proximally and distally in the interval between the FCU and ECU, and the fracture is reduced and held with a locked small fragment plate (Synthes; TECH FIG 3D).
I prefer to use six cortices of fixation on either side of the fracture, but this is not possible within 3 cm of the ulnar head. In this situation, two 2.7-mm mini-fragment plates are placed at right angles to each other.
The fascia and epimysium are closed together, and skin closure follows.
POSTERIOR APPROACH TO THE ULNA
The posterior approach is preferred for fractures of the proximal third of the ulna diaphysis but can be used to expose the entire ulna.
Distally, the dorsal branch of the ulna nerve is at risk where it exits between the FCU and the ulna, but it usually passes distal to the head of the ulna where it crosses the ECU tendon sheath and the extensor retinaculum.
The interval for the approach is between the ECU and FCU, which share a short fascial septum along most of the length of the ulna.
The olecranon and ulnar head can be palpated on all patients, and marked. In slim individuals, the fracture and the entire subcutaneous border of the ulna can be palpated. The incision is centered on the fracture, over the subcutaneous border or in line with the olecranon and ulnar head.
The incision is deepened down to the fascia, and in most cases the epimysium over the ECU is opened. The ulna is exposed in the interval between the ECU and FCU distally and between the FCU and anconeus proximally.
The fracture is reduced and held following AO principles with a locked small fragment plate. The plate usually is placed on the lateral surface of the ulna.
FRACTURE REDUCTION AND FIXATION
Once the bone is reached by an anterior or posterior approach, reduction and fixation are performed.
Bone-holding clamps allow delivery of the fracture ends into the wound (TECH FIG 4A).
For an oblique fracture, a lobster claw bone reduction clamp is placed on either side of the fracture site and angled about 30 degrees to the longitudinal axis of the bone. This allows control of both fracture fragments.
The fracture fragments are completely cleaned of all soft tissue debris (TECH FIG 4B).
The fracture fragments are reduced using longitudinal traction and rotation (TECH FIG 4C).
Once this is accomplished provisional stability is obtained using a bone clamp across the fracture site (TECH FIG 4D).
The clamp is then lifted and the plate slid beneath and the clamp replaced (TECH FIG 4E).
In its mid-portion the radius is bowed, but the plate is straight. The plate will always appear to sit obliquely even when properly applied.
The two screw holes closest to the fracture are filled first, followed by placement of an interfragmentary screw (TECH FIG 4F).
In both-bone fractures, the second bone is now approached and stabilized in a similar manner before final fixation of the first fracture.
Locking (TECH FIG 4G) or non-locking screws are placed in the remaining open screw holes, and fixation is complete (TECH FIG 4H).


TECH FIG 4 • Reduction of an oblique fracture. A. A lobster-claw bone reduction clamp is placed on either side of the fracture site and angled about 30 degrees to the longitudinal axis of the bone. Each end of the fracture is delivered into the wound. B. The fracture fragments are completely cleaned of all soft tissue debris. C. Fracture reduction is obtained using longitudinal traction, and rotation applied through the lobster clamps. D. The lobster-claw bone clamp temporarily secures the fracture site. E. The clamp is lifted and the plate slid beneath. F. One screw on each side of the fracture and closest to the fracture is placed first, followed by an interfragmentary screw. G. Locking guides attached to the proximal two holes allow placement of the locking screws in this Synthes plate. H. Fixation is complete.

POSTOPERATIVE CARE
 The key points in immediate postoperative care are splinting, pain relief, elevation of the extremity, and watching for signs of complications.
The patient usually receives axillary block anesthesia, which allows him or her to return home pain-free.
A sugartong splint is placed at the time of surgery and is worn for 2 weeks, at which time the patient returns to the office for a removal of splint and sutures.
Narcotic pain relief usually is ceased at 2 weeks.
Radiographs of the wrist, elbow, and forearm are ordered at the 2-week visit.
At the 2-week visit the patient is referred for physical therapy and rehabilitation to work on ROM of the elbow, forearm, and wrist using active and gentle active assisted exercises.
From 2 to 6 weeks, the patient is given a 5-pound weight lifting restriction and is placed on restricted work duty, including no repetitive forearm twisting, until union occurs.
At 6 weeks, simple two-part fractures usually are united and all lifting and twisting restrictions are removed. If there is no evidence of union, the patient is placed on a 20-pound weight restriction until union has occurred.
OUTCOMES
In two-part fracture of the radius and ulna, patients can expect over 95% problem-free consolidation before 6 months. In a study by Hertel,11 out of 132 patients there were two delayed unions and two non-unions that required reoperation. Plates were removed from 70 patients (53%) at a mean of 33.1 months (range 8–122 months) after the first operation. In this group, there were three refractures (4.3%) occurring at a mean of 8.7 months (range 0–14) after plate removal. In another study by Chapman,7 98% of the fractures united, and 92% of the patients achieved an excellent or satisfactory functional result.
Nonunion rates are much higher in comminuted fractures, approximately 12%, but it has been shown that bone grafting primarily does not lead to improved outcomes.19
COMPLICATIONS
Complications of forearm fractures include compartment syndrome,6 malunion,25 nonunion,5 and radioulnar synostosis.4 The rate of infection is about 2%.7
In a study by Stern23 of 64 adult patients with 87 diaphyseal forearm fractures treated by plating, 18 patients (28%) had a major complication. There was a nonunion rate four times higher for bones plated with four screws than six screws, and screws loosened in three fractures, all involving the ulna. Radioulnar synostosis occurred in seven forearms, and in five of these the forearm injuries were associated with multiplesystem trauma involving head injury. Two patients had osteomyelitis.
The surgeon must be aware of the DRUJ and PRUJ dislocation associated with either an isolated or both-bone forearm fracture.
With attention to detail, using the appropriate anatomic approach, accurate reduction, and the use of hardware that provides adequate bone stability, outcomes from diaphyseal fractures of the forearm are as good as any in orthopaedic surgery.
REFERENCES
1. Anderson LD, Sisk D, Tooms RE, et al. Compression-plate fixation in acute diaphyseal fractures of the radius and ulna. J Bone Joint Surg Am 1975;57:287.
2. Bado JL. The Monteggia lesion. Clin Orthop Relat Res 1967; 50:71–86.
3. Bolton H, Quinlan AG. The conservative treatment of fractures of the shaft of the radius and the ulna in adults. Lancet 1952;1:700.
4. Botting TD. Posttraumatic radio-ulna cross union. J Trauma 1970; 10:16–24.
5. Brakenbury H, Corea JR, Blakemore ME. Nonunion of the isolated fracture of the ulnar shafts in adults. Injury 1985;12:371.
6. Brostrom LA, Stark A, Svartengren G. Acute compartment syndrome in forearm fractures. Acta Orthop Scand 1990;61:50–53.
7. Chapman MW, Gordon JE, Zissimos AG. Compression-plate fixation of acute fractures of the diaphyses of the radius and ulna. J Bone Joint Surg Am 1989;71A:159–169.
8. Evans EM. Rotational deformities in the treatment of fractures of both bones of the forearm. J Bone Joint Surg Am 1945;27A:373–379.
9. Galeazzi R. Uber ein Besonderes Syndrom bei Verltzunger im Bereich der Unteraumknochen. Arch OrthoUnfallchir 1934;35:557–562.
10. Henry AK. Extensile Exposure, 2nd ed. Baltimore: Williams & Wilkins, 1970.
11. Hertel R, Pisan M, Lambert S, et al. Plate osteosynthesis of diaphyseal fractures of the radius and ulna. Injury 1996;27:545–548.
12. Hughston JC. Fracture of the distal radial shaft: Mistakes in management. J Bone Joint Surg Am 1957;39:249–264.
13. Knight RA, Purvis GD. Fractures of both bones of the forearm in adults. J Bone Joint Surg Am 1949;31A:755–764.
14. Mackay D, Wood L, Rangan A. The treatment of isolated ulnar fractures in adults: a systematic review. Injury 2000;31:565–570.
15. Matthews LS, Kaufer H, Garver DF, et al. The effect on supinationpronation of angular malalignment of fractures of both bones of the forearm. J Bone Joint Surg Am 1982;64A:14–17.
16. Mino DE, Palmar AK, Levinsohn EM. The role of radiography and computerized tomography in the diagnosis of subluxation and dislocation of the distal radioulnar joint. J Hand Surg Am 1983;8:23–31.
17. Monteggia GB. Instituzioni Chirurgiche Vol. 5. Milano: Maspero, 1814.
18. Muller ME, Allgower M, Schneider R, et al. Manual of Internal Fixation: Techniques Recommended by the AO-ASIF Group. New York: Springer-Verlag, 1991.
19. Ring D, Rhim R, Carpenter C, et al. Comminuted diaphyseal fractures of the radius and ulna: Does bone grafting affect nonunion rate? J Trauma 2005;59:438–441.
20. Rosacker JA, Kopta JA. Both bone fractures of the forearm: A review of surgical variables associated with union. Orthopaedics 1981; 4:1353–1356.
21. Sarmiento A, Latta LL, Zych G, et al. Isolated ulnar shaft fractures treated with functional braces. J Orthop Trauma 1998;12:420–423.
22. Schemitsch EH, Richards RR. The effect of malunion on functional outcome after plate fixation of fractures of both bones of the forearm in adults. J Bone Joint Surg Am 1992;74:1068–1078.
23. Stern PJ, Drury WJ. Complications of plate fixation of forearm fractures. Clin Orthop Relat Res 1983;175:25–29.
24. Thompson JE. Anatomical methods of approach in operations on the long bones of the extremities. Ann Surg 1918;68:309.
25. Trousdale RT, Linscheid RL. Operative treatment of malunited fractures of the forearm. J Bone Joint Surg Am 1995;77A:894–902.