
Yasuhito Tanaka
DEFINITION
 Varus-type osteoarthritis is characterized by varus deformity combined with anterior opening of the articular surface at the distal end of the tibia.1,2
It often develops bilaterally in middle-aged and elderly women.
Low tibial osteotomy (LTO) was developed to treat varustype osteoarthritis of the ankle. Cartilage defects can be repaired with fibrocartilage by resolving the stress concentration.
ANATOMY
The distal joint surface of the tibia appears almost perpendicular to the anterior longitudinal axis of the tibia and slight anterior opening to the lateral longitudinal axis (FIG 1).
PATHOGENESIS
The cause of varus-type osteoarthritis is not clear.
Radiographic measurements showed varus tilt of the distal joint surface (Fig 1). It was thought that the varus tilt was caused by acquired changes, because the ankles of infants are in the valgus position.3
Some biomechanical studies4,10 showed that varus tilt of the distal joint surface of the tibia caused stress concentration on the medial side of the ankle (FIG 2). The stress moved to the lateral side after valgus osteotomy at a distal portion of the tibia.8
NATURAL HISTORY
Osteophyte formation and sclerotic changes of subchondral bone initially appear in a medial gutter and an anteromedial corner of the ankle joint.
Damage of articular cartilage gradually progresses from the medial side to the lateral side.

FIG 1 • Varus-type osteoarthritis is characterized by varus tilt of the distal joint surface.
Varus-type osteoarthritis of the ankle is classified into four stages (FIG. 3)6,9:
 Stage 1: no joint space narrowing, but early sclerosis and osteophyte formation
Stage 2: narrowing of the joint space medially
Stage 3: obliteration of the joint space with subchondral bone contact medially
 Stage 3a: obliteration of the joint space in the facet is limited to the medial malleolus
Stage 3b: obliteration of the joint space has advanced to the roof of the talar dome
Stage 4: obliteration of the entire joint space with complete bone contact
PATIENT HISTORY AND PHYSICAL FINDINGS
The patient complains of ankle pain at the start of walking and after walking for a long distance.
Pain on movement and swelling become significant as osteoarthritis progresses.
A tender point is present at the medial joint space of the ankle.
Motion of the ankle is retained until relatively advanced stages.
IMAGING AND OTHER DIAGNOSTIC STUDIES
Weight-bearing AP and lateral radiographs should be taken to detect narrowing of the joint space.
The angle between the tibial shaft and the distal joint surface of the tibia is measured on the AP view (TAS angle) and on the lateral view (TLS angle) (FIG 4).1,2,5 Those angles represent the varus angle and the amount of anterior opening of the joint, respectively.

FIG 2 • Stress is distributed widely in a normal joint, but it is concentrated on the medial side of the ankle with varus-type osteoarthritis.
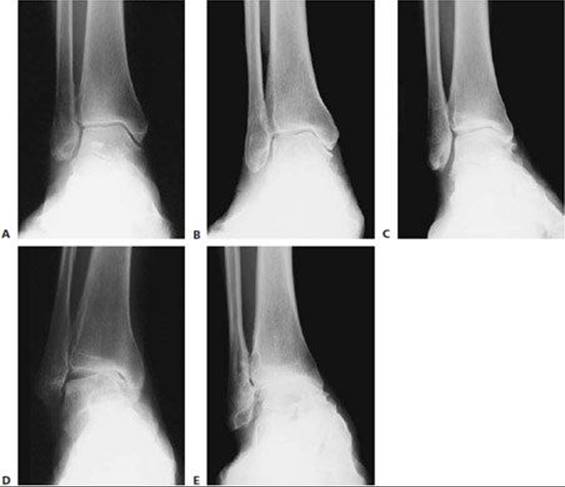
FIG 3 • Stages of varus-type osteoarthritis of the ankle. A. Stage 1: no joint space narrowing, but early sclerosis and osteophyte formation. B. Stage 2: narrowing of the joint space medially. C. Stage 3a: obliteration of the joint space in the facet is limited to the medial malleolus. D. Stage 3b: obliteration of the joint space has advanced to the roof of the talar dome. E. Stage 4: obliteration of the entire joint space with complete bone contact.
Normal values are 88 to 90 degrees for the TAS angle and 80 to 81 degrees for the TLS angle.1,2,5
The tibial axis is defined as the line between the midpoints of the tibial shaft at 8 cm and 13 cm above the tip of the medial malleolus.
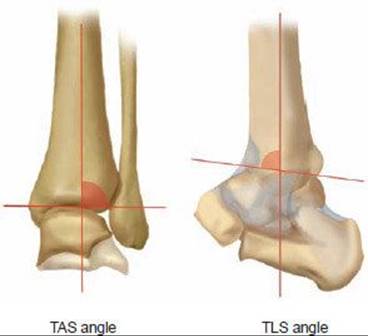
FIG 4 • The angle between the tibial shaft and the distal joint surface of the tibia on the AP view (TAS angle) and on the lateral view (TLS angle).
Varus tilt of the talus has been observed in some ankles with osteoarthritis. The varus tilt angle is evaluated on a weightbearing AP radiograph that shows the distal joint surface of the tibia and the upper surface of the talar dome (FIG 5).
DIFFERENTIAL DIAGNOSIS
Posttraumatic osteoarthritis
Rheumatoid arthritis
Infectious arthritis
Charcot joint
Crystal-induced arthritis

FIG 5 • Varus tilt angle on a weight-bearing AP view.

FIG 6 • A shoe insert with an outer wedge. A. Lateral view. B. Posterior view.
NONOPERATIVE MANAGEMENT
Rest and avoidance of offending activity is recommended.
Warming with hot packs and ultra microwave is effective.
Nonsteroidal anti-inflammatories and an injection of hyaluronic acid are used for moderate and severe pain.
A shoe insert with an outer wedge is very effective for osteoarthritis in stage 1 and stage 2 (FIG 6).
SURGICAL MANAGEMENT
An anteromedial opening-wedge osteotomy to correct the varus and anterior opening of the distal joint surface should be planned (FIG 7). The open-wedge method of osteotomy is more effective than the closed-wedge method. The lateral closed-wedge method is difficult because of the presence of the fibula on the lateral side, and this method can weaken the peroneal muscles because it shortens the lateral side.
LTO is very effective for patients with stage 2 or stage 3a, but clinical results for patients with stage 3b are unsatisfactory. There must be cartilage on the roof of the talar dome for this procedure to be indicated.
If the varus tilt angle on the weight-bearing AP view is 5 degrees or less, good results can be obtained from osteotomy alone. However, no joint with a varus tilt angle exceeding 10 degrees can attain a normal joint space.9
Although the indications for this procedure are very limited, LTO can provide relief of pain with retention of joint function.
Preoperative Planning
In terms of the TAS angle, overcorrection has produced much better results than undercorrection, especially in cases of advanced osteoarthritis. Therefore, the ideal TAS angle is 96 to 98 degrees.
With the TLS angle, overcorrection has been found to restrict dorsiflexion of the ankle. Consequently, the ideal TLS angle is 81 to 82 degrees.
Preoperative drawing
The osteotomy site is set at 5 cm above the tip of the medial malleolus. The extent of correction is appropriate to the shape of the grafted bone.
The lengths of the outer and side margins of the wedgeshaped graft bone are measured during preoperative drawing for the osteotomy. The grafted bone is usually harvested from the iliac bone crest. The medial height of the graft usually ranges from 6 to 8 mm.
Positioning
The operation is performed under general anesthesia or spinal anesthesia in a supine position using an air tourniquet.
Approach
Usually two separate incisions are made, on the lateral side of the fibula and on the medial side of the tibia.

FIG 7 • Low tibial osteotomy. A. Anterior view. B. Lateral view.
TECHNIQUES
FIBULAR OSTEOTOMY
 The fibular osteotomy is performed first. Make a 2-cm lateral longitudinal incision 7 cm proximal from the tip of the lateral malleolus. The tip of the lateral malleolus is detected using a needle percutaneously.
Make an oblique cut on the fibula running from anteroproximal to posterodistal using a bone saw. When the tibia is corrected in the valgus direction, the hindfoot usually rotates laterally. This movement puts the osteotomy site in the appropriate position.
If opening at the tibial osteotomy site is difficult, excise a 5-mm segment from the fibular osteotomy site.
TIBIAL OSTEOTOMY
The tibial osteotomy is performed using an open-wedge technique.
Make an 8-cm medial longitudinal incision beginning 5 cm proximal from the tip of the medial malleolus. The tip of the medial malleolus is detected using a needle percutaneously.
The anterior surface of the distal part of the tibia is easily exposed, but retain as much of the periosteum as possible.
Mark an osteotomy line using a chisel 5 cm proximal from the tip of the medial malleolus.
Perform the osteotomy using a bone saw. Do not completely bisect the tibia. Retain several areas of cortex on the lateral side of the tibia. Open the osteotomy site carefully from the medial side using a chisel (TECH FIG 1A,B).
Harvest grafted bone, the size of which has been decided during preoperative planning, from the iliac bone crest or a distal portion of the tibia.
Form the grafted bone into a shape appropriate to an anteromedial opening-wedge osteotomy with reference to the drawing.
Use the grafted bone to fill any open space at the osteotomy site (TECH FIG 1C).
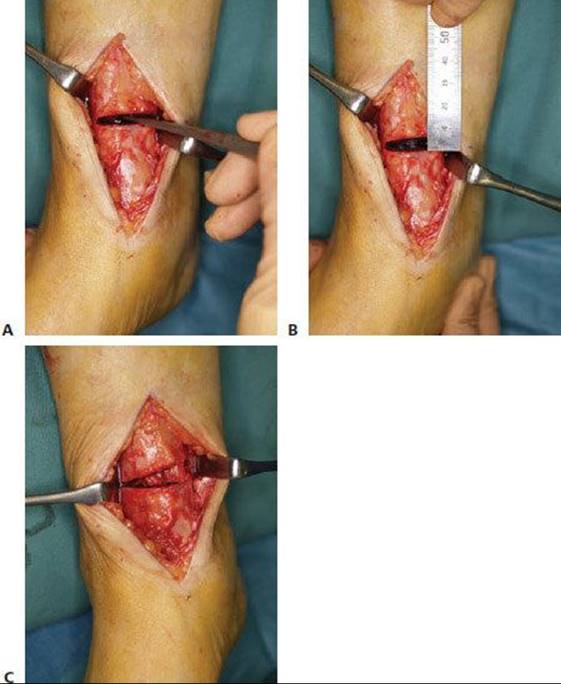
TECH FIG 1 • Tibial osteotomy. A. The osteotomy site is opened carefully. B. The size of the opening space is measured carefully. C. Open space is filled with bone graft.
FIXATION AT OSTEOTOMY SITE
Fix the osteotomy site in the tibia using a fouror fivehole AO/ASIF Narrow Plate (Synthes), a sixor eight-hole Form Plate (Osteo), or a fouror six-hole Cloverleaf Plate (Stryker) (TECH FIG 2).
Use cancellous screws for fixation at the distal end of the tibia to prevent fixing the distal talofibular joint.
Fix the osteotomy site of the fibula using a screw or Kirschner wire.
The compression mechanism of the screw holes on the plate sometimes causes loss of correction. If a plate has a compression mechanism, take extra care during the operation.

TECH FIG 2 • Plate fixation.
CLOSING
Place a suction tube at the osteotomy site.
Suture the subcutaneous fat tissue and close the skin.
Apply a below-knee cast postoperatively.

POSTOPERATIVE CARE
The leg is elevated with a pillow immediately postoperatively.
The day after the operation, non–weight-bearing walking is allowed. Exercises for flexion and extension of the toes and knee are prescribed to prevent deep vein thrombosis and muscle weakness.
A cast is used for 4 to 6 weeks. Touchdown with low–weightbearing (5 kg) is allowed 2 weeks after the operation. Partial weight bearing (10 to 15 kg) is allowed 4 weeks postoperatively.
After the cast is removed, a compression bandage is applied from the toes to the thigh to prevent edema. Active rangeof-motion exercise of the ankle promotes repair of cartilage.
The amount of weight bearing is increased gradually until full weight bearing on the ankle is allowed 2 months after the operation.
OUTCOMES
The clinical results of 25 consecutive patients (26 feet) with varus-type osteoarthritis of the ankle who underwent LTO in our hospital were analyzed.9 All were women aged 37 to 76 years (mean 54 years). Mean follow-up was 8 years 3 months.
Patients reported marked relief of pain and exhibited significantly improved walking ability and activities of daily living. However, ankle movement did not improve postoperatively.
The overall result was excellent in 4 ankles, good in 16 ankles, fair in 2 ankles, and poor in 4 ankles.
Radiographic evaluation showed that the mean TAS angle was corrected from 83 degrees before surgery to 98 degrees at the follow-up examination; the mean TLS angle was corrected from 79 degrees before surgery to 85 degrees at the follow-up examination.
In ankles that were radiographically classified as stage 2 or stage 3a, the lost joint space was restored. In contrast, only 2 of the 12 ankles that were classified as stage 3b exhibited restoration of the lost joint space. These findings indicate that LTO is indicated for stage 2 or 3a (FIG 8).
COMPLICATIONS
Delayed union and nonunion are rare.
Arthrodesis or total ankle arthroplasty as a salvage procedure should be selected for patients with poor results.

FIG 8 • A 44-year-old woman with stage 3a varus-type osteoarthritis. A. Preoperative obliteration of the joint space only at the tip of the medial malleolus. B. Immediate postoperative AP view. C. An excellent clinical result with no pain 11 years after the operation.
REFERENCES
· Katsui T, Takakura Y, Kitada C, et al. Roentgenographic analysis for osteoarthrosis of the ankle. J Jpn Soc Surg Foot 1980;1:52–57.
· Monji J. Roentgenological measurement of the shape of the osteoarthritic ankle. Nippon Seikeigeka Gakkai Zasshi 1980;54:791–802.
· Nakai T, Takakura Y, Tanaka Y, et al. Morphologic changes of the ankle in children as assessed by radiography and arthrography. J Orthop Sci 2000;5:134–138.
· Noguchi K. Biomechanical analysis for osteoarthritis of the ankle. Nippon Seikeigeka Gakkai Zasshi 1985;59:213–220.
· Sugimoto K, Samoto N, Takakura Y, et al. Varus tilt of the tibial plafond as a factor in chronic ligament instability of the ankle. Foot Ankle Int 1997;18:402–405.
· Takakura Y, Tanaka Y, Kumai T, et al. Low tibial osteotomy for osteoarthritis of the ankle. J Bone Joint Surg Br 1995;77B:50–54.
· Takakura Y, Takaoka T, Tanaka Y, et al. Results of opening-wedge osteotomy for the treatment of a post-traumatic varus deformity of the ankle. J Bone Joint Surg Am 1998;80A:213–218.
· Tanaka Y, Ohneda Y, Nakayama S, et al. Computer simulation of low tibial osteotomy using a three dimensional rigid body spring model. J Jpn Soc Surg Foot 1992;13:134–138.
· Tanaka Y, Takakura Y, Hayashi K, et al. Low tibial osteotomy for varus-type osteoarthritis of the ankle. J Bone Joint Surg Br 2006;88B:909–913.
· Unno M. An experimental stress analysis around the ankle after a low tibial osteotomy using two dimensional photoelasticity. J Nara Med Assoc 1984;36:524–546.