
PART I
PRINCIPLES, TECHNIQUES, AND BASIC SCIENCE
CHAPTER 8 PRINCIPLES OF MICROSURGERY
CHARLES E. BUTLER AND DAVID M. ADELMAN
INTRODUCTION
Microsurgery refers to a set of surgical techniques performed beyond the limits of human eyesight. These procedures require magnification by either surgical loupes or an operating microscope. Contemporary procedures that use microsurgical techniques include nerve and blood vessel repairs and grafts, free tissue transfers, limb replantation, and composite tissue allotransplantation. Technical expertise is essential for success, but preoperative planning and postoperative monitoring are also critical in achieving a successful microsurgical reconstruction.
HISTORY
The first successful end-to-end arterial anastomosis was reported in 1889 by Jassinowski.1 He used fine, curved needles and silk sutures to join the cut ends of carotid arteries in sheep. In 1897, Murphy reported an invagination method in which two double-ended silk sutures were used to intussuscept one blood vessel end into another, following which interrupted sutures were used to oversew the overlapping ends. This technique led to anastomotic narrowing and thrombosis in animal experiments but was used clinically for human femoral artery repair.
Prior to the standardization of vascular repair techniques, there was controversy regarding whether to include the tunica intima vasorum in vascular sutures. Carrel, Burci, and Jassinowski favored excluding the intima, whereas Briau, Dofler, Jensen, and Hopfer recommended including the intima in anastomoses. Guthrie and Carrel examined various techniques for anastomoses and found that inclusion of the intima promoted “uniformly successful results,” thus laying the foundations for standardiz0ation of anastomotic techniques.1,2
Carrel, who received the 1912 Nobel Prize in Medicine and Physiology for his work in this field, first described the technique of placing triangulating sutures to ensure equal traction on the blood vessels being anastomosed. In 1966, Buncke3 reported rabbit ear replantations with anastomosis of vessels approximately 1 mm in diameter. This microsurgical procedure was made possible by the use of fine instruments adapted from those used by watchmakers and jewelers and the development of thin sutures swaged on suitably small-gauge needles.
Advances in magnification technology often paralleled those in surgical technique and were essential to the evolution of modern microsurgical techniques. Janssens invented the first compound microscope in the 1590s. However, it would be more than 300 years before Nylen introduced the operating microscope for otolaryngologic surgery in 1921. The term microvascular surgery was coined by Jacobson, who wished to operate on small blood vessels under microscopic magnification and later demonstrated a 100% patency rate in vessels from 1.6 to 3.2 mm in diameter.1 Further developments included foot-operated microscope controls that freed the surgeons’ hands, a beam-splitting device to allow the use of a second set of eyepieces for a surgical assistant during procedures, optical zoom and independent focus controls, and cooler fiberoptics with a reduced likelihood of tissue desiccation and improved signal transmission.
These technical advances, along with increased interest in and knowledge of fine vascular anatomy, have made available the wide variety of microsurgical reconstructive options included in the armamentarium of reconstructive surgeons today.
INDICATIONS FOR FREE TISSUE TRANSFERS
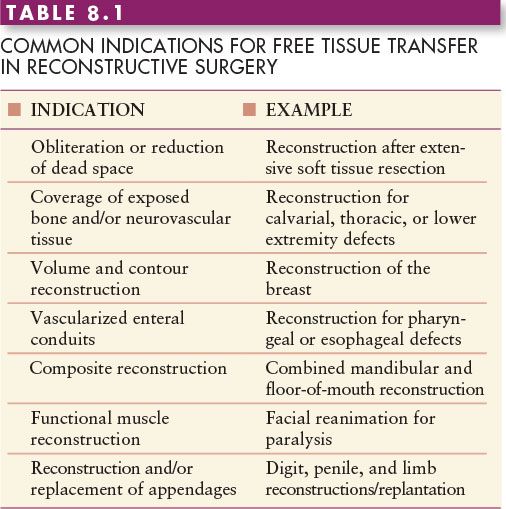
The reconstructive “ladder” algorithm advocates repairing tissue defects with the least invasive option that will produce successful results. The simplest technique is direct closure, and the most complex technique—with the greatest potential morbidity—is free tissue transfer. Free tissue transfers, located at the “top” of the reconstructive ladder, are usually considered when local or regional tissues are insufficient or suboptimal for reconstruction. The unavailability of local or regional tissues may be a result of infection, inflammation, trauma, radiation, insufficient volume or surface area, insufficient vascular pedicle length, and/or the unacceptability of morbidity at that donor site. In these situations, free tissue transfer becomes the best option. Free tissue transfer is also the most suitable option when highly vascularized tissue is required, when specialized tissues (such as functional muscles) are not available locally, or when specialized components (such as vascularized bowel or bone) are required.Table 8.1 outlines common indications for free flap reconstruction.
A detailed discussion of the factors involved in choosing a specific free flap for a particular reconstruction is beyond the scope of this chapter but is covered elsewhere in this book. Generally speaking, the operating surgeon should ensure that the tissue chosen for free tissue transfer is of sufficient size to cover or fill the defect, is associated with acceptable donor site morbidity (i.e., the benefits of the reconstruction outweigh the disadvantages of the flap harvest), and replaces “like with like,” as with any reconstruction. Additionally, factors such as color, pedicle length, and vessel size similarity must be considered.
PATIENT SELECTION AND EDUCATION
The reconstructive surgeon should establish that the patient is medically fit for the proposed procedure, which may be complex and lengthy. Microsurgical procedures are not specifically contraindicated by age, provided the patient is in reasonable health. However, the surgeon should rule out the presence of significant cardiovascular, respiratory, hepatic, or renal dysfunction and abnormal bleeding or clotting states.
The proposed procedure should be discussed at a level of detail suitable for the patient. This includes a discussion of the likely donor sites for the tissue transfer, anticipated morbidity at each site, expected intraoperative and postoperative course, possible donor and recipient site complications, expected level of discomfort and scarring, and expected postoperative recovery times needed to regain preoperative function and activity levels.
EQUIPMENT AND OPERATIVE PREPARATION
The correct instrumentation should be available for the operating team, along with additional sets in case of accidental damage or contamination of the instruments during the procedure. A microsurgical instrument set minimally includes fine jeweler’s forceps, vessel-dilating forceps, straight and curved microsurgical scissors, and microsurgical needle holders. Heparinized saline solution is frequently used for irrigation of the vessel lumen.
The choice of magnifying equipment depends on individual surgeon preference. Surgical loupes, which typically range from 2.5 × to 5.5 × magnification, can be used for fine dissection and the preparation of vessels. Some surgeons also prefer to use loupes rather than operating microscopes when performing the vascular anastomoses.4 The advantages of the operating microscope are that it provides wide-field adjustable magnification and allows significant depth-of-field perception. The microscope should have two sets of eyepieces to allow the surgeon and the assistant to operate simultaneously. The use of a video output device allows viewing of the operative field on a separate monitor and is helpful for the scrub team in following the anastomotic activity.
The free tissue transfer procedure should be outlined preoperatively to the anesthetic and nursing teams, as well as the ablative surgical team. This ensures that all parties are aware of the donor and recipient sites and helps to streamline operative activity. The need for (or avoidance of) anticoagulation, neuromuscular paralysis, vasopressors, and antibiotic prophylaxis should be discussed with the anesthesiologist. Patient positioning and preparation, the expected length of the procedure, and any resultant physiologic or anatomic risks should also be discussed. Intravenous and intra-arterial access should be planned in conjunction with the anesthetic and nursing teams to avoid interference with potential flap harvest and recipient sites.
The patient should be positioned for easy access to the flap donor and recipient sites. Dependent and pressured areas on the patient should be padded to avoid pressure damage, and the patient should be well secured on the operating table to allow limited change of position without the risk of a fall.
PREOPERATIVE PLANNING
Careful preoperative planning is essential. This is particularly true in microsurgery, since the donor sites are limited and the consequences of flap failure are considerable. Often, the type of reconstruction needed is known prior to surgery (e.g., breast reconstruction). Other times, the extent of resection is altered based on intraoperative findings and pathologic examination (e.g., resection of head and neck tumors). In these latter situations, having discussed multiple possible flap options with the patient during consultation will allow for the most appropriate reconstruction to be performed without the need for delay or additional conversation. It is the responsibility of the microsurgeon to anticipate as many reconstructive variables as possible.
Multiple flap options are usually available and the microsurgeon must consider which to use. Donor site morbidity and replacing “like with like” are critical. Patient positioning is also important. Certain flaps may be harvested simultaneously with the ablative resection or wound preparation; this may decrease overall operative time and patient turning. Keeping ischemia time to a minimum is equally important, and timing flap harvest with recipient site preparation is key. In cases in which the flap may be rendered ischemic by the ablative team (e.g., when using a filet of extremity plap for a proximal defect), dissection of the flap prior to disease resection may maximize flap viability after reperfusion.
In the event of flap injury or flap failure, certain backup flap options may become important. Planned vein grafts may allow a short pedicle to reach the recipient vessels or bypass an area of vessel injury or disease. Ensuring potential vein graft harvest sites are appropriate for use and included in the sterile surgical field will facilitate their use during surgery, if needed. Furthermore, in the case of recurrent disease or late flap loss, backup options need to be considered for later use. Communication with the ablative team preoperatively is essential to understand the anticipated defect characteristics, optimize flap choice, and, consequentially, maximize the outcomes of the reconstruction.
OPERATIVE TECHNIQUE
Once the recipient site is available (e.g., after debridement or tumor resection), the defect is evaluated, and the final decision regarding the type of reconstruction is made. Surgical templates can be helpful in determining the exact dimensions and shape of the defect, particularly if it has a complex three-dimensional form.
Prior to free flap harvest, the recipient vessels are evaluated. Factors to evaluate include the presence of vessels; their distance from the defect (i.e., pedicle length required); their size, patency, and flow; and their condition (including previous radiation damage, atherosclerotic change, previous trauma, and/or infection). If the initially chosen vessels are inadequate, alternative recipient vessels are sought. Vein grafts may be required to bridge the distance between the donor and recipient vessels. Free tissue transfer requires a thorough understanding of the relevant donor and recipient site anatomy, including the main arterial and venous supply, major vessel variations, important associated structures, and associated nerve supply. The flap’s vascular pedicle is dissected under magnification, with care taken to avoid injury to the flap blood supply. The required pedicle length should be apparent from operative planning and intraoperative measurement. Ideally, the donor and recipient are vessels of similar diameter. The vessels are handled minimally and with care by holding the adventitial tissue on the outermost aspect of the vessel wall. It is equally important to avoid significant traction on the vessels. Manipulation of the lumen is avoided to minimize intimal injury.
The microscope setup is one of the most important aspects of an anastomosis. The operating table height is adjusted so that the operative field is approximately level with the surgeons’ elbows. The height of the microscope is adjusted for adequate focal length of the objective lens but in such a way that the surgeons can avoid excessive flexion or extension of their cervical spines or ligamentous and muscular strain. Both eyepieces are set to neutral optical correction or adjusted for each surgeon’s vision if corrective lenses are needed.
The recipient site is positioned for optimal exposure. This includes retraction of the skin flaps or tissue using retractors, tension sutures, or skin hooks. The orientation of the flap pedicle is checked to ensure that the anastomoses will not be under excessive tension and the pedicle is checked for acute bends or twists both before and after completion of the anastomoses. The phrase “macro before micro” is a useful reminder to check that the pedicle has an appropriate lie within the recipient bed, prior to losing the wide perspective under the microscope. To aid visualization during anastomosis, a small sheet of plastic polymer “background material” in a contrasting color can be placed under the vessels. If the operative field is deep, placing surgical sponges at the base of the defect can elevate it.
The vessels to be anastomosed are positioned to allow tension-free, surface-to-surface apposition. Once the pedicle length and orientation of the donor and recipient vessels are decided, low-pressure microvascular clamps are applied for vascular control. Application of vessel clamps on the donor vessels can help eliminate oozing from arterial inflow and venous backflow. The recipient artery and vein are checked for open branches near the planned anastomoses; these are then ligated. The cut edges of the donor and recipient vessels are checked for a clean, uniform edge and trimmed as necessary to avoid stray tissue ends encroaching into the lumen; these can be foci for thrombus formation. For an end-to-end anastomosis, both the donor vessel and recipient vessel are most commonly cut perpendicular to the vascular axis. An oblique cut results in a larger circumference and can be used to minimize vessel size mismatch when coapting vessels of different diameters.
The quality of the luminal intima is then inspected for irregularities such as thrombi, atherosclerotic plaques, and friable, calcified walls. Any detected debris is gently irrigated away. If a satisfactory internal surface cannot be obtained by gentle irrigation, the vessel should be cut back a suitable distance, with care taken not to jeopardize the flap pedicle length or caliber. It is also important to ensure that the recipient vessels are outside any zone of injury or infection; using inflamed vessel segments increases the risk of post-anastomotic thrombosis.5 If the recipient vessels do not appear suitable for microsurgical anastomosis, then new recipient vessels are located. If they are some distance from the original recipient vessels, vein grafts may be needed to bridge the gap.
Once a satisfactory vessel segment is attained, adventitial cleaning is carried out with sharp, curved microsurgical scissors (Figure 8.1). It is important to avoid separation of the intima from the media in arteries and to avoid excessive thinning of the vessel walls. Excessive stripping of adventitia can result in vessel tearing during suture placement. Judicious tangential sharp excision is carried out for a distance of approximately 1 mm from the edge of each vessel. Some surgeons prefer to maintain luminal apposition by careful vessel positioning and/or the use of anastomotic retraction sutures; others prefer to use double-approximating vascular clamps (Figure 8.2).6
After adequate preparation, the vessels are aligned for suture placement. Fine, non-absorbable sutures appropriate to the size and thickness of the vessels are used (most commonly 8-0, 9-0, or 10-0 nylon). Ideally, suture entry is perpendicular to the vessel wall surface. Each bite should be of a sufficient distance away from the edge so that the suture will not cut through the wall. These sutures should be placed an equal distance apart to distribute the tension evenly around the circumference of the anastomosis.6
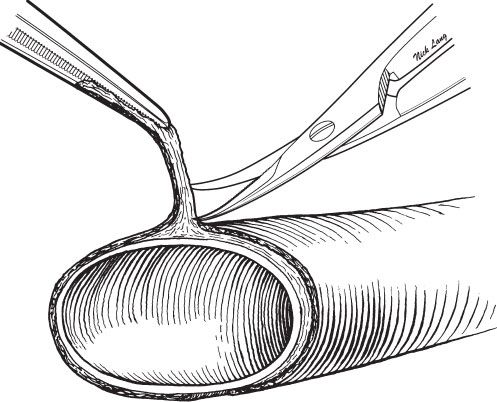
FIGURE 8.1. Donor and recipient vessel preparation. The excess adventitial tissue near the cut edge of the vessel is removed with dissecting scissors to prevent intrusion into the lumen during the anastomosis. Care is taken to avoid excessive thinning, which can result in vessel tears during the placement of sutures. Visual Art © 2004 The University of Texas M. D. Anderson Cancer Center. Used with permission.
The method of suturing depends on surgeon preference. A popular method is to start with two orientation sutures placed 180° apart (Figure 8.3A) or three orientation sutures placed 120° apart (Figure 8.3B). Some surgeons believe that placing the correct number of sutures between the orientation sutures is easier when there are two; others believe that using three orientation sutures reduces the risk of including the opposite wall in a suture (known as “backwalling”), as traction on the third suture holds the opposite wall away from the anterior suture line.

FIGURE 8.2. Use of double-approximating microvascular clamps. The donor and recipient vessels are placed within the clamps, and the vessel ends are approximated along the direction of the arrows. This technique maintains the correct orientation of the vessels and facilitates suture placement. After the anterior suture line is complete, the clamps are turned over to allow access to the posterior suture line. Visual Art © 2004 The University of Texas M. D. Anderson Cancer Center. Used with permission.

FIGURE 8.3. Orientation sutures. A. Bisecting interrupted sutures are placed 180° apart, dividing the vessel circumference in half. This technique is particularly useful when there is a vessel size mismatch. B. Triangulating interrupted sutures are placed 120° apart, dividing the vessel circumference into thirds. This technique helps prevent inadvertent inclusion of the opposite wall of the vessel in the remaining sutures; the surgeon applies gentle downward traction on the posterior orientation suture while the other two sutures are gently retracted upward and laterally during placement of the remaining anastomotic sutures. Visual Art © 2004 The University of Texas M. D. Anderson Cancer Center. Used with permission.
The remaining sutures are then placed, usually beginning on the posterior wall to facilitate visualization of the lumen and continuing to the anterior wall. These sutures can be interrupted or continuous (running). Interrupted sutures are preferred when the size match of the two vessel ends is not ideal. Continuous sutures require less knot tying, are faster, and distribute the tension line evenly between the orientation knots (Figures 8.4 and 8.5). In practice, arterial anastomoses are often performed with interrupted sutures and venous anastomoses with continuous sutures. Several studies have shown no significant difference in thrombosis rates between the two suturing techniques.2,7,8
Accidental penetration into, or inclusion of, the opposite (back) wall of a vessel in a suture is unacceptable and must be avoided by careful visualization and meticulous technique. Backwalling is prevented by a combination of luminal irrigation to distend the vessel (particularly thin-walled veins) and ensuring the vessel edges are everted. The tips of jeweler’s forceps can be placed just inside the vessel lumen to provide counterpressure to facilitate external-to-intraluminal passage of the needle (Figure 8.6A) and against the adventitial surface of the vessel wall to facilitate intraluminal-to-external passage of the needle (Figure 8.6B).
Square knots are used whenever possible. For sutures under some tension, such as the initial orientation sutures, a surgeon’s knot is frequently preferred. Three square throws are usually sufficient for interrupted suture knots. Ideally, sutures are tied with a degree of tension sufficient to adequately coapt the vessel edges but not to cause excessive bunching. However, sutures that are tied too loosely may result in a thrombosis and/or leakage at the anastomosis.
Nakayama introduced a vascular anastomotic coupling device, which Ostrup and Berggren subsequently modified, consisting of polyethylene rings secured with steel pins.9 The use of such a device requires everted vessel walls and may not be possible with vessels that have a small diameter or atherosclerotic changes. Commercially available anastomotic coupling systems are available for vessels 1 to 4 mm in diameter. The patency rates achieved using anastomotic coupling devices are comparable to those using hand-sewn techniques. Figure 8.7 illustrates the technique for using an anastomotic coupling device.
Antispasmodic agents, such as papaverine, can be used throughout the dissection and anastomosis to reduce vasospasm. After the vascular clamps are released, the anastomosis is carefully checked for active leaks, which are managed by accurate placement of additional sutures. Small leaks from needle holes often stop on their own, and sometimes the anastomosis can be draped with a pledget of fat, which provides tissue thromboplastin to further facilitate the process. The entire pedicle is examined to ensure there is no tension, torsion, or bleeding, particularly from vessel branches or the flap itself. The time at which flow resumes is then recorded and the flap ischemia time totaled.

FIGURE 8.4. End-to-end anastomosis using continuous (running) sutures. A. Donor and/or recipient vessel ends may be cut at an oblique angle to increase their circumference and facilitate suturing, particularly for small vessels. B, C. Interrupted traction sutures are placed at 180° (shown) or 120° (not shown) to orient the vessels and facilitate placement of the running sutures. Visual Art © 2004 The University of Texas M. D. Anderson Cancer Center. Used with permission.
A gentle Acland (vessel strip) test can be carried out near an arterial or venous anastomosis to confirm anastomotic patency (Figure 8.8). Flap color, capillary refill, tissue bleeding, and flap temperature are all assessed to ensure adequate flap perfusion.2,10 A Doppler probe can be used to assess vascular flow within the pedicle and/or specific areas of the flap. These areas can be marked with a fine, non-absorbable suture on the skin paddle for ease of location during postoperative monitoring.
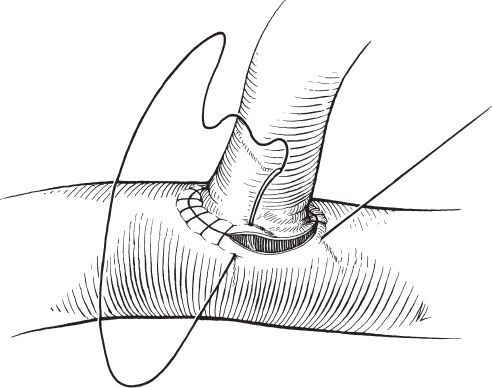
FIGURE 8.5. End-to-side anastomosis using continuous (running) sutures. An elliptical opening is created on the recipient vessel wall, and the end of the donor vessel is anastomosed to this opening. The end-to-side technique maintains distal flow in the recipient vessel and is frequently performed when there is a donor and recipient vessel diameter mismatch. Visual Art © 2004 The University of Texas M. D. Anderson Cancer Center. Used with permission.
During ischemia, the flap is often kept cold to minimize the metabolic demands of the tissue. However, once reperfusion is established, the flap is warmed to decrease vasospasm and thrombosis and to restore cellular activity to normothermic levels.
POSTOPERATIVE MONITORING AND TROUBLESHOOTING
The anesthetic is reversed gently to avoid sudden changes in blood pressure, which may cause unwanted bleeding. The patient is kept warm, well hydrated, and pain free during and after the procedure. The use of vasoconstrictive agents is avoided. Blood pressure, oxygenation, ventilation, and fluid balance are carefully monitored. The postoperative use of an anticoagulant agent (such as dextran, heparin, or aspirin) is dependent on surgeon preference. These anticoagulating agents are usually used only if there is a higher-than-normal risk of thrombosis, such as with procedures involving small-caliber vessels, poor quality vessels, friable vessel walls, previously irradiated tissue, or patients who are heavy smokers.7,11
Experienced personnel are essential for monitoring the flap postoperatively. The gold standard for assessing the viability of transferred tissue is clinical examination.10 Identification of a failing or insufficiently perfused flap can occasionally be challenging for even the most experienced microsurgeon. Pattern recognition is essential to identify compromised flaps within a “window of salvageability.” The threshold for operative re-exploration of a flap for suspected arterial or venous insufficiency should be extremely low, as salvage rates are significantly increased by early identification and treatment. One never regrets a “take back” but one may definitely regret postponing a “take back.”
A number of clinical signs, when present either singly or in combination, may suggest a perfusion problem. These include pale flap color, reduction in flap temperature, loss of capillary refill, and loss of flap turgor; all may indicate arterial insufficiency. Venous insufficiency, on the other hand, can result in a purple or blue hue in the flap, congestion, swelling, and rapid capillary refill in the early stages followed by eventual loss of capillary refill. There may be increased dark bleeding at the flap edges, hematoma formation, and eventual concomitant loss of arterial inflow. These signs may be easier to detect on a skin paddle than on a skin-grafted portion of muscle. Also, problems are detected more easily and earlier when a large flap surface area is available for physical examination.
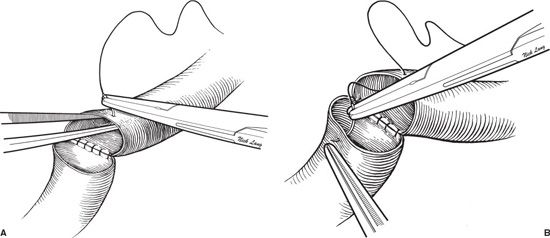
FIGURE 8.6. Forceps counter-traction to facilitate needle placement and penetration. A. In select cases, partially open blunt jeweler’s forceps tips are placed into the vessel lumen to evert the vessel wall, avoid inclusion of the back wall in sutures, and provide counter-traction for needle penetration. Extreme care must be taken to avoid traumatizing the vessel intima; some microsurgeons avoid this technique for this reason. B. When the needle is passed from inside the vessel lumen to outside the lumen, it is often useful to use the tips of the forceps to provide counter-traction on the adventitial surface of the vessel to facilitate needle penetration. Visual Art © 2004 The University of Texas M. D. Anderson Cancer Center. Used with permission.
A Doppler ultrasonic probe is helpful for flap monitoring. The external pencil probe, which is applied on the skin paddle over a known cutaneous perforator location (often marked with a suture during surgery) is one option. For flaps in which no perforator signal is easily accessible (such as a buried flap), an implantable Doppler ultrasonic probe can be used. This consists of a small probe attached to a polymer sleeve that is placed around a pedicle vein or artery adjacent to the anastomosis; a thin probe lead wire exits through the incision.12 The lead wire easily detaches from the probe and is removed through the incision with gentle traction on the wire. Doppler signals have a characteristic pattern that can, with experience, be identified as arterial (pulsatile) or venous (undulating). A change in the character of the signals from strong to diminished or undetectable may indicate vascular occlusion. Doppler monitoring is, however, subject to error (both false-positive and false- negative) and thus should never replace clinical assessments.

FIGURE 8.7. Use of an anastomotic coupling device. A. With the device’s lateral wings open, each vessel is passed through a plastic ring, and the vessel walls are everted and impaled on pins mounted on the rings. B. After both vessels are mounted, the knob is turned to close the wings and secure the rings with the vessels in opposition. The rings are securely attached to each other by the pins of one ring interlocking with the opposite plastic ring. After the anastomosis, the coupled rings are released in the direction of the arrow by continuing to turn the knob. Visual Art © 2004 The University of Texas M. D. Anderson Cancer Center. Used with permission.

FIGURE 8.8. Use of the Acland test to confirm antegrade vascular flow through an anastomosis. A. The direction of blood flow is indicated by the arrow. B. Two jeweler’s forceps are used to gently occlude the vessel distal to the venous anastomosis. C. Blood is milked out of the vessel between the two forceps by gently sliding the distal forceps along the vessel without injuring it. This results in a segment of collapsed vessel between the proximal and distal forceps. D. Releasing the proximal forceps allows the collapsed vessel segment to be filled by antegrade flow if the anastomosis is patent. The distal forceps prevent retrograde filling of the collapsed segment. This test should be performed sparingly to minimize potential trauma to the vessel intima. Visual Art © 2004 The University of Texas M. D. Anderson Cancer Center. Used with permission.
The time between the clinical diagnosis of a vascular problem in the flap and the return to the operating room is critical for flap salvage. Beyond a certain period, depending on the type of flap and clinical conditions, salvage of a compromised flap becomes impossible. It is therefore advisable to be overly cautious when assessing flap status, as the consequences of an undiagnosed problem may result in partial or complete flap loss.7 When in doubt, operative exploration can be both diagnostic and therapeutic.
Once the patient is back in the operating room, the flap may be released from its inset if the pedicle is beneath it (e.g., breast reconstruction), or the pedicle may be exposed first through a separate incision (e.g., neck exploration for a compromised intraoral free flap). A tight flap inset can lead to decreased perfusion, and release alone may adequately restore perfusion. If not, the position of the pedicle is examined, specifically looking for a twist, kink, stretch, or compression that may have impeded flow. This can often happen postoperatively secondary to swelling, patient activity, and/or infection. Flow across both the arterial and venous anastomoses is checked, using any or all of the aforementioned techniques (Acland test, Doppler probe, palpation, etc.). If no flow is detected, the anastomosis is opened and examined. Common findings include thrombosis, suture occlusion of the lumen (by previously undiagnosed back wall placement), and dissection. Once the problem is determined, it can be repaired. Simple revision of the anastomosis or thrombectomy via mechanical (e.g., Fogarty catheter) and/or chemical (e.g., thrombolytics) means may be required. If inflow and/or outflow is diminished despite anastomotic patency, new recipient vessels may be required, along with new vein grafts to reach them.
Once the ischemia is eliminated and perfusion restored, additional monitoring of the flap is crucial. Increased post-reperfusion swelling of the flap tissue is common, and often the flap inset needs to be adjusted to avoid pressure-induced ischemia of the flap and surrounding tissues. In some situations, multiple trips to the operating room may be required for flap salvage. Unfortunately, salvage rates decrease with cumulative injury to the flap. If the flap ultimately fails, it should be immediately debrided to prevent it from becoming a nidus for infection. Concurrent with debridement, decisions must be made regarding temporary versus definitive wound coverage. Factors to consider include patient stability, presence of infection, availability of pedicled and free flap backup options, and quality of recipient vessels.
CONCLUSIONS
The use of microvascular techniques has revolutionized reconstruction and expanded the range of options for repairing large anatomic defects. Microsurgery is complex and technically demanding, but with careful preparation, proper execution, and postoperative monitoring, it is beneficial to the patient and rewarding to the surgeon.
References
1. Lee S, Frank DH, Choi SY. Historical review of small and microvascular vessel surgery. Ann Plast Surg. 1983;11:53-62.
2. Weiss DD, Pribaz JJ. Microsurgery. In: Achauer BM, Eriksson E, Guyuron B, et al., eds. Plastic Surgery: Indications, Operations and Outcomes. Vol 1. St. Louis, MO: Mosby; 2000:163-183.
3. Buncke HJ. Microsurgery—retrospective. Clin Plast Surg. 1986;13:315-318.
4. Shenaq SM, Klebuc MJ, Vargo D. Free-tissue transfer with the aid of loupe magnification: experience with 251 procedures. Plast Reconstr Surg. 1995;95:261-269.
5. Johnson PC, Barker JH. Thrombosis and antithrombotic therapy in microvascular surgery. Clin Plast Surg. 1992;19:799-807.
6. Acland R. Microsurgery: A Practice Manual. St. Louis, MO: Mosby; 1980.
7. Chao JJ, Castello JR, English JM, et al. Microsurgery: free tissue transfer and replantations. Sel Read Plast Surg. 2000;9:1-32.
8. Samaha FJ, Oliva A, Buncke GM, et al. A clinical study of end-to-end versus end-to-side techniques for microvascular anastomosis. Plast Reconstr Surg. 1997;99:1109-1111.
9. Ostrup LT, Berggren A. The UNILINK instrument system for fast and safe microvascular anastomosis. Ann Plast Surg. 1986;17:521-525.
10. Neligan PC. Monitoring techniques for the detection of flow failure in the postoperative period. Microsurgery. 1993;14:162-164.
11. Reus WF 3rd, Colen LB, Straker DJ. Tobacco smoking and complications in elective microsurgery. Plast Reconstr Surg. 1992;89:490-494.
12. Swartz WM, Izquierdo R, Miller MJ. Implantable venous Doppler microvascular monitoring: laboratory investigation and clinical results. Plast Reconstr Surg. 1994;93:152-163.