PART 3 The Intermediate Series of Asanas (Postures)
FIRST CONNECTIVE SECTION
BACKBEND SEQUENCE
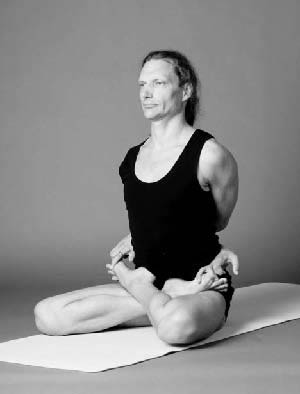
Supta Vajrasana
RECLINING THUNDERBOLT POSTURE
Drishti Nose
PREREQUISITE: Reaching your toes in Kapotasana
without the help of the teacher. Do not start performing Supta Vajrasana before you have properly learned Kapotasana. Use all your energy first to learn Kapotasana properly.
OVERVIEW:Supta Vajrasana combines the backbend movement of Kapotasana with a full lotus position. At this point all the lessons learned in the Primary Series will pay off, or lack thereof will show up. Unless one is constitutionally very flexible or lean, one will not get past this point without the internal rotation pattern of the femur learned in the Primary Series. Supta Vajrasana directs the intensity of the backbend into the lotus position and opens it further. It functions as a warm-up for the more challenging lotus and half-lotus postures later in the sequence, and chiefly for Karandavasana.
Vinyasa Count
Vinyasa Seven
Inhaling, jump through to Dandasana.
Vinyasa Eight
Exhaling, fold into Padmasana, placing the right leg first and then the left leg on top.
Reach around and bind the foot on top first. In our case, usually the left foot is on top, so we reach around and bind with the left arm first. Then reach around with your right arm, placing the right arm on top of the left one, and bind the right big toe.
OBSTACLES TO BINDING IN SUPTA VAJRASANA
If binding is difficult, try the following:
· Stretch your pectoralis minor and major muscles regularly or get the teacher to stretch them while you are in the posture by drawing your arm backward. This will bring your hands closer to your feet.
· Draw your feet higher up into the groin by internally rotating your femurs more and by bringing the knees closer together. This will bring your toes closer to your hands.
· Place the right elbow over the left one. If that doesn’t work, spray your elbows and forearms with water so that the elbows can slide over each other.
· Dispose of excess adipose tissue on your waist.
Baddha Padmasana
PLACING THE RIGHT LEG FIRST INTO LOTUS
As stated already in Ashtanga Yoga: Practice and Philosophy, the reason to place the right leg into lotus first is to accommodate the asymmetry of the abdominal cavity. According to Yoga Shastra, placing the right leg first into Padmasana and the left leg on top purifies liver and spleen, while placing the left leg first does not produce any desirable result. Padmasana right-side-first is also thought to stimulate insulin production.
Pranayama techniques involving kumbhaka (breath retention) and alternate nostril breathing generally start with the first kumbhaka after an inhalation through surya, the right nostril. The reason this is done is that the surya nadi, which powers the solar mind, promotes structured learning, refining, controlling, achieving, and perfecting. This also means, for example, that you will memorize more details when reading a textbook when breathing through your right nostril. A more intuitive form of learning (which won’t get you far when going to university) or visionary insight is possible when breathing through ida, the left nostril, which powers the lunar mind.
A similar relationship exists not only for the breath but also for the body. As pranayama is generally started with the right nostril, so is asana generally done on the right side first,15 which is also reflected in placing the right leg into Padmasana first.
One might think that doing all lotus postures with the right side first could have an adverse effect on the balance of the hips, leading to a permanently torqued pelvis. It appears, though, that this effect is counteracted by the leg-behind-head postures such as Supta Kurmasana in the Primary Series and Dvipada Shirshasana in the Intermediate Series, in which the left leg is placed in position first. Evidence supports the conclusion that students who practice a complete Primary or Intermediate Series seem to not be harrowed by pelvic imbalance.16 The situation appears to be different with those students who stay at Supta Vajrasana for a very long time without mastering this posture. They thereby do not receive the next postures from their teachers and do not progress to the safety of the hip-balancing Dvipada Shirshasana and Yoganidrasana.
If you belong to this group, there might be ground to do the lotus postures on one day with your right leg first and on the next day with your left leg first. Another option would be to get your teacher to select some lotus postures in your practice that you could do with the left side first. Once you have progressed to intermediate leg-behind-head postures, I suggest going back to doingPadmasana exclusively with the right leg first. The only time my pelvis was torqued was when I sat for long periods of pranayama in Padmasana with my right leg first, while at the same time my intermediate leg-behind-head postures were disabled through a shoulder problem. I solved the problem by sitting not in Padmasana but rather in Siddhasana during my pranayama.
Holding on to both big toes, you are now in Baddha Padmasana. Supta Vajrasana is a backbend in Baddha Padmasana.
Inhaling, lift your chest and arch your back. The same principles apply here as in Kapotasana. Let the arch commence from your T1 vertebra, and from there let it travel down the spine in a wavelike motion.17 Let your clavicles curl back over your shoulders as if wanting to meet your shoulder blades. Draw your shoulder blades down your back and wrap your chest back over them. As you arch back, attempt to cross your elbows past each other. Imagine that you are arching back over a bar that extends right behind your shoulder blades. Expand the front of your chest by stretching your intercostals. Rather than just folding your pelvis back, drop your pubic bone down together with the coccyx and lift the ASISs upward rather than letting them drop backward. Keep extending out of the top of the back of the head to transfer the stretch from the cervical spine into the thoracic spine, maximizing back arch.
Vinyasa Nine
The ideal scenario is described first and then a more beginner-friendly version is introduced.
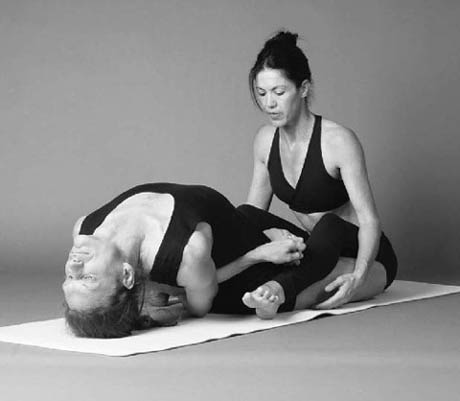
Exhaling, arch back and place the crown of your head on the floor behind you. Attempt to touch the crown of your head as close to your buttocks as possible. To prevent landing with a thud, fade the movement out by lifting your knees off the floor. Once your head is down, place your knees back down. Stay for five breaths and look toward the nose.
Inhaling, lift your knees off the floor with a rapid movement, then flex your hip joints to lift your head off the floor. Once your chest is up, place your knees back down on the floor.
This version takes a lot of flexibility. If you are not yet flexible enough, ask the teacher to place his or her legs over your knees, or if you practice alone, stick your knees under a sofa.
Supta Vajrasana
If your teacher keeps your knees in position, check first whether both knees are on the floor while sitting in Padmasana. If one knee is airborne, place a folded towel under it, so that when the teacher places his or her legs on top of yours, your knee is not pressed down to the floor. If you can’t get your knee down by yourself while in lotus or half-lotus using your leg muscles only, do not allow someone else to press it down. The pressing down of the knee will result in unwanted friction in the knee or your opposite buttock will lift off, in which case the pelvis can become torqued.
Once your knees are securely in place, start arching back. If your hands start to slip, use some rough cotton cloth to keep your toes bound. In no case are you to let go of your hands. If you let go, you are not doing Supta Vajrasana but only Matsyasana (counter-posture for shoulder stand in the finishing sequence). Part of the journey of Supta Vajrasana is to strengthen your hands enough for the advanced arm balances. If you let go, the energy cycle will be interrupted and the posture rendered useless. Instead, arch back only to an extent where you still can hold on, and then come back up even if your head does not reach the floor. Reaching the floor is not the defining element; bending back in Baddha Padmasana is the defining element. If you let go of your feet, you are no longer bound (baddha) and you are doingMatsyasana, which is part of the finishing series and not the Intermediate Series. Go to your limit of flexibility, and if possible rest your head on the floor for five breaths. As you arch back, hold on to your toes and draw your feet further up into the groin while bringing your knees closer together and internally rotating the thighbones. A great part of Supta Vajrasana’s effectiveness lies in its ability to open your lotus further by rapidly switching between internal and external rotation of your thighbones.
Inhaling, come up, and exhaling, place your head back down. If you cannot perform the final version of Supta Vajrasana, for training purposes you can repeat this movement four more times synchronized dynamically with the breath, using a significant amount of momentum.
The purpose of this sequence within vinyasa nine is to emphasize femur rotation. Apart from arching the back and strengthening the hands, the other theme of Supta Vajrasana is to improve the lotus by leading us deeper into femur rotation. It is an expansion of the material covered in the Primary Series, and once we reach Karandavasana, we need to be proficient in femur rotation. In other words, it needs to either happen here and now or it never will. As you lower your head down and arch back, you need to internally rotate your femurs (thighbones), which will let your feet slide higher up into the groin and thereby move closer to your hands. As you lift your torso and come up, you need to externally rotate your femurs. The more you can rotate, the more open the lotus becomes. Eventually, with sufficient external rotation, one could potentially slide into lotus position in midair. The flexibility you gain here will be instrumental in properly performing postures such as Mulabandhasana (the most extreme internal hip rotation) and Kandasana (the most extreme external hip rotation) later on. Both these postures are used to trigger the rising of kundalini, to which extreme movements of the femur seem to be linked.
On the fifth exhalation, keep your head on the floor for another five breaths.
Inhaling, come up and place your hands on the floor on either side of your thighs.
Advanced practitioners may use the nutation of the sacrum described here also in Supta Vajrasana to increase back arch.
Vinyasa Ten
Inhaling, lift off the floor.
Vinyasa Eleven
Slide out of Padmasana in midair and float back into Chaturanga Dandasana. This movement was described in Ashtanga Yoga: Practice and Philosophy (pp. 98–99) and is not covered here in detail. Perform this movement only if you do not suffer from a knee condition such as a cruciate or collateral ligament sprain or menisci tears. If any knee pain is present, simply sit on the floor, gently fold out of lotus, and jump back.
Vinyasa Twelve
Inhale into Upward Dog.
Vinyasa Thirteen
Exhale into Downward Dog.
10 Schools stemming from Shri T. Krishnamacharya are collectively referred to as the “Southern Indian school of yoga.”
11 Alexander Lowen, Körperausdruck und Persönlichkeit [The Language of the Body] (Munich: Koesel Verlag, 1981), p. 197ff.
12 The term prana refers generally to life force and more specifically to the up-breath, one of the ten vital airs.
13 The quadriceps has four heads — the two-joint muscle rectus femoris (which also flexes the thigh at the hip), the vastus lateralis, the vastus medialis, and the vastus intermedius — all of which insert into the patellar tendon. If one of the three vasti muscles is more toned than the others — most often the vastus lateralis — the patella will be pulled laterally.
14 One can entirely take out the intensity by walking the hands out further (which is not suggested). In other words, some students will think, “More intense? What are you talking about?” They are the ones who walk out their hands too far.
15 There are exceptions, such as Pashasana and two-sided leg-behind-head postures, in which you place your left leg first.
16 Apart from those who continue to drink coffee. Coffee is a stimulant that mobilizes and expels prana that otherwise is used to stabilize the pelvis. This is not a moralistic statement but is based on observation. Over the years, most of my students who had a tendency to have a twisted or imbalanced pelvis were those who insisted on continuing their coffee habit. Decaffeinated coffee or tea does not appear to have the same destabilizing effect.
17 We don’t start from the cervical spine as it is too soft and lends itself too easily to extension. It will automatically emulate the backward arch attempted in the thoracic spine and usually too much so.