
PART 1 Roots
Chapter 6
Anatomy: Understanding the Capabilities and Limitations of Your Body
In bygone times, yogis could easily perform postures properly, as people’s minds (chitta) were habitually suspended (nirodha) or single-pointed (ekagra).1 The nirodha mind was predominant during the time when the Vedas were composed. Ancient people generally had the ability to reabsorb the mind into the heart and could therefore “see” the divine matrix that gave rise to an asana and its respective alignment. The ekagra mind was predominant during the time of the Upanishads. Although the tendency toward habitual suspension (nirodha) was lost by then, people generally could still concentrate their minds to such an extent and for such a time span that they could “download” the matrix behind the asana, its essence (dharmin). Both of these states of mind are nowadays exceedingly rare.
In the current age (Kali Yuga), our minds are habitually infatuated (mudha) with our bodies, wallets, and gene pools or families.2 The infatuated, or mudha, mind has neither the ability of the nirodha mind to look right into the heart of things nor the capacity of the ekagra mind to slice like a laser through mere appearances to arrive at their deepest layer. The mudha mind tends to superimpose past conditioning onto present sensory input. In other words, it usually lives in the past, relating to its fear and guilt, or in the future, projecting its desires onto the present. The scriptures say that those who live in the Kali Yuganeed clear instructions to perform all actions, such as asanas, correctly. The Shiva Purana, for example, says that during the Kali Yuga one’s actions can be crowned by success only when they are performed with utmost precision.3 There is a special class of scriptures, called the Tantras, in which every single act performed by humans is described in detail.
India’s Tantric phase was characterized by the analysis and deconstruction of accepted beliefs and systems of thought.4 Interestingly enough, the same tendency surfaced, albeit much later, in the West in the form of Western science. Since Western anatomical inquiry allows us to fulfill the directive of the Shiva Purana and other texts — that is, to perform our actions (in this case, asana) with utmost precision — it should be one of the tools of modern yogis. For most of us, anatomical inquiry into asana provides the best way to practice postures precisely, without pain or injury.
This chapter will provide you with the tools you need to use anatomical inquiry to illuminate your asana practice. It identifies the various forms of pain and explains why pain during asana practice needs to be avoided. It then explores the relationship between the postures of the Intermediate Series and the parts of the body on which these postures focus. This sets the stage for the remainder of the chapter, which goes into the anatomical details of these parts of the body and discusses the various issues that may arise during asana practice, including injuries and the limitations imposed by anatomical abnormalities. Youwill find many tips for performing the most challenging postures in the series as well as suggestions for rehabilitation. I deem this chapter one of the most important and practical in the book and recommend that you revisit it often.
Do Postures Have to Be Painful?
There is a widespread misconception that postures should be painful. As a rule of thumb, postures should not be painful, which is something that even the ancient masters pointed out. Patanjali states in Yoga Sutra, “heyam duhkham anagatam,” which means that new suffering needs to be avoided.5 The reasoning behind this injunction is simple. Every experience you have forms a subconscious imprint (samskara). Every subconscious imprint, whatever its content, calls for its own repetition.
This means that if you frequently practice postures in a way that causes pain, you will create more pain in your postures in the future. The adage “No pain, no gain” may work in some areas of life, but applied to asana it becomes destructive. Apart from damaging bodily tissues, you may become more and more preoccupied with pain and with the body if you imprint pain into your subconscious again and again. All intense physical sensations call for more identification with the body. The goal of yoga, however, is not to increase this identification. It is to perfect the body so as to transform it into a capable and reliable vehicle on the road to freedom. Think of your body as akin to your car: the better you treat it, the better it will run. You need to service it regularly, maintain fluid levels, and correct tire pressure. Treating the body respectfully does not mean identifying with it. If you identify with your body, it becomes an obstacle to spiritual evolution, not a vehicle for it. This is nowhere clearer than at the moment of death, one of the key moments in terms of spiritual evolution. If you have not learned detachment from the body, dying will not elevate you. This potentially most powerful moment then becomes a painful experience.
Another scriptural injunction against pain appears in the Bhagavad Gita. The Supreme Being in the form of the Lord Krishna criticizes those who torture the body.6 He, as the true self of the world, lives as the self in our hearts and thus lives in every body. Those who cause pain to the body desecrate his abode. This has led to the notion of the body as the temple of God. We need to treat our bodies as we would the home of the Supreme Being.
There are three types of unpleasant physical sensations that can occur in postures. I call them (1) creative discomfort, (2) unnecessary pain, and (3) necessary, karmic pain.
CREATIVE DISCOMFORT
In asana it is important to recognize the difference between pain and discomfort. When you stretch a muscle or hold a demanding strength posture, there is necessarily a certain amount of discomfort involved. This discomfort comes from stretching the muscle or making it stronger, both of which are among the goals of the practice. In regard to asana, therefore, we may say, “No discomfort, no gain.” (Postures that are to be held for a long time for the purpose of pranayama and meditation are an exception; they need to be completely comfortable.) If the discomfort crosses the line into pain, on the other hand, injuries can happen. This is particularly true if the pain is felt in a joint, ligament, or tendon. If you feel pain, you need to back off or adjust the posture and work more precisely so that you can return to the zone of discomfort. Anatomical knowledge guides this process.
Practitioners should analyze the postures and continually correct their performance of them until awareness is spread all over the body. When that happens, the body is hardly felt anymore. This sounds paradoxical, but you feel the body mainly when something is wrong. The absence of negative feedback means that everything is okay. When the body is correctly aligned, a feeling of stillness and firmness yet vibrant lightness arises. The mind becomes luminous, still, and free from ambition and egoic tendencies. This is the state that you are looking for. It is conducive to meditation. When this quality is achieved in a posture, that posture is fit as a platform for the higher limbs of yoga.
There is no point in waiting for this state to suddenly and miraculously appear by performing the same faulty postures again and again. From a faulty action, no correct result can be achieved. Faulty postures cause more faulty postures in the future.
UNNECESSARY PAIN
Any pain experienced in joints, ligaments, tendons, and at the origins and insertions of muscles is likely to be unnecessary pain. This type of pain accounts for the vast majority of pain experienced in asana. It is completely avoidable and almost always due to faulty technique. This may sound like a steep claim, but this type of pain can easily be recognized because it disappears in due time when postural alignment is analyzed and corrected. For this reason, you should always assume that the pain you experience when executing a posture is in the category of unnecessary pain. All such pain can be avoided by applying the tool of anatomical inquiry into posture. If unnecessarily painful practice is continued, an already existing negative tendency — toward self-torture, perfectionism, or egotism, for example — may be increased instead of reduced.
NECESSARY, KARMIC PAIN
This form of pain is more difficult for Westerners to understand, as it involves the concept of karma. Through our past actions, words, and thoughts, we have created who we are today, including, according to Patanjali, the type of body, span of life, and form of death we will experience. When Patanjali stated that future pain is to be avoided, he did not elaborate about past pain. Past pain in this context is the pain that we have created through our past actions. It may be experienced now or in the future. We cannot change our past actions. Once the seeds of our actions have sprouted, the karma associated with those actions cannot be intercepted, and the pain resulting from them needs to be endured — not grudgingly endured but willingly accepted as ordained. If it is willingly accepted, it will lead to a karmic purification, to a burning of the old karma associated with that pain.
Occasionally in life we have to go through letting-go processes, and they are not complete without painful sensations. Grief is an example of such a process. Nobody will doubt that a possibly lengthy grieving process, during which we learn or come to terms with letting go, follows the death of a loved one. These processes can come to a conclusion only if we willingly and consciously enter into them.
Karmic pain in asana is that pain that cannot be removed by anatomical inquiry and attention to detail. If you have done everything in your power to correct the posture and the pain still persists, it may be necessary, karmic pain, something you may have to go through. It is very challenging for a yogini to know that she has done everything in her power and yet continues to suffer. Many people at this point will stop practicing because they feel unfairly treated. If you manage to continue your practice, you are fostering tapas, the ability to sustain your practice in the face of adversity. If you refuse to work through karmic pain and simply endure it, your yogic progress may stagnate.
Yoga in this regard is similar to a marriage. When you get married, you commit to sticking with your partner through good and bad times. The same unwavering commitment is necessary in your asanapractice. However, it needs to be an intelligent commitment. You need to be able to clearly identify whether the pain is the avoidable result of faulty technique or whether it is caused by demerit accumulated in the past. You can achieve this by doing everything in your power to make sure that you perform asana correctly and are therefore sure beyond doubt that avoiding the pain that you experience is not possible.
A word of caution: If you do not correctly identify your pain, you may make matters worse. Again, the overwhelming majority of pain experienced during asana is unnecessary and due to faulty technique. Never accept that your pain is karmic until you have ruled out beyond doubt that it is caused by poor alignment. This point shows the importance of anatomical inquiry. If your understanding of the anatomical principles of the body and the posture under discussion are sound, you will know whether you have done everything to avoid the pain. Anatomical knowledge must be used to determine whether pain is karmic or not.
The instruction given in the previous paragraphs may easily lend itself to abuse. Often students are only too happy to believe that their pain is necessary, as this way they don’t have to take responsibility for changing their approach to asana. For the correct identification of pain, consult a qualified yoga instructor steeped in the study of anatomy and alignment. This section in no way constitutes medical advice. If you experience any ongoing pain, consult your physician.
Anatomical Foci of the Intermediate Series Postures
On an anatomical level, the Primary Series focuses on lengthening the hamstrings, opening the hip joints, and establishing the bandhas. The Intermediate Series expands this focus to the spine, the sacroiliac joints, and the shoulder joints, while giving intensified attention to the hip joints.
Recall the outline of the Intermediate Series given in the Introduction. There I noted that of the seven distinct sequences making up the Intermediate Series, three form the core of the series, while the remainder serve as “connective tissue” linking these core parts together. These three core parts are the backbending sequence (eight postures), the leg-behind-head sequence (three postures), and the arm-balancing sequence (four postures). The backbends are the postures that work primarily on the spine and the sacroiliac joints; the leg-behind-head postures are those that further open the hip joints (while also working on the sacroiliac joints); and the arm balances are the postures that give attention to the shoulder joints.
These three core sequences, or posture themes, are primarily what produce the defining effect of the Intermediate Series of postures — the purification of the nadi system. If you can become proficient at the postures making up these three themes, you will enjoy the benefits of this series of postures. None of the three themes is easy, and sometimes students are so eager to progress that they attempt them while yet ill prepared. Apart from listening to the advice of your teacher, understanding the information in the remainder of this chapter will be a helpful aid in learning to practice these postures correctly.
In the rest of the chapter, I look sequentially at the four major parts of the body — the spine (particularly the thoracic spine), the sacroiliac joint, the hip joint, and the shoulder joint — on which the core sequences of the Intermediate Series focus. I explain the structure of each of these body parts and how it functions, focusing in particular on information useful in practicing the postures correctly, avoiding injury, and healing existing injuries. Table 3 on the next page indicates which Intermediate Series postures focus on each of these body parts.
The Spine
Knowledge of the spine’s various movements and restrictions is important in backbending, and it is also applicable in forward bending and twisting. Let’s look first at the thoracic spine, which is inherently less flexible in extension than the cervical and lumbar spines.
Anatomically, the vertebrae of the thoracic spine are wedge shaped, thereby forming its kyphotic (bent forward) curve. Here, long, overlapping spinous processes add stability and prevent extensive backward arching. Additionally, the almost vertical plane of the facet joints is specifically designed for rotation versus extension, as this facilitates the varied activities we perform with our upper limbs. Finally, the attachment of the ribs to the vertebral bodies and the sternum form a stable cage to house our most vital organs.
Since the armor of the heart prevents the thoracic spine from arching, you need to consciously distribute part of your effort in backbending toward your rib cage and thoracic spine. If you do not make a conscious effort to do so, your backbend will translate into your lumbar spine, which is weak and unsupported and thus prone to overstretching.
The thoracic spine is especially designed for flexing forward and for actions that require twisting. The ability to rotate or twist our thoracic spines gives us a much greater range of motion in the use of our upper limbs and hands. The wedge-shaped vertebral bodies forming a kyphotic curve, the long overlapping spinous processes, and the attachment of ribs make the chest much less suited for extension (20–25 degrees extension compared to 30–40 degrees flexion). Additionally, the angle of the facet joints (nearly vertical with a front-to-back orientation) provides an uninterrupted surface for these articulations to glide and for rotation to occur easily. In comparison, the lumbar facet joints have a side-to-side orientation, which prevents rotation and promotes flexion and extension.

In general, the magnitude of rotation in the thoracic spine decreases in a head-to-tail direction. The lowermost thoracic vertebrae, T12, has its superior facet joints at the angle of a thoracic vertebra and its inferior facets at that of a lumbar vertebra. This transitional segment also takes the brunt of many opposing muscular forces that attach into this area and is thereby prone to dysfunction and/or instability. Additionally, the diaphragm muscle influences one’s ability to twist freely because of its horizontal plane and position in the floor of the thoracic cage. Practically speaking, all of the above means that when performing twists you need to carry as much of the action out of your lumbar spine, which is unsuited to twisting, and up into the thoracic spine.
SCOLIOSIS
If you find twisting to one side much harder than twisting to the other, you may have scoliosis. Scoliosis is a deformity of the spine that involves lateral or rotational curvatures. Whether you experience discomfort or dysfunction from your scoliosis depends on the severity of the angle of the curve(s) and whether or not your body has compensated successfully.
If you have scoliosis, do not follow your tendency to go deeper on your flexible side; instead, follow the general rule to balance the extremes and work on your weaknesses. Also, find out whether the scoliosis is structural or functional. A structural scoliosis is one caused by the underlying structure, meaning the bones. In a structural scoliosis the sacrum is not level. Eighty percent of structural scolioses are idiopathic — that is, the cause is unknown. The remainder are usually caused by congenital abnormalities (present at birth) or are secondary to another condition, such as cerebral palsy. A small minority of structural scolioses are due to anatomical leg length discrepancies (LLD). If one leg is longer than the other, the pelvis and the sacrum will be raised on that side. The L5 vertebra will be slightly tilted toward the side of the shorter leg. Depending on the severity of the leg length discrepancy, the entire lumbar spine may curve toward the side of the shorter leg, with the thoracic spine balancing into the opposing direction as a compensatory mechanism to keep the spine upright and the head level. The compensating vertebrae are also usually rotated. A structural scoliosis can also be caused by an asymmetry or deformity of the pelvic bones.
A functional scoliosis is one in which an imbalance of the pelvic or spinal musculature is responsible for the lateral spinal curve. A tilt of the pelvis can, for example, be caused by the left adductor muscles and the right abductors being tight and chronically in spasm. This will result in the pelvis being lifted on the left side, especially if the opposing muscle groups (the right adductors and the left abductors) lack tone and strength.
Yoga practice cannot change the underlying cause of a structural scoliosis, but it can alleviate symptoms, reduce discomfort, and prevent degeneration. If you have a structural scoliosis, practice asymmetrical postures to strengthen weak areas.7 When you are performing symmetrical postures, your stronger side will always perform the bulk of the work, and thus the imbalance will be exacerbated. When you perform asymmetrical postures, you can target each side separately, exercise your weak side more, and so work toward a state of balance. You are likely to need a program of therapeutic exercise that can be done as a warm-up before your vinyasa practice.
A functional scoliosis can be corrected by resetting the muscles to their proper tone. Yoga can help you to stretch tight muscles and strengthen weak ones. If you suffer from a functional scoliosis, analyze all forms of physical labor and recreational activity that you engage in for imbalance. Change sides for some time and see what influence that has. If you are a gardener, start using the shovel with the other hand. Change the side on which you carry your bag or, if possible, abandon handbags altogether and switch to backpacks. If you have young children, change the side on which you carry your baby. It is very common for a mother to twist her pelvis by carrying her baby exclusively on one side.
If you are an Ashtanga Mysore–style teacher, change the leg that you place in front when adjusting Supta Kurmasana and drop-backs. Inevitably you will twist your pelvis when you always use the same leg. I used to place my left foot in front when adjusting, and consequently suffered from pelvic obliquity, colloquially referred to as a twisted pelvis, for a long time. I had to place my right foot in front for one year to become balanced. Since then I have frequently changed sides.
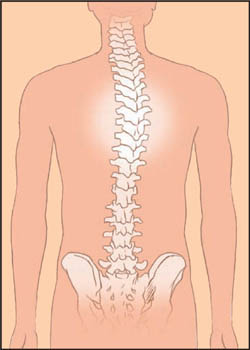
FIGURE 1: Example of scoliosis

FIGURE 2: The role of facet joints in twisting
Compared to the thoracic spine, the lumbar spine is much more unstable. Injuries of the intervertebral discs are far more common in the lumbar spine. This is due to the absence of the protective corset of the rib cage. The yogi has to train the abdominal muscles to the extent that they give the lumbar spine all the necessary support it needs to avoid damage. Such training is given through application of Uddiyana Bandha; the vinyasa movement of jumping back and through; leg-behind-head postures; and arm balances. Most important, the yogini needs to use abdominal bracing during backbending. Through abdominal bracing, backbending is distributed from the lumbar spine to the thoracic spine. Abdominal bracing is different from tucking in the abdomen. Tucking in the abdomen does not support the low back. The main difference between the two is that during abdominal bracing you bear down with the diaphragm, thus increasing intro-abdominal pressure. Tucking in the abdomen requires sucking up the diaphragm into the thoracic cavity. Bearing down with the diaphragm not only stabilizes the low back but also (through increase of intra-abdominal pressure) draws the lumbar vertebrae away from each other and thus takes pressure off the lumbar intervertebral discs during backbending.8
The Sacroiliac Joints
The sacroiliac (SI) joints are essential for backbending. They also play a major role during leg-behind-head postures and twisting. If forward bending is not executed properly, it can lead to strain of the sacroiliac joints. A proper understanding of the movements and function of these joints is therefore necessary for all yogis.
The sacroiliac joints form an integral part of the pelvic girdle. The pelvic girdle is connected to the spine via the sacrum and to the lower extremities via the hip joint. The upper part of the pelvic bone is called the ilium, and its articulation with the sacrum forms the sacroiliac joint. The sacrum is actually an extension of the spine, being composed of the fusion of five vertebrae. It is wedged in between the two pelvic bones. The coccyx, or tailbone, attaches to the end of the sacrum and is usually made of three small vertebrae.
We will look at the pelvic bone first. Before skeletal maturity the pelvic bone consists of three un-united bones, which eventually fuse to form the pelvis. This is reflected in the three names given to the different parts of the pelvic bone: the ilium, ischium, and pubis. The acetabulum, with which the head of the femur articulates, sits in the lower, lateral aspect of the ilium. The four spines of the ilium provide points of origin for many muscles.
The ischium (sit bone) is the lower (inferior), rear (posterior) part of the pelvic bone. The adductor magnus and the hamstring muscles originate here. The pubic bone is the inferior, anterior part of the pelvic bone. Here the two halves of the pelvis join via a cartilaginous pad. The adductor muscles insert at the pubis along with the muscles that form the pelvic diaphragm.
The wedge-shaped sacrum connects to the lumbar spine via the L5 intervertebral disc and to the coccyx, which Western scientists allege to be a rudimentary leftover of a tail.9 The sacrum has a kyphotic shape. It is part of the primary curvature that the infant acquires in the womb, where the entire spine is curved in this direction. The thoracic spine is the other area of the spine that has retained its primary curvature. Two areas of the spine adapt to a lordotic (bent backward) curvature during the maturation process to produce the double-S curve of the spine of the upright walking hominid. The lordotic curve of the cervical spine begins to form during infancy with the constant effort of lifting the head while lying on the belly; it is necessary to support our heads in an upright position. The lordotic curvature of the lumbar spine begins to form when we stand upright and start to bear weight in an upright position.

FIGURE 3: Sacroiliac joints showing joint movement
The sacroiliac joint is composed of two auricular (ear-shaped) articulations, which form a relatively rigid joint between the sacrum and the two ilia. The open sides of the semicircular, boomerang-shaped joints face backward, in the opposite direction of the kyphotic sacrum. When we look at the sacrum from the side and draw a horizontal line through both joints, we can understand that the joints enable the sacrum to perform up to 10 degrees of rotation around this axis.
The SI joint is unusual because the lower third of the joint is a synovial type of joint (consisting of a joint capsule containing fluid), while the upper portion resembles a fibrous joint (consisting of connective fibers). In childhood it has all the characteristics of a synovial joint. This changes between puberty and young adulthood, and with age the SI joints develop intra-articular grooves and interdigitating bony growths (osteophytes), and become increasingly fibrosed and less pliable. The resultant reduction of mobility develops as an adaptive, stability-promoting response to the stresses of weight bearing. Anthropologists use the condition of the SI joint as a reliable indicator of the approximate age of a specimen.
The SI joint provides two functions: stress relief within the pelvic ring, and (along with the pubic symphysis) shock absorbance between the lower limbs and the spine. It is principally a ligamentous joint, supported and stabilized by strong ligaments. Some are primary stabilizers that cross the joint, while others act as guy-wires to surrounding structures. The stabilizing action of the muscles surrounding the SI joints is based on their attachments to the fascia and ligaments. The only muscle that spans the joint itself is the piriformis, which originates on the anterior aspect of the second to fourth sacral tubercle and inserts onto the greater trochanter of the femur.
Some describe the SI joint as a friction joint. The forces that act on the joint, associated with weight bearing and the stresses placed on ligaments and muscles that attach to surrounding structures, tend to force the joint closed. Thus, the SI joint is stabilized by its form (angle, grooves, and later osteophytes) and the force of the ligaments and muscles that increase the friction between the joint surfaces when weight bearing is added.
It is important to understand the movement of the sacrum in relation to the ilia (hip bones) on either side. When the spine flexes, as in forward bending, the ilia move in the opposite direction — that is, backward. The opposite occurs with backbending: the ilia roll forward. For this reason, “jutting out” the pubic bone in backbends is contraindicated. Doing so causes the ilia to move in the same direction as the sacrum, preventing normal function of the SI joint. This reciprocal flexion–extension pattern causes each side of the pelvis to rotate slightly out of phase with the other while we are walking. Some musculoskeletal specialists describe the kinesthetic action of the sacrum with its articulating ilia as “floating.” This is a wonderful image to keep in mind when practicing both forward and backward spinal movements, because it helps to keep a harmonious relationship of movement between the sacrum and ilia at the SI joints.
Another important concept of sacral movement is nutation. When the pelvic bone is stationary and the top edge of the sacrum moves forward and down around this axis, this movement is called nutation (bowing, nodding).10 If the top of the sacrum returns from nutation and moves backward, the movement is defined as counter-nutation. Nutation is a flexion-like movement, and counter-nutation an extension-like movement. The differing terms were chosen because the range of the movements involved are too insignificant for them to be called flexion and extension.
When we look at the sacrum from above and draw lines through the SI joints, we notice that the lines meet at an angle of roughly 45 degrees. This means that a movement of the sacrum around the horizontal axis will change the position of the two sides of the pelvic bones relative to each other.
If the sacrum nutates (bows forward), it will pull the ilia toward each other. Since the ilia and the ischia are fused as one unit, the drawing together of the ilia will pull the ischia apart from each other, a movement that in yoga is dubbed as the “broadening of the sit bones.”
This movement occurs during childbirth (parturition), and examining how it works enables one to more clearly understand the reciprocal movement of the ilia and the sacrum. In the early stages of parturition, when the head of the baby enters the pelvic bowl, the sacrum counter-nutates (bows backward). This counter-nutation draws the ilia apart and thus opens the top of the pelvic bowl to give more space for the baby’s head. When in the final phase of the birth the head passes through the birth canal, the sacrum nutates. This nutation has two effects. The moving together of the ilia squeezes the baby down from above, aiding its passage, while the broadening or moving out to the side of the ischia provides a wider opening for the passing of the head of the baby.
We have observed during our yoga teaching that those females who are very proficient in backbending and nutation of the sacrum (all else being within normal limits) tend to give birth easily, whereas those who have difficulties in sacral nutation tend to find giving birth more challenging. Perhaps it would be wise to establish a high culture of backbending in females as a preparation for giving birth.
There are other important functions of nutation and counter-nutation of the sacrum. One of these is that this movement enables the sacrum to act as a pump for cerebrospinal fluid (CSF). The brain floats in cerebrospinal fluid, which nourishes, removes toxins from, and protects the brain with its shock-absorbing qualities. The pulse of the cerebrospinal fluid, which occurs about eight times per minute, also has a massaging or stimulating quality. It is important for the sacroiliac joints to be mobile to perform the oscillation of the cerebrospinal fluid. In this way the sacrum acts as a CSF pump.
When the cerebrospinal fluid does not properly pulse, the individual will have more adverse reactions to stress, tire more quickly, and be more susceptible to aggressive behavior or depression. We believe that the health of the sacroiliac joints contributes to the overall well-being of the individual. It is important to mention that aggressive backbending, like other forms of aggressive exercise, can have a detrimental effect on the sacroiliac joints and thus on the entire organism.

FIGURE 4: Sacrum movement and the pulse of cerebrospinal fluid
Although contraction of the erector spinae pulls the sacrum forward, contributing to a nutational force, there is no muscle that directly performs this action. Such a muscle would need a position that would impinge on the integrity of the female reproductive system. The muscle that can strongly affect the action of nutation, therefore, originates higher up on the lumbar vertebrae and, circumnavigating the uterus, travels through the pelvis and attaches at the lesser trochanters of the femurs. It is the psoas.
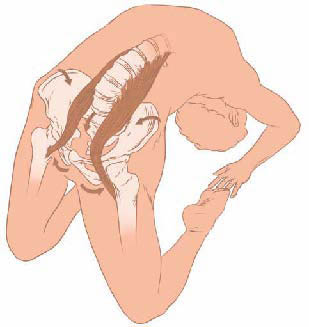
FIGURE 5: The psoas in relation to sacroiliac-joint movement
The lower fibers of the psoas in particular are in an ideal position to pull the upper part of the sacrum in the anterior direction (forward). However, a muscle that also inserts at the lesser trochanter of the femur, the iliacus, and is usually used together with the psoas, will pull the entire pelvic bone and thus the ilium forward. This will make our attempts to nutate the sacrum futile. The iliacus therefore must be released, while the psoas is engaged. This is possible because different nerves innervate the two muscles. The psoas is innervated by the branches of the lumbar plexus, a group of nerves that exit the spinal cord at the levels of the first to fourth lumbar vertebrae. The iliacus is innervated by the femoral nerve, which shares the same nerve roots at L2 to L4.
When you engage the psoas separately from the iliacus, the ilium has a tendency to follow the sacrum forward. If you are initially unable to isolate the iliacus and release it, allowing the sacrum to “float” in the SI joints and the natural reciprocal movement of the ilium to take its natural course, try gently drawing the pelvis down in the back. I suggest performing this action by ever so slightly engaging the hamstrings, rather than the gluteus maximus, because the gluteus externally rotates the femurs.

FIGURE 6: The iliacus in relation to sacroiliac-joint movement
The Hip Joint
The hip joint performs the essential function during leg-behind-head postures. If the hip joints are opened properly, there is no or very little pressure on the various segments of the spine. If the movements and limitations of the hip joints are not properly understood, execution of leg-behind-head postures can lead to subluxated vertebrae and damage to the intervertebral discs.11
The hip joint consists of the femur, which is articulated by its large, spherical head with the acetabulum (socket of the hip joint) of the pelvis. The right and left halves of the pelvic bone are each divided into three parts. The upper part is the ilium, the lower anterior part is the pubis or pubic bone, and the lower posterior part is called the ischium. All three bones of the pelvis intersect and form part of the acetabulum. The deep socket of the acetabulum stabilizes the femoral head and is surrounded by an extensive set of capsular ligaments. Many forceful muscles insert onto the pelvis and around the hip joint. These provide the necessary torques needed to propel the body forward and upward. Weakness in any of these muscles has profound impact on the mobility of the body as a whole.
RELATIONSHIP OF UDDIYANA BANDHA TO SACRUM NUTATION
In Ashtanga Yoga: Practice and Philosophy, Uddiyana Bandha was defined as the engaging of the lower part of the transverse abdominis muscle. For novices it is essential to isolate this part of the muscle not only from the upper part but, more important, from the rectus abdominis (six-pack muscle, or “abs”). The rectus abdominis will lift the pubic bone up toward the chest and flatten out the lower back, which means it counteracts nutation of the sacrum. The lower part of the transverse abdominis, however, attaches mainly over fascia at the anterior superior and anterior inferior iliac spines (ASIS and AIIS, respectively). The ASIS especially move toward each other during nutation of the sacrum. Uddiyana Bandha, if correctly implemented, will encourage and support nutation, whereas to mistake Uddiyana Bandha with the indiscriminate contracting of all abdominal muscles will oppose it! A sophisticated understanding and performance of Uddiyana Bandha rather than a “tucking in” of the entire abdomen is necessary to foster nutation of the sacrum.

FIGURE 7: The lower transverse abdominis in relation to sacroiliac-joint movement
The femur is the longest and strongest bone in the human body. The head of the femur is connected to the shaft via the femoral neck. The neck serves to displace the femur laterally away from the hip joint to reduce the likelihood of any bony impingement against the hip joint. Anatomically, leg-behind-head flexibility may be limited by a short, less concave femoral neck, as it will come in contact with the hipbone earlier and thus limit further movement. This needs to be understood especially by teachers giving leg-behind-head adjustments to their students and also by students who are practicing forcefully. The sensation of encountering a bony obstacle to movement is completely different from that of movement being limited by ligaments, muscles, adipose tissue, or even lack of support strength. A teacher needs to be able to determine, by the quality of the barrier, the type of tissue that is obstructing progress.
The angle between neck and shaft (angle of inclination) is about 125 degrees and causes the femoral shaft to be angled inward (medially), giving optimal alignment for the hip joint surfaces. The angle of inclination places the knees and feet closer to the midline of the body, which allows humans to walk upright without leaning from one side to the other as apes do. An angle markedly less than 125 degrees, termed coxa varus, causes the knees to bow out. An angle markedly greater is called coxa valgus and causes a knock-kneed condition.
The neck of the femur points not exactly out to the side but slightly backward if we choose the hip joint as the reference point. Viewed in the standing (anatomical position) from above, the relative rotation (twist) that exists between the neck of the femur and the shaft is called torsion angle. In conjunction with a normal angle of inclination this affords optimal alignment and congruence of the hip joint. The degree of torsion is normally approximately 12 to 15 degrees and is called normal anteversion.12 A torsion angle significantly greater than 15 degrees is called excessive anteversion and often produces a compensatory toe-in posture and gait. Excessive anteversion hampers the ability to place one’s leg behind the head. In contrast, an angle significantly less than 15 degrees is in retroversion and may produce an externally rotated leg posture with a toe-out gait. This angle complements leg-behind-head postures. This torsion angle allows a person to place her leg not only behind the head but way down the back if she radically combines three of the movements of the hip joint (flexion, abduction, and external rotation). Through this movement, the hip joint is taken through its entire range of more than 180 degrees.
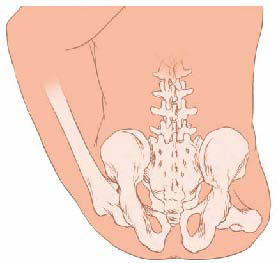
FIGURE 8: The hip joint during leg-behind-head postures
The opening of the hip joint is an important goal in Ashtanga Vinyasa Yoga. If, however, the force of an adjustment is obstructed by the shape of the participating bones, this force may be diverted. Typical locations that receive the stress of the force during leg-behind-head adjustments are the lateral longitudinal (collateral) ligament of the knee, the lateral semilunar cartilage (meniscus), the sacroiliac joints, and the lumbar intervertebral discs. All of these are potentially vulnerable and sensitive structures. If damaged, their repair requires considerable time, as ligaments and cartilage have limited circulation, which is of course necessary in the healing process. A ligament or sacroiliac joint sprain, for example, may take six weeks to stabilize or heal. Additionally, scar tissue is never as strong as original healthy tissue. It is therefore wise to proceed with caution in leg-behind-head postures. Needless to say, this is also valid for backbending and other areas of yogic asana practice.
The axis of pelvic movement is the hip joint. An unlevel or oblique pelvis is another issue that may cause asymmetry in flexibility in leg-behind-head postures. This may be due to a sprain, instability, or fixation of the sacroiliac joint. Additionally, symptoms of knee, sacroiliac joint, groin, or low-back pain may arise if the pelvis is torqued or twisted. A malpositioning of the sacrum in relation to the pelvis can also be a source of problems. The sacrum is the axis of spinal movement. Its correct position in the pelvis is therefore paramount to full and optimal function of both the spine and the pelvis.
As described previously, the pelvis is made of two separate bones (innominates) that articulate with the sacrum in the back and are joined in the front by a fibrocartilage pad, forming the pubic symphysis. This allows substantial scope for the innominates to move. Because of their attachments, these composite parts act as one unit and therefore, the position of one part will affect the motion and/or position of the other. Additionally, all of the muscles that attach to the pelvis act as guy wires in providing support and stability. Any change in position of either innominate will cause particular muscles to be lengthened or shortened. If the ilium (upper part of the pelvis) moves backward, it is referred to as a posterior tilt of the pelvis, which is accompanied by a forward movement of the pubic bone. If, for example, one ilium is positioned posterior and therefore inferior to its counterpart, the muscles that attach to the front of the ilium will be drawn taut, while the muscles on the posterior side will be shortened and contracted. Because of the angle of the femur in the hip joint, a posterior inferior ilium will draw the leg on that side upward, causing a functional leg-length discrepancy. The psoas and/or quadratus lumborum muscles may also go into spasm. An innominate may also flare out to one side, which will cause the groin muscles to be stretched and taut with the external hip rotators shortened and contracted.
The Shoulder Joint
The shoulder joint carries most of the workload during arm balances. Arm balances are very important and beneficial; unfortunately, however, long-term Ashtanga practitioners frequently give up performing them due to shoulder problems. These problems can be avoided or, if incurred already, the shoulders can be rehabilitated through proper anatomical understanding and ensuing action.
The shoulder joint is described as a ball-and-socket joint, similar to the hip joint. The difference between these joints is the vast range of movement in all directions that the shoulder joint has compared to the hip joint. Since range of movement is always a trade-off against stability, this also means that the shoulder joint is much less stable than the hip joint due to its minimal osseous support.
The socket of the shoulder joint is formed by the glenoid fossa of the scapula, in which the head of the humerus (arm bone) is located. To enable the arm’s enormous range of movement, the glenoid fossa of the shoulder joint is much more shallow than the glenoid cavity of the hip joint, the acetabulum. The actual shoulder socket cannot prevent the dislocation of the head of the humerus as the hip socket can do for the head of the femur. Therefore, the labrum, joint capsule, ligaments, and a complex of tendons take on the function of keeping the head of the humerus in position. The labrum of the glenoid fossa is a fibrocartilaginous pad, analogous to the meniscus of the knee. It lines the glenoid fossa, deepening the concavity for the humeral head and thereby stabilizing the joint. The biceps tendon inserts into the labrum and serves as a crucial anterior support for the shoulder joint. Additionally, active support is provided directly through the capsular integration of the rotator cuff muscles. The rotator cuff muscles insert into the joint capsule. These are the supraspinatus, infraspinatus, teres minor, and subscapularis muscles. Contraction of these muscles tightens the capsule, which has a stabilizing effect. Besides having a stabilizing role, the rotator cuff muscles also perform dynamic movements. The supraspinatus mainly performs abduction; the infraspinatus and teres minor both perform external rotation; and the subscapularis performs internal rotation of the humerus.
The shoulder joint is only indirectly connected to the axial skeleton (spine, thorax, and pelvis) through the clavicle (collarbone), which is joined distally to the acromion process of the scapula and proximally via the sternoclavicular (SC) joint to the sternum. There are in fact three joints and one “articulation” that make up the shoulder girdle. These are the glenohumeral joint, the acromioclavicular (AC) joint, the sternoclavicular joint, and the scapulothoracic articulation — that is, where the scapula glides over the thoracic cage. These four work together to permit the full range of motion appreciated at the shoulder joint. Function of the shoulder joint is dependent on coordinated integration of this complex of joints as well as an integrated, position-dependent system of ligaments, muscles, and tendons that provide stability.
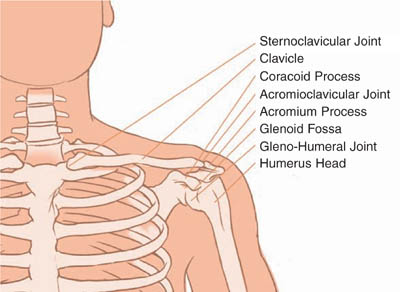
FIGURE 9: The shoulder joint
Besides permitting the actions of protraction and retraction of our arms, movement of the scapula also enables us to raise our arms above our heads. For the first 30 degrees of abduction, the scapula seeks a stable position on the rib cage via contraction of the trapezius, rhomboid, and serratus anterior muscles. Beyond 30 degrees, for every two degrees of abduction of the humerus, the scapula moves one degree laterally and superiorly on the back of the chest. Abduction is performed by the supraspinatus and deltoid muscles. The fact that the scapula “swims” on the posterior aspect of the thorax with almost no limitation to its movement poses the main problem in prevention and rehabilitation of shoulder joint injuries. It led the American orthopedic surgeon Dr. Stephen Michael Levin to develop the model of the scapula as a sesamoid, a floating bone.13
Sesamoid bones are bones that are not directly attached to other bones, their movements being solely guided by the attached bones and ligaments. Examples of sesamoid bones are the patella (kneecap) and the hyoid bone in the neck. Levin compared the scapula to the hub of a bicycle wheel, which is placed in position by a network of spokes. The spokes can be tightened or released, and thus the position of the hub changed. Similarly, the scapula is held in position only by the tension or tone of its stabilizing muscles. When the prime mover muscles of the shoulder girdle exert their pull on the humerus, the stabilizers maintain the optimal position of the glenoid fossa (the most lateral aspect of the scapula) as it articulates with the head of the humerus. Maintaining the proper position of the scapula allows the instant center of rotation to be maintained. These muscles are of utmost importance because, ultimately, they determine the position and thereby function of the entire shoulder girdle.
The correct functional position of the scapula influences the tone of all the muscles of the shoulder girdle. Just as the abdominal muscles anchor the anterior chest wall to enable the diaphragm to function optimally, so the rhomboids, the lower trapezius, and the serratus anterior muscles stabilize the scapula to enable the other prime mover muscles of the shoulder-girdle to perform their actions. The tone of the stabilizer muscles can be lost or become aberrant through trauma, imbalanced use, or poor posture. Once this has happened, the scapula is no longer anchored properly when the other shoulder-girdle muscles are engaged. This may result in inflammation or dysfunction of any of the structures of the shoulder (muscles, tendons, ligaments, or bursa). The action of the stabilizing muscles is unconscious, so one can correct dysfunction only by isolating and targeting the individual muscles through specific strengthening exercises. Attempting to strengthen the stabilizing muscles through general shoulder exercises alone will only exacerbate the problem.
The rhomboids are a pair of muscles of prime importance for balancing the strong muscles on the posterior surface of the rib cage. The majority of the population and especially those with desk jobs have rounded shoulders. Those with this posture will automatically have weak, underdeveloped rhomboid muscles, as rounding the shoulders places the rhomboids in a lengthened position. Additionally, many Ashtanga practitioners do not bring the rhomboids into play enough; they often perform the vinyasa movement of jumping through and jumping back without enough awareness of the importance of engaging these scapular stabilizing muscles. Concurrently, this movement encourages the use of serratus anterior and pectoralis minor together with the deltoid. These muscles become stronger and stronger while their antagonists (the rhomboids) recede more and more into the background. If such an imbalance exists, the rhomboids need to be targeted through isolated strengthening exercises.
The rhomboids originate at the spinous processes of the lowest cervical (C7) to upper thoracic (T1–T5) vertebrae and insert along the entire length of the medial border of the scapula. When contracting they adduct the scapula (draw the shoulder blades in toward the spine); they are fixed in adduction especially when the humerus (arm bone) is extended or adducted under load, such as when doing chin-ups. As this movement does not occur in Ashtanga Yoga, the rhomboids may become underdeveloped if the practitioner does not focus on the action of “sucking the heart through” or “leading with the heart” in various postures, including jumping through to a sitting posture. If the practitioner has a shoulder injury and the rhomboids are weak, he must enhance their functioning. The jump-through to sitting, however, contains too much serratus anterior activation to bring the rhomboids sufficiently into play (the serratus anterior is an antagonist of the rhomboids). Chin-ups, on the other hand, require you to suddenly lift your entire body weight without any preparation. Such intense exercises are unfortunately often performed without developing sufficient awareness. For this reason they are unsuitable for the correction of faulty motor patterns. It is more effective to exercise the rhomboids with very small weights, such as resistance bands, slowly and with maximum awareness.

FIGURE 10: The rhomboid muscles
Since the rhomboids slightly elevate the shoulder girdle, an action that in asana can lead to “hunching of the shoulders around the ears,” their action needs to be combined with that of the lower trapezius and latissimus dorsi, which depress the shoulder girdle, to have a major stabilizing impact on the scapula and thus the entire shoulder joint.
Another important muscle in the stabilization of the shoulder joint is the subscapularis. This rotator cuff muscle originates on the anterior surface of the scapula and surfaces to attach on the inside of the humoral head (the lesser tubercle). Apart from being a strong internal rotator of the humerus, the subscapularis, through its origin on the front of the scapula, is in the unique position to suck the shoulderblades (scapulae) into the back of the chest. If the shoulderblades have a winged appearance — that is, if the medial borders of the scapulae lift off the posterior surface of the thorax under load — the shoulder joint complex is not properly stabilized and shoulder injury and strain are more likely. Engagement of the subscapularis, along with the serratus anterior muscle, can correct this problem.14 Their use is crucially important during all arm balances and weight-bearing exercises.

FIGURE 11: The subscapularis muscle
The subscapularis muscle, however, should not be contracted indiscriminately, as it vigorously internally rotates the humerus. In yogic forearm balances (for example, those in the Intermediate Series), this would lead to the elbows sliding out to the sides and the hands moving together. To prevent this, the subscapularis needs to be used in unison with the infraspinatus muscle and its “little helper,” teres minor. The infraspinatus and teres minor muscles originate on the posterior surface of the scapulae and insert on the outer surface of the humeral heads (the greater tubercles). The action of these other two rotator-cuff muscles balances the inward rotation of the subscapularis and, in concert with the action of the subscapularis, stabilizes the humeri. When the insertion of the subscapularis muscle is thus fixed in space, its contraction leads to the movement of its origin, the anterior surface of the scapula. In other words, as long as the infraspinatus accompanies the action of the subscapularis, the subscapularis will suck the shoulderblades into the back, thereby functioning as an essential stabilizer of the shoulder joint.
SHOULDER INJURIES
Most shoulder injuries are caused by performing rapid movements under load. Tears of the glenoid labrum, the cartilage lining of the glenoid fossa, are often produced in the attempt to catch a heavy falling object. This object can be your own body if, for example, you fall off a chair, a ladder, or a bicycle and try to brace your fall with your arm.
Many people have decreased space between the humerus and the acromiocoracoid ceiling. This condition increases the likelihood of the joint becoming inflamed due to constant friction from exercise or repetitive movement. In all exercises where the arms are raised the supraspinatus tendon may rub against the acromion process and coracoacromial ligament and become inflamed. The insertion of the supraspinatus tendon onto the greater trochanter of the humerus has a relatively poor blood supply, making it susceptible to injury and delayed repair. Inflammation may also spread to the infraspinatus and long head of the biceps tendon. Once a tendon is inflamed it can no longer glide properly in its sheath and becomes susceptible to tear during fast movements. The body’s chemical reaction to a chronically inflamed tendon is to either lay down scar tissue in an attempt to repair the damage or to eventually calcify the tendon. These processes make future tears more likely, especially during dynamic movements that involve a humerus flexed to its maximum. These movements rarely occur in yoga, but handstand drop-backs and so-called backflips are examples.
Shoulder injuries are more common in practitioners over forty years of age. The incidence of injury is more frequent, and recovery is usually slower due to a loss of elasticity and reduced cellular activity. If you injure your shoulder, it is important that you avoid reinjuring it. If you do reinjure your shoulder while it is healing, you may set yourself back for many months. After repeated episodes, the shoulder injury will be chronic and less likely to respond to any sort of treatment.
A drawn-out shoulder injury often comes with dysfunction of the lower cervical spine. The arm and shoulder are common sites for referred pain from the cervical spine. The nerves that supply the muscles of the shoulder, arm, and hand exit the spinal cord between the lowermost cervical vertebrae. If there is any disruption to the nerve supply to the muscles, causing over- or underactivity of the muscles, the shoulder joint will be susceptible to injury and its ability to heal will be impeded. For optimal functioning of the spine, the muscles, and the nervous system, it is important that the cervical vertebrae move freely in all directions. As the shoulder-girdle muscles attach to the thorax, it is additionally important for the thoracic spine and rib cage to function optimally. The single most important way to avoid rigidity of the rib cage is to apply the three stages of breathing, drawing the inhalation all the way up into the manubrium (the uppermost part of the sternum, right under the collarbones), avoiding exclusive abdominal breathing. The important word here is exclusive. Exclusive chest breathing is of course equally detrimental. In the case of shoulder injuries any therapy must involve breathing exercises that draw the breath into the upper thorax, thus directing a wavelike healing motion of breath all the way up to the topmost thoracic vertebrae.
Another underlying cause of shoulder injury is the inability to use the abdomen as a support structure to lift weight. When we are lifting heavy weights during standing, or in fact during all strenuous actions, the abdomen forms a hydraulic system.15 Supported from underneath with Mula Bandha and by bracing in front with Uddiyana Bandha, the descending of the diaphragm during the inhalation leads to increased intra-abdominal pressure. With the glottis then partially closed to create the Ujjayi sound, the pneumatic pressure in the chest will rise at the same time and the thorax and abdomen will form one solid support structure, enabling us to lift heavy weights. This is all the more necessary in the case of yogic arm balances. The more the abdominal wall is firmed during the lifting of the body, the more the shoulders are supported and kept in an anatomically sound position during yogic arm balances.
Another common cause of inflammation of the shoulder joint is an imbalance between the muscles on the anterior surface of the rib cage (the pectoralis major and minor, and often the serratus anterior) and the muscles on the posterior surface of the rib cage (typically the latissimus dorsi, teres major, lower trapezius, and rhomboids). People often acquire this imbalance slowly through poor posture or faulty technique. One cause can be the failure to shorten one’s stance in Chaturanga Dandasana as one increases in strength.16 If the hands are kept under the shoulders, the pectoralis muscles and serratus anterior will continue to build through the constant push-up motion. Since the latissimus dorsi, teres major, and rhomboids are not getting a comparable amount of exercise, they do not grow stronger. The result will be that the anterior muscles will pull the shoulder forward and rotate the head of the humerus internally, all of which can in due time lead to inflammation.
Imbalance of the shoulder girdle may be due to trauma, such as from catching a heavy falling object, jolting the shoulder in an anterior direction, or even repeating smaller stressful movements, such as carrying a growing child. Such trauma can decrease the proprioceptive awareness of the shoulder joint.17 This simply means that you will perform asanas and believe your shoulders to be in the proper position when in fact they are not. It will be difficult to rectify your problem since you have no awareness of it. You can only deduce the problem from the presence of its symptoms, such as pain and/or eventually dysfunction. Often this pain results from the biceps tendon being pulled out of its groove by the fascia attached to the pectoralis major. It is unlikely that you can fix this problem in the practice itself. You will often need to add therapeutic exercises in which the muscles in question are isolated so that you can restore proprioceptive awareness.
As mentioned earlier, the rotator cuff muscles both stabilize the shoulder joint and produce torque forces for larger movements. An imbalance between these muscles is a common cause of shoulder problems. Inflamed shoulder joints can be due to excessive inward or outward rotation. Either can be preexisting as a postural imbalance and then lead to inflammation or can be acquired through faulty exercise technique.
Most beginners start Downward Dog with their shoulders hunched around their ears, which usually accompanies internally rotated humeri (arm bones). The problem usually starts with an overworked upper trapezius muscle (which elevates the shoulders) and the subscapularis muscles rotating the arm bones inward. If the practitioner does not correct this imbalance, the trapezius and the other muscles build up even more, increasing the already existing dysfunction. Especially during strenuous arm balances or dynamic backbends, an already existing imbalance in the shoulders can be exaggerated to the point of inflammation.
In the other extreme are avid students who analyze their imbalances and correct them excessively. There is a natural imbalance of strength in the shoulder, with the internal rotator muscles of the shoulder girdle being stronger than the external rotators. Most students will, at some point, need to externally rotate their arm bones in Downward Dog, arm balances, and backbends. The problem is knowing when this action is performed to satisfaction and then allowing one’s shoulders to settle in the neutral or balanced state. If you go beyond that point through overuse of the infraspinatus muscle (which externally rotates), friction will occur, often involving the biceps tendon. The body will now communicate its predicament through inflammation, which leads to pain and loss of range of motion.
The neutral position of the humerus in the respective postures needs to be assessed by a qualified teacher. Do not expect the practice to miraculously fix everything, a belief that would permit you to continue practicing without using inquisitive intelligence. Experience shows that in unmindful practice the exact opposite usually happens; that is, students increase their already existing tendencies and conditioning rather than counteracting them to find a state of balance.
The following points summarize what’s important to keep in mind in healing shoulder injuries:
· Avoid reinjury. The healing of shoulder injuries, especially in practitioners over forty years of age, can be very drawn out. Every time you reinjure your shoulder, you set yourself back for several more months and greatly increase the chance that your injury will become chronic.
· Shoulder injuries often have dysfunctional lower cervical vertebrae as a precipitating factor. If such a cervical joint dysfunction persists, chances of healing are reduced. See a musculoskeletal specialist.
· Shoulder injuries are often associated with the inability to draw the inhalation all the way up to the upper part of the thorax. The upper rib cage should enlarge, meaning it should increase its volume to the front and back during the inhalation. Failure to do so will lead to a lack of energy supply to the shoulder girdle.
· Make sure you use a short stance in Chaturanga Dandasana, with your hands beside your waist. This will encourage you to bring your latissimus dorsi, rhomboids, and lower trapezius more into play. Consciously focus on engaging these three muscles whenever you bear weight into the hands.
· If you have a shoulder problem, consider not lowering down into Chaturanga Dandasana but rather performing it with straight arms until your condition improves. Remove any postures and movements from your practice that aggravate your condition. Examine critically all fast dynamic movements, such as drop-backs.
· Train the weak and underused muscles by using exercises that isolate these muscles. Start with isometric exercise (where the muscle stays the same length) and progress into the use of very low weights such as graded resistance bands or tubing. Perform these exercises slowly and with maximum awareness.
· Massage and release the overworked and tight muscles daily. Include “trigger point therapy” in your daily massage. Trigger points are tender spots in the muscles that when pressed may radiate pain into areas other than that point.
In this chapter, I hope that I have created some openness toward Western anatomical inquiry. My stance is that if we can improve the effectiveness of our yoga by reducing pain and increasing precision, then we should do so, whether the tools we use are old or new.
1 For a detailed discussion of the relationship of the historical phases to stages of mind see Ashtanga Yoga: Practice and Philosophy, pp. 133ff.
2 The Indian traditional view is that the Kali Yuga, which has the Tantra as its scriptures, started five thousand years ago.
3 Shiva Purana, Vidyeshvara Samhita XI. 66.
4 Western scholars say India entered its Tantric phase in the eighth century CE. They do, however, admit that as a grassroots movement, Tantra is much older. For example, the Harappa-Mohenjodaro culture (more than four thousand years old) appears to have been Tantric.
5 Yoga Sutra II.16.
6 Bhagavad Gita XVII.5–6.
7 This approach was taught to me by Shri A. G. Mohan.
8 This is described in detail in Ashtanga Yoga: Practice and Philosophy, pp. 113–14.
9 The lumbar spine consists of five vertebrae, which are numbered from the top. The L1 vertebra borders the thoracic spine, and the L5 vertebrae is located above the sacrum.
10 The term nutation is also used to describe the third movement of the planet Earth. The first movement is its rotation around the sun; the second, its rotation around itself; and the third is a minute wobble in this second movement, which is strong enough to make us change the position of the pole star about every five hundred years.
11 A subluxated vertebra is somewhere between its ideal position and the dislocated state. The ideal anatomical position of a vertebra or in fact any joint of the body will give us 100 percent function, whereas a dislocated joint provides 0 percent function. In between these extremes are the many shades of subluxation in which some function of varying degrees exists, albeit often accompanied by discomfort.
12 Since the torsion angle describes the twist between shaft and neck of femur, the reference point used here is the shaft of the femur and not, as it is in yoga, the hip joint. The normal angle of the neck of the femur is therefore called anteverted, which means it points forward of the plane of the femur.
13 Stephen Michael Levin, “The Scapula Is a Sesamoid Bone,” Journal of Biomechanics 38, no. 8 (August 2005): 1733–34.
14 For a detailed description of the action of the serratus anterior muscle, see Ashtanga Yoga: Practice and Philosophy, p. 48.
15 Hydraulic refers to a system containing a liquid under pressure in a confined space.
16 See Ashtanga Yoga: Practice and Philosophy, p. 28.
17 Proprioceptive refers to an awareness of the placement of one’s limbs in space that does not rely on visual clues.