
Eric F. Reichman
Airway management is one of the most basic, crucial, and important aspects of emergency medicine. Without oxygen, the brain begins to die within minutes. The mission for airway management is to ensure airway patency, to protect the airway from contamination (blood, fluids, and/or food), to provide supplemental oxygen, and to institute positive pressure ventilation when spontaneous respirations are inadequate or absent. Airway management can be as simple as lifting a snoring patient’s chin or as involved as awake fiberoptic-guided endotracheal intubation.
A thorough understanding of anatomy is essential for the performance of any medical procedure. Untoward events related to a procedure are often the result of inexperience and/or an inadequate understanding of the regional anatomy, and the airway procedures are no exception. From the evaluation of external anatomic landmarks to the performance of nerve blocks for fiberoptic intubation, understanding the anatomy of the airway will result in fewer attempts at intubation and improved success with fewer iatrogenic misadventures.
CLINICAL PRESENTATION
Airway intervention is required if there is uncertainty about whether the patient’s airway patency, respiratory drive, or oxygenation can be maintained without intervention. Inadequate ventilation may occur for a variety of reasons. Spontaneously breathing patients may develop an airway obstruction caused by food, blood, secretions, or tissue obstruction as a result of the loss of the normal pharyngeal tone. Unconscious patients should have their airway secured and receive mechanical ventilation. Despite spontaneous respiration, the unconscious patient is at risk for aspiration of gastric contents. The conscious patient with airway obstruction is in obvious distress and is more likely to have an obstruction caused by a foreign body, tissue swelling from an infection, laryngeal edema, cancer, or laryngospasm.
Endotracheal intubation can be performed to administer resuscitation medications, ensure a patent airway, deliver oxygen, isolate the airway, reduce the risk of aspiration of gastric or oral contents, suction the trachea, ventilate the patient, or apply positive pressure ventilation. Other indications include altered mental status, head injury requiring hyperventilation, hypoxemia, hypoventilation, apnea, lack of a gag reflex, and unconsciousness.
ED EVALUATION
Evaluation of the airway includes an internal and external examination. The internal examination should evaluate the patient’s dentition, palate, and tongue. Note any protuberant incisors, loose teeth, broken teeth, dental work, and dental devices. Determine if the palate is normal, high and arched, or cleft. Determine if the tongue is elevated, larger, or wider than normal in comparison to the oral cavity. A common classification used by anesthesiologists to grade the difficulty of laryngoscopy and intubation involves the identification of the size the tongue in relation to the faucial pillars, the soft palate, and the uvula (1). External evaluation of the airway is a critical step to a successful intubation. External inspection should include mouth opening, atlantooccipital extension, and thyromental distance. External inspection should also identify obvious problems (e.g., cervical collars, face and/or neck trauma, severe micrognathia, massive obesity, etc.). Please refer to Chapter 1 for a more detailed discussion of this topic.
There are numerous differences between the adult’s and the child’s airway (2). The head-to-body ratio is larger in the child, which results in neck flexion when the child is supine. Placing a rolled towel under the child’s shoulders will correct the flexion. Children have a small mouth with a relatively large tongue when compared to an adult, making orotracheal intubation difficult. The presence of adenoidal tissue in the child makes nasotracheal intubation difficult and orotracheal intubation the preferred method. The most important difference is that the narrowest portion of the infant and child’s airway is below the vocal cords at the cricoid cartilage. In an adult, the narrowest point is at the level of the vocal cords. An endotracheal tube (ETT) may pass through the vocal cords of a young child but might not advance past the cricoid cartilage because of normal anatomy. Forcing an ETT past the vocal cords might result in trauma to the airway and subsequent tracheal stenosis. The child’s laryngeal inlet is narrow and more susceptible to obstruction. The U-shaped epiglottis and a more acute angle between the epiglottis and glottis cause the aryepiglottic folds to be more midline. Children have a relatively shorter trachea, making both right main bronchial intubation and accidental extubation much easier. The narrower diameter of the trachea with smaller spaces between the cartilaginous rings makes a tracheostomy more difficult to perform.
Traditional teaching holds that cuffed ETTs increase the risk of ischemic damage to the tracheal mucosa due to compression between the cuff and the cartilaginous rings. This resulted in the old mandate to use uncuffed ETTs in children younger than 8 years of age. There have been numerous advances in modern ETTs that are changing this orthodoxy (3). Current American Heart Association guidelines now recommend, but do not require, a cuffed ETT for children older than 28 days of age. In the first 28 days of life, the cricoid narrowing functions as a cuff. For children over 28 days of age, the cuffed ETT is just as safe as an uncuffed ETT. The high volume, low pressure cuffs found on currently available ETTs allow the cuff to produce a seal at much lower pressures. The use of cuffed ETTs is becoming more common in pediatric ICUs and emergency departments. Several studies have shown no increase in postintubation stridor or reintubation when cuffed ETTs are used in controlled settings with regular cuff pressure monitoring.
ED MANAGEMENT
Basic Airway Management
Basic airway management is a fundamental skill that must be mastered by all caregivers. With an oxygen source, a means to deliver positive pressure ventilation, attention to detail in positioning, and the use of airway adjuncts, it is usually possible to prevent hypoxia and hypercarbia in the apneic patient.
Patient Positioning
The first goal of airway management is the establishment of a patent airway. The importance of proper positioning cannot be overemphasized. The success of airway management is predicated on this very basic, but often overlooked, issue. Placing the patient in the “sniffing” position may correct many upper airway obstructions because of soft tissue impingement. The “sniffing” position is achieved by flexing the cervical spine approximately 15 degrees and extending the atlantooccipital joint maximally. This position can also be achieved with the chin-lift or jaw-thrust maneuvers. If the patient is obese or has large breasts, the normal sniffing position is often insufficient for relieving an airway obstruction. A ramp or shoulder roll placed under the upper back will result in the “sniffing” position.
Jaw-Thrust Maneuver
The jaw thrust is one of the most basic maneuvers and an initial method of establishing a patent airway. The jaw-thrust maneuver is a two-handed technique. The operator is positioned at the head of the patient and places his or her fingers on the angles of the mandible bilaterally, displacing it anteriorly (Fig. 2.1). A face mask may be simultaneously held in place with the operator’s thumbs and index fingers.

FIGURE 2.1 The jaw-thrust maneuver. (From Reichman EF. Emergency Medicine Procedures. 2nd ed. New York, NY: McGraw-Hill; 2013, with permission.)
Chin-Lift Maneuver
The chin lift is also one of the most basic maneuvers to establish a patent airway. The chin lift is performed by placing the fingers under the tip of the mandible and lifting the chin in an anterior and cephalic direction (Fig. 2.2). Do not place the fingers on the soft tissue of the submandibular space, because this will elevate the tongue and cause further obstruction. The patient’s head may be tilted slightly posterior to aid in opening the airway.
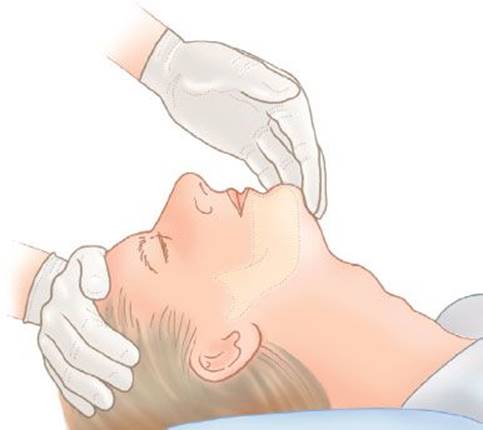
FIGURE 2.2 The chin-lift maneuver. (From Reichman EF. Emergency Medicine Procedures. 2nd ed. New York, NY: McGraw-Hill; 2013, with permission.)
Nasopharyngeal Airways
In addition to proper positioning, one can use various aids to overcome pharyngeal obstruction and facilitate effective ventilation (4). The most commonly used devices are oropharyngeal (oral) and nasopharyngeal (nasal) airways. Regardless of which device is chosen, it is important to place a large-enough airway to bridge the area of soft tissue impingement on the pharynx. Nasopharyngeal airways are soft-rubber or plastic tubes that are inserted through the nostril and into the oropharynx, just above the epiglottis. They are available in numerous sizes; the larger inner diameter is associated with the longer tubes. A size 30- to 32-French tube is appropriate for most adults. Nasopharyngeal airways can be safely placed in the conscious, semiconscious, and unconscious patients. They can also be used when an oropharyngeal airway cannot be placed (e.g., in cases of oral trauma, braces, seizures, trismus, etc.).
Insertion of a nasopharyngeal airway is a quick and rapid procedure. Choose the proper size nasopharyngeal airway. The correct size is estimated by placing the airway next to the patient’s face. Place the flared end of the airway near the tip of the patient’s nose. The airway’s tip should be at the external auditory canal. Liberally apply water-soluble lubricant or anesthetic jelly to the nasopharyngeal airway. If not contraindicated, apply a vasoconstrictor to the patient’s nasal mucosa. Gently insert the nasopharyngeal airway with the beveled tip against the nasal septum to prevent it from getting caught on the turbinates laterally. Insert the airway completely until the flared tip is against the nostril, and rotate it 90 degrees so that it is concave upward. Slight rotation often facilitates the passage of the airway if resistance is encountered during insertion. Supplementary oxygen or positive pressure ventilation with a bag-valve-mask device can be started after the insertion of the airway.
Insertion of a nasopharyngeal airway is associated with complications. If too long, the airway may cause laryngospasm and vomiting. The airway may also be placed with its tip in the esophagus, resulting in gastric distention and subsequent aspiration. Nasal mucosal injury upon insertion can result in epistaxis and aspiration of blood.
Oropharyngeal Airways
The oropharyngeal airway is a semicircular plastic device that holds the tongue up and away from the posterior pharyngeal wall. The oropharyngeal airway is less traumatic and more easily placed than a nasopharyngeal airway. An oropharyngeal airway must only be used in an unconscious patient, or it may cause laryngospasm and vomiting. An 8-, 9-, or 10-cm oral airway is appropriate for most adults.
Insertion of the oropharyngeal airway is a quick and simple procedure. Choose the proper size of oropharyngeal airway. The correct size is estimated by placing the airway next to the patient’s mouth. The distal tip should lie just above the angle of the mandible. Clear the mouth and oropharynx of any blood, secretions, or vomit. Open the patient’s jaw, and separate the teeth. Insert the oropharyngeal airway curved side down. The tip will slide along the palate. After insertion, rotate the airway 180 degrees so that the curve of the oropharyngeal airway follows the curvature of the tongue. An alternative method is to use a tongue blade to depress the tongue and then insert the oropharyngeal airway as above. If the tongue blade is used, the oropharyngeal airway may also be inserted with the curve side upward. Supplementary oxygen or positive pressure ventilation with a bag-valve-mask device can be started after the insertion of the airway.
Insertion of an oropharyngeal airway is not a benign procedure. The airway can push the tongue posteriorly and further obstruct the oropharynx if not inserted properly. Significant lacerations can occur if the lips or tongue are caught between the teeth and the oral airway. The airway can force the epiglottis closed against the vocal cords if it is too long, resulting in complete airway obstruction. Too small an airway will force the tongue against the pharynx, producing an obstruction.
Mask Ventilation
Once mastered, expertise with bag-mask ventilation (BMV) allays the urgency to intubate and permits one to rescue a failed intubation. BMV is a prerequisite to the use of neuromuscular blocking agents to facilitate intubation. Provided one takes steps to minimize the risks of gastric aspiration, BMV for prolonged periods is not unreasonable if intubation is not possible.
Face masks are made of clear plastic, have a soft seal, and have an anatomic shape that conforms to the contours of the patient’s face. Typical adult sizes are 3, 4, or 5. The size must be large enough to completely cover the nose and mouth but not be so large as to allow a leak. The key to effective mask ventilation is ensuring a continually patent airway. A patent airway is initially achieved by placing the patient in the “sniffing” position coupled with a combination of chin lift, jaw thrust, oral airway, or nasal airway. Neglecting this key maneuver results in using excessive positive pressure ventilation in an attempt to compensate for an obstructed upper airway. A bag-mask device can deliver 50 to 100 cm of water pressure to the upper airway with an adequate mask seal, which is more than sufficient pressure to insufflate the stomach if the airway is not optimally opened.
There are two ways to properly hold a face mask (4). The one-handed technique is performed with the nondominant hand (Fig. 2.3). Place the little, ring, and middle fingers under the side of the patient’s mandible. Place the index finger and thumb on the bottom and top portion of the mask. This technique allows the operator to simultaneously lift the mandible and extend the atlantooccipital joint while applying enough downward pressure to create an airtight seal. The dominant hand is used to ventilate the patient with the bag-valve device. The bag-valve device is used to provide positive pressure ventilation. The device consists of a self-inflating bag connected to oxygen on one end and a one-way (nonrebreathing) valve on the other. The valve is connected to the mask or other airway device to allow one-way flow of oxygen.

FIGURE 2.3 The one-handed, one-person, mask-ventilation technique. (From Reichman EF. Emergency Medicine Procedures. 2nd ed. New York, NY: McGraw-Hill; 2013, with permission.)
A two-handed, two-person technique may be necessary in patients with facial hair, are obese, are elderly, or are edentulous. Both of the operator’s hands are applied to the face mask to aid in the creation of a tight seal and proper airway alignment (Fig. 2.4). Place the index, middle, ring, and small fingers of the left hand on the body of the left half of the mandible. Position the right hand similarly on the right half of the mandible. Place the face mask on the patient’s face. Apply both thumbs to the mask, and apply pressure to create a seal. Anteriorly elevate the mandible to perform the jaw-thrust maneuver. The second person applies positive pressure through the bag-valve device.
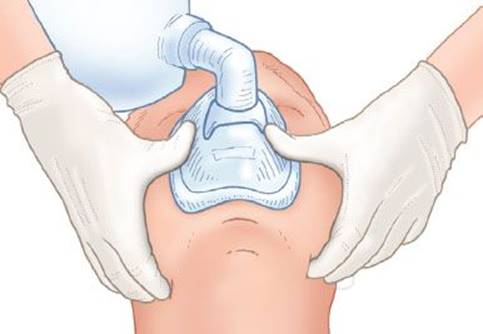
FIGURE 2.4 The two-handed, two-person, mask-ventilation technique. (From Reichman EF. Emergency Medicine Procedures. 2nd ed. New York, NY: McGraw-Hill; 2013, with permission.)
A standard adult resuscitation bag is 1,500 mL. The goal is to deliver 500 to 600 mL of tidal volume at a rate of 24 breaths/min. Smaller devices are available for children, infants, and neonates. Typical ventilation volumes are 5 to 8 mL/kg per breath. Provided the airway is patent, significant insufflation of the stomach is unlikely. The cadence should be similar to the “squeeze …release … release” cadence recommended by advanced cardiac life support (ACLS) but at a slightly faster pace.
The specific type of bag employed in BMV is also important (4). Recent studies demonstrate that bags that minimize dead space, incorporate unidirectional air flow valves (e.g., “duck bill” inspiratory valves), and use one-way expiratory valves to prevent the entrainment of room air during inspiration will deliver 90% to 97% oxygen to spontaneously breathing or ventilated patients. This delivery is in sharp distinction to improperly configured bags that will provide high oxygen concentration during active bagging but deliver only 30% oxygen during spontaneous patient breathing as a result of the entrainment of room air.
Complications of Basic Airway Management
The most serious complication of basic airway management is aspiration of gastric contents, resulting in an acute chemical pneumonitis. It is a significant risk when airway management is needed emergently or routinely in the pregnant, trauma, diabetic, or obese patient. Less-serious complications include soft tissue trauma to the lips, tongue, oral cavity, and eyelids. Tooth fractures or avulsions are uncommon but possible. Facial nerve dysfunction caused by pressure effects of the mask is transient. Corneal abrasions, conjunctival chemosis, and increased intraocular pressure are common with masks that are too large.
Intubation
Orotracheal Intubation
Orotracheal intubation is both common and life-saving. Orotracheal intubation is the primary and preferred method of airway management that every emergency physician must master (3). With proper preparation, definitive control of the airway can be obtained. Airway control assures that the patient can be oxygenated and ventilated when the patient cannot do this on his or her own.
Orotracheal intubation is relatively contraindicated in patients who do not need it, who are likely to be injured by the procedure, whose injuries make success unlikely, or in whom less-invasive techniques may suffice. Intubation may be difficult in patients with likely cervical spine injuries, severe arthritis, severe orofacial injuries, deep airway obstruction, gross deformities of the head and neck, or a quickly changing obstruction (edema or an expanding hematoma). Choose a surgical airway if the manipulation or time required for oral endotracheal intubation puts the patient at risk for spinal injury or hypoxia.
The evaluation, preparation, and technique for orotracheal intubation are complex and essential. Firmly grasp the laryngoscope in the left hand. Insert the tip of the laryngoscope blade into the right side of the patient’s mouth. Smoothly advance the blade inward while keeping pressure against the tongue. Move the blade toward the midline to trap and push the tongue to the left, “clearing a path” for your gaze.
Lift the patient’s airway up and forward exactly along the long axis of the laryngoscope handle (Fig. 2.5). Do not “cock” or “crank back” on the laryngoscope handle with the wrist, or the back of the laryngoscope blade may break the maxillary incisors. If intubating with the curved Macintosh blade, advance the tip into the vallecula, lift the laryngoscope handle to raise the tongue–jaw–epiglottis unit (Fig. 2.5), visualize the vocal cords, and insert the ETT. If intubating with the straight Miller blade, insert the blade completely, lift the laryngoscope handle to raise the tongue–jaw–epiglottis unit (Fig. 2.6), visualize the vocal cords and airway, and insert the ETT. Advance the ETT until the cuff passes through the vocal cords and 2 to 3 cm into the trachea. Inflate the cuff, assess for proper placement, and secure the ETT in place.
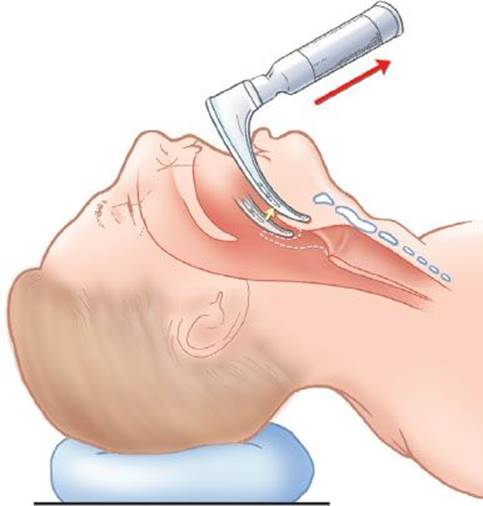
FIGURE 2.5 Intubation with the Macintosh blade. The blade is inserted into the vallecula to elevate the mandible, tongue, and epiglottis as a unit. (From Reichman EF. Emergency Medicine Procedures. 2nd ed. New York, NY: McGraw-Hill; 2013, with permission.)

FIGURE 2.6 Intubation with the Miller blade. The blade is inserted into the vallecula to elevate the mandible, tongue, and epiglottis as a unit. (From Reichman EF. Emergency Medicine Procedures. 2nd ed. New York, NY: McGraw-Hill; 2013, with permission.)
Numerous complications are associated with orotracheal intubation (3). Hypoxia often results from prolonged intubation attempts and misplaced ETTs. Bradycardia can be produced by pharyngeal manipulation. Bradycardia may be especially pronounced in children because of their higher vagal tone. Pretreatment with atropine (0.02 mg/kg, with a minimum dose of 0.15 mg) in children younger than 6 years of age can prevent bradycardia. Increased intracranial pressure that is transient can occur as a result of the direct laryngoscopy. Direct mechanical complications from the laryngoscope include lacerations of the lips, trauma to the pharyngeal wall, broken teeth, or dentures that may be aspirated. Vomiting and aspiration can cause subsequent chemical and bacterial pneumonitis. Prolonged stimulation of the pharynx may cause apnea, bronchospasm, or laryngospasm.
Nasotracheal Intubation
Nasotracheal intubation is an alternative to orotracheal intubation to secure an airway in the spontaneously breathing patient (5). Nasotracheal intubation allows awake intubations while the patient maintains protective airway reflexes and avoids the risks of paralytic agents. It is a fairly simple procedure that should be considered in patients with spontaneous respirations in whom an oral airway is considered difficult and in those with an anticipated short intubation period. Nasotracheal intubation is well tolerated by most patients and produces less reflex salivation than orotracheal intubation, thus leading to fewer attempts of self-extubating.
Nasotracheal intubation is contraindicated in patients with apnea, with severe facial or maxillofacial fractures, with basilar skull fractures, with head injury and an elevated intracranial pressure, with nasal or nasopharyngeal obstruction, receiving thrombolytics, with a coagulopathy, or receiving parenteral anticoagulants. Nasotracheal intubation is also contraindicated in patients with neck injuries, as the procedure may increase morbidity and mortality. Nasotracheal intubation should not be performed in neonates, infants, and young children.
Prepare for the procedure. Apply a topical vasoconstrictor to shrink the nasal mucosa. Apply a topical anesthetic to the nasal mucosa. Dilate the nasal passage with your little finger or a series of increasingly larger size nasopharyngeal airways. Choose an ETT. The proper size tube should be at least 0.5 to 1 mm smaller than the size chosen for orotracheal intubation of the same patient.
Insert the ETT into the nostril with the bevel facing the septum (Fig. 2.7A). Advance the ETT with gentle pressure along the nasal floor to pass it through the nasal cavity (Fig. 2.7B). Continue advancing the ETT as resistance is met while it makes a 90-degree change of direction into the oropharynx. Advance the ETT through the oropharynx and into the laryngopharynx (Fig. 2.7C). Listen for breath sounds through the proximal end of the ETT while advancing it. As soon as an exhalation is heard, the patient will take a breath. Advance the ETT during inhalation. The vocal cords are opened their widest during inspiration, which facilitates passage of the ETT. Inflate the cuff (Fig. 2.7D), begin ventilation, confirm proper positioning, and secure the ETT.

FIGURE 2.7 Nasotracheal intubation. (From Reichman EF. Emergency Medicine Procedures. 2nd ed. New York, NY: McGraw-Hill; 2013, with permission.)
The immediate complications of nasotracheal intubation include epistaxis, laryngeal and tracheal trauma, mucosal avulsion, retropharyngeal laceration, turbinate avulsion, intracranial placement, bacteremia, esophageal intubation, and prolonged attempts to place the ETT. Many of these complications can be prevented by choosing the appropriate-size ETT, facilitating nasal mucosal vasoconstriction, and applying lubricant to the ETT. Long-term complications include maxillary sinusitis, retropharyngeal abscess, mediastinitis, nasal mucosal necrosis, and cellulitis.
Digital (Tactile) Orotracheal Intubation
Digital (tactile) intubation is a viable alternative airway management technique with which every practitioner of emergency medicine should be familiar (6). Digital intubation is a rapid and safe method to intubate a patient. It is an ideal method for intubating a comatose or paralyzed patient if the patient’s upper airway cannot be visualized because of secretions or blood. Digital intubation also should be considered when intubating the patient with a known or suspected cervical spine fracture as this technique requires minimal head and neck movement. Digital intubation is also a variable method for out-of-hospital intubation. The main danger of this procedure involves the healthcare worker performing the intubation being at risk for having his or her fingers bitten. This technique should only be performed on patients who are paralyzed or unconscious.
Stand to the patient’s right side, and face the patient. Insert the right index and middle fingers into the right side of the patient’s mouth. Elevate the epiglottis with the index finger (Fig. 2.8). Insert the ETT into the patient’s mouth between the two fingers, and advance the tip into the trachea. Advance the ETT an additional 3 to 4 cm. Inflate the cuff, begin ventilation, confirm proper tube placement, and secure the tube.

FIGURE 2.8 Digital orotracheal intubation. (From Reichman EF. Emergency Medicine Procedures. 2nd ed. New York, NY: McGraw-Hill; 2013, with permission.)
Supraglottic Airway Devices
Supraglottic devices all allow positive pressure ventilation with placement of the device above the glottis, and thus they are classified as supraglottic devices. The most commonly used of these devices are the esophageal–tracheal Combitube (ETC) or the laryngeal mask airway (LMA) described later in this chapter. The advantage of a supraglottic device is that it allows ventilation without tracheal placement. The majority of these devices can be inserted blindly and quickly by minimally trained personnel, which makes them ideal for prehospital providers, in hospital arrests where no airway providers are available, or as a rescue device in the setting of a failed intubation. In general, supraglottic devices have a cuff that inflates in the posterior pharynx and obstructs the proximal airway above the distal port, allowing positive pressure ventilation of the lungs.
Laryngeal Mask Airway and Intubating Laryngeal Mask Airway
The LMA is a novel device that fills the gap in airway management between endotracheal intubation and the use of a face mask (7). The LMA was designed primarily as a means of providing ventilatory support while avoiding the fundamental disadvantage of the need to visualize and penetrate the vocal cords with an ETT. The LMA is blindly introduced into the hypopharynx to form a low-pressure seal around the laryngeal inlet and to permit positive pressure ventilation.
Many disadvantages of the standard LMA became apparent with widespread use of the device. The intubating laryngeal mask airway (ILMA) was then developed through the aid of analysis of magnetic resonance images of the human pharynx and laboratory testing of ETTs.
The LMA and ILMA are proprietary devices of a single company (LMA North America, San Diego, CA). Numerous other companies produce similar laryngeal mask devices with a variety of modifications as to not interfere with the LMA and ILMA patents. These other devices are used and inserted similarly to the LMA and ILMA with some minor differences specific to each device.
The indications for the use of the LMA and the ILMA parallel the general indications for active airway management. Either the LMA or the ILMA may be used in the event of a failed endotracheal intubation. These devices have a role in securing the airway preemptively in patients with an “anteriorly” situated larynx. However, there is a conspicuous absence of airway protection from aspiration.
There are no absolute contraindications to the use of either the LMA or the ILMA. However, there are several relative contraindications, including patients at an increased risk of regurgitation or aspiration; with airway obstruction at or below the larynx; with low pulmonary compliance or high airway resistance (e.g., morbidly obese, bronchospasm, pulmonary edema, pulmonary fibrosis or thoracic trauma); and who cannot open their mouth at least 1.5 cm. The LMA and ILMA are relatively contraindicated in cases of pharyngeal pathology. Pathology includes, but is not limited to, abscesses, hematomas, or tissue disruptions.
The LMA is a disposable unit that conforms to the contours of the hypopharynx with its lumen facing the glottic opening (Fig. 2.9). The unit consists of an airway tube, inflation line, and mask. The technique for inserting the LMA is rather simple (7). Position the patient’s head as for endotracheal intubation in the “sniffing” position. Insert and advance the LMA into the oral cavity in one smooth movement following the curvature of the pharynx until it enters the hypopharynx and resistance is felt. Inflate the cuff with the recommended volume of air. When correctly positioned, the tip of the LMA cuff lies at the base of the hypopharynx against the upper esophageal sphincter, the sides lie in the pyriform fossae, and the upper border of the mask lies at the base of the tongue, pushing it forward (Fig. 2.9). Secure the LMA in a fashion similar to that used to secure an ETT.
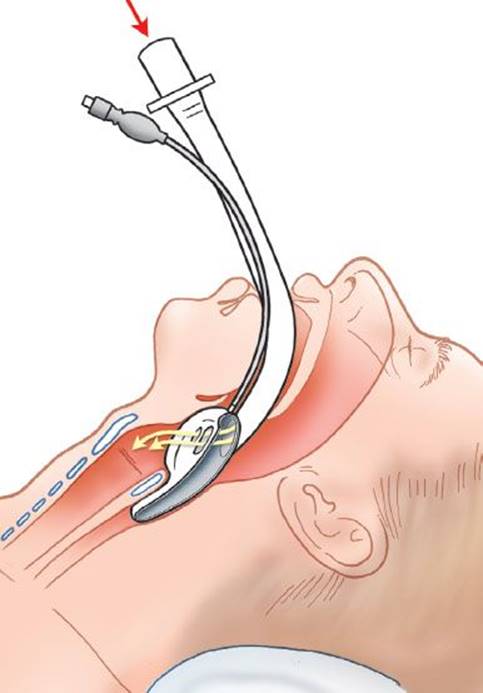
FIGURE 2.9 Sagittal view of the airway demonstrating correct placement of the laryngeal mask airway. (From Reichman EF. Emergency Medicine Procedures. 2nd ed. New York, NY: McGraw-Hill; 2013, with permission.)
The form of the ILMA was derived from head and neck sagittal magnetic resonance imaging studies. The ILMA consists of an anatomically curved steel tube connected to the standard LMA cuff. The ILMA has several significant modifications that make it different from the LMA. These modifications include a stainless steel airway tube covered with silicone rubber, a handle fused to the airway tube, and a larger inner diameter (13 mm vs. 9 mm) than the LMA. The mask of the ILMA is similar to that of the LMA with two major modifications. A ramp inside the distal airway tube directs an ETT into the center of the aperture and into the patient’s airway. The ILMA has a large, single, and stiff epiglottic-elevating bar designed to lift the epiglottis away from the path of the advancing ETT.
The insertion of the ILMA is not too dissimilar from the standard LMA (7). Confirm proper placement of the ILMA with a bag-valve device attached to the proximal end of the airway tube, and ventilate the patient. The ILMA may be left in this placement (Fig. 2.10A). Alternatively, an ETT can be inserted through the ILMA and into the trachea (Fig. 2.10B).

FIGURE 2.10 Insertion of the intubating laryngeal mask airway. (From Reichman EF. Emergency Medicine Procedures. 2nd ed. New York, NY: McGraw-Hill; 2013, with permission.)
There are numerous documented complications associated with the use of the LMA and ILMA. An obvious complication, and potentially the most devastating, is the failure to successfully place the device or to attain a satisfactory laryngeal seal. The incidence of failure to attain satisfactory ventilation is quite low. Other complications include aspiration, cuff herniation, contusions, lingual nerve injury, tongue numbness, parotid gland swelling, hypoglossal nerve palsy, unilateral vocal cord paralysis, dental trauma, laryngospasm, bronchospasm, and cardiac arrhythmias.
Double Lumen Airway Tube Intubation
The ETC (Kendall Sheridan, Mansfield, MA) and the EasyTube (EzT; Teleflex Medical, Kernen, Germany) are double-lumen, double-tubed, and double-cuffed airway devices that can be blindly inserted into the unconscious and unresponsive patient (8). The ETC and EzT are most often used in the prehospital setting by emergency medical technicians not trained in standard orotracheal intubation and by paramedic-level rescuers as an alternative when standard orotracheal intubation fails.
These devices are inserted blindly into a patient’s airway. If the distal tip enters the trachea, the patient is ventilated through the shorter tube, and the distal cuff prevents aspiration of gastric contents into the trachea. If the distal tip enters the esophagus, the patient is ventilated through the longer tube whose proximal ports lie in the hypopharynx while the distal cuff will occlude the esophagus.
Certain contraindications should be mentioned. The ETC and EzT should not be used on patients with an intact gag reflex. The size limits of the standard ETC prevent its use in patients shorter than 5 ft in height. The smaller SA model can be used in shorter adults and adolescent patients from 4 to 5.5 ft in height. Neither model can be used in people shorter than 4 ft in height. The ETC and EzT are contraindicated if the patient has known esophageal disease or an airway obstruction.
Insert the ETC or EzT into the midline of the patient’s open mouth (Fig. 2.11A). Advance the device in a downward curved motion until the patient’s teeth or alveolar ridge lie between the two printed bands (Fig. 2.11B). Inflate the pharyngeal cuff with air. The device will slightly withdraw from the patient’s mouth. Inflate the distal cuff with air.

FIGURE 2.11 Intubation with the esophageal–tracheal Combitube. (From Reichman EF. Emergency Medicine Procedures. 2nd ed. New York, NY: McGraw-Hill; 2013, with permission.)
Because most intubations are esophageal, begin ventilation through the longer blue tube labeled No. 1 (Fig. 2.11C). Auscultation of breath sounds, symmetric rise of the chest, fogging in the tube for more than six breaths, and lack of gastric insufflation confirm placement within the esophagus and ventilation through the proximal ports (Fig. 2.11C). If no breath sounds are auscultated and gastric insufflation occurs, the trachea is intubated (Fig. 2.11D). Begin ventilation through the shorter clear tube and verify by auscultation the presence of breath sounds. Secure the device using the standard method of taping or a commercially available ETT holder.
Despite the potential utility of the ETC or EzT in acute situations, several disadvantages must be kept in mind (8), including its high cost and bulky packaging. A rigid cervical collar might cause great difficulties in the proper placement of this device. There is a risk of esophageal injury. There is no way to suction the trachea with the open distal port in the esophagus. It is important to note that resuscitation drugs that can be routinely given through an ETT cannot be given through the device positioned with the tip in the esophagus. Significant soft tissue injury can occur as a consequence of the tip of the device or the balloons containing too much air.
Laryngeal Tube
The laryngeal tube (LT; King Systems, Noblesville, IN) is available in a variety of styles and is a device similar to the ETC and EzT. The LT has a single port placed between an oropharyngeal cuff and an esophageal cuff. The LT lacks a distal port. The device is designed to be placed in the same way as the ETC and EzT. Insert the LT blindly in the midline until significant resistance is felt. Inflate both cuffs, and begin ventilation through the port in the glottis. Adequate ventilation is confirmed by auscultation, chest rise, and end-tidal CO2 measurements. The most significant difference as compared to the ETC and EzT is the single port opening in the hypopharynx. The distal tip is designed to be placed in the esophagus. The LTD models have no distal port to allow for esophageal and gastric suctioning. The LTS-D models have a distal port to allow for esophageal and gastric suctioning.
Advanced Airway Devices
Intubating Introducers
Intubating introducers were first described by Dr. Robert Macintosh when a gum rubber urologic stylet was used as a device to aid in intubation (9). The device was inserted into the trachea, and an ETT advanced over the stylet. This “Seldinger-type” intubation did not gain widespread use until much later. Intubating introducers are now often considered standard equipment in the management of difficult airways.
Multiple intubating introducers are currently available (10). Two of the most common are the Eschmann (Eschmann Tracheal Tube Introducer, SIMS Portex, Inc., Keene, NH) and the Frova (Cook Medical Inc., Bloomington, IN). Both of these devices have a 30-degree bend at the tip and are rigid enough to hold an additional bend placed in the shaft of the introducer by the physician. There are differences between the two devices. The Frova is a single-use item, and the Eschmann is designed for multiple uses. The Frova has a central port that can provide limited ventilation, and the Eschmann is a solid introducer. The Eschmann is more flexible and may potentially decrease the forces transmitted to the airway and decrease airway trauma.
Although there are slight differences between the two devices, they are used in a similar manner (Fig. 2.12). Perform direct laryngoscopy in the standard fashion. An intubation introducer can be used if a limited view is obtained or a difficult airway is predicted. The vocal cords or epiglottis should be visualized to use the introducer effectively. Insert the introducer with the 30-degree bend at the tip and the introducer distance markings aimed anteriorly (Fig. 2.12A). Advance the stylet under the epiglottis (Fig. 2.12B). If the vocal cords are visualized, continue to advance the stylet through the cords. If only the epiglottis is visualized, gently advance the stylet “blindly” while relying on the 30-degree bend to direct it into the trachea (Fig. 2.12C). Continue to advance the stylet until the 25-cm mark is positioned at the patient’s lips. This motion should place the tip of the stylet in the midtrachea and should avoid entering either the left or right mainstem bronchus (Fig. 2.12D).

FIGURE 2.12 Intubation using a bougie or intubating introducer. (From Reichman EF. Emergency Medicine Procedures. 2nd ed. New York, NY: McGraw-Hill; 2013, with permission.)
Tracheal placement of the stylet is identified by one of four methods. The most reliable method is direct visualization of the stylet passing through the vocal cords. The second method is feeling the transmission of vibratory clicks as the advancing stylet tip contacts the tracheal rings. Absence of this sensation does not confirm esophageal placement. The third method is noting the presence of a cough in a patient who is sedated but not paralyzed. The final method is advancement of the introducer until there is distal holdup or blockage of advancement as the introducer enters the distal airways. This advancement is potentially the most dangerous of the methods and should not be used if any other method can confirm placement.
Advance the ETT over the introducer while maintaining direct laryngoscopy (Fig. 2.12E). This method allows easier placement of the ETT by minimizing curvature of the airway. Advance the ETT to the appropriate depth. If there is difficulty in advancing the ETT, it can be gently rotated 90 degrees to the right and left to promote passage through the vocal cords. Remove the introducer while firmly holding the ETT so it does not change position. Confirm proper ETT placement, and secure it in position.
The complications for this procedure are similar to direct laryngoscopy with the additional risk of airway trauma from the intubating introducer. The use of intubating introducers and bougies is an easily learned technique to improve endotracheal intubation when an anticipated or actual difficult airway is encountered.
Video Laryngoscopy
Video laryngoscopy is a relatively new method of indirect laryngoscopy. Video laryngoscopy involves a laryngoscope blade with a camera or another optical device attached to the end of the blade. The laryngoscope is then attached to a view screen. These devices are different from fiberoptic devices in that they require viewing on a screen, as there is no optical port on the device. Two more commonly available devices are multiple versions of the GlideScope (Verathon Inc., Bothell, WA) and the C-MAC Video Laryngoscope (Karl Storz Endoscopy Ltd., Tuttlingen, Germany).
Video laryngoscopy allows for indirect viewing of the epiglottis and vocal cords, and hence indirect orotracheal intubation (11). The indirect view can be obtained with minimal force and less manipulation of the airway. This may lead to decreased movement of the cervical spine as compared to other techniques. Video laryngoscopy can also provide for a better view of the epiglottis and vocal cords when compared to direct laryngoscopy. Video laryngoscopy may be easier to learn than either direct laryngoscopy or other methods of indirect laryngoscopy. Viewing images on a screen can be used as a teaching adjunct either during the intubation or can be recorded and reviewed at a later time.
Video laryngoscopy can be used for both routine and difficult intubations. This technique may be of additional benefit in patients with predicted difficult airways, limited laryngoscopic views during direct laryngoscopy, or restricted cervical spine movement. Video laryngoscopy is contraindicated when there is a proximal obstruction preventing passage of an ETT. The camera placement midway on the blade decreases the risk of occlusion of the camera with secretions, but occlusion is still a possibility.
The GlideScope consists of a 60-degree curved laryngoscope blade and handle combination with a camera embedded in the blade midway on the device. There are light emitting diode (LED) lights mounted adjacent to the camera. The device is attached to a color liquid crystal display (LCD) screen for image viewing. The GlideScope is available in three sizes (small, medium, and large). The small size is similar to a Macintosh size 0 blade, the medium is similar to a Macintosh size 2 blade, and the large is similar to a Macintosh size 3 blade. The benefit of this design is the camera mounted at the midpoint of the blade that allows for a wider view and less obstruction of the view with debris and secretions in the airway. The similarity to a standard Macintosh blade helps facilitate the GlideScope use with providers skilled in direct laryngoscopy.
To orotracheal intubate with a GlideScope, the first step is preparation. Turn on the device, and position the screen for the intubator to view. Prepare an ETT containing a stylet curved to a 60-degree or 90-degree angle. Open the patient’s mouth with the right hand while the GlideScope is advanced with the left hand in the midline and posteriorly. When the blade enters the oropharynx, the physician views the screen. Continue to advance the blade in the midline until the epiglottis is seen. The blade is either in the vallecula or underneath the uvula. Apply slight upward pressure in a tilting motion to visualize the vocal cords. Once the vocal cords are visualized, advance the ETT until it is viewed on the screen. Continue to advance the ETT through the vocal cords. The ETT can be used without the stylet to decrease the angle of the posterior portion of the tube if there is difficulty in passing the ETT. The GlideScope can be manipulated while viewing on the screen to decrease the laryngeal angle and help in ETT placement.
The C-MAC Video Laryngoscope is a similar device to the GlideScope. This device consists of a Macintosh blade with a camera at the distal aspect of the blade. The C-MAC is used in a similar method to the GlideScope and standard Macintosh blade. The C-MAC improves laryngoscopic views of the epiglottis and vocal cords.
The complications associated with the different video laryngoscopes are not yet well studied. It can be anticipated that the complications are similar to those of direct laryngoscopy and fiberoptic devices.
Overall, video laryngoscopy is a useful device for the management of both uncomplicated and complicated airways. Video laryngoscopy improves views of the epiglottis and vocal cords. It requires less force than direct laryngoscopy, which may cause less airway trauma, less cervical spine movement, and decreased hemodynamic response to intubation. Lastly, video laryngoscopy is a strong educational tool for teaching airway management.
Rigid and Semirigid Fiberoptic Devices
This category of devices is one of the most rapidly growing areas of difficult airway management. Fiberoptic devices allow for indirect visualization of the larynx, similar to the flexible fiberoptic scopes and rigid fiberoptic scope blade combinations. This device allows for airway management without the force and movement of the airway inherent to direct laryngoscopy. The benefit is decreased cervical spine motion during laryngoscopy (12,13). These devices demonstrate improved views of the larynx, allowing for increased endotracheal intubation rates in difficult airways.
There are numerous advantages to the rigid and semirigid devices when compared to flexible fiberoptic scopes. These devices are often easier to learn and master when compared to flexible fiberoptic scopes. The rigid and semirigid devices are designed to function similar to or in conjunction with direct laryngoscopy. Their rigidity and shape conforms to the airway. This allows easier passage through the pharynx and past the tongue. These devices are often less expensive and more durable than flexible fiberoptic scopes.
The indications for the use of rigid and semirigid devices are the same as for direct laryngoscopy. They can be used as a primary device in uncomplicated airways, in potentially difficult airways, or as a secondary device after a failed intubation attempt. Rigid and semirigid devices are contraindicated, as are other fiberoptic devices, if there is a proximal airway obstruction and relatively contraindicated when the airway contains vomitus, blood, or copious secretions that may obstruct the optical port.
These devices can be used either as an adjunct to direct laryngoscopy or as a single instrument for endotracheal intubation. Most rigid and semirigid devices have a site for attachment of a viewer or can be connected to a monitor for viewing. These devices represent a useful adjunct in the management of the difficult airway. Rigid and semirigid devices often require less training to master than flexible fiberoptic scopes. Although there is still limited evidence of their use in the emergency department, it is likely these devices will become commonly used in airway management.
There are multiple rigid and semirigid devices on the market including the Bonfils Retromolar Intubation Fiberscope (Karl Storz Endoscopy Ltd., Tuttlingen, Germany), the Levitan FPS (Clarus Medical, Minneapolis, MN), the Video Optical Intubating Stylet (VOIS, VOLPI AG, Schlieren, Switzerland), and the TrachView Intubating Videoscope (Parker Medical, Englewood, CO). Although there is evidence that the use of these devices improves laryngeal views in the difficult airway, there is little evidence comparing these devices to each other. Preference for a device is often user and institution specific.
Fiberoptic Endoscopic Intubation
The flexible fiberoptic bronchoscope has become a popular and useful instrument for placing ETTs in awake and nonparalyzed patients. This bronchoscope is unique because its flexible cord allows it to conform to the patient’s anatomy, making intubation possible in a variety of clinical situations when direct laryngoscopy is likely to be difficult or impossible. When performed properly, awake fiberoptic tracheal intubation is more accepted by patients and is associated with fewer hemodynamic changes than awake laryngoscopy. Fiberoptic intubation may be used to orally or nasally intubate a patient (14). It provides excellent visualization of the airway.
A fiberoptic intubation is indicated when it is anticipated that a direct laryngoscopy might be difficult to perform such as in morbidly obese patients; in patients with a limited mandibular opening, an unstable or immobile cervical spine, macroglossia, or micrognathia; in patients who appear to have pathologic airway anatomy (e.g., tracheal deviation, stenosis, tumors, trauma); and in patients who appear to be at increased risk for dental damage.
Proficiency in the skills required for fiberoptic intubation requires both instruction and practice. In most instances, it is a lack of expertise with the fiberoptic bronchoscope that results in technical problems, inadequate patient preparation, and prevents the successful completion of fiberoptic intubation. Successful intubation is also prevented by blood or secretions obstructing the fiberoptic port. Patients who are hypoxic or require assisted ventilation by mask are poor candidates. Contraindications specific to nasal fiberoptic intubation include coagulopathy, significant midface trauma, severe intranasal pathology, cribriform plate fracture, and cerebrospinal fluid leak.
Prepare the fiberoptic bronchoscope. Apply antifog solution to the insertion cord tip, or place the tip in warm water. Apply a thin film of silicone spray or water-soluble lubricant onto the flexible insertion cord. Insert the flexible insertion cord completely through the ETT.
Insert and navigate the insertion cord tip through the nose or mouth until the glottic opening comes into view. Advance the insertion cord tip toward and past the vocal cords. Advance the insertion cord tip further to bring the bifurcation of the trachea at the carina into view. Advance the ETT over the insertion cord and into the trachea. Securely hold the ETT, and remove the insertion cord. Inflate the ETT cuff, begin ventilation, confirm proper tube placement, and secure the tube.
Although the fiberscope is passed through the glottis and into the trachea with direct vision, the ETT is passed blindly over the fiberoptic bronchoscope. It is possible to cause injury to the arytenoids. The ETT may also be blocked in the nasal cavity or larynx, resulting in epistaxis, nasal turbinate fracture, and tearing of the tracheal tube cuff.
Rigid Fiberoptic Scopes and Blades
The Bullard laryngoscope is the most well-known of the rigid fiberoptic scopes. Other commonly used devices include the Airtraq (King Systems Corp., Noblesville, IA), the Upsherscope (Mercury Medical, Clearwater, FL), and the WuScope (Achi Corporation, Fremont, CA). These devices are all rigid devices with a built-in optical and light system, a rigid blade, and a channel for the ETT. The most significant difference among these devices is the Airtraq, is a single-use disposable device and the others are reusable.
These devices have waned in popularity as flexible and semirigid fiberoptic scopes have become more prevalent and simpler to use. The major limitation of these devices is their complex design and difficulty in ETT advancement after visualization of the vocal cords. Two of them require multiple pieces to be assembled before use—not a desirable characteristic when a device is required in an emergency or as a rescue technique after a failed airway by direct laryngoscopy. The Airtraq, a single-piece disposable device, may overcome some of these limitations, but the evidence to support its use in the emergency department is limited.
Surgical Airways
Cricothyroidotomy
Cricothyroidotomy is a technique that has been in use since the early 1900s. This technique has evolved into the surgical airway of choice for emergent situations in which other less-invasive intubation methods have failed or are contraindicated (15). There are numerous advantages to performing a cricothyroidotomy instead of a tracheostomy. A cricothyroidotomy is easier, faster, and safer to perform. It can be performed in less than 2 minutes. A cricothyroidotomy can be performed by those with little to no surgical training. It does not require the support of an operating room and a large amount of equipment. The anatomic landmarks are superficial, easily seen, and easy to palpate. Cricothyroidotomy does not require a deep dissection. The cricothyroid membrane is not covered by any structures that would interfere with the procedure. A cricothyroidotomy can be performed with the neck in a neutral position. The procedure has fewer associated complications than a tracheostomy.
There are a few absolute contraindications to performing a cricothyroidotomy. The most important contraindication is when the patient can be endotracheally intubated by less-invasive methods. Partial or complete transection of the airway is a contraindication to a cricothyroidotomy. In these cases, a tracheostomy is the preferred method to secure the airway. Finally, a cricothyroidotomy should not be performed in cases of significant injury or fracture of the cricoid cartilage, larynx, and/or thyroid cartilage. Relative contraindications to performing a cricothyroidotomy are the presence of a coagulopathy, massive neck swelling, or a hematoma in the neck; all of which increase the risk of bleeding and distortion of the anatomy.
Stabilize the large thyroid cartilage. The immobilization of the larynx cannot be overemphasized. If the larynx is not secure and the landmarks are lost, the procedure will fail. Identify the anatomic landmarks necessary to perform this procedure. This identification is critical to the performance of a cricothyroidotomy.
There are numerous techniques to perform a cricothyroidotomy (15). The surgical techniques require a skin incision carried down through the cricothyroid membrane (Fig. 2.13A). This is followed by grasping the thyroid cartilage with a tracheal hook to control the airway (Fig. 2.13B). The tract is dilated (Fig. 2.13C), and a tracheostomy tube or ETT is inserted into the trachea (Fig. 2.13D). A percutaneous kit is available and uses a modified Seldinger technique to perform a cricothyroidotomy. A needle cricothyroidotomy is performed in children, instead of the surgical approach.

FIGURE 2.13 Cricothyroidotomy. (From Reichman EF. Emergency Medicine Procedures. 2nd ed. New York, NY: McGraw-Hill; 2013, with permission.)
Complications following a cricothyroidotomy can be classified as early or late based on when they occur. Early complications will be recognized either immediately after insertion of the tracheostomy tube or within a few hours. These complications include tube malposition, laryngeal injury, bleeding, and infection. Late complications may not be apparent for weeks to months following the procedure. These complications include progressive airway obstruction and chronic voice changes.
A cricothyroidotomy is a potentially life-saving technique. It is an important procedure for the emergency physician to be skilled in as it may represent the only access to the patient’s airway. Cricothyroidotomy can be used to provide oxygenation and ventilation to a patient when other less-invasive airway control methods have failed or are contraindicated. It is a relatively safe, simple, and reliable procedure that can be performed within a few minutes. Knowledge of the anatomy of the anterior neck is essential to minimize early complications.
Tracheostomy
A tracheostomy is an ancient and time-honored technique for securing and maintaining an artificial airway. Modern emergency physicians have many options for airway management. They are skilled in a variety of invasive, noninvasive, and surgical procedures to optimize the management of a patient’s airway. The role of tracheostomy for emergent airway access has diminished as newer, safer, and equally effective techniques have evolved. Familiarity with the methods for tracheostomy is still valuable (16). Knowledge of proper techniques, possible indications, limitations, and likely complications will guide one’s judgment in critical moments when it most counts. Understanding the procedure for a tracheostomy allows emergency physicians to properly care for a problem or complication when a patient with a tracheostomy tube presents to the emergency department.
When performed under emergency circumstances, a tracheostomy is fraught with danger. There are only three clinical settings in which an emergency tracheostomy should be considered (16). The first is laryngotracheal injuries with airway disruption. The second is the need for a surgical airway in an infant or a small child where a cricothyroidotomy is contraindicated. The third is the need for an airway when all other methods have failed.
A cricothyroidotomy is the procedure of choice when an invasive approach to the airway is needed. Compared with a tracheostomy, the cricothyroidotomy is faster, is more direct, relies predominantly on external landmarks, requires only a single operator, can be done with ambient lighting, and requires a limited amount of equipment. In contrast, a tracheostomy is a procedure requiring multiple steps. The procedure involves direct visualization to dissect through vascular structures and requires better light than is commonly present at the bedside. It is easier, and thus faster, if one has an assistant, proper suctioning equipment, and electrocautery. Without these advantages, the technique is difficult and likely to be complicated. The average time to establish an airway by tracheostomy is too long for the true emergency in a patient who lacks an airway.
Tracheal Confirmation Devices
Confirmation of ETT placement within the trachea is one of the most important steps of endotracheal intubation. If the ETT is placed within the esophagus or pharynx, it must be quickly recognized, and tracheal intubation or effective ventilation promptly performed. This necessity has led to a vast array of techniques to confirm correct ETT position.
One of the most sensitive and specific tests for correct ETT placement is direct visualization of the ETT passing through the vocal cords and into the trachea. This can be done by direct laryngoscopy or a fiberoptic device. When the ETT is visualized passing through the vocal cords, tracheal placement is confirmed; however, this cannot be done in all cases. Because of the life-threatening complications of a misplaced ETT, correct placement must be confirmed by multiple methods.
Methods of tracheal confirmation can be separated into three categories: Clinical examination, tests based on anatomic differences between the trachea and esophagus, and tests based on physiologic differences (17). The clinical examination findings of tracheal intubation are symmetric chest rise, absence of sounds over the epigastrium, bilateral breath sounds in the axilla, condensation in the ETT with ventilation, and direct visualization of the ETT passing through the cords. Although all of these findings can have false positives and negatives, in combination, these findings are sensitive and specific indicators of tracheal intubation.
Tests for tracheal intubation that rely on anatomic differences include esophageal detector devices (EDDs), transtracheal illumination, and transtracheal ultrasound. These tests rely on the structural difference of the esophagus and trachea, as well as their relative position in the neck. EDDs rely on the flexible esophagus collapsing when negative pressure is applied while the cartilaginous trachea is unaffected by negative pressure. The negative pressure is applied by either a syringe-like device or self-inflating bulb attached to the ETT. When the syringe-like device is used, an ETT in the trachea results in no resistance or rebound of the plunger during aspiration of 40 to 60 mL of air into the syringe. If the ETT is placed within the esophagus, the esophagus will collapse around the ETT, preventing large-volume aspiration and causing rebound of the plunger.
Self-inflating bulbs work in a similar method to the syringe-like devices. Deflate the bulb, and attach it to the end of an ETT. The bulb is then allowed to inflate passively. Inflation should take less than 4 seconds if the ETT is within the trachea. Reinflation of the bulb may be prolonged or not occur if the ETT is within the esophagus.
In the transtracheal illumination technique, alighted stylet is placed through the ETT and illuminated. If the ETT and stylet are within the trachea there should be a discreet glow seen on the anterior neck. If the ETT is placed within the esophagus, the posterior position of this structure, as well as its muscular wall and soft tissue will cause a diffuse dull light in the neck. This method is best used when the physician is comfortable with lighted stylet intubation.
Transtracheal ultrasound relies on ultrasonographic images to confirm correct ETT position. This can be done by either the dynamic or the static method. In the dynamic method, the trachea is visualized with a high-frequency linear transducer. The ETT is then visualized entering the trachea, and position is confirmed. The static method uses ultrasound to confirm tracheal placement after the ETT has been placed. Although there is limited evidence to support its use at this time, ultrasound may become a commonly used method for ETT confirmation in the emergency department (18,19).
The tests for tracheal intubation that rely on physiologic differences include capnometry, the Beck Airway Airflow Monitor (BAAM, Great Plains Ballistics, Lubbock, TX), and pulse oximetry. Capnometry relies on detection of CO2 in exhalation. In a healthy preoperative patient, capnometry is a highly sensitive and specific test for tracheal intubation. In the emergency setting, capnometry can be limited by CO2 in the gastrointestinal tract and in situations where respiration is limited or absent, such as cardiac arrest and severe pulmonary edema. There are two commonly used methods of capnometry in the emergency department: colorimetric and quantitative capnometry or capnography. Colorimetric capnometry uses a device that contains purple-colored pH paper that releases hydrogen ions when in contact with CO2, turning the paper yellow. The device is attached to the end of the ETT between the bag-valve-mask device and the respiratory adapter. Ventilate the patient, and check the colored indicator paper after five to six breaths to allow for washout of residual carbon dioxide.
Capnography samples the exhaled gasses and calculates end tidal CO2, which is displayed as a number or a graph on a physiologic monitor. The advantage of capnography instead of colorimetric capnometry is a continuous reading of end tidal CO2. This reading allows for both continuous monitoring of ETT position and continuous monitoring of respiration. In the noncardiac arrest patient, capnography is a very useful tool in confirming ETT placement (19).
The BAAM is a novel device that contains a whistle that attaches to the respiratory connector of an ETT. Air exiting the proximal end of an ETT results in a whistle. In a spontaneously breathing patient this device works well to confirm tracheal placement. This device is best used in a nasotracheal intubation of an awake (sedated) intubation. In an apneic patient, the chest can be compressed, and the forced exhalation of air can cause the whistle. If the tube is placed in the esophagus, there should be no air movement with respiration or chest compression. There is very limited evidence to support the use of the BAAM.
Pulse oximetry is a commonly used device that is a poor predictor of esophageal intubation. In a preoxygenated patient, it can take several minutes for hypoxia to present, regardless of esophageal or tracheal intubation. If the ETT is misplaced, confirmation is desired before hypoxia ensues. Although pulse oximetry is a useful adjunct for monitoring for intubation, it is not an ideal agent for confirmation of tracheal intubation.
The last method for confirming ETT position is the chest radiograph. Although chest radiographs are taken after almost every endotracheal intubation, it is difficult to determine endotracheal or esophageal position in a single anteroposterior (AP) view. Indications of esophageal placement include ETT visualized outside the tracheal shadow or an ETT in the midline below the carina. A chest radiograph is best utilized to determine tracheal position of a confirmed tracheal intubation.
The clinical examination, in addition to capnometry or EDDs, are the best methods for determination of tracheal intubation. In the nonarrest patient, either colorimetric or continuous capnography is very sensitive and specific. In the postarrest patient, capnometry can be difficult to interpret, and the clinical examination and EDDs are the best methods to confirm the tracheal tube position (20).
CRITICAL INTERVENTIONS
• Properly position the patient’s head to optimize the view of the vocal cords during orotracheal intubation.
• Prepare sequential airway securing techniques when faced with a potentially difficult airway.
• Video-assisted intubation devices should be considered as a primary intubation device as well as for failed direct laryngoscopy.
• Confirm proper position of ETT after intubation.
DISPOSITION
Almost all patients who require the airway management techniques as described in this chapter will be admitted to an intensive care setting. The patient who is intoxicated, has taken too much medication, or used illicit substances may be the exception to admission.
Common Pitfalls
• Proper patient positioning is very basic but often overlooked.
• Simple maneuvers using the jaw thrust, chin lift, nasopharyngeal airway, or oral airway can prevent hypoxia and hypercarbia in the apneic patient.
• Orotracheal intubation is the airway of choice.
• The emergency physician must know several alternative techniques for airway management when orotracheal intubation fails or is contraindicated.
• The cricothyroidotomy is the preferred surgical airway in an emergency.
REFERENCES
1. Mallampati SR, Gugino LD, Desai SP, et al. A clinical sign to predict difficult tracheal intubation: A prospective study. Can Anaesth Soc J. 1985;32(4):429–434.
2. Nasr NF, Tyler SG, Voronov G, et al. Essential anatomy of the airway. In: Reichman EF, ed. Emergency Medicine Procedures. 2nd ed. New York, NY: McGraw-Hill; 2013:35–40.
3. Reichman EF, Cornett J. Orotracheal intubation. In: Reichman EF, ed. Emergency Medicine Procedures. 2nd ed. New York, NY: McGraw-Hill; 2013:64–76.
4. Russo CJ, Kassutto Z. Basic airway management. In: Reichman EF, ed. Emergency Medicine Procedures. 2nd ed. New York, NY: McGraw-Hill; 2013:40–47.
5. Nasr NF, Rahman R, Nasr IF. Nasotracheal intubation. In: Reichman EF, ed. Emergency Medicine Procedures. 2nd ed. New York, NY: McGraw-Hill; 2013:
134–139.
6. Ma OJ, Munk A. Digital (tactile) orotracheal intubation. In: Reichman EF, ed. Emergency Medicine Procedures. 2nd ed. New York, NY: McGraw-Hill; 2013:100–102.
7. Takenaka K, Howard T. Laryngeal mask airways. In: Reichman EF, ed. Emergency Medicine Procedures. 2nd ed. New York, NY: McGraw-Hill; 2013:110–122.
8. Weber J. Dual lumen airway tube intubation. In: Reichman EF, ed. Emergency Medicine Procedures. 2nd ed. New York, NY: McGraw-Hill; 2013:122–127.
9. Macintosh RR. An aid to oral intubation (letter). BMJ. 1949;1:28.
10. Pawelek O, Reichman EF. Endotracheal tube intubating introducers and bougies. In: Reichman EF, ed. Emergency Medicine Procedures. 2nd ed. New York, NY: McGraw-Hill; 2013:95–100.
11. Inboriboon PC. Video-assisted orotracheal intubation devices. In: Reichman EF, ed. Emergency Medicine Procedures. 2nd ed. New York, NY: McGraw-Hill; 2013:80–89.
12. Reichman EF, ed. Emergency Medicine Procedures. 2nd ed. New York, NY: McGraw-Hill; 2013.
13. Turkstra TP, Craen RA, Pelz DM, et al. Cervical spine motion: A fluoroscopic comparison during intubation with lighted stylet, GlideScope, and Macintosh laryngoscope. Anesth Analg. 2005;101:910–915.
14. Schroeder ED, Linscott MS, Bledsoe J. Fiberoptic endoscopic intubation. In: Reichman EF, ed. Emergency Medicine Procedures. 2nd ed. New York, NY: McGraw-Hill; 2013:127–134.
15. Reichman EF. Cricothyroidotomy. In: Reichman EF, ed. Emergency Medicine Procedures. 2nd ed. New York, NY: McGraw-Hill; 2013:148–161.
16. Romano TM, Haines CJ. Tracheostomy. In: Reichman EF, ed. Emergency Medicine Procedures. 2nd ed. New York, NY: McGraw-Hill; 2013:161–171.
17. Salem MR. Confirmation of endotracheal tube position. Anesthesiol Clin North Am. 2001;19(4):813–839.
18. Werner SL, Smith CE, Goldstein JR, et al. Pilot study to evaluate the accuracy of ultrasonography in confirming endotracheal tube placement. Ann Emerg Med. 2007;49(1):75–80.
19. Grmec S. Comparison of three different methods to confirm tracheal tube placement in emergency intubation. Intensive Care Med. 2002;28:701–704.
20. Bozeman WP, Hexter D, Liang HK, et al. Esophageal detector device versus detection of end-tidal carbon dioxide level in emergency intubation. Ann Emerg Med. 1996;27:595–599.