
PART 3 The Intermediate Series of Asanas (Postures)
SECOND CONNECTIVE SECTION
LEG-BEHIND-HEAD SEQUENCE
Ekapada Shirshasana
ONE-LEG-BEHIND-THE-HEAD POSTURE
Drishti Nose in upright version; up to the foot in final version
OVERVIEW: Ekapada Shirshasana is the entrance to a whole universe of leg-behind-head postures. It is easier than Dvipada Shirshasana and Yoganidrasana because you place only one leg at a time. Practice it well before moving on.
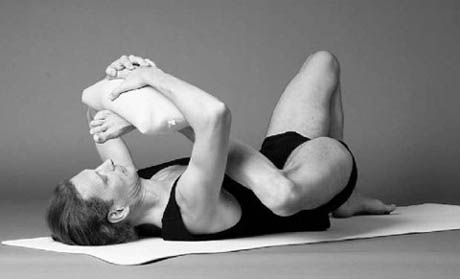
Leg-behind-head warm-up 3
CONTRAINDICATIONS: Forward head-posture, acute sacroiliac-joint injuries, twisted pelvis, weak low back, weak neck muscles, and weak abdominal muscles.
Vinyasa Count
Vinyasa Seven
Inhaling, jump your right leg around the outside of your right arm while bringing your left leg through as in any conventional jump-through. This jumping of the right leg is the same as in the transition intoBhujapidasana in the Primary Series, except that in Bhujapidasana we perform the movement simultaneously with both legs. It is wise, therefore, to start exercising by jumping straight into Bhujapidasanawithout touching down at an early point, as suggested in Ashtanga Yoga: Practice and Philosophy (p. 90), because this will prepare us for many transitions to come. If Bhujapidasana has been done to satisfaction, Ekapada Shirshasana should hold no surprises for us.
Make sure that you clear the floor with both legs. You may slightly swing out to the right to land your right thigh on your right arm. This can be achieved, for example, by bending the left arm slightly just before landing while keeping the right arm straight.
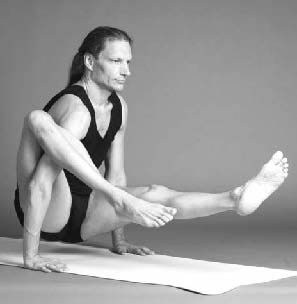
Jumping around the right arm without touching the floor
Sit down with your left leg straight in front of you, your right knee on your right arm, and your hips square. As you place your leg behind your head, keep your left leg straight to anchor your pelvis. If you bend up your left leg, you will more readily be able to compensate for lack of hip joint flexibility by tilting the pelvis backward. We will try to avoid this tilt as much as possible while learning leg-behind-head. Tilting the pelvis places considerable stresses on the lumbar facet discs as well as the sacroiliac joints. This constellation also diverts movement away from the hip joint and will thus not force you to open it. Remember that Ashtanga Yoga of Patanjali starts with ahimsa, meaning “non-harming.” To not harm with speech, thought, and action includes your own body. Teachers knew this in the great days of yore, and the practice therefore adapted to the needs of the students. Today much of this knowledge is lost, and many believe it is the student who must adapt to the practice.
Since not all students will be able to get into this posture with the speed that the vinyasa count requires, we give, in the interest of non-harm, a step-by-step breakdown into five phases for beginners. As you get more proficient, delete or amalgamate unnecessary steps until you arrive at the original vinyasa count.
PHASE 1 — PLACING KNEE BEHIND SHOULDER
Bend your right leg approximately 90 degrees,20 and
taking your right foot with your left hand, lift your right knee over your right shoulder by laterally rotating your femur (thighbone).
Flex your spine forward slightly and at the same time draw your right knee behind your shoulder, using the strength of your left arm. You can bring your right shoulder forward if that makes it easier (we will draw it backward once the leg is in position). Use your breath to do so, bending forward on the exhalation, placing the knee behind the shoulder at the end of the exhalation, and growing tall and sitting up on the inhalation, thus opening the hip joint. If you find it difficult to get your knee behind your shoulder, repeat the same movement several times, each time lifting your leg a little higher onto your shoulder.
At the end of phase 1, you will need to have your right knee firmly behind your shoulder. Your shoulder will carry a significant part of the weight of the leg and in this way will take pressure off the neck. You need to understand that leg-behind-head postures are partially strength postures. They will make your spine strong. Trying to do them with only flexibility will lead you nowhere.
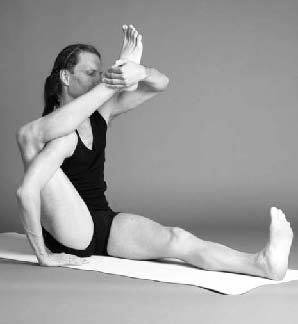
Placing the knee behind the shoulder
If you can’t get your knee on your shoulder, the cause could be one of the following four scenarios:
1. In all leg-behind-head postures, the femur (thighbone) is first flexed, abducted, and laterally rotated and then adducted (drawn toward) to place the leg behind the head. In this final movement, the femur is drawn toward the ilium (hip bone), which is part of the pelvic bone. The closer the femur can get to the ilium, the further you will get the leg behind your head. Anything that gets in between your femur and your pelvis will obstruct your progress. This “anything” is all too often adipose tissue (fat). Eliminating excess adipose tissue can make the difference between your experiencing despair in this magnificent posture or being at ease.
Solution: Eat less and exercise more.
2. Leg-behind-head postures are a peculiar mix of hamstring flexibility and hip rotation. A satisfactory amount of hamstring flexibility needs to be acquired by practicing the Primary Series before commencing the Intermediate Series.
The longer your legs are, the less hamstring flexibility is required, as you will bend your legs more to get into the posture. As you know from forward bending, bending your legs at the knees takes the stretch off your hamstrings. Due to the lateral rotation of the femur, it is only the most lateral of the hamstrings, the biceps femoris, that experiences a significant stretch in this posture. The tendon of the biceps femoris can sometimes get caught close to its origin at the ischial tuberosity (protuberance of the sit bones). Shaking out the leg or making a gentle kicking movement often resolves this predicament.
Please note that the biceps femoris is in most individuals the hamstring that obstructs forward bending the least. Antagonistic to the other two hamstring muscles (semimembranosus and semitendinosus), it performs external rotation. Novice students may find it difficult in Pashimottanasana to keep the big toes together, to extend out through the inseam of the legs, and to keep the thighbones from rotating externally, all at the same time.
Solution: Improve forward bending by putting renewed emphasis on the Primary Series.
3. Unless your hip joints are already extremely flexible, all leg-behind-head postures involve a significant amount of trunk flexion. As in most Marichyasanas, curl your trunk forward to hook your shoulder around your upright knee, and then extend your spine, working against the resistance of the posture.21
The more you are able to flex your spine, the more you can draw your leg down your back. This action can be performed only by strong trunk flexors — that is, the abdominal muscles. Strengthening the abdominals demands that you relentlessly attempt to clear the floor with your feet in all vinyasas. Don’t be surprised if this does not happen in the first year of practice. Most students will need to perform jumping through and jumping back roughly about fifty thousand times to become proficient.
The trunk flexors need to be accompanied by similarly strong trunk extensors. Apart from leg-behind-head postures, Shalabhasana and Mayurasana are the main strengthening postures of the trunk extensors in the Intermediate Series. Solution: Put more emphasis on Navasana and cleanly jumping back and through.
4. The most important factor in performing leg-behind-head postures is the flexibility of the hip joints. Please note that it is a different form of flexibility than that required in lotus postures and the deep hip rotations like Mulabandhasana, Kandasana, Ekapada Yogadandasana, and so on.22 There are students who are flexible in lotus postures and stiff in leg-behind-head postures, and vice versa. If you find your hip joints to be stiff, it is worth spending some time warming them up, preferably outside of your vinyasa practice. These warm-ups typically take some time and would interfere with the sequencing and rhythm of your vinyasa practice.
Solution: Practice leg-behind-head warm-ups outside of your vinyasa practice.
In many cases a combination of several or all four of these solutions needs to be applied. Be persistent. The outcome is worth the effort.
After duly practicing these warm-ups to satisfaction, disposing of excess adipose tissue, and improving forward-bending flexibility and abdominal strength, you will likely be able to keep your leg behind your head in an upright position.
PHASE 2 — PLACING LEG BEHIND HEAD
To place the leg behind the head, we use the same steps and breathing technique we used when placing the knee behind the shoulder.
Exhaling, draw your head forward and place your leg behind your head. Still holding your foot with your hand, feel the weight of the leg on the back of your head. With your next exhalation, bend forward again, and with your hand, draw your foot down behind your head. Inhaling, extend your neck and your back, drawing your head backward. This will open your hip joints further and give you a bit more space for the next exhale. Exhaling, draw the foot an inch or two (a few centimeters) further down the back, and inhaling, draw your head and chest backward again. Repeat these steps until you have come to your limit for that day. Always work patiently and without aggression.
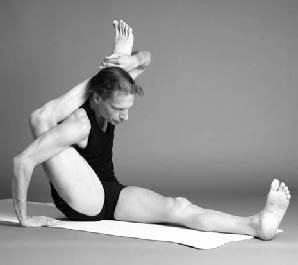
Placing the leg behind the head
PHASE 3 — TAKING SHIN BELOW C7
If you are ready to go further, we will now take the shin below the C7 vertebra (its spinous process is the large protrusion at the base of your neck). Passively, meaning by using your left hand, laterally rotate your right femur further, and flex your knee joint. Then draw your foot behind your head and down behind your neck. Ideally you will hook your shin below your C7 vertebra. If you manage to get your leg that low, it will likely feel as comfortable as carrying a large backpack. The weight of your leg is carried by your shoulders and your rib cage, which are designed to carry significant loads.
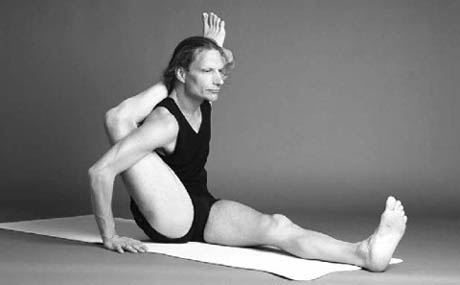
Placing the shin below C7
If you can’t get your leg that low, the sensation in the posture will be similar to someone pushing your head under water from behind. Indeed, it will make you feel as if you’re drowning in a leg-behind-head posture. This is due to the weight of your leg being carried by your neck only, which is not designed to withstand such a heavy load. If you imagine your C7 vertebra as the axis of a lever, you can appreciate the vast difference it makes if you carry the weight of your leg right at or below C7 versus much higher up. If your leg is pressing against the back of your skull, for example, you will have to carry several times the weight that you would if you carried it below C7. It is possible to carry your leg on the back of your skull, but you need to be quite athletic in order not to experience any adverse effects from it. In many students, over time this results in cervical spine dysfunction, combined with a strain of the trapezius and levator scapulae muscles.
PHASE 4 — ASSUMING THE PRAYER POSITION
To keep the leg in position, we now take the head back, which will let the foot slide further down the back. With your leg safely behind your shoulder and lower cervical or ideally thoracic spine, you can let go of the foot, which until now was held up by the guiding left hand. Before you let go fully, brace your abdomen. This action includes not only all four abdominal muscles but also the psoas, quadratus lumborum, and all layers of the erector spinae — that is, all the muscles that maintain the integrity of the low back under load. Place your hands in prayer position and gaze toward your nose.
Keep the right foot pointed and keep the hamstrings of the right leg engaged, which aids in keeping the leg behind the head and takes pressure off the neck muscles. Do not attempt to straighten the leg that is behind your head, as this would increase the load on your neck. (This may be done by advanced and very flexible students and then constitutes “active release.”)
Lift your heart and draw your shoulder blades down your back. Gently draw your chin backward to support your neck. Draw your right shoulder back against your right knee to take weight off your neck. Lift the back of your head up toward the ceiling to grow as tall as possible. Ground down through your sit bones to elongate and lengthen in the posture. Remember that because yoga works mainly with subtle spinal energy (kundalini), we are not concerned as much with the position of the limbs as with the integrity and proper function of the spine and associated nadi (energy channel) system.
Keep your left leg straight by pulling up on the kneecap without letting the thigh rotate laterally. Extend out through the heel and the bases of the toes and gently press the heel of the left foot into the floor.
If you need to open your hip joints further, you are advised to take five breaths here before going on to the next phase. If you are proficient at leg-behind-head, look at this phase as a transition only and directly proceed to phase 5. If you choose to stay here for five breaths, you may experiment with looking toward your third eye instead of your nose. This encourages you to take your head back further, which encourages the leg to slide further down the back.
PHASE 5 — BENDING FORWARD PRECAUTION: Move into phase 5 only if you can sit in the upright version of Ekapada Shirshasana with apparent ease and prayer-position hands for five breaths. Needing the help of the teacher or your own hand to keep your leg behind your head indicates that the support strength of your spine and abdomen as well as your flexibility are not yet sufficient to go further. In this case, continue with the program until your teacher deems you ready rather than going on to the next phase.
Vinyasa Eight
Exhaling, keeping your spine as straight as possible and your leg behind your head, fold forward and clasp your left foot with both hands as in Janushirshasana (a posture of the Primary Series). Continuing to exhale, place your forehead and eventually your chin on your left shin. Do this without jutting the chin forward. Instead, drop your chin and lift the back of your neck away from the floor as you suck your chest through toward your left knee. This movement is designed to further open your right hip joint. It is the equivalent of sitting up tall in the upright version.
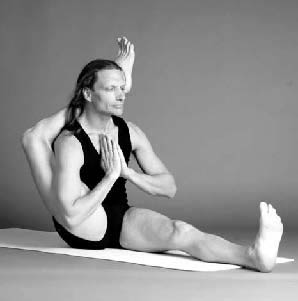
Ekapada Shirshasana, vinyasa seven
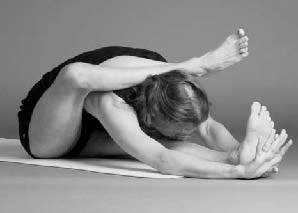
Ekapada Shirshasana, vinyasa eight
If flexibility permits, let your chin slide forward on your shin, elongating your spine. Draw your shoulder blades down your back and your elbows out to the sides. Make sure to ground your right sit bone and extend backward through both sit bones. Draw your left sit bone into the floor, and extend out through the bases of all toes of your left foot. Extend the crown of your head and your heart toward your left big toe.
Gaze toward your nose and, once you have progressed enough, up toward your left foot. Take five breaths in this full version of Ekapada Shirshasana.
Vinyasa Nine
Inhaling, let go of your left foot and come upright, again placing your hands in Anjali Mudra (prayer position).
Exhaling, place your hands down on either side of your hips, ready for lift up.
Vinyasa Ten
Inhaling, lift your sit bones off the floor and, keeping your right leg behind your head, draw your straight left leg into your torso until your shin comes close to your chin. Point your left foot and look up to your toes. Note that this transition posture is similar to leg-behind-head warm-up 2 (p. 136). There you performed it lying on your back, whereas here you balance on your arms and have to work against gravity. However, here this posture is only a transition and is held merely for the duration of the inhalation. It is nevertheless the most taxing part of Ekapada Shirshasana and must be performed cleanly before going on to the next posture.
ACTIVE RELEASE TECHNIQUE: Please note that this
method is only for practitioners already proficient in leg-behind-head postures.
Medially rotate your femur and attempt to straighten your leg. Counteract this with your core muscles by sitting upright and drawing your head, neck, and right shoulder backward. Superficially, this will take you out of the posture, but if your support structure is sound, it will open your hip joint more and increase the lateral rotation of your femur.
Vinyasa Eleven
As you initiate the exhalation, flex your neck slightly and sweep your right leg off your back. At the same time, flex your left leg, drawing your knee into your chest, and jump back into Chaturanga Dandasana. Perform this movement without touching your feet down before landing in Chaturanga Dandasana.
Vinyasa Twelve
Inhaling, lift into Upward Dog.
Vinyasa Thirteen
Exhaling, transit into Downward Dog.
Vinyasas Fourteen to Twenty
Repeat Ekapada Shirshasana on the left side.
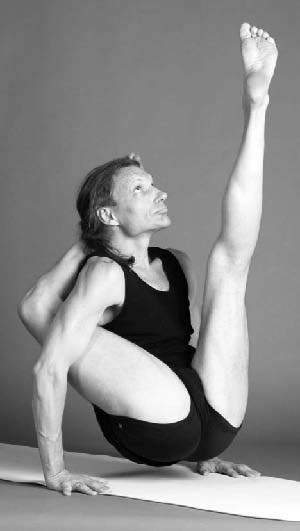
Ekapada Shirshasana, vinyasa ten