
PART 3 The Intermediate Series of Asanas (Postures)
THIRD CONNECTIVE SECTION
ARM-BALANCE SEQUENCE
Karandavasana
WATERFOWL POSTURE
Drishti Nose
OVERVIEW: Karandavasana is the most difficult posture in the series; however, progress is possible if its phases are precisely isolated. It is essential that we isolate the movements of the hip joints from the movements of the spine and the movements of the shoulder joints to succeed in this difficult posture. We will also learn the importance of being able to revert each phase of this posture before going on to the next.
PREREQUISITES: Taking your feet in Kapotasana shows that your shoulders are open enough to sustain that openness against the shoulder and back-stiffening tendency of this strenuous posture. Keeping hold of your toes during the entire transition in Supta Vajrasana without the aid of the teacher shows that your hip joints are flexible enough. Jumping out of Pincha Mayurasana in the prescribed method is important because you exit Karandavasana in the same way, but the transition is more difficult after having performed the much more strenuous Karandavasana.
CONTRAINDICATIONS: Knee problems, shoulder problems.
WARM-UP AND RESEARCH POSTURE: The following suggestions will prepare you for this difficult posture.
1. Lie on the floor face down with legs folded in Padmasana and arms extended over your head. Draw your hips and shoulders into the floor to target residual stiffness here.
2. When performing your cool-down postures, fold into lotus during Shirshasana (headstand). Although this transition is much easier than Karandavasana, it will highlight any difficulties in performingPadmasana without the help of your hands and in an upside-down position.
3. Hold Pincha Mayurasana for fifteen breaths instead of only five breaths, as that’s how long you will be in the various phases of Karandavasana initially (unless you are already proficient).
4. Hold Urdhva Dandasana (headstand variation) for ten to fifteen breaths. On the way in and out of Karandavasana, you will transit through a forearm balance with your hips extended over or even beyond the back of your head. At this point, many students fall out of the posture due to lack of strength. Holding Urdhva Dandasana for ten to fifteen breaths will prepare you.
As usual, you should practice variations outside of the vinyasa practice or, if you need to introduce them into the practice, then include them for only as long as necessary.
Vinyasa Count
Vinyasa Seven
Inhaling, hop forward to land on your knees. Exhaling, as in Pincha Mayurasana, place your forearms on the floor, straighten your legs, and walk your feet in.
Vinyasa Eight
Inhaling, move up into Pincha Mayurasana as described.
Vinyasa Nine
As with all complex postures, the key is to completely break the posture down into its constituents and isolate the respective phases of the movement. We use six phases here.
PHASE 1 — PLACING THE RIGHT LEG CORRECTLY
Exhaling, while balancing on your forearms, place first your right leg into half-lotus. You will need sufficiently flexible hip joints, which we acquired through the practice of such postures as Baddhakonasanaand Garbha Pindasana, and strong lateral (external) rotators of the hip, which we acquired in Janushirshasana B and Triang Mukha Ekapada Pashimottanasana, all part of the Primary Series. Also, performing the prescribed femur rotations in Supta Vajrasana while holding on to your toes will have prepared you for this moment.
You need to strongly externally rotate your femur to get into lotus without the aid of your hands. If you cannot get your right foot far enough toward your left groin, you may use momentum to sweep your right foot over your left thigh.
Once your right leg is in half-lotus, bend your left leg and draw the left knee toward your chest and abdomen. This will bring your legs into a similar position as they are when performing Marichyasana D, only here you are upside down. The bent left leg will help to draw the right leg deeper into half-lotus. When you cannot get any further, alternately abduct and adduct the right thigh (which means to move the knee away from the center line of your body and again back toward the midline), while continuing to flex the right knee. This will make the right foot slide over the left thigh, and since you continue to flex the left thigh, the right leg will now slip deeper toward the left groin. Continue to flex the left hip to draw the left knee further toward your chest, until your right foot is firmly placed into the left groin.
If your right foot does not slide up into half-lotus, consider the same situation as in Garbha Pindasana regarding traction. The solution that worked for you there is likely to work for you here. To repeat, if you have a papery skin type (vata skin) you may find it beneficial to wear long tights. If you have thick, watery skin (kapha skin type), you will be better off wearing shorts and sprinkling water on your thighs and feet before you perform the posture. If your skin is oily (pitta skin type), you might consider an oil-based lubricant or emulsion. However, if you use this option, make sure not to use too much lubricant or make your skin too slippery. You will need a certain amount of traction to safely perform the posture’s subsequent phases.
PHASE 2 — PLACING THE LEFT LEG CORRECTLY
Proceed with the next phase only if your right leg is in a stable position, deeply in half-lotus. Remember that when you sit on the floor to perform Padmasana, you never place the second leg into position before the first one is properly secured, so we will not resort to this while balancing on our arms either. Doing otherwise might endanger the knee joint of the leg that is on top.

Forearm balance with right leg in half-lotus
Place the left leg into lotus by strongly externally rotating the left femur. For most students, it will be helpful to sweep the leg into position using momentum, especially if you have strong, bulging thighs. Once your left leg is in position, alternately adduct and abduct both thighs. Every time you move your knees together, strongly internally rotate your thighbones (this is similar to the femur movement performed in Supta Vajrasana in vinyasa nine). This will annul the previous external rotation and move your legs deeply into lotus. Both feet will need to be high up in the groin with the heels close together and the femurs almost parallel to move through the next phase of Karandavasana.
If you are new to this posture, I suggest that you stay here for five breaths, then extend your legs slowly back up into Pincha Mayurasana and then exit as described under vinyasa nine of that posture. Do this for some time before you go on to the next phase.

Forearm balance with both legs in lotus
These first two phases deal only with movements of the hip joints.
PHASE 3 — LOWERING THE LEGS TO THE HORIZONTAL PLANE
If you are a seasoned practitioner, then slowly flex your hip joints until your folded legs are parallel to the floor and your knees are at the same height as your sit bones. To do so, you need to extend your low back into the same position that you hold in Urdhva Dandasana, the variation of headstand wherein your legs are parallel to the floor. Holding Urdhva Dandasana for a long time is good training forKarandavasana. As with Urdhva Dandasana, in this phase of Karandavasana you need to draw your sit bones over the back of your head. The defining moment of this phase is when you have a distinct backbend in your low back.
Balance here for five breaths or for longer if you want to build strength. Then slowly lift your knees up to the ceiling, sweep your legs out of Padmasana, and exit the posture in the same way as Pincha Mayurasana.
In this phase we added back extension to the movement of the hip joints.
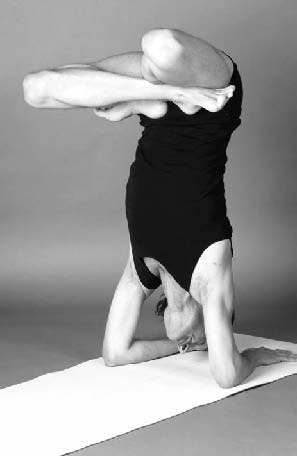
Forearm balance with horizontal lotus
PHASE 4 — STRAIGHTENING THE BACK
If phase 3 and the proper execution of its exit have become easy for you, then you are ready for the next step. Characteristic of phase 4 is that we completely annul the backbend that we created in phase 3, by dropping the knees further down. You may go as far as touching the thighs to your rib cage, but do not go further yet. Focus on stabilizing the shoulder blades using the latissimus dorsi, lower trapezius, and rhomboid muscles. Keep your humeri (arm bones) still completely flexed and resist the urge to lower down further.
Stay here for five breaths and then transit backward through the previous phases and out of Pincha Mayurasana. If you cannot lift back up out of phase 4, do not go any further but take the time to learn to do so. The further you lower down, the harder it will be to come back up. You need to imprint into your body the memory of lifting yourself up. Then you can try lifting up from a slightly lower point each day.
In this phase we flexed the hip joints to the maximum and returned the low back to neutral from extension.
PHASE 5 — FLEXING THE BACK
Once you can hold and lift out of phase 4, start to flex your trunk until your thighs are almost vertical. Your knees will now rest on your chest. If this is not the case, powerfully flex your hip joints and suck your knees into your chest.
Resist the temptation to drop down further. Stay here for five breaths before you lift back up out of the posture. If you can’t hold this phase and just drop down to rest on your arms, chances are you won’t be able to come back up.
In this phase we only flexed the spine. The hip joints were fully flexed in the previous phase and the shoulder joints will be extended in the subsequent phase.
PHASE 6 — EXTENDING THE HUMERI
In this final phase of the descent we add only the extension of the shoulder joint. Perform this action very slowly. Suck your knees up into your armpits rather than letting them drop down to your elbows. You will need very strong abdominal muscles to isometrically maintain the curl of your trunk. Fortunately, if you performed Navasana in the Primary Series with passion, your abdominals should be sufficiently strong. You also need to continue isometrically flexing your hip joints.
You will be able to draw your knees up into your armpits only when you have completed isotonic (contraction of muscles that involves their shortening) flexion of the hip joint and flexion of the trunk in the previous phases. We may call this the secret of successful execution of Karandavasana.
Make sure that you lower down in slow motion. To land heavily on your arms is not conducive to healthy knee joints. It would be the equivalent of receiving a kick against your knees from the front when sitting in Padmasana. If you collapse to the floor, landing on your derriere with a thud, your spine — and more important, what is attached to its other end, your brain — will bear the brunt of the impact.
After landing gently on your knees in a controlled fashion, stay in Karandavasana for five breaths, gazing toward your nose and keeping your knees sucked into your armpits.
Vinyasa Ten
Inhaling, strongly suck your thighs into your chest and at the same time flex your arm bones. To do so, imagine that you are lifting a heavy weight over your head. Focus on stabilizing your shoulder blades by drawing them down the back, engaging latissimus dorsi and lower trapezius. At the same time, draw the shoulder blades in toward the spine by engaging the rhomboids. Engage subscapularis and serratus anterior to suck the medial border of the shoulder blades into the posterior surface of the rib cage. Only when all of those actions are performed satisfactorily can the deltoid, triceps, and pectoralis major raise the heavy weight of the trunk effectively. Do not try to swing your legs up yet. This will move a large portion of your weight (that is, your legs) away from the axis around which you have to lift (that is, your shoulder joint) and thus increase the total weight you will need to lift.

Karandavasana
If you tend to lose your balance — that is, fall toward the foot end of your mat — shift more weight into your hands. Continue to draw your knees into your chest by isometrically flexing your hip joints until your thighs are vertical to the floor. This is an exact reversion of phase 6.
Continue to suck the thighs into your chest and start to extend your back until it is in a neutral position. This is a reversion of phase 5.
Continue to extend your back by lifting your sit bones over the back of your head. Stop hip flexion and just slightly lift your legs off your rib cage. This movement reverses phase 4.
In the next phase we encounter a change of weight distribution, and many students lose their balance and fall out of the posture at that point. As we slowly extend the hip joints and lift the thighs toward a horizontal position, we need to create an arch in the low back and let the sit bones travel over the back of the head to balance the weight of the legs. This annuls phase 3.
Continuing the inhalation, extend the knees up to the ceiling and return the spine back to neutral. From here, straighten your legs out of lotus and transit out of the posture as described under Pincha Mayurasana, vinyasa eight.
Vinyasa Eleven
Exhaling, transit into Chaturanga Dandasana.
Vinyasa Twelve
Inhale into Upward Dog.
Vinyasa Thirteen
Exhale into Downward Dog.
We will continue the vinyasa count here to standing. The vinyasa count for the next three postures starts from the standing position, as you will either enter the state of the asana already in vinyasa five (which is normally the vinyasa for Upward Dog), as is the case for Mayurasana and Nakrasana, respectively; or you will begin the vinyasa count by placing your leg in half-lotus, as is the case withVatayanasana.
Vinyasa Fourteen
Inhaling, jump forward to standing and look up. This vinyasa is identical with vinyasa three of Surya Namaskara A.
Vinyasa Fifteen
Exhaling, bend forward, placing your hands on either side of your feet, with your fingertips in line with your toes. This vinyasa is identical with vinyasa two of Surya Namaskara A.
Inhaling, come up to Samasthiti. This is the concluding posture of Surya Namaskara A.