
PART 3 The Intermediate Series of Asanas (Postures)
FOURTH CONNECTIVE SECTION
Mukta Hasta Shirshasana
FREE HANDS HEADSTAND
Drishti Nose
OVERVIEW: The seven headstands energetically seal the Intermediate Series. A lot of energy has been created and released during the practice of the series. This energy now needs to be accumulated and stored. According to the yogic texts, the nectar of life (amrita) drizzles from the soft palate (the end of the sushumna), a place called the moon, downward, to then be burned by the sun of the gastric fire. Headstands reverse this process by placing the sun above the moon. The other reason for the headstands is that through their variety they offer the opportunity to closely study the subtle alignment of the shoulders. Understanding this alignment is necessary before the yogi practices the advanced arm balances of the third series.
Vinyasa Count — A Version
Vinyasa Seven
Inhaling, hop forward and land on your knees.
Exhaling, place your head and hands down in a three-point-headstand position, with your forearms perpendicular to the floor. Place the highest point of your head down. Most students have the tendency to balance too far toward the forehead, which unnecessarily compresses the neck. Of course, it is also possible to place the weight too much toward the back of the head. If this is done continuously over a long period, a reverse curvature may be induced in the cervical spine. If in doubt, ask a qualified instructor to assess your head position.
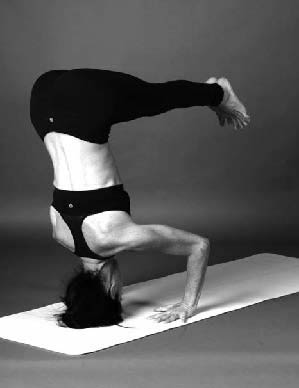
Entering headstand with straight legs, vinyasa seven
Once you have the head in the correct position, straighten your legs and walk your feet in toward your head as far as possible, without rounding your back. In fact, to achieve a headstand while keeping the legs straight, you will need to increase the lordotic curve in your low back. At this point your hips and buttocks will need to extend back beyond your spine for your feet to lift off the floor. This happens naturally and without effort when the hips are taken far enough back. To not lose your balance, simply keep your weight evenly distributed between your hands and the crown of your head.
Vinyasa Eight
Inhaling, slowly lift your straight legs together up into headstand. You need to be comfortable with transiting in and out of headstand with straight legs if you are practicing the Intermediate Series. This way of transiting is vastly superior to transiting with bent legs, as it creates more core strength, of which you will need copious amounts in many of the asanas in this and the next series. Avoid using the help of a wall for balancing in all headstand variations. As already explained, walls are tamasic objects that cannot supply feedback. (The same must, of course, be said about books and DVDs. They cannot provide feedback even if the knowledge enclosed in them is of a sattvic nature.) Students who do use walls are often stunted in their development. If you need help, a teacher who is able to analyze your postures can tell you exactly which actions in the posture you are not performing.
Firmly pressing your hands into the floor, lift your legs until your hip joints are completely extended and your body forms a straight line from head to toe. Point your feet and keep all leg and trunk muscles engaged lightly to prevent the sagging of blood toward the brain. Keep your bandhas firmly engaged and breathe slowly into the chest, keeping the diaphragm oscillating freely. Breathing in all inversions should always be slow, as rapid breathing would disturb your balance through the resonance frequency created in the abdomen. This would lead to either the body swinging back and forth like a pendulum or so much energy being wasted on the suppression of this swinging that the student would fatigue quickly and fall out of headstand. All inversions therefore require slow and controlled thoraco-diaphragmatic breathing.
As in all headstand versions, engage lower trapezius to draw your shoulder blades up toward the ceiling, and attempt to carry most of your weight in your arms. However, the latter instruction is not as important here as in Shirshasana, since we hold these headstand versions for five breaths only. Take five breaths and look toward your nose.

Mukta Hasta Shirshasana A
To transit out of this posture, we will use essentially the same method employed and described under Pincha Mayurasana. You need to transit out of these inversions on the peak of the inhalation but before you begin the exhalation. On the last inhalation, shift more weight from your head to your hands, become light, and when you are most buoyant, press your hands powerfully into the floor. The crucial moment to change your hand position is when you stop resisting gravity and allow your feet to fall toward the floor. Keep your body weight forward on your hands so that your feet land lightly and with minimal impact.
Vinyasa Nine
Exhaling, drop into Chaturanga Dandasana with both legs at the same time. If you cannot rely on your shoulder strength, then flex your hip joints slightly on the way down to use your hip flexors to soften the landing. If you are capable of performing half-vinyasas without touching your feet down, then on your way out of Mukta Hasta Shirshasana, draw your hands toward your waistline and suck your chest toward the front end of your mat. You can then lower down with your back slightly extended. This way you can fade out the movement and land lightly.
Whichever method you choose, to prepare for the impact make sure that your feet are flexed (dorsi flexed) and your toes are extended (curled up).
Vinyasa Ten
Inhaling, move into Upward Dog.
Vinyasa Eleven
Exhaling, move into Downward Dog.
Vinyasa Count — B Version
Vinyasa Seven
Inhaling, hop forward and land on your knees.
Exhaling, place your head and hands down as in Mukta Hasta Shirshasana A, but then straighten your arms and place your palms, facing up, on either side of your feet so that your arms are parallel to each other. Straighten your legs now and walk your feet in as far as possible. Engage the stabilizer muscles of the shoulder girdle strongly to secure the position of your shoulder blades. Make sure that you include the muscles in your back (latissimus dorsi, lower trapezius, rhomboids) and do not attempt to perform the stabilizing in the posture with your pectoralis major and minor only. This is a common mistake that in the long run leads to an imbalance between the muscles on the front and back of the chest and shoulders.
Vinyasa Eight
Inhaling, maintain the pressure of the backs of the wrists and hands onto the floor, and slowly lift your straight legs together up into headstand. Follow all the instructions given for the previous headstand.
Firmly engage all the muscles of the shoulder girdle and arms to balance.
Take five breaths and look toward your nose.
On the last inhalation, hook the breath into the bandhas and become as light as possible.
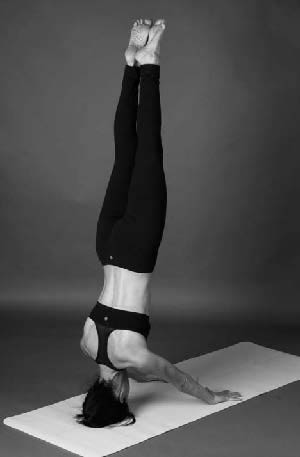
Mukta Hasta Shirshasana B
When you are most buoyant, quickly move your hands back into a three-point-headstand position (as in Mukta Hasta Shirshasana A), shift your weight toward your hands, and press them powerfully into the floor.
Vinyasa Nine
Exhaling, drop into Chaturanga Dandasana, as in the previous version.
Vinyasa Ten
Inhaling, move into Upward Dog.
Vinyasa Eleven
Exhaling, move into Downward Dog.
Vinyasa Count — C Version
Vinyasa Seven
Inhaling, hop forward and land on your knees.
Exhaling, place your head and hands down as in Mukta Hasta Shirshana A, then extend your arms out to the sides with palms facing downward. Ideally, your arms will be straight out, in line with your head, but if you are new to the posture, you will likely need to keep your arms 20 to 30 degrees further forward to train yourself to balance in this difficult variation. The wide arm position of this variation often leads to taking most of the body’s weight on the head. Avoid this as much as you can by pressing your hands into the floor. However, this can lead to another problem: hyperextension of the elbow joints. If the insides of your elbows ache after doing the Intermediate Series, elbow hyperextension in Mukta Hasta Shirshasana C is most likely the culprit.30 In this case, you need to slightly bend your elbows in this posture (if you were practicing in a very full class, you might have to do this anyway because of lack of space).
Straighten your legs and walk your feet in as far as possible.
Vinyasa Eight
Inhaling, slowly lift your straight legs together up into headstand. Follow all the instructions given for the previous versions.
Firmly engage all the muscles of the shoulder girdle and arms to balance. Create lightness in the core of your body and suck every cell of your body up toward the ceiling using the breath. It is possible; try it out. Stand tall. Imagine that you are carrying a heavy weight on your head. In that case, you would not slump down but would stand as tall under the weight as possible. If you were to slump, the curvatures in your spine and thus the gravitational force would increase. By standing tall you decrease the lumbar, thoracic, and cervical curves and thus use less muscle activity to carry the weight. Here, you especially need to reduce the cervical curvature right before you jump out of the posture.
Take five breaths and look toward your nose.

Mukta Hasta Shirshasana C
On the last inhalation, hook the breath into the bandhas and become as light as possible. When you are most buoyant, quickly move your hands into a three-point-headstand position (as in Mukta Hasta Shirshasana A), shift your weight toward your hands, and press them powerfully into the floor.
Vinyasa Nine
Exhaling, drop into Chaturanga Dandasana, as in the previous version.
Vinyasa Ten
Inhaling, move into Upward Dog.
Vinyasa Eleven
Exhaling, move into Downward Dog.