
|
Area |
Indication |
Projection |
|
Hand |
Fractures and dislocation of metacarpals |
Postero-anterior (basic) Anterior oblique (basic) |
|
Serious injury or foreign bodies |
Lateral (basic) Antero-posterior (alternate) |
|
|
Pathology e.g. rheumatoid arthritis |
Postero-anterior - both hands Postero-oblique - both hands (ball catcher’s) |
|
|
Fingers |
Fractures and dislocation/foreign bodies |
Postero-anterior (basic) Lateral (basic) |
|
Thumb |
Fractures and dislocation of phalanges |
Antero-posterior (basic) Lateral (basic) |
|
Injury to base of first metacarpal e.g. |
Antero-posterior (basic) |
|
|
Bennett’s fracture |
Lateral (basic) |
|
|
Carpal bones |
e.g. Scaphoid |
Postero-anterior with hand adducted (ulnar deviation) Anterior oblique (basic) Posterior oblique Lateral (basic) |
|
Carpal tunnel syndrome |
Axial Postero-anterior |
|
|
Distal end radius and ulna |
Trauma or pathology |
Postero-anterior (basic) Lateral (basic) Oblique |
|
Forearm |
Trauma or pathology |
Antero-posterior (basic) Lateral (basic) |
|
Serious injury |
Antero-posterior (modified) Lateral (modified) |
|
|
Elbow joint |
Trauma or pathology |
Lateral (basic) Antero-posterior (basic) |
|
Elbow cannot be extended |
Lateral (basic) Antero-posterior Axial |
|
|
Trauma or pathology head of radius |
Antero-posterior (basic) Lateral with rotation of radius Axial (2) |
|
|
Proximal radio-ulnar joint |
Lateral (basic) Antero-posterior - oblique |
|
|
Ulnar groove |
Antero-posterior (basic) Axial |
|
|
Supracondylar fracture |
Antero-posterior (modified) Lateral (modified) |
|
|
Humerus |
Trauma or pathology |
Antero-posterior (erect) Lateral (erect) |
|
Intertuberous sulcus (bicipital groove) |
Antero-posterior (basic) Axial |
|
|
Neck of humerus |
Fracture |
Antero-posterior Lateral oblique Lateral - supero-superior Lateral - infero-superior |
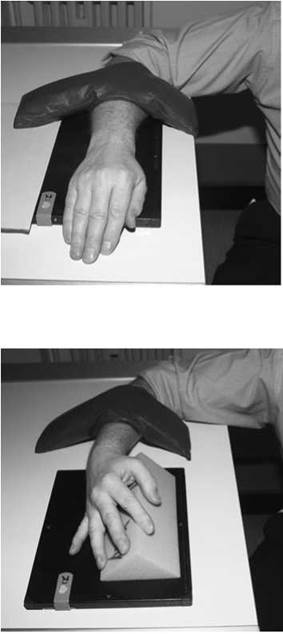
Position of patient in 2 relation to table
Although radiographic examinations of the upper limb are routine, a high standard of radiography must be maintained. The best possible radiographs are essential, because decisions about injuries, especially of the elbow and the wrist, affect future dexterity, employment and earnings of the patient.
The importance of registering the correct right or left marker at the time of the exposure cannot be overemphasized; neither can the importance of recording the correct patient identification and date of the examination.
To ensure maximum radiation protection, the patient should be seated at the side or end of the table with the lower limbs and gonads away from the primary beam, i.e. with the legs to the side of the table rather than under it; the beam should be collimated within the margins of the cassette. More than one projection can be recorded on the cassette provided that lead-rubber is used to mask off the parts of the cassette not being used.
The limb should be immobilized by the use of non-opaque pads within the radiation field and sandbags outside the field. It is important to remember that the patient will be able to keep the limb still only if it is in a comfortable and relaxed position. When the hand or wrist is being examined, the patient’s forearm and hand can rest on the table. For examination of the forearm, elbow and humerus, the shoulder, elbow and wrist should be in a plane parallel to the cassette. With the cassette on the table, this means that the shoulder, elbow and wrist will be at the same horizontal level, i.e. the upper arm, elbow and forearm should be in contact with the table.
Hand
Basic projections
It is common practice to obtain two projections, a postero-anterior and an anterior oblique, on one 24 X 30-cm cassette. If possible use a cassette with high-resolution screens. A lead-rubber mask may be used to mask off the half of the film not in use.
Postero-anterior - dorsi-palmar
Position of patient and cassette
• The patient is seated alongside the table with the affected arm nearest to the table.
• The forearm is pronated and placed on the table with the palmer surface of the hand in contact with the cassette.
• The fingers are separated and extended but relaxed to ensure that they remain in contact with the cassette.
• The wrist is adjusted so that the radial and ulna styloid processes are equidistant from the cassette.
• A sandbag is placed over the lower forearm for immobilization.
Direction and centring of the X-ray beam
• The vertical central ray is centred over the head of the third metacarpal.
Essential image characteristics
• The image should demonstrate all the phalanges, including the soft-tissue fingertips, the carpal and metacarpal bones, and the distal end of the radius and ulna.
• The inter-phalangeal and metacarpo-phalangeal and carpometacarpal joints should be demonstrated clearly.
• No rotation.


Normal postero-anterior radiograph of left hand
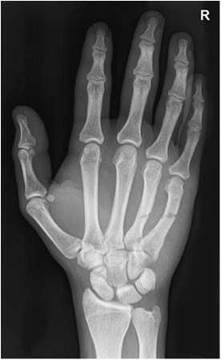
Postero-anterior radiograph showing fractures of fourth and fifth metacarpals
Radiographic anatomy

Anterior oblique - dorsi-palmar oblique
Position of patient and cassette
• From the basic postero-anterior position, the hand is externally rotated 45 degrees with the fingers extended.
• The fingers should be separated slightly and the hand supported on a 45-degree non-opaque pad.
• A sandbag is placed over the lower end of the forearm for immobilization.
Direction and centring of the X-ray beam
• The vertical central ray is centred over the head of the fifth metacarpal.
• The tube is then angled so that the central ray passes through the head of the third metacarpal, enabling a reduction in the size of the field.
Essential image characteristics
• The image should demonstrate all the phalanges, including the soft-tissue of the fingertips, the carpal and metacarpal bones, and the distal end of the radius and ulna.
• The correct degree of rotation has been achieved when the heads of the first and second metacarpals are seen separated whilst those of the fourth and fifth are just superimposed.
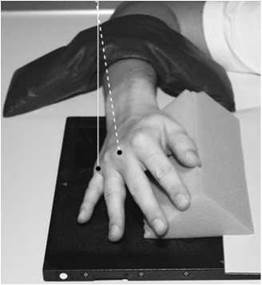
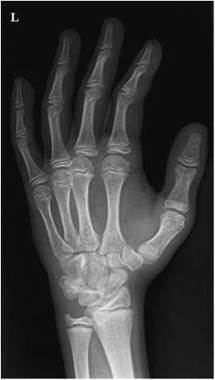
Normal anterior oblique radiograph of left hand
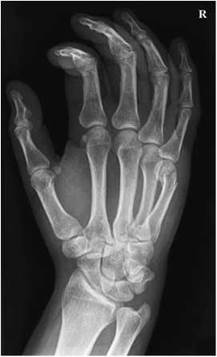
Anterior oblique radiograph of right hand showing fracture neck of fifth metacarpal (Boxer’s fracture)
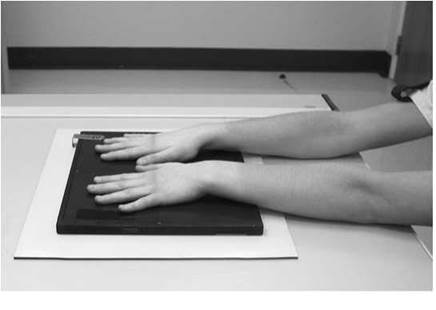

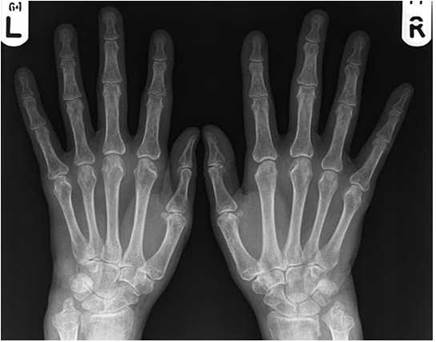
Normal postero-anterior radiograph, both hands
Postero-anterior - both hands
This projection is often used to demonstrate subtle radiographic changes associated with early rheumatoid arthritis and to monitor the progress of the disease.
Position of patient and cassette
• Ideally, the patient is seated alongside the table. However, if this is not possible due to the patient’s condition, the patient may be seated facing the table (see Radiation protection, p. 35).
• Both forearms are pronated and placed on the table with the palmer surface of the hands in contact with the cassette.
• The fingers are separated and extended but relaxed to ensure that they remain in contact with the cassette.
• The wrists are adjusted so that the radial and ulna styloid processes are equidistant from the cassette.
• A sandbag is placed over the lower forearms for immobilization.
Direction and centring of the X-ray beam
• The vertical central is centred over a point midway between the inter-phalangeal joints of both thumbs.
Essential image characteristics
• The image should demonstrate all the phalanges, including the soft-tissue fingertips, the carpal and metacarpal bones, and the distal end of the radius and ulna.
• The exposure factors selected must produce a density and contrast that optimally demonstrate joint detail.
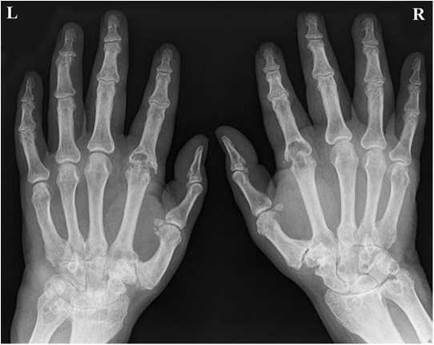
Postero-anterior radiograph of both hands showing severe erosive disease
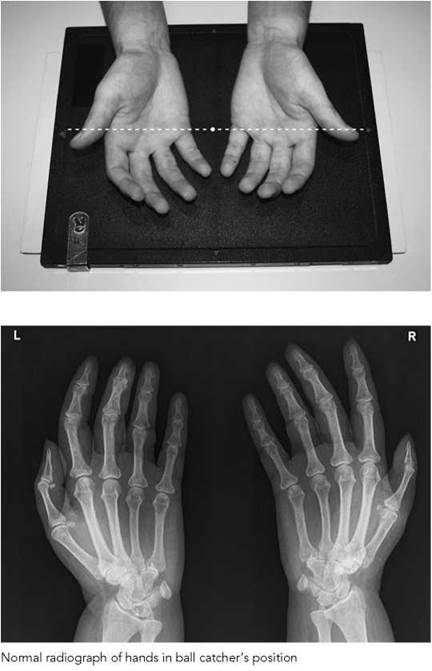
Posterior oblique - both hands (ball catcher’s or Norgaard projection)
This projection may be used in the diagnosis of rheumatoid arthritis. It can also be used to demonstrate a fracture of the base of the fifth metacarpal.
Position of patient and cassette
• Ideally, the patient is seated alongside the table. However, if this is not possible due to the patient’s condition, the patient may be seated facing the table (see Radiation protection, p. 35).
• Both forearms are supinated and placed on the table with the dorsal surface of the hands in contact with the cassette.
• From this position, both hands are rotated internally (medially) 45 degrees into a ‘ball-catching’ position.
• The fingers and thumbs are separated and extended but relaxed to ensure that they remain in contact with the cassette.
• The hands may be supported using 45-degree non-opaque pads.
• A sandbag is placed over the lower forearms for immobilization.
Direction and centring of the X-ray beam
• The vertical central ray is centred to a point midway between the hands at the level of the fifth metacarpo-phalangeal joints.
Essential image characteristics
• The image should demonstrate all the phalanges, including the soft-tissue of the fingertips, the carpal and metacarpal bones, and the distal end of the radius and ulna.
• The exposure factors selected must produce a density and contrast that optimally demonstrate joint detail.
• The heads of the metacarpals should not be superimposed.
Radiation protection
If it has been necessary to position the patient facing the table, it is essential to provide radiation protection for the lower limbs and gonads. This may be achieved by placing a lead-rubber sheet on the table underneath the cassette to attenuate the primary beam.

Lateral

This is used in addition to the routine postero-anterior projection to locate a foreign body. It may also be used to demonstrate a fracture or dislocation of the carpal bones.
Position of patient and cassette
• From the postero-anterior position, the hand is externally rotated 90 degrees.
• The palm of the hand is perpendicular to the cassette, with the fingers extended and the thumb abducted and supported parallel to the film on a non-opaque pad.
• The radial and ulnar styloid processes are superimposed.
Direction and centring of the X-ray beam
• The vertical central ray is centred over the head of the second metacarpal.
Essential image characteristics
• The image should include the fingertips, including soft tissue, and the radial and ulnar styloid processes.
• The heads of the metacarpals should be superimposed.
• The thumb should be demonstrated clearly without superimposition of other structures.
Notes
• If the projection has been undertaken to identify the position of a foreign body, the kVp should be lowered to demonstrate or exclude its presence in the soft tissues.
• A metal marker placed adjacent to the puncture site is commonly used to aid localization of the foreign body.
Radiological considerations
• The hand and wrist (like the ankle and foot) have many accessory ossicles, which may trap the unwary into a false diagnosis of pathology.
• ‘Boxer’s fracture’ of the neck of the fifth metacarpal is seen easily, but conspicuity of fractures of the bases of the metacarpals is reduced by over rotation and underexposure.
Fingers
Basic projections
It is common practice to obtain two projections, a postero-anterior and a lateral, on one 18 X 24-cm high-resolution cassette.
It is often necessary to image adjacent fingers, e.g. the second and third or the fourth and fifth. If this is the case, then care should be taken to avoid superimposition, particularly in the lateral projection, by fully extending one finger and partly flexing the other. A non-opaque foam pad is used to support the finger not in contact with the cassette.
A lead-rubber mask may be used to mask off the half of the film not in use.
Postero-anterior
Position of patient and cassette
• The patient is positioned seated alongside the table as for a postero-anterior projection of the hand.
• The forearm is pronated with the anterior (palmer) aspect of the finger(s) in contact with the cassette.
• The finger(s) are extended and separated.
• A sandbag is placed across the dorsal surface of the wrist for immobilization.
Direction and centring of the X-ray beam
• The vertical central ray is centred over the proximal inter- phalangeal joint of the affected finger.
Essential image characteristics
• The image should include the fingertip and the distal third of the metacarpal bone.
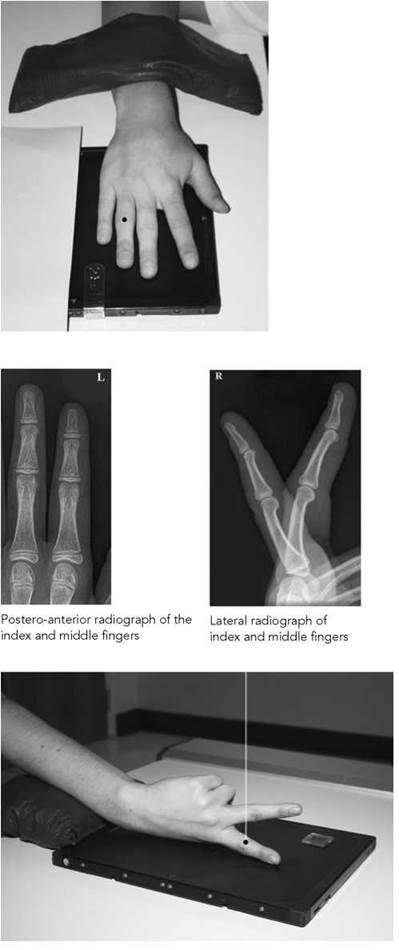
Lateral - index and middle fingers
Position of patient and cassette
• The patient is seated alongside the table with the arm abducted and medially rotated to bring the lateral aspect of the index finger into contact with the cassette.
• The raised forearm is supported.
• The index finger is fully extended and the middle finger slightly flexed to avoid superimposition.
• The middle finger is supported on a non-opaque pad.
• The remaining fingers are fully flexed into the palm of the hand and held there by the thumb.
Direction and centring of the X-ray beam
• The vertical central ray is centred over the proximal inter- phalangeal joint of the affected finger.
Essential image characteristics
• The image should include the fingertip and the distal third of the metacarpal bone.
• The condyles should be superimposed to avoid obscuring a volar plate fracture.
Lateral - ring and little fingers


Position of patient and cassette
• The patient is seated alongside the table with the palm of the hand at right-angles to the table and the medial aspect of the little finger in contact with the film.
• The affected finger is extended and the remaining fingers are fully flexed into the palm of the hand and held there by the thumb in order to prevent superimposition.
• It may be necessary to support the ring finger on a nonopaque pad to ensure that it is parallel to the film.
Direction and centring of the X-ray beam
• The vertical central ray is centred over the proximal inter- phalangeal joint of the affected finger.
Essential image characteristics
• The image should include the tip of the finger and the distal third of the metacarpal bone.
Note
In cases of severe trauma, when the fingers cannot be flexed, it may be necessary to take a lateral projection of all the fingers superimposed, as for the lateral projection of the hand, but centring over the proximal inter-phalangeal joint of the index finger.
Radiological considerations
• Scleroderma (one cause of Raynaud’s disease) causes wasting and calcification of the soft tissue of the finger pulp.
• Chip fracture of the base of the dorsal aspect of the distal phalanx is associated with avulsion of the insertion of the extensor digitorum tendon, leading to the mallet finger deformity.
It is common practice to obtain two projections, an anteroposterior and a lateral, on one 18 X 24-cm high-resolution cassette.
In the case of a suspected foreign body in the thenar eminence, a postero-anterior projection is used to maintain the relationship with adjacent structures.
A lead-rubber mask may be used to mask off the half of the cassette not in use.
Lateral
Position of patient and cassette
• The patient is seated alongside the table with the arm abducted, the elbow flexed and the anterior aspect of the forearm resting on the table.
• The thumb is flexed slightly and the palm of the hand is placed on the cassette.
• The palm of the hand is raised slightly with the fingers partially flexed and supported on a non-opaque pad, such that the lateral aspect of the thumb is in contact with the cassette.
Direction and centring of the X-ray beam
• The vertical central ray is centred over the first metacarpophalangeal joint.
Essential image characteristics
• Where there is a possibility of injury to the base of the first metacarpal, the carpo-metacarpal joint must be included on the image.

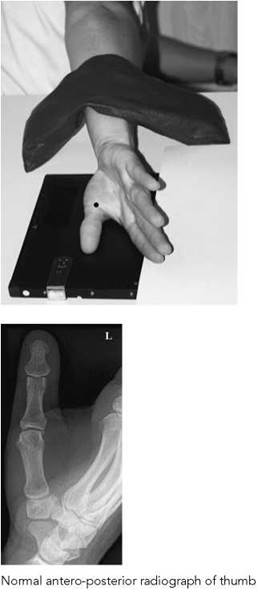
Antero-posterior
Position of patient and cassette
• The patient is seated facing away from the table with the arm extended backwards and medially rotated at the shoulder. The hand may be slightly rotated to ensure that the second, third and fourth metacarpals are not superimposed on the base of the first metacarpal.
• The patient leans forward, lowering the shoulder so that the first metacarpal is parallel to the tabletop.
• The cassette is placed under the wrist and thumb and oriented to the long axis of the metacarpal.
Direction and centring of the X-ray beam
• The vertical central ray is centred over the base of the first metacarpal.

Postero-anterior - foreign body

Position of patient and cassette
• With the hand in the postero-anterior position, the palm of the hand is rotated through 90 degrees to bring the medial aspect of the hand in contact with the table and the palm vertical.
• The cassette is placed under the hand and wrist, with its long axis along the line of the thumb.
• The fingers are extended and the hand is rotated slightly forwards until the anterior aspect of the thumb is parallel to the cassette.
• The thumb is supported in position on a non-opaque pad.
Direction and centring of the X-ray beam
• The vertical central ray is centred to the first metacarpophalangeal joint.
Essential image characteristics
• Where there is a possibility of injury to the base of the first metacarpal, the carpo-metacarpal joint must be included on the image.
• The second, third, fourth and fifth metacarpals should not be superimposed on the first.
Notes
• The postero-anterior projection increases object-to-film distance and hence, potentially, unsharpness, but it is sometimes easier and less painful for the patient.
• The use of the postero-anterior projection maintains the relationship of the adjacent bones, i.e. the radius and ulna, which is essential in cases of suspected foreign body in the thenar eminence.
Radiological considerations
Fracture of the base of the first metacarpal through the joint surface may be associated with dislocation due to the pull of the abductor and extensor tendons of the thumb. This is known as Bennett’s fracture and may cause functional impairment and early degenerative disease if not corrected. In contrast, a fracture that does not transgress the articular surface does not dislocate and does not have the same significance (Rolando fracture).
Scaphoid
Postero-anterior - ulnar deviation
Imaging of the carpal bones is most commonly undertaken to demonstrate the scaphoid. The projections may also be used to demonstrate other carpal bones, as indicated below.
Four projections may be taken to demonstrate all the carpal bones using a 24 X 30-cm cassette, each quarter being used in turn, with the other three-quarters masked off using lead rubber.
For scaphoid fractures, three projections are normally taken: postero-anterior, anterior oblique and lateral.
Position of patient and cassette
• The patient is seated alongside the table with the affected side nearest the table.
• The arm is extended across the table with the elbow flexed and the forearm pronated.
• If possible, the shoulder, elbow and wrist should be at the level of the tabletop.
• The wrist is positioned over one-quarter of the cassette and the hand is adducted (ulnar deviation).
• Ensure that the radial and ulnar styloid processes are equidistant from the cassette.
• The hand and lower forearm are immobilized using sandbags.
Direction and centring of the X-ray beam
• The vertical central ray is centred midway between the radial and ulnar styloid processes.


Essential image characteristics
• The image should include the distal end of the radius and ulna and the proximal end of the metacarpals.
• The joint space around the scaphoid should be demonstrated clearly.
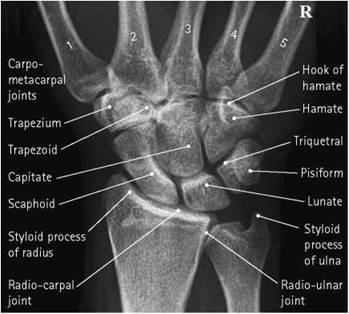
Antero-posterior radiograph of wrist

Normal postero-anterior radiograph of scaphoid in ulnar deviation

Anterior oblique - ulnar deviation

Anterior oblique radiograph of scaphoid
Position of patient and cassette
• From the postero-anterior position, the hand and wrist are rotated 45 degrees externally and placed over an unexposed quarter of the cassette. The hand should remain adducted in ulnar deviation.
• The hand is supported in position, with a non-opaque pad placed under the thumb.
• The forearm is immobilized using a sandbag.
Direction and centring of the X-ray beam
• The vertical central ray is centred midway between the radial and ulnar styloid processes (see p. 58).
Essential image characteristics
• The image should include the distal end of the radius and ulna and the proximal end of the metacarpals.
• The scaphoid should be seen clearly, with its long axis parallel to the cassette.

Normal anterior oblique radiograph of scaphoid
Posterior oblique
Position of patient and cassette
• From the anterior oblique position, the hand and wrist are rotated externally through 90 degrees, such that the posterior aspect of the hand and wrist are at 45 degrees to the cassette.
• The wrist is placed over an unexposed quarter of the cassette, with the wrist and hand supported on a 45-degree non-opaque foam pad.
• The forearm is immobilized using a sandbag.
Direction and centring of the X-ray beam
• The vertical central ray is centred over the styloid process of the ulna.

Essential image characteristics
• The image should include the distal end of the radius and ulna and the proximal end of the metacarpals.
• The pisiform should be seen clearly in profile situated anterior to the triquetral.
• The long axis of the scaphoid should be seen perpendicular to the cassette.
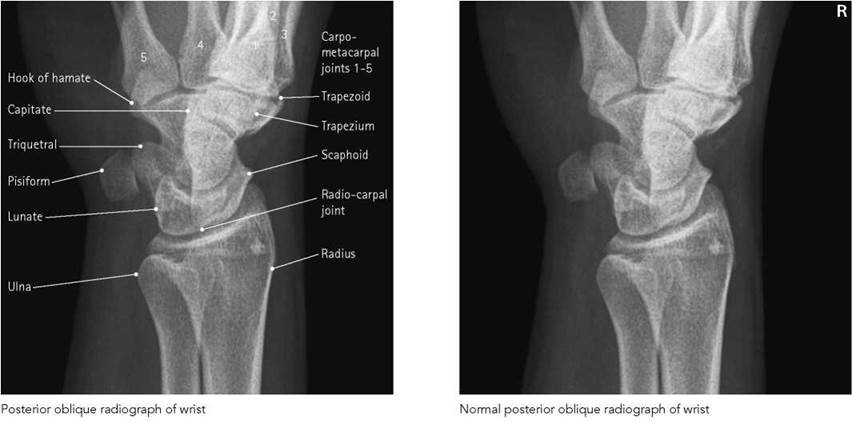

Lateral radiograph of wrist
Lateral
Position of patient and cassette
• From the posterior oblique position, the hand and wrist are rotated internally through 45 degrees, such that the medial aspect of the wrist is in contact with the cassette.
• The hand is adjusted to ensure that the radial and ulnar styloid processes are superimposed.
• The hand and wrist are immobilized using non-opaque pads and sandbags.
Direction and centring of the X-ray beam
• The vertical central ray is centred over the radial styloid process.
Essential image characteristics
• The image should include the distal end of the radius and ulna and the proximal end of the metacarpals.
• The image should demonstrate clearly any subluxation or dislocation of the carpal bones.
Radiological considerations
• Fracture of the waist of the scaphoid may be very poorly visible, if at all, at presentation. It carries a high risk of delayed avascular necrosis of the distal pole, which can cause severe disability. If suspected clinically, the patient may be re-examined after 10 days of immobilization, otherwise a technetium bone scan or magnetic resonance imaging (MRI) may offer immediate diagnosis.

Normal lateral radiograph of wrist
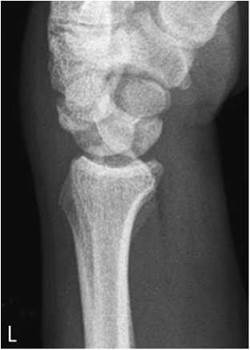
Lateral radiograph of wrist showing dislocation of the lunate. The lunate bone is rotated and anteriorly displaced
Carpal tunnel
The carpal bones form a shallow concavity, which, with the bridging flexor retinaculum, forms the carpal tunnel. The flexor retinaculum is attached to the two medial prominences (the pisiform and the hook of the hamate) and to the two lateral prominences (the tubercle of the scaphoid and the tubercle of the trapezium). The median nerve along with the flexor tendons pass through the tunnel, and any swelling here can cause compression of the median nerve, giving rise to the carpal tunnel syndrome. Radiographic examination of the bony part of the tunnel is by an axial projection to demonstrate the medial and lateral prominences and the concavity.
This examination is requested less often nowadays due to improved electrophysiological techniques and the advent of MRI, which gives far better anatomical information.
Two alternative positions using an 18 X 24-cm cassette are described, depending on the condition of the patient.
Axial - method 1
Position of patient and cassette
• The patient stand with their back towards the table.
• The cassette is placed level with the edge of the tabletop.
• The palm of the hand is pressed on to the cassette, with the wrist joint dorsiflexed to approximately 135 degrees.
• The fingers are curled around under the table to assist in immobilization.
Direction and centring of the X-ray beam
• The vertical central ray is centred between the pisiform and the hook of the hamate medially and the tubercle of the scaphoid and the ridge of the trapezium laterally.
Axial - method 2
Position of patient and cassette
• The patient is seated alongside the table.
• The cassette is placed on top of a plastic block approximately 8 cm high.
• The lower end of the forearm rests against the edge of the block, with the wrist adducted and dorsiflexed to 135 degrees.
• This position is assisted using a traction bandage held by the patient’s other hand.
Direction and centring of the X-ray beam
• The vertical central ray is centred between the pisiform and the hook of the hamate medially and the tubercle of the scaphoid and the ridge of the trapezium laterally.
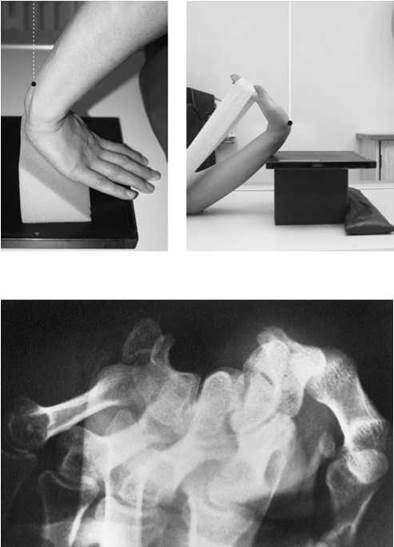
Normal carpal tunnel radiograph

Essential image characteristics
• The image should demonstrate clearly the pisiform and the hook of the hamate medially and the tubercle of the scaphoid and the tubercle of the trapezium laterally.
Wrist
Basic projection
Two projections are routinely taken, a postero-anterior and a lateral, using an 18 X 24-cm high-resolution cassette. A lead- rubber sheet can be used to mask the half of the cassette not in use. An additional oblique projection may also be undertaken to provide further information.
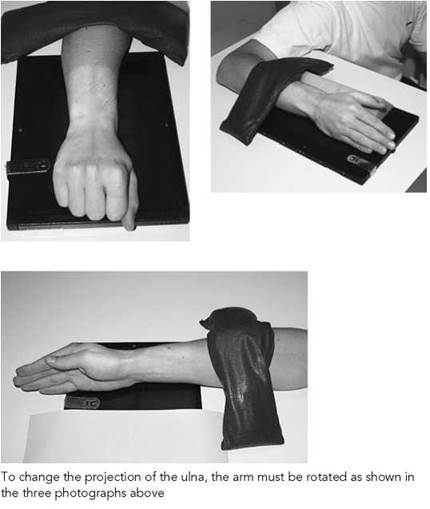
When carrying out radiographic examinations of the radius and ulna, it is important to bear in mind the movements that occur at the joints of the upper limb. The hand can be rotated from the palm facing the table to the palm at right-angles to the table with little or no rotation of the ulna. In this movement, the upper end of the radius rotates about its long axis while the lower end rotates around the lower end of the ulna, carrying the hand with it.
The hinge formed by the trochlear surface of the humerus and the trochlear notch of the ulna prevents rotation of the ulna unless the humerus rotates. If, therefore, the wrist is positioned for a postero-anterior projection and then moved into the position for the lateral simply by rotating the hand, we will obtain two projections of the radius but the same projection of the ulna. To achieve two projections at right-angles of both the radius and the ulna, the two positions must be obtained by rotating the humerus (not simply the hand) through 90 degrees, i.e. there should be no rotation at the radio-ulnar joints.
Thus, there are basically two methods of positioning the wrist for a radiographic examination of the lower end of radius and ulna, but only one of these will give two projections of both the radius and the ulna.
Method 1
The forearm remains pronated and the change in position from that for the postero-anterior projection to that for the lateral is achieved by rotation of the hand. In this movement, only the radius, and not the ulna, rotates, giving two projections at rightangles to each other of the radius but the same projection each time for the ulna.
Of the two bones, the radius is the more frequently injured, so this positioning method can be used to demonstrate the injury, provided that the patient can rotate the hand. Very often, the patient cannot rotate the hand, so the second method must be used.
Method 2
The change in position is achieved by rotation of the humerus. Because the humerus rotates, so does the ulna. This method therefore gives us two projections at right-angles to each other of the radius and the ulna.


Postero-anterior
Position of patient and cassette
• The patient is seated alongside the table, with the affected side nearest to the table.
• The elbow joint is flexed to 90 degrees and the arm is abducted, such that the anterior aspect of the forearm and the palm of the hand rest on the cassette.
• If the mobility of the patient permits, the shoulder joint should be at the same height as the forearm.
• The wrist joint is placed on one half of the cassette and adjusted to include the lower part of the radius and ulna and the proximal two-thirds of the metacarpals.
• The fingers are flexed slightly to bring the anterior aspect of the wrist into contact with the cassette.
• The wrist joint is adjusted to ensure that the radial and ulnar styloid processes are equidistant from the cassette.
• The forearm is immobilized using a sandbag.
Direction and centring of the X-ray beam
• The vertical central ray is centred to a point midway between the radial and ulnar styloid processes.
Essential image characteristics
• The image should demonstrate the proximal two-thirds of the metacarpals, the carpal bones, and the distal third of the radius and ulna.
• There should be no rotation of the wrist joint.
Lateral - method 1

Position of patient and cassette
• From the postero-anterior position, the wrist is externally rotated through 90 degrees, to bring the palm of the hand vertical.
• The wrist joint is positioned over the unexposed half of the cassette to include the lower part of the radius and ulna and the proximal two-thirds of the metacarpals.
• The hand is rotated externally slightly further to ensure that the radial and styloid processes are superimposed.
• The forearm is immobilized using a sandbag.
Direction and centring of the X-ray beam
• The vertical central ray is centred over the styloid process of the radius.
Essential image characteristics
• The exposure should provide adequate penetration to visualize the carpal bones.
• The radial and ulnar styloid processes should be superimposed.
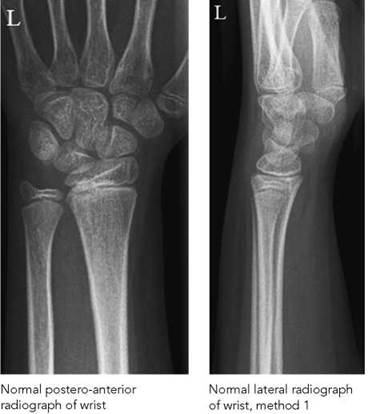
• The image should demonstrate the proximal two-thirds of the metacarpals, the carpal bones, and the distal third of the radius and ulna.

Lateral - method 2
This projection will ensure that both the radius and the ulna will be at right-angles, compared with the postero-anterior projection.

Position of patient and cassette
• From the postero-anterior position, the humerus is externally rotated through 90 degrees.
• The elbow joint is extended to bring the medial aspect of the forearm, wrist and hand into contact with the table.
• The wrist joint is positioned over the unexposed half of the cassette to include the lower part of the radius and ulna and the proximal two-thirds of the metacarpals.
• The hand is rotated externally slightly further to ensure that the radial and styloid processes are superimposed.
• The forearm is immobilized using a sandbag.
Direction and centring of the X-ray beam
• The vertical central ray is centred over the styloid process of the radius.
Essential image characteristics
• The exposure should provide adequate penetration to visualize the carpal bones.
• The radial and ulnar styloid processes should be superimposed.
• The image should demonstrate the proximal two-thirds of the metacarpals, the carpal bones and the distal third of the radius and ulna.
Notes
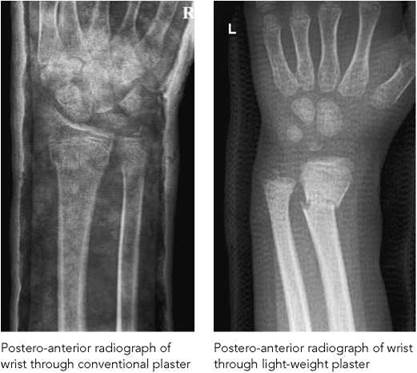
• If the patient’s limb is immobilized in plaster of Paris, then it may be necessary to modify the positioning of the patient to obtain accurate postero-anterior and lateral projections. Increased exposure factors will be necessary to penetrate the plaster, and the resultant image will be of reduced contrast.
• Light-weight plasters constructed from a polyester knit fabric are radio-lucent and require exposure factors similar to uncasted areas.
Oblique (anterior oblique)
Position of patient and cassette
• The patient is seated alongside the table, with the affected side nearest to the table.
• The elbow joint is flexed to 90 degrees and the arm is abducted, such that the anterior aspect of the forearm and the palm of the hand rest on the tabletop.
• If the mobility of the patient permits, then the shoulder joint should be at the same height as the forearm.
• The wrist joint is placed on the cassette and adjusted to include the lower part of the radius and ulna and the proximal two-thirds of the metacarpals.
• The hand is externally rotated through 45 degrees and supported in this position using a non-opaque pad.
• The forearm is immobilized using a sandbag.
Direction and centring of the X-ray beam
• The vertical central ray is centred midway between the radial and ulnar styloid processes.
Essential image characteristics
• The exposure should provide adequate penetration to visualize the carpal bones.
• The image should demonstrate the proximal two-thirds of the metacarpals, the carpal bones, and the distal third of the radius and ulna.
Notes
• This projection results in an additional oblique projection of the metacarpals, the carpal bones and lower end of the radius. To obtain an additional projection of the lower end of the ulna, it is necessary to rotate the humerus (see Wrist, lateral - method 2, p. 57).
• The three projections, postero-anterior, lateral and oblique, may all be taken on the same cassette using lead rubber to mask off all but the one-third of the cassette being used.
Radiological considerations
• Fracture of the distal radius can be undisplaced, dorsally angulated (Colles’ fracture) or ventrally angulated (Smith’s fracture). The importance of Smith’s fracture lies in the fact that it is less stable than Colles’ fracture.
• Dislocations of the carpus are uncommon, but again they carry potential for serious disability. One manifestation of lunate dislocation is an increased gap between it and the scaphoid, which will be missed if the wrist is rotated on the postero- anterior projection.

Forearm
Two projections (antero-posterior and lateral) are required at right-angles to each other to demonstrate the full length of the radius and ulna to include both the elbow and the wrist joint.
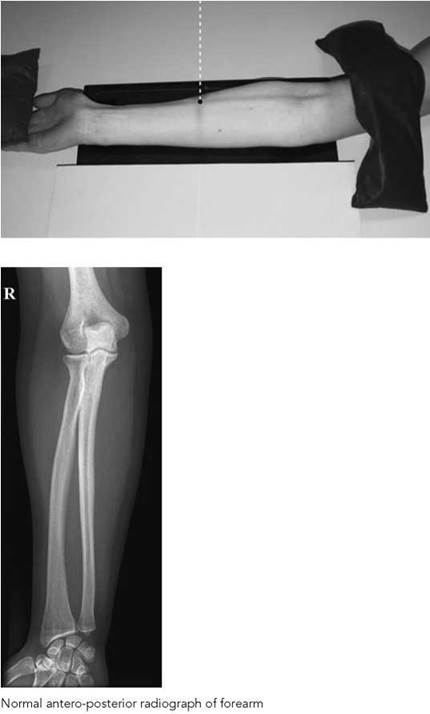
The antero-posterior projection with the forearm supinated demonstrates the radius and ulna lying side by side.
A 24 X 30-cm cassette with high-resolution screens may be used and positioned to include both joints on one image. Both projections are normally acquired on one film, with the half of the film not in use being shielded with by lead rubber.
Antero-posterior - basic
Position of patient and cassette
• The patient is seated alongside the table, with the affected side nearest to the table.
• The arm is abducted and the elbow joint is fully extended, with the supinated forearm resting on the table.
• The shoulder is lowered to the same level as the elbow joint.
• The cassette is placed under the forearm to include the wrist joint and the elbow joint.
• The arm is adjusted such that the radial and ulnar styloid processes and the medial and lateral epicondyles are equidistant from the cassette.
• The lower end of the humerus and the hand are immobilized using sandbags.
Direction and centring of the X-ray beam
• The vertical central ray is centred in the midline of the forearm to a point midway between the wrist and elbow joints.
Essential image characteristics
• Both the elbow and the wrist joint must be demonstrated on the cassette.
• Both joints should be seen in the true antero-posterior position, with the radial and ulnar styloid processes and the epicondyles of the humerus equidistant from the cassette.
Note
The postero-anterior projection of the forearm with the wrist pronated is not satisfactory because, in this projection, the radius is superimposed over the ulna for part of its length.

Lateral - basic
Position of patient and cassette
• From the antero-posterior position, the elbow is flexed to 90 degrees.
• The humerus is internally rotated to 90 degrees to bring the medial aspect of the upper arm, elbow, forearm, wrist and hand into contact with the table.
• The cassette is placed under the forearm to include the wrist joint and the elbow joint.
• The arm is adjusted such that the radial and ulnar styloid processes and the medial and lateral epicondyles are superimposed.
• The lower end of the humerus and the hand are immobilized using sandbags.
Direction and centring of the X-ray beam
• The vertical central ray is centred in the midline of the forearm to a point midway between the wrist and elbow joints.
Essential image characteristics
• Both the elbow and the wrist joint must be demonstrated on the image.
• Both joints should be seen in the true lateral position, with the radial and ulnar styloid processes and the epicondyles of the humerus superimposed.
Notes
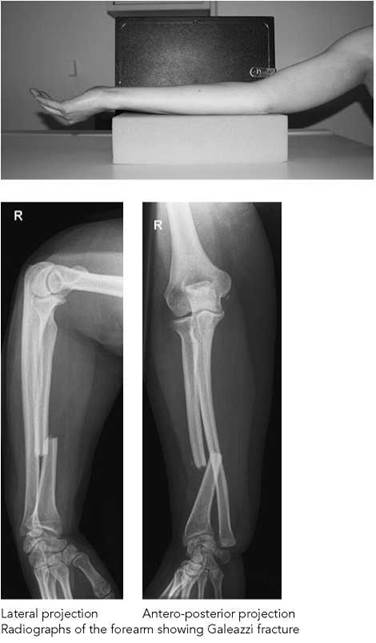
• In trauma cases, it may be impossible to move the arm into the positions described, and a modified technique may need to be employed to ensure that two projections at right-angles to each other are obtained.
• If the limb cannot be moved through 90 degrees, then a horizontal beam should be used.
• Both joints should be included on each image.
• No attempt should be made to rotate the patient’s hand.
Radiological considerations
• When two or more bones such as the radius and ulna form a ring, fracture of one of the bones is often associated with fracture or dislocation elsewhere in the ring, especially if the fracture is displaced or the bone ends overlap. In Galeazzi fracture there is a fracture of the radius with dislocation of the distal ulna, while in Monteggia fracture there is fracture of the ulna with dislocation of the head of the radius. In forearm fracture, therefore, both ends of both bones, as well as the proximal and distal radio-ulnar joints, must be demonstrated.
• General forearm projections do not give adequate views of the elbow and should not be relied upon for diagnosis of radial head injury.
• If an elbow joint effusion is shown, formal projections of the elbow joint will be required.

Elbow
The most satisfactory projections of the elbow joint are obtained when the upper arm is in the same plane as the forearm. For many examinations, the patient will be seated at the table with the shoulder lowered, so that the upper arm, elbow and forearm are on the same horizontal level. To gain the patient’s confidence, the lateral projection is taken first, because the patient will find it easier to adopt this position. In changing the position from that for the lateral projection to that for the antero-posterior projection, the humerus must be rotated through 90 degrees to make sure that two projections at right-angles are obtained of the humerus as well as the ulna and radius. Alternatively, if the limb cannot be moved, two projections at right-angles to each other can be taken by keeping the limb in the same position and moving the tube through 90 degrees between projections.
For the lateral projection, the central ray should pass parallel to a line joining the epicondyles of the humerus. For the anteroposterior projection, the central ray should pass at right-angles to this line. In some instances, tube angulation will be necessary.
If the patient cannot extend the elbow fully, modified positioning is necessary for the antero-posterior projection.
Special care should be taken with the child suffering from a supracondylar fracture of the humerus, when basic projections should not be attempted.
Basic lateral and antero-posterior projections can be taken on the same cassette using lead rubber to mask off each half of the cassette in turn. For each projection, care should be taken to place the elbow in the centre of the half of the film being used, so that the two projections of the joint are at the same eye level when viewed.
Lateral
Position of patient and cassette
• The patient is seated alongside the table, with the affected side nearest to the table.
• The elbow is flexed to 90 degrees and the palm of the hand is rotated so that it is at 90 degrees to the tabletop.
• The shoulder is lowered so that it is at the same height as the elbow and wrist, such that the medial aspect of the entire arm is in contact with the tabletop.
• The half of the cassette being used is placed under the patient’s elbow, with its centre to the elbow joint and its short axis parallel to the forearm.
• The limb is immobilized using sandbags.
Direction and centring of the X-ray beam
• The vertical central ray is centred over the lateral epicondyle of the humerus.
Essential image characteristics
• The central ray must pass through the joint space at 90 degrees to the humerus, i.e. the epicondyles should be superimposed.
• The image should demonstrate the distal third of humerus and the proximal third of the radius and ulna.

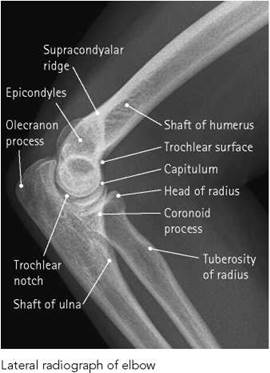

Elbow
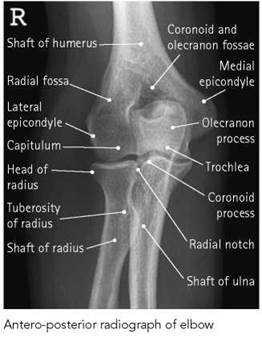
Antero-posterior
Position of patient and cassette
• From the lateral position, the patient’s arm is externally rotated.
• The arm is then extended fully, such that the posterior aspect of the entire limb is in contact with the tabletop and the palm of the hand is facing upwards.
• The unexposed half of the cassette is positioned under the elbow joint, with its short axis parallel to the forearm.
• The arm is adjusted such that the medial and lateral epicondyles are equidistant from the cassette.
• The limb is immobilized using sandbags.
Direction and centring of the X-ray beam
• The vertical central ray is centred through the joint space 2.5 cm distal to the point midway between the medial and lateral epicondyles of the humerus.
Essential image characteristics
• The central ray must pass through the joint space at 90 degrees to the humerus to provide a satisfactory view of the joint space.
• The image should demonstrate the distal third of humerus and the proximal third of the radius and ulna.
Notes
• Care should be taken when a supracondylar fracture of the humerus is suspected. In such cases, no attempt should be made to extend the elbow joint, and a modified technique must be employed.
• When the patient is unable to extend the elbow to 90 degrees, a modified technique is used for the antero-posterior projection.
• If the limb cannot be moved, two projections at right-angles to each other can be taken by keeping the limb in the same position and rotating the X-ray tube through 90 degrees.
Antero-posterior - partial flexion
If the patient is unable to extend the elbow fully, the positioning for the antero-posterior projection may be modified. For a general survey of the elbow, or if the main area of interest is the proximal end of the radius and ulna, then the posterior aspect of the forearm should be in contact with the cassette. If the main area of interest is the distal end of the humerus, however, then the posterior aspect of the humerus should be in contact with the cassette.
If the elbow is immobilized in the fully flexed position, then an axial projection must be used instead of the antero-posterior projection.
In both of the above cases, some superimposition of the bones will occur. However, gross injury and general alignment can be demonstrated.


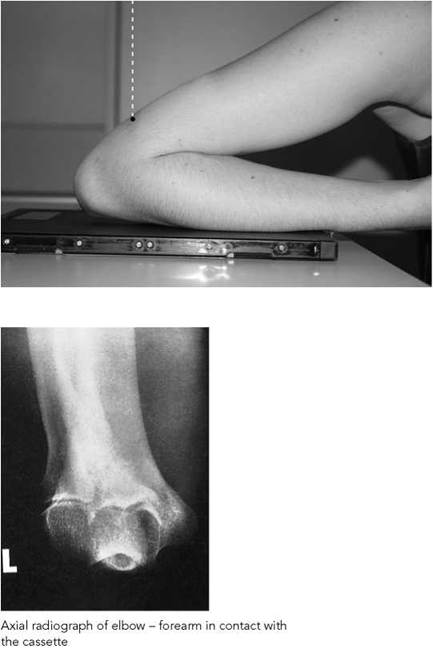
Antero-posterior - forearm in contact
Position of patient and cassette
• The patient is seated alongside the table, with the affected side nearest to the table.
• The posterior aspect of the forearm is placed on the table, with the palm of the hand facing upwards.
• The cassette is placed under the forearm, with its centre under the elbow joint.
• The arm is adjusted such that the medial and lateral epicondyles of the humerus are equidistant from the cassette.
• The limb is supported and immobilized in this position.
Direction and centring of the X-ray beam
• The vertical central ray is centred in the midline of the forearm 2.5 cm distal to the crease of the elbow.
Essential image characteristics
• The image should demonstrate the distal third of humerus and the proximal third of the radius and ulna.

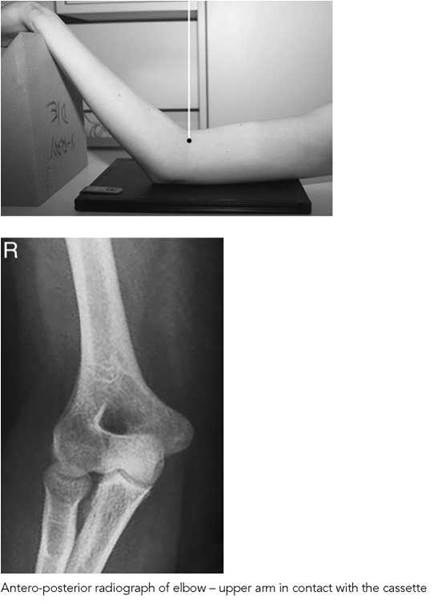
Antero-posterior - upper arm in contact
Position of patient and cassette
• The patient is seated alongside the table, with the affected side nearest to the table.
• The posterior aspect of the humerus is placed on the table, with the palm of the hand facing upwards.
• The cassette is placed under the forearm, with its centre under the elbow joint.
• The arm is adjusted such that the medial and lateral epicondyles of the humerus are equidistant from the film.
• The limb is supported and immobilized in this position.
Direction and centring of the X-ray beam
• The vertical central ray is centred midway between the epicondyles of the humerus.
Essential image characteristics
• The image should demonstrate the distal third of humerus and the proximal third of the radius and ulna.
Full flexion
When the patient’s elbow is immobilized in full flexion, an axial projection may be substituted for the antero-posterior projection.
It is preferable for the patient’s upper arm to be in contact with the cassette for examination of the distal end of the humerus and olecranon process of the ulna, and for the forearm to be in contact with the cassette if the proximal ends of the radius and ulna are to be examined.
In either of these cases, the bones of the forearm will be superimposed on the humerus. However, gross injury and general alignment can be demonstrated.
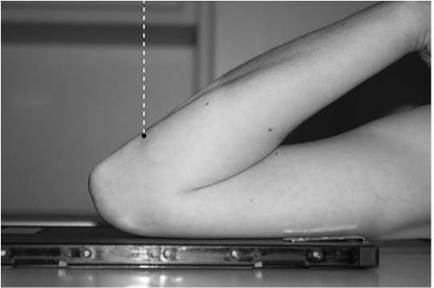
Axial - upper arm in contact
Position of patient and cassette
• The patient is seated alongside the table, with the affected side nearest to the table.
• The elbow is fully flexed, and the palm of the hand is facing the shoulder.
• The posterior aspect of the upper arm is placed on the cassette, with the arm parallel to the long axis of the cassette.
• The patient’s trunk is adjusted in order to bring the medial and lateral epicondyles of the humerus equidistant to the cassette.
Direction and centring of the X-ray beam
• For the lower end of the humerus and the olecranon process of ulna, the vertical central ray is centred 5 cm distal to the olecranon process.
• For the proximal ends of the radius and ulna, including the radio-humeral joint, the central ray is directed at right-angles to the forearm and centred 5 cm distal to the olecranon process.
Essential image characteristics
• The image will include the olecranon process and the lower third of the radius and ulna superimposed on the lower third of the humerus.
• The exposure should be adequate to visualize all three bones.


Axial - forearm in contact
Position of patient and cassette
• The patient is seated alongside the table, with the affected side nearest to the table.
• The elbow is fully flexed and the palm of the hand is facing upwards.
• The forearm is fully supinated, with the posterior aspect of the forearm resting on the cassette and the arm parallel to the long axis of the cassette.
• The patient’s trunk is adjusted in order to bring the medial and lateral epicondyles of the humerus equidistant to the cassette.
Direction and centring of the X-ray beam
• For the proximal ends of the radius and ulna and the radiohumeral joint, the vertical central ray is directed to a point on the posterior aspect of the upper arm 5 cm proximal to the olecranon process.
• For the lower end of the humerus and the olecranon process of the ulna, the central ray is directed at right-angles to the upper arm centred to a point 5 cm proximal to the olecranon process.
Lateral head of radius
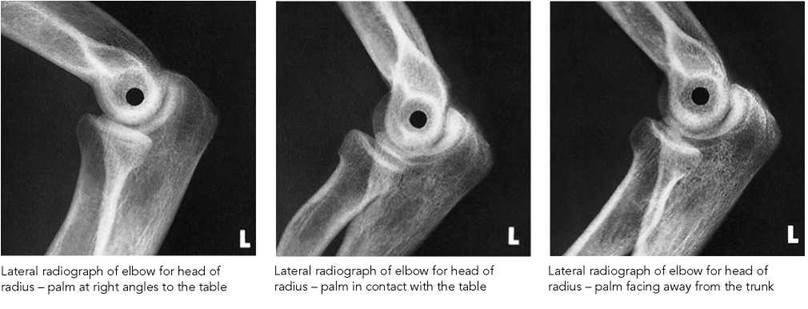
An 18 X 24-cm cassette with high-resolution screens is used for a single projection. Alternatively, an 18 X 43-cm cassette is chosen for multiple projections. A lead-rubber sheet may be used to mask off the area of the cassette not currently in use.
The elbow is positioned as for the lateral elbow. The hand is then moved through different degrees of rotation, enabling visualization of small fissure fractures through the head of the radius.
Position of patient and cassette
• For the first projection, the patient is positioned as for a lateral elbow projection, with the palm of the hand vertical. The forearm is immobilized using a sandbag.
• For the second exposure, the upper arm and elbow are maintained in the same position, whilst the hand is rotated medially until the palm of the hand rests on the table. The forearm is immobilized using a sandbag.
• For the third exposure, the upper arm and elbow are maintained in the same position, whilst the hand is rotated further medially, until the palm of the hand is vertical, facing away from the body. The forearm is immobilized using a sandbag.
Direction and centring of the X-ray beam
• In each case, the vertical central ray is centred to the lateral epicondyle of the humerus.
Essential image characteristics
• The elbow joint should be seen in the true lateral position in each projection.
• Sufficient detail of bony trabeculae should be demonstrated to enable fine fractures to be detected.

Proximal radio-ulnar joint - oblique
An 18 X 24-cm cassette with high-resolution screens is used.
Position of patient and cassette
• The patient is positioned for an anterior projection of the elbow joint.
• The cassette is positioned under the elbow joint, with the long axis of the cassette parallel to the forearm.
• The humerus is then rotated laterally (or the patient leans towards the side under examination) until the line between the epicondyles is approximately 20 degrees to the cassette.
• The forearm is immobilized using a sandbag.
Direction and centring of the X-ray beam
• The vertical central ray is centred 2.5 cm distal to the midpoint between the epicondyles.
Essential image characteristics
• The image should demonstrate clearly the joint space between the radius and the ulna.


Note
A well-collimated beam is used to reduce degradation of the image by scattered radiation.
Ulnar groove - axial
The ulnar groove through which the ulnar nerve passes lies between the medial epicondyle and the medial lip of the trochlear of the humerus and is a possible site for ulnar nerve compression.
A modified axial projection with the elbow joint fully flexed demonstrates the groove and any lateral shift of the ulna, which would lead to tightening of the ligaments overlying the ulnar nerve. An 18 X 24-cm cassette with high-resolution screens is used.
Position of patient and cassette
• The patient is seated alongside the X-ray table, with the affected side nearest the table.
• The elbow is fully flexed, and the posterior aspect of the upper arm is placed in contact with the tabletop.
• The cassette is positioned under the lower end of the humerus, with its centre midway between the epicondyles of the humerus.
• With the elbow still fully flexed, the arm is externally rotated through 45 degrees and supported in this position.
Direction and centring of the X-ray beam
• The vertical central ray is centred over the medial epicondyle of the humerus.
Essential image characteristics
• The exposure is chosen to demonstrate the ulnar groove in profile.
Radiological considerations
• An effusion is a useful marker of disease and may be demonstrated in trauma, infection and inflammatory conditions. It is seen as an elevation of the fat pads anteriorly and posteriorly (see below) and requires a good lateral projection with no rotation. It may be an important clue to otherwise occult fracture of the radial head or a supracondylar fracture of the humerus.
• Radial head fracture may be nearly or completely occult, showing as the slightest cortical infraction or trabecular irregularity at the neck or just a joint effusion.
• Avulsion of one of the epicondyles of the humerus may be missed if the avulsed bone is hidden over other bone or in the olecranon or coronoid fossae. Recognition of their absence requires knowledge of when and where they should be seen.

Antero-posterior radiograph of elbow showing vertical fracture of the head of the radius
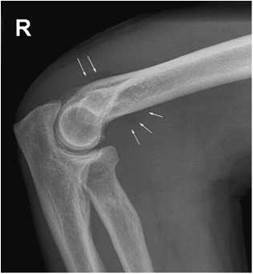
Lateral radiograph of elbow showing elevation of anterior and posterior fat pads

Lateral radiograph showing dislocation of the elbow

Antero-posterior radiograph of elbow showing avulsion injury of the lateral epicondyle
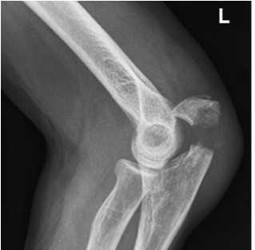
Lateral radiograph showing fracture through the olecranon process, with displacement due to triceps muscle pull
A type of injury commonly found in children is a fracture of the lower end of the humerus just proximal to the condyles. The injury is very painful and even small movements of the limb can exacerbate the injury, causing further damage to adjacent nerves and blood vessels.


Lateral radiograph of elbow showing undisplaced supracondylar fracture

Lateral radiograph of elbow showing supracondylar fracture with displacement and bone disruption
Humerus - supracondylar fracture
Any supporting sling should not be removed, and the patient should not be asked to extend the elbow joint or to rotate the arm or forearm.
A 24 X 30-cm cassette is used.
Lateral
Position of patient and cassette
Method 1
• The patient sits or stands facing the X-ray tube.
• A cassette is supported between the patient’s trunk and elbow, with the medial aspect of the elbow in contact with the cassette.
• A lead-rubber sheet or other radiation protection device is positioned to protect the patient’s trunk from the primary beam.
Method 2
• A cassette is supported vertically in a cassette holder.
• The patient stands sideways, with the elbow flexed and the lateral aspect of the injured elbow in contact with the cassette. The arm is gently extended backwards from the shoulder. The patient is rotated forwards until the elbow is clear of the rib cage but still in contact with the cassette, with the line joining the epicondyles of the humerus at right-angles to the cassette.
Direction and centring of the X-ray beam
Method 1
• The X-ray tube is angled so that the central ray is directed perpendicular to the shaft of the humerus and centred to the lateral epicondyle.
Method 2
• The horizontal central ray is directed to the medial epicondyle and the beam collimated to the elbow.
Essential image characteristics
• The image should include the lower end of the humerus and the upper third of the radius and ulna.
Notes
• The patient should be made as comfortable as possible to assist immobilization.
• An erect cassette holder, or similar device, may be used to assist the patient in supporting the cassette.
• The X-ray beam should be collimated carefully to ensure that the primary beam does not extend beyond the area of the cassette.
Antero-posterior
As in the lateral projection, the cassette is held in a vertical cassette holder with the patient either standing or sitting during the procedure.
Position of patient and cassette
• From the lateral position, the patient’s upper body is rotated towards the affected side.
• The cassette is placed in an erect cassette holder, and the patient’s position is adjusted so that the posterior aspect of the upper arm is in contact with the cassette.
Direction and centring of the X-ray beam
• If the elbow joint is fully flexed, the central ray is directed at right-angles to the humerus to pass through the forearm to a point midway between the epicondyles of the humerus.
• If the elbow joint is only partially flexed, the central ray is directed at right-angles to the humerus to a point midway between the epicondyles of the humerus without first passing through the forearm.
Essential image characteristics
• If the elbow joint is fully flexed, sufficient exposure must be selected to provide adequate penetration of the forearm.
Notes
• It is essential that no movement of the elbow joint occurs during positioning of the patient.
• Particular attention should be paid to radiation protection measures.
Radiological considerations
• Signs of supracondylar fracture can be very subtle. Demonstration of the position of the condyles in relation to the anterior cortical line of the humeral shaft may be crucial and demands a true lateral image.
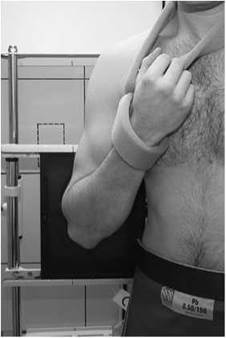

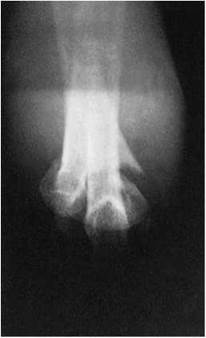
Antero-posterior radiograph in full flexion showing supracondylar fracture

Antero-posterior radiograph in partial flexion showing supracondylar fracture
A 35 X 43-cm cassette fitted with regular-speed screens can be used, providing it is large enough to demonstrate the elbow and shoulder joint on one film. To reduce the risk of patient movement, exposures are made on arrested respiration.


Humerus - shaft
Antero-posterior - supine
When movement of the patient’s arm is restricted, a modified technique may be required.
Position of patient and cassette
• The patient lies supine on the X-ray table, with the unaffected side raised and supported on pads.
• The cassette is positioned under the affected limb and adjusted to include the shoulder and elbow joints.
• The arm is slightly abducted and the elbow joint is fully extended, so that the posterior aspect of the upper arm is in contact with the cassette.
• The arm is adjusted to ensure that the medial and lateral epicondyles are equidistant from the cassette.
• The forearm is immobilized using a sandbag.
Direction and centring of the X-ray beam
• The vertical central ray is centred to a point midway between the shoulder and elbow joints.
Lateral - supine
Position of patient and cassette
• From the antero-posterior position, the elbow joint is flexed to 90 degrees.
• The arm is abducted and then medially rotated through 90 degrees to bring the medial aspect of the arm, elbow and forearm in contact with the table.
• The cassette is placed under the arm and adjusted to include both the shoulder and the elbow joints.
• The humerus is adjusted to ensure that the medial and lateral epicondyles of the humerus are superimposed.
• The forearm is immobilized using a sandbag.
Direction and centring of the X-ray beam
• The vertical central ray is centred to a point midway between the shoulder and elbow joints.
Notes
• When rotating the humerus, it is essential to ensure that the forearm and hand rest on the tabletop and not the trunk.
• The humerus is normally examined with the patient erect and the cassette placed in an erect cassette holder. The radiographic technique is similar (except that a horizontal central ray is used) but additional care should be taken to ensure that the patient is immobilized adequately, as described below.
Essential image characteristics
• Both joints should be seen on the image.
• The elbow joint should be seen in the true lateral and anteroposterior positions.
Antero-posterior - erect
Position of patient and cassette
• The cassette is placed in an erect cassette holder.
• The patient sits or stands with their back in contact with the cassette.
• The patient is rotated towards the affected side to bring the posterior aspect of the shoulder, upper arm and elbow into contact with the cassette.
• The position of the patient is adjusted to ensure that the medial and lateral epicondyles of the humerus are equidistant from the cassette.
Direction and centring of the X-ray beam
• The central ray is directed at right-angles to the shaft of the humerus and centred midway between the shoulder and elbow joints.
Lateral - erect
If the arm is immobilized in order to obtain a true lateral projection, i.e. one that is at right-angles to the antero-posterior, then it will be necessary to have the patient’s median sagittal plane parallel to the cassette and the lateral aspect of the injured arm in contact with the cassette, and to direct the horizontal central ray through the thorax to the injured arm. This has the disadvantage that the ribs and lungs will be superimposed on the humerus, obscuring details of the injury and signs of healing and adding to the radiation dose to the patient. The position described, although not fully at right-angles to the antero-posterior projection, avoids this superimposition.
Position of patient and cassette
• The cassette is placed in an erect cassette holder.
• From the anterior position, the patient is rotated through 90 degrees until the lateral aspect of the injured arm is in contact with the cassette.
• The patient is now rotated further until the arm is just clear of the rib cage but still in contact with the cassette.
Direction and centring of the X-ray beam
• The horizontal central ray is directed at right-angles to the shaft of the humerus and centred midway between the shoulder and elbow joint.
Essential image characteristics
• The exposure should be adjusted to ensure that the area of interest is clearly visualized.


Antero-posterior radiograph of humerus showing a fracture of the proximal shaft of the humerus
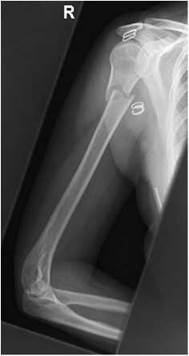
Lateral radiograph of the humerus in the same patient


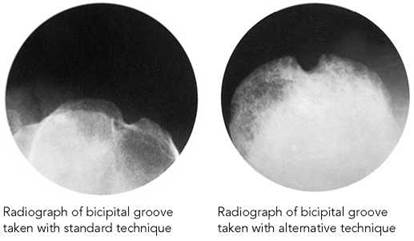
Humerus - intertuberous sulcus (bicipital groove)
The intertuberous sulcus or bicipital groove is situated between the greater and lesser tuberosities of the humerus. It transmits the tendon of the long head of the biceps.
An 18 X 24-cm cassette with high-resolution screens is used.
Axial
Position of patient and cassette
• The patient lies supine on the X-ray table.
• The cassette is supported vertically above the shoulder.
• The arm is rested on the tabletop with the palm of the hand facing the patient’s side and the line joining the epicondyles of the humerus at 45 degrees to the table.
Direction and centring of the X-ray beam
• The central ray is directed almost horizontally and centred to the anterior part of the head of the humerus.
Essential image characteristics
• The sulcus should be seen in profile, and the exposure is such as to demonstrate lesions within or impingements on the sulcus.
Notes
• To reduce the risk of patient movement, the exposure is made on arrested respiration.
• The exposure is adjusted to demonstrate soft-tissue structures within the sulcus.
Alternative axial projection
Direction and centring of the X-ray beam
• The patient sits with their shoulder joint against a vertical cassette holder.
• Ideally, this holder should be angled 15 degrees forwards, but if this facility is not available the cassette can be supported above the shoulder.
• The arm is abducted anteriorly and supported to bring the long axis of the shaft of the humerus perpendicular to the cassette.
• The hand is rotated 45 degrees laterally from the prone position to bring the bicipital groove in profile with the central beam.
Direction and centring of the X-ray beam
• The central ray is directed cranially along the long axis of the humerus and centred to the anterior part of the head of the humerus. The beam is collimated to the humeral head.
Humerus - neck
The most common reason for radiography of the neck of the humerus is suspected fracture, either pathological or traumatic.
Two projections at right-angles are necessary: an anteroposterior and an axial or a lateral projection. Movement of the arm may be limited, and the technique may need to be modified accordingly. Where possible, the supporting sling should be removed.
Depending on the condition of the patient, the examination may be undertaken with the patient erect, providing adequate immobilization is used, supine on the X-ray table, or, in cases of multiple trauma, on a trolley.
The exposure is made on arrested respiration.
A 24 X 30-cm cassette fitted with a regular-speed screen is used.
Antero-posterior
Position of patient and cassette
• The patient stands or lies supine facing the X-ray tube.
• The patient is rotated towards the affected side to bring the posterior aspect of the injured shoulder into contact with the midline of the cassette.
• The cassette is positioned to include the acromion process and the proximal half of the humerus.
Direction and centring of the X-ray beam
• The central ray is directed at right-angles to the humerus and centred to the head of the humerus.
Essential image characteristics
• The image should include the acromion process and proximal half of the shaft of the humerus.
• The exposure should demonstrate adequately the neck of the humerus clear of the thorax.
Notes
• Exposure should be made on arrested respiration.
• The patient should immobilize the affected forearm by supporting its weight with the other arm. If the patient is supine, a sandbag should be placed over the forearm.
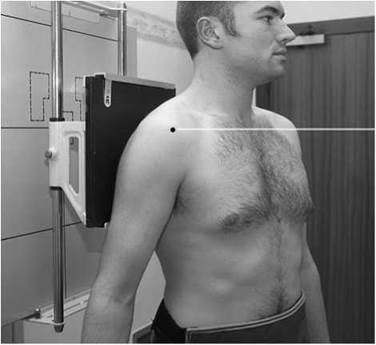


Antero-posterior radiograph of neck of humerus taken erect to show fracture of the neck of the humerus


Normal supero-inferior projection to show neck of humerus
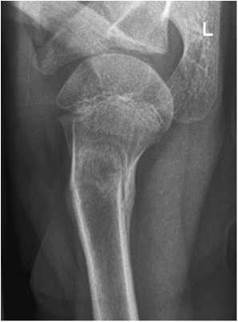
Supero-inferior projection for neck of humerus, showing healing angulated fracture of proximal shaft of humerus
Axial projection
Positioning for the lateral projection will depend on how much movement of the arm is possible.
If the patient is able to abduct the arm, then a supero-inferior projection is recommended with the patient sitting at the end of the X-ray table. Alternatively, if the patient is lying on a trolley, then an infero-superior projection is acquired. If, however, the arm is fully immobilized, then an alternative lateral oblique (as for the lateral scapula) may be taken.
Lateral - supero-inferior
This projection can be taken even when only a small degree of abduction is possible. It is important that no attempt should be made to increase the amount of movement that the patient is able or willing to make.
An 18 X 24-cm cassette is selected.
Position of patient and cassette
• The patient is seated at one end of the table, with the trunk leaning towards the table, the arm of the side being examined in its maximum abduction, and the elbow resting on the table.
• The height of the table is adjusted to enable the patient to adopt a comfortable position and to maximize full coverage of the neck of the humerus and the shoulder joint.
• The cassette rests on the table between the elbow and the trunk.
Direction and centring of the X-ray beam
• The vertical central ray is directed from above to the acromion process of the scapula.
• Owing to increased object-to-cassette distance, a small focal spot together with an increased FFD should be selected.
Essential image characteristics
• The image should include the acromion and coracoid processes, the glenoid cavity and the proximal head and neck of the humerus.
• The exposure should demonstrate adequately the neck of the humerus.
Lateral - infero-superior
This projection is usually undertaken with the patient supine on a trolley or the X-ray table.
Position of patient and cassette
• The patient lies supine on the trolley, with the arm of the affected side abducted as much as possible (ideally at rightangles to the trunk), the palm of the hand facing upwards, and the medial and lateral epicondyles of the humerus equidistant from the tabletop.
• The shoulder and arm are raised slightly on non-opaque pads, and a cassette supported vertically against the shoulder is pressed against the neck to include as much of the scapula as possible in the image.
Direction and centring of the X-ray beam
The horizontal central ray is directed upwards and centred to the patient’s axilla with minimum angulation towards the trunk.
Essential image characteristics
• The image should include the acromion and coracoid processes, the glenoid cavity and the proximal head and neck of the humerus.
• The exposure should demonstrate adequately the neck of the humerus.
Notes
• Exposure should be made on arrested respiration.
• It is important that no attempt is made to increase the amount of movement that the patient is able or willing to make.
Lateral oblique
This projection is used when the arm is immobilized and no abduction of the arm is possible. A vertical Bucky technique may be necessary to improve image quality.
Position of patient and cassette
• The patient stands or sits with the lateral aspect of the injured arm against the cassette or vertical Bucky.
• The patient is rotated forwards until the line joining the medial and lateral borders of the scapula is at right-angles to the cassette.
• The cassette is positioned to include the head of the humerus and the whole scapula.
Direction and centring of the X-ray beam
• The horizontal X-ray beam is directed to the medial border of the scapula and centred to the head of the humerus.
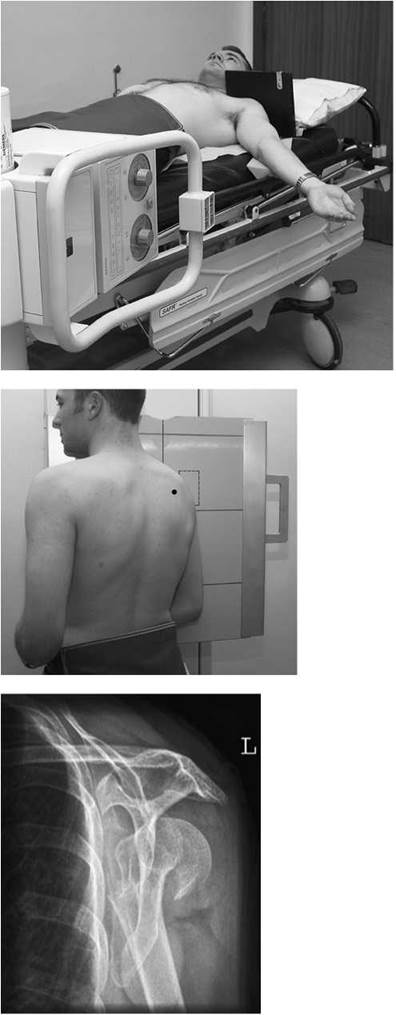
Lateral oblique projection of neck of humerus, showing fracture
Essential image characteristics
• The scapula and the upper end of the humerus should be demonstrated clear of the thoracic cage.